

My engine removal thread FAQ


Joined: Jan 2009
Posts: 526
Likes: 62
From: Motorcity
Ah yes, here in Saltville we deal with those spinning captive nuts on a regular basis. Pull the carpet back in the area of the bolts. There is a weatherproofing/soundproofing liner on the floor covering the access points for the nuts in the subframe. Look for an area in the weatherproofing that looks like there is a grid underneath. Cut the liner in that area and you will find precut slots in the metal of the floor. You'll have to cut enough of the slots free on one end and bend them up to get access to the nuts which are 24mm. Unfortunately you have already cut the heads off of the bolts so removal will be somewhat harder. We usually hold the nut with a 1/2" ratchet and extension while someone else hits the bolts with an impact. You may have to bend the tabs that hold the nuts in place and pull them up from inside the car and then install new nuts, these are not available from Jaguar so you will have to match threads with your new subframe bolts 14mmx1.0 if I remember correctly.
Thread Starter
|
Senior Member
Joined: May 2007
Posts: 351
Likes: 72
From: Louisville, KY
Thank real_tech, I really appreciate your insight. I've still got a lot of tear down to do, but this will be a small project I'll undertake when the short block is at the machine shop.
If this hadn't happened I'd say that this project has gone very smoothly. It hasn't necessairly been difficult, just time consuming.
I'll go out there tonight and take another look at the floor boards, but it's awful cold here.. Only 27 degress right now. The garage is about 2 1/2 cars big, situation lengthwise. It's got one gas heater at the rear, and heating the thing makes a noticable difference in the utility bill. :/
Senior Member
Joined: Feb 2009
Posts: 119
Likes: 40
From: OKLAHOMA, USA
Jag310,
Sorry to hear about the sub-frame bolts. Mine felt really stiff and at one point I could not budge them. I DID NOT use an air impact tool, I used a 1/2" breaker with 24" handle and another pipe slid on the handle for a 36" bar. It was slow moving. I think there is a compound on my bolt threads. When I could not budge the bolts after about 1/2" separation, I stopped and raised the powertrain with my floor jack to lift the weight off the sub-frame. After I had raised the powertrain a couple of inches the bolts would turn again. I did not realize they were sooo long so I unscrewed them about 2 inches and by that time I could turn them with standard 1/2" ratchet. SPECIAL NOTE: The big difference between mine and yours, my Tranny was replaced in 2004 under the recall. This probably helped allot.
As far as the teardown, Yes the exhaust is a difficult once the powertrain is resting on the subframe. If I could have a do-over I would remove the exhaust from the exit of the cats back and have that mess out of the way. I ended up using 2 floor jacks and an engine hoist to lift the whole mess in the air. Sorry no pics of my mistakes, no really it was I just wanted to get it done while the weather was warm enough to work comfortably. The hoist was chained through the Tranny mount and to two hooks on the heads. This gave me the clearance I needed to attack the exhaust. The blots, although rusted, came off with some rust eater and not too much effort. I again used good old muscle for these also. With that stuff removed you can access the front manifold bolts easily even with the cat attached. The back, you will have to remove the cat inlet flange bolts and break the seal so you can move it down about 3/4 to 1" to access the header bolts STRAIGHT on. Once all the exhaust is removed you will still have to remove the Torque Converter bolts through the access port on the rear section area of the oil pan. I used the Crank Pulley bolt to turn the engine to get to each of the 4 bolts. I then removed the lower Tranny bolts. If I had a do-over I would have done this also before removing. After that lower the assembly back down on your carts. DO not remove the Wheel hubs unless you are going to have that serviced. Remove the starter and the rest of the Tranny bolts. Re-chain the BLOCK to your hoist. In the front I used the same hook location and on the rear I found 2 more locations on the heads to bolt the hooks. Now you are almost there, just un-bolt the anti-twist strap in the back of the sub-frame and hoist away. NOTE: Lift until the weight of the motor is on the hoist. Gently separate the Tranny with a pry bar until it cracks free. Lift a little more and Open the gap between the Tranny and the Engine. There are 2 alignment collars on the Tranny the protrude about 1". If you can slide the engine forward, away from the Tranny them you should do this and clear the collars. After that is free.
Your subframe and Tranny with the axles will stay intact.
Thread Starter
|
Senior Member
Joined: May 2007
Posts: 351
Likes: 72
From: Louisville, KY
Time for another update.
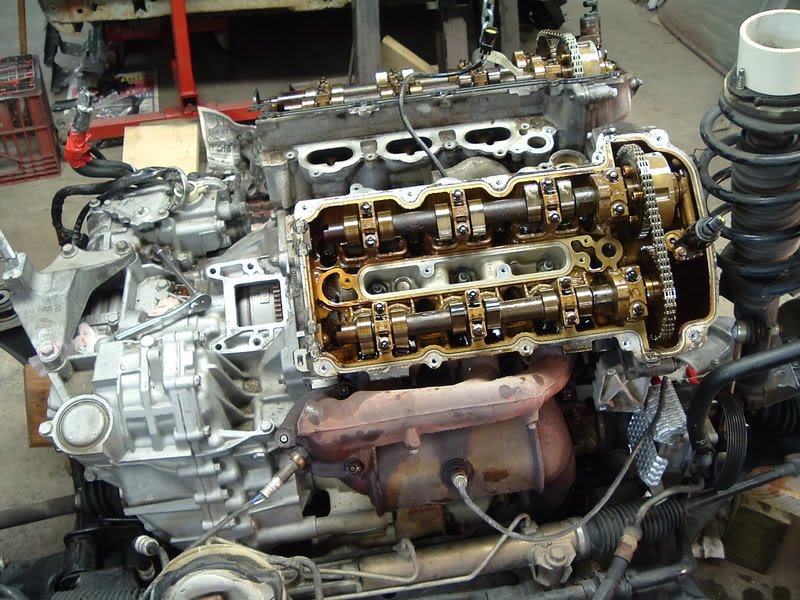
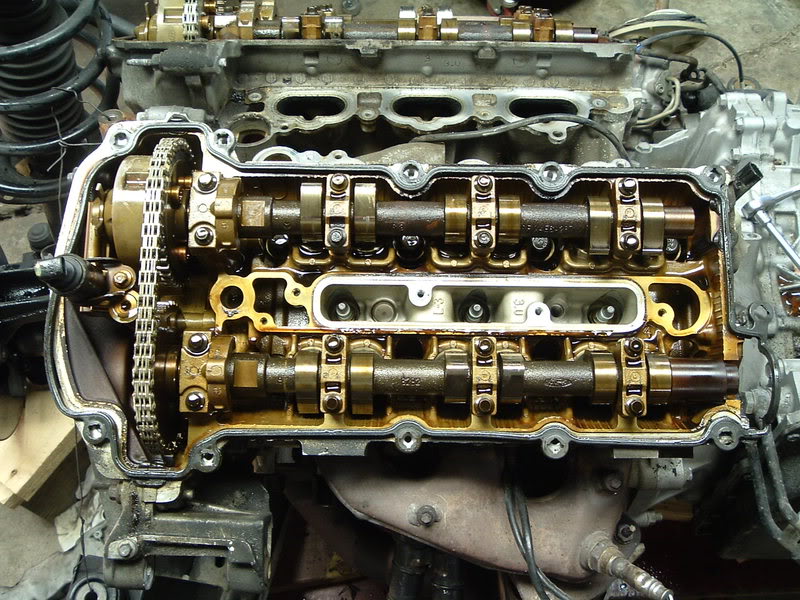
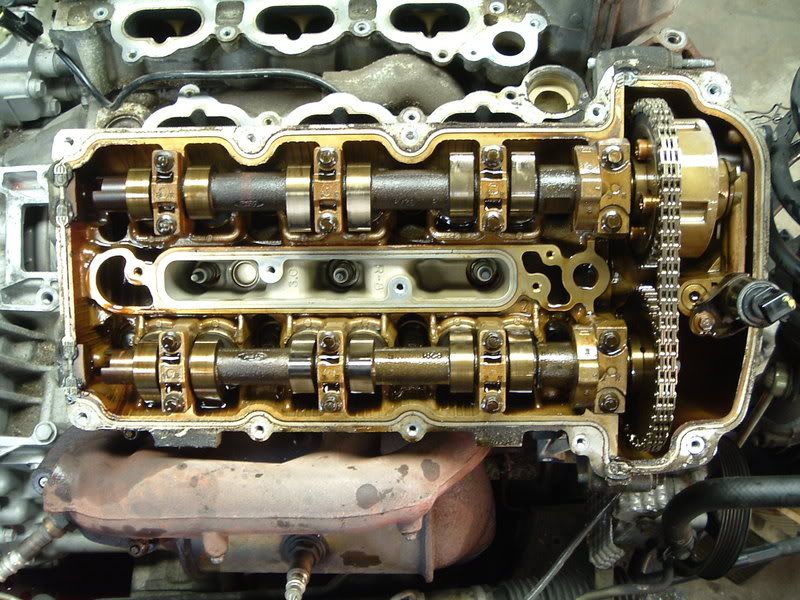
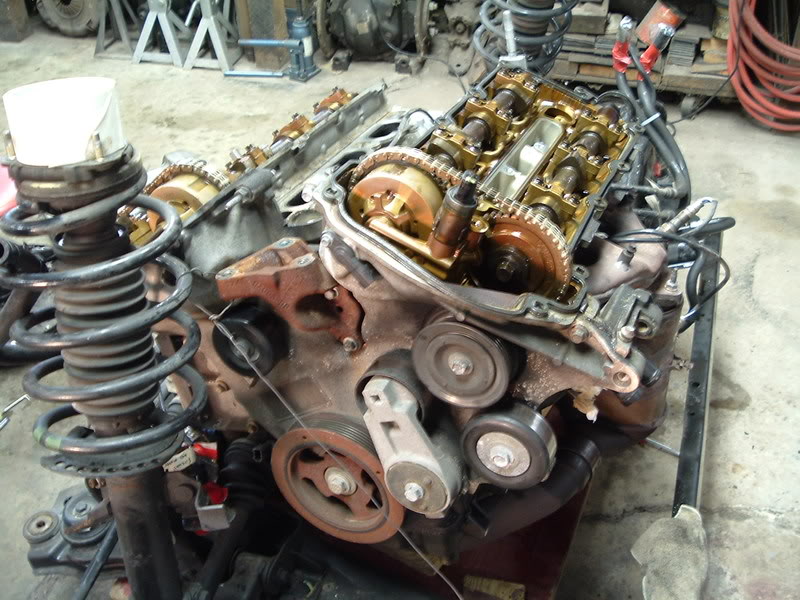
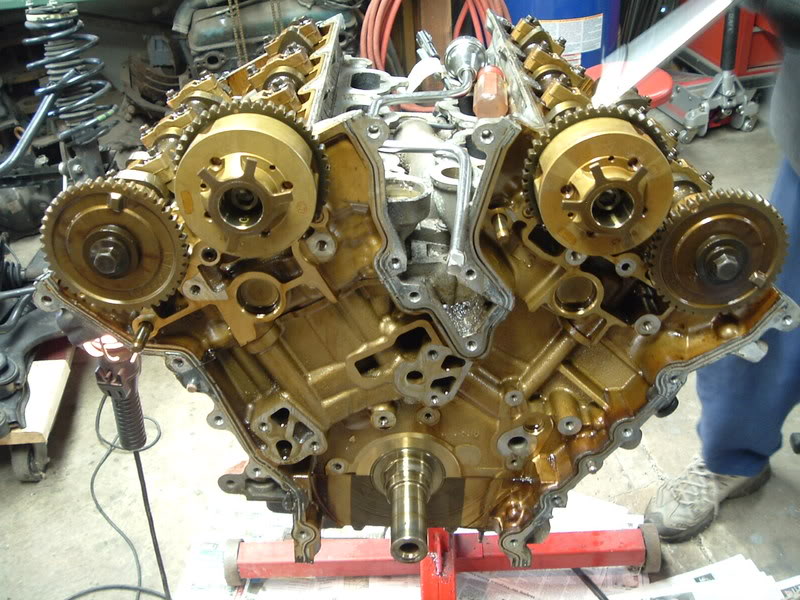
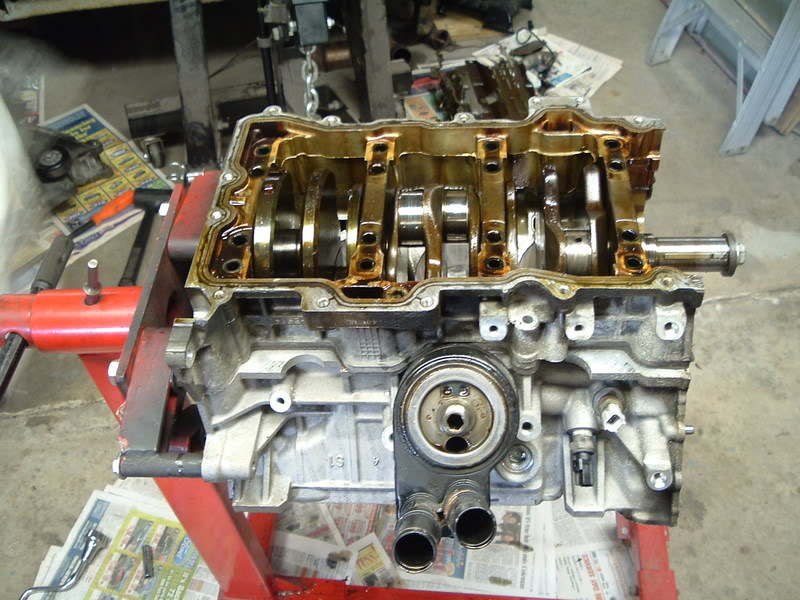
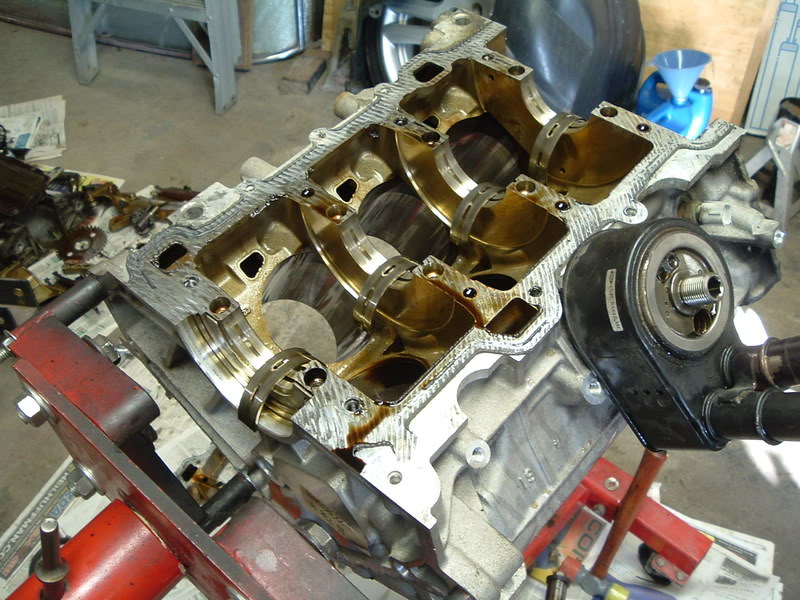
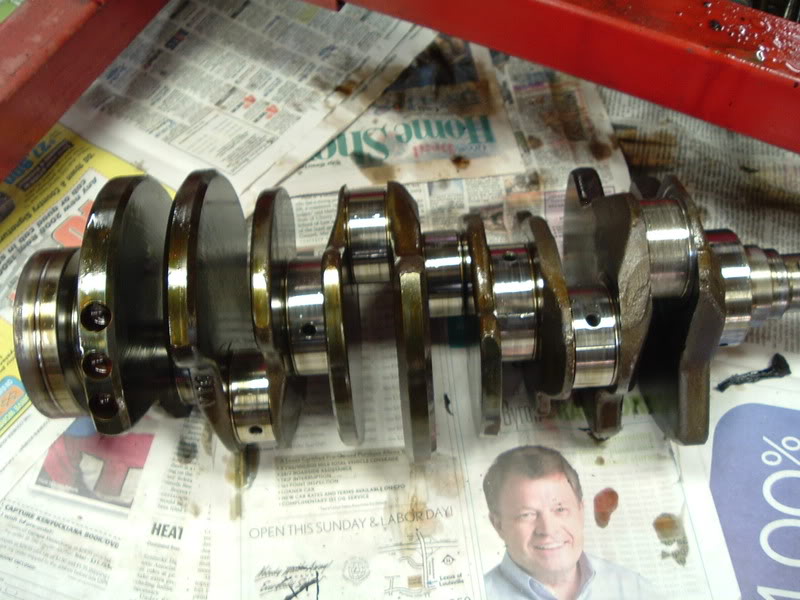
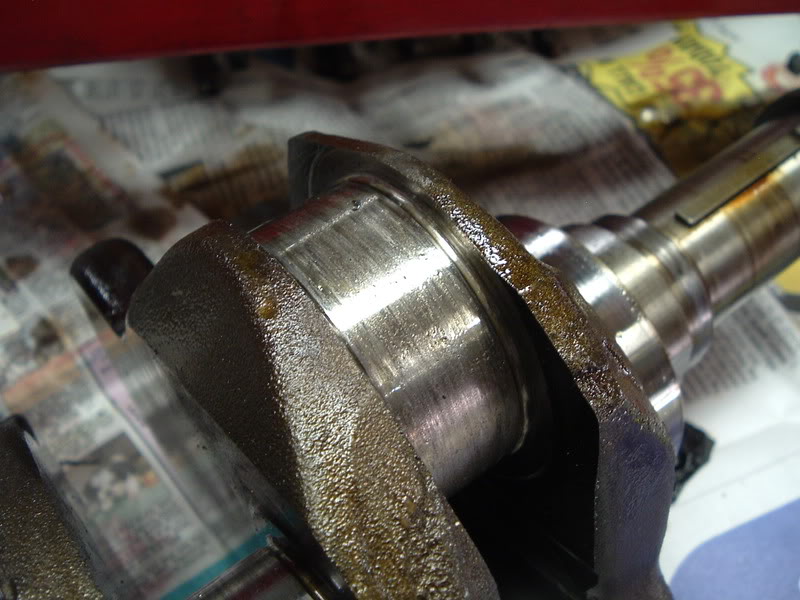
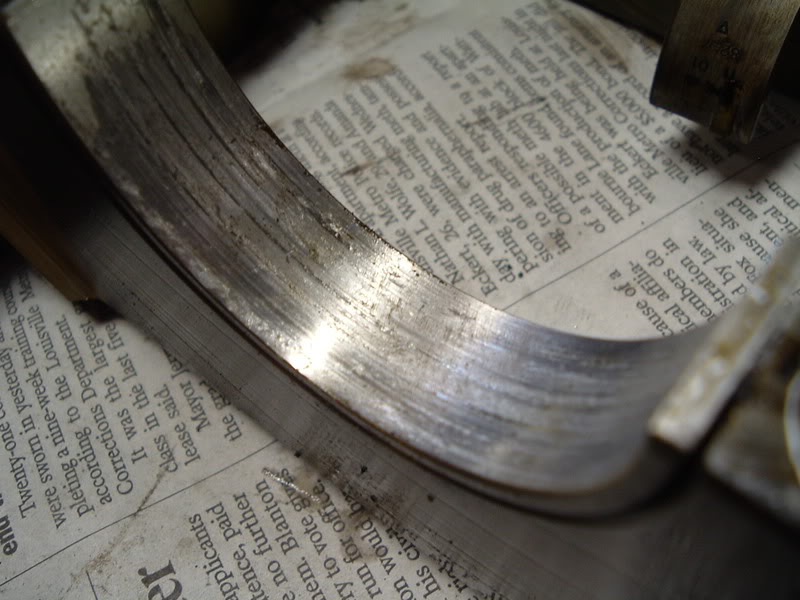
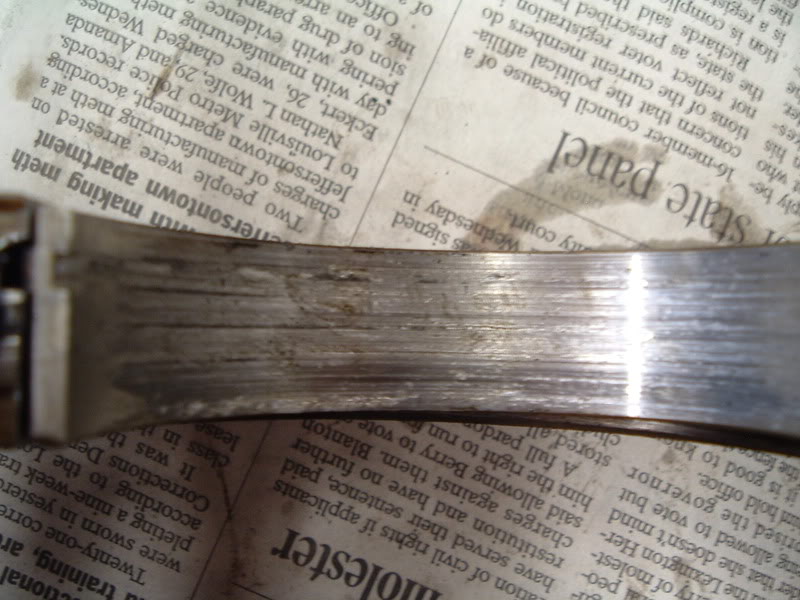
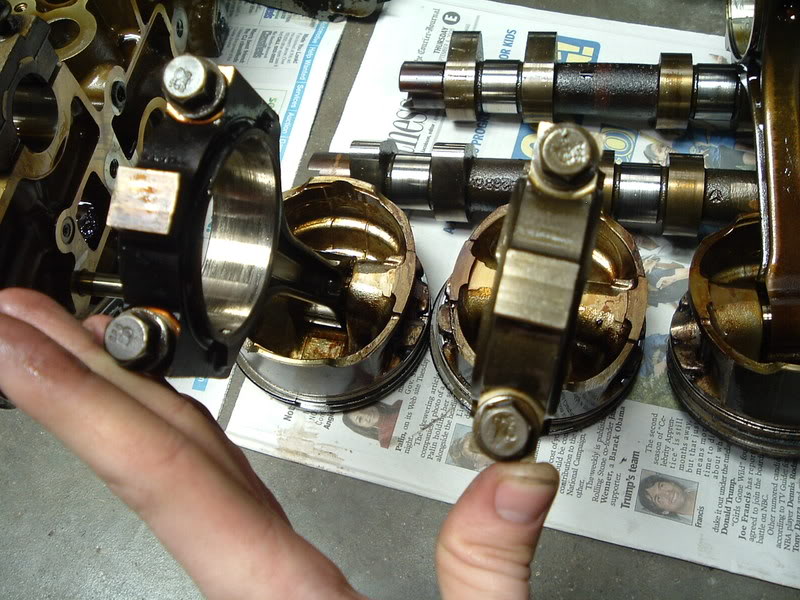
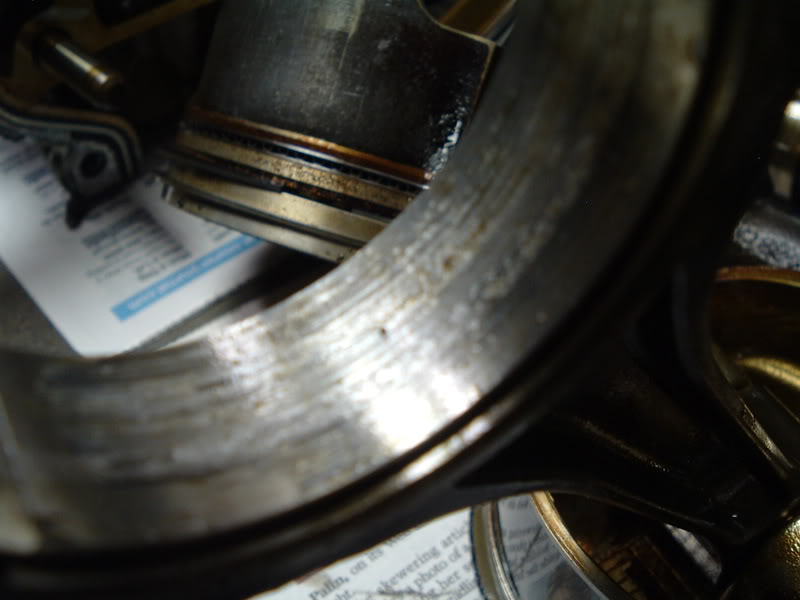
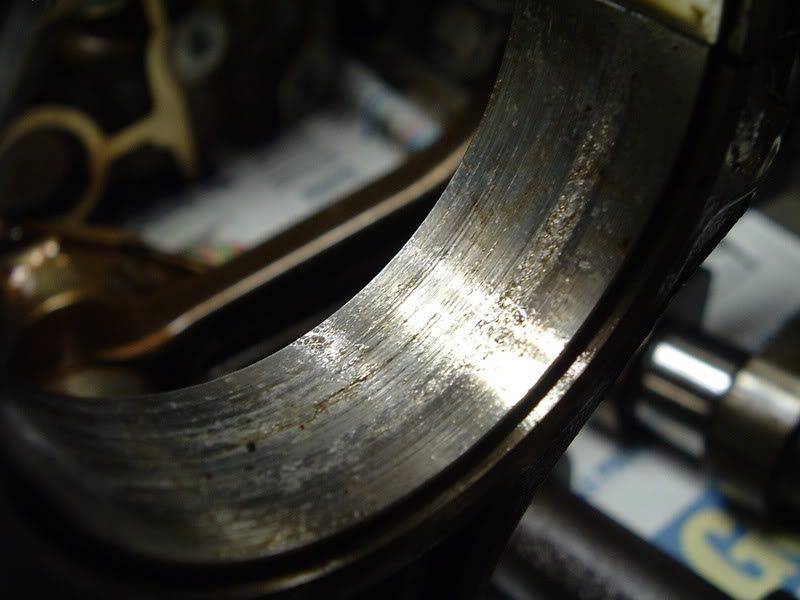
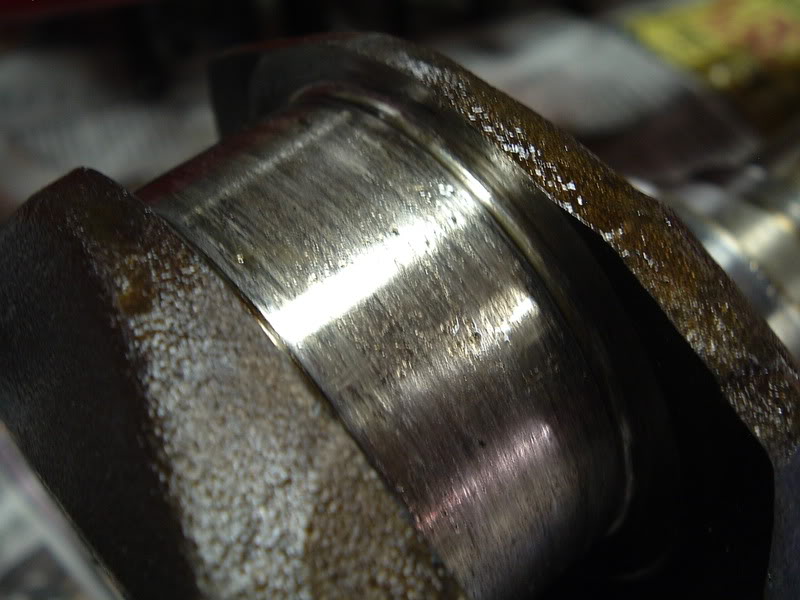
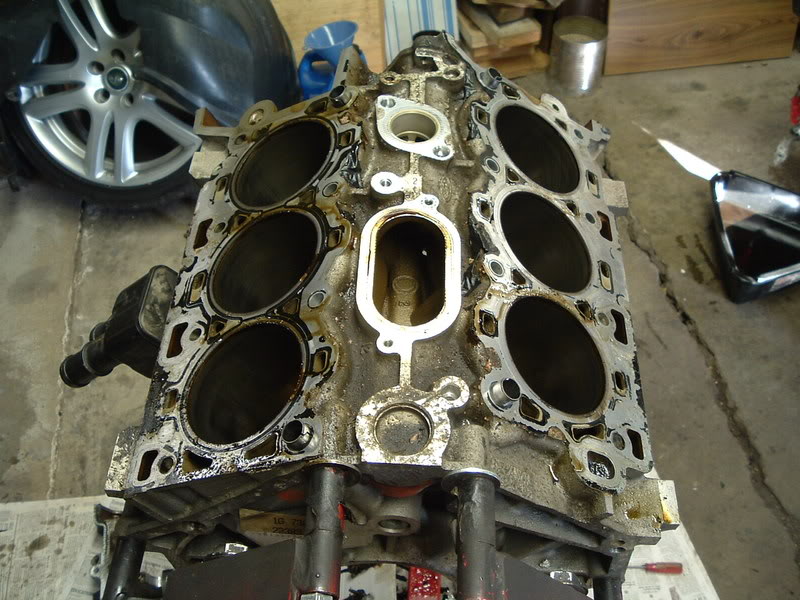
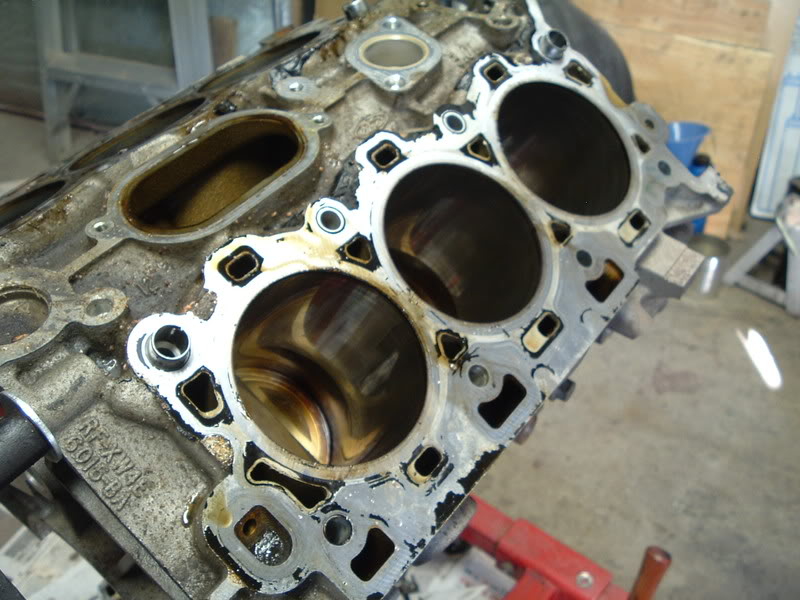
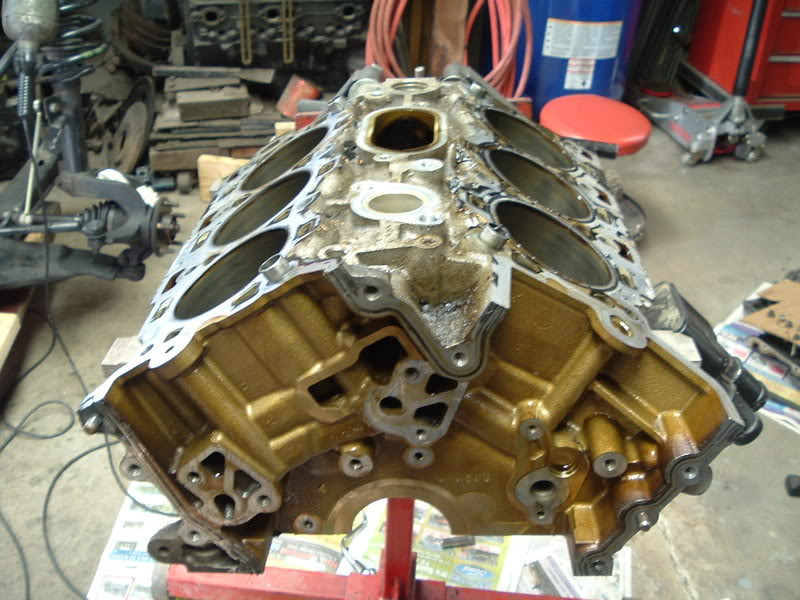
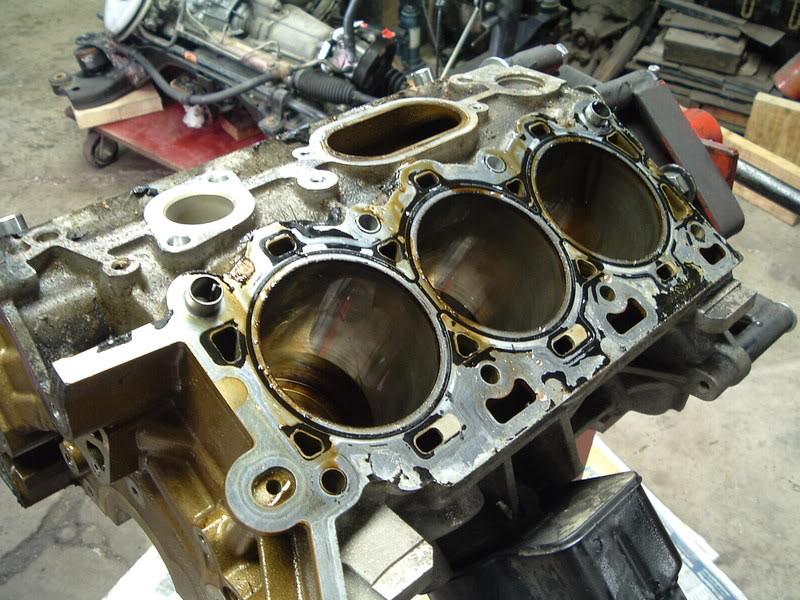
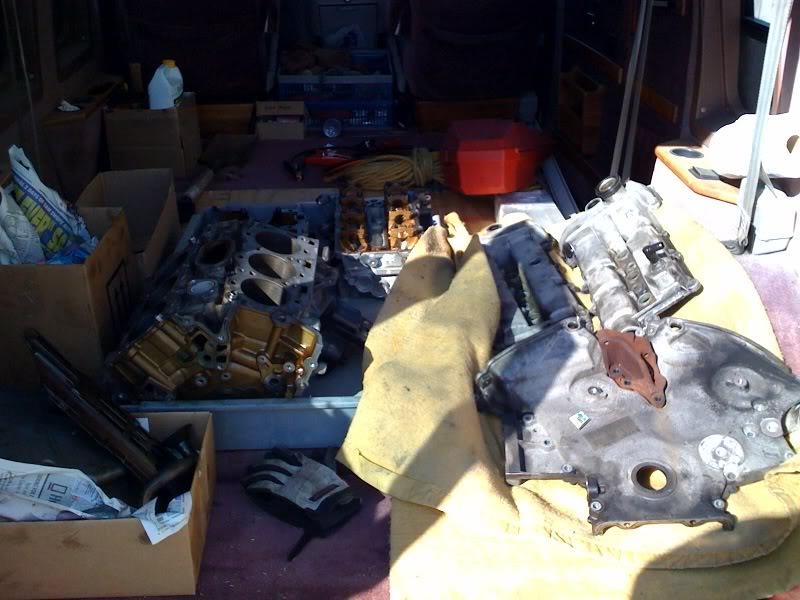
As of tonight, the engine is on the stand, and stripped down to just the bare block. It's amazing how small the block is when it's stripped down. Unfortunately I didn't take any pics of the engine with only the front cover to show the timing chains, but there are plenty of pics of them floating around. Once I got down to the rod/main bearings, I was quite surprised. All of the rod end caps had play in them before being broken loose. Every bearing showed serious wear. The first and last main bearing showed serious scoring, and two rod bearings showed serious wear. The worst one (pictured further down, on the workbench) was worn threw and spun, nearly identical to the ways James' looked. The end cap of this particular rod was VERY discolored from the heat. It was a very deep, gloss black.. whereas the others were a golden color. The lobes on the crank surrounding that rod were discolored to a bluish/green color.
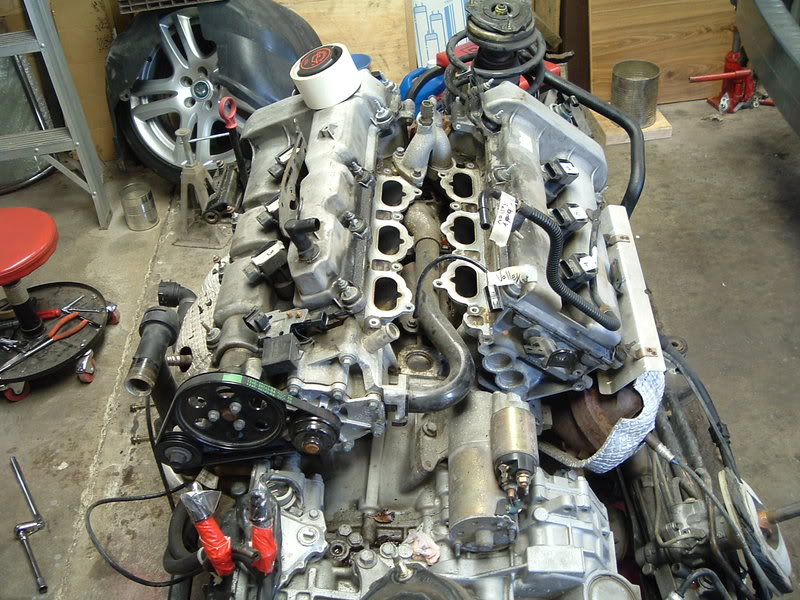
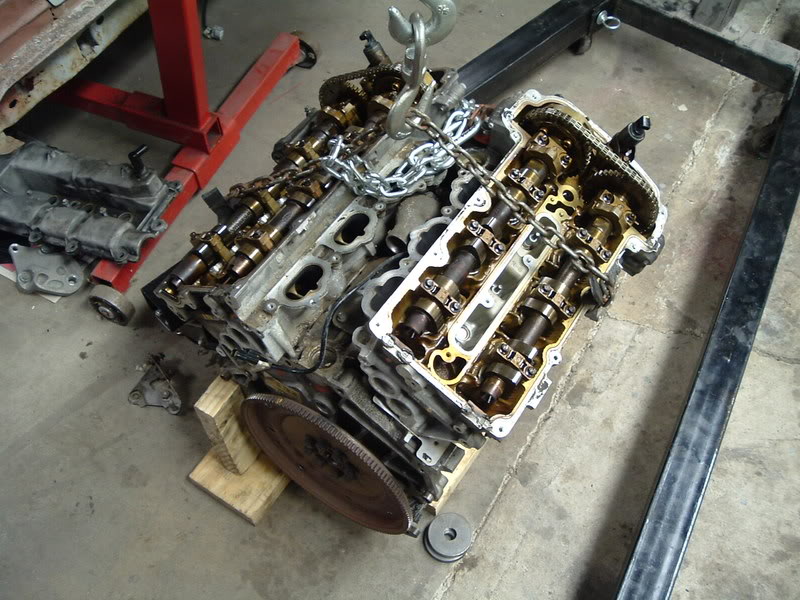
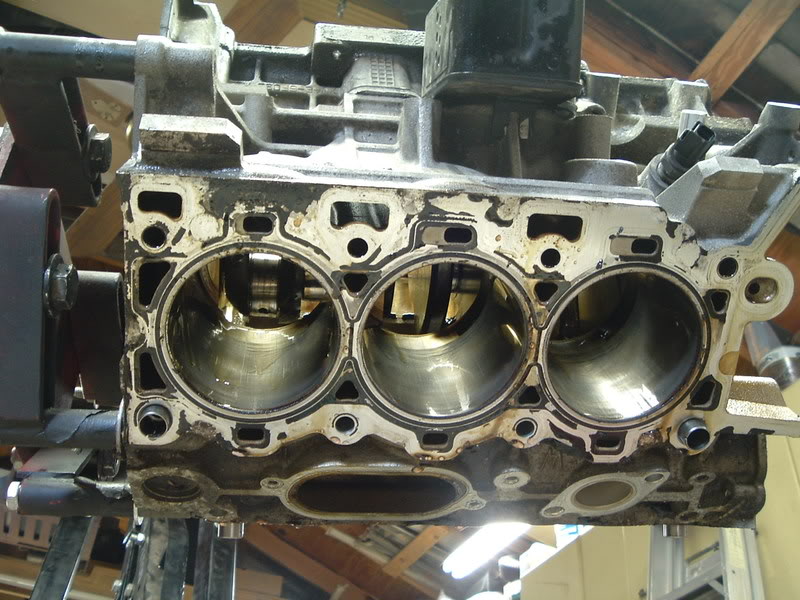
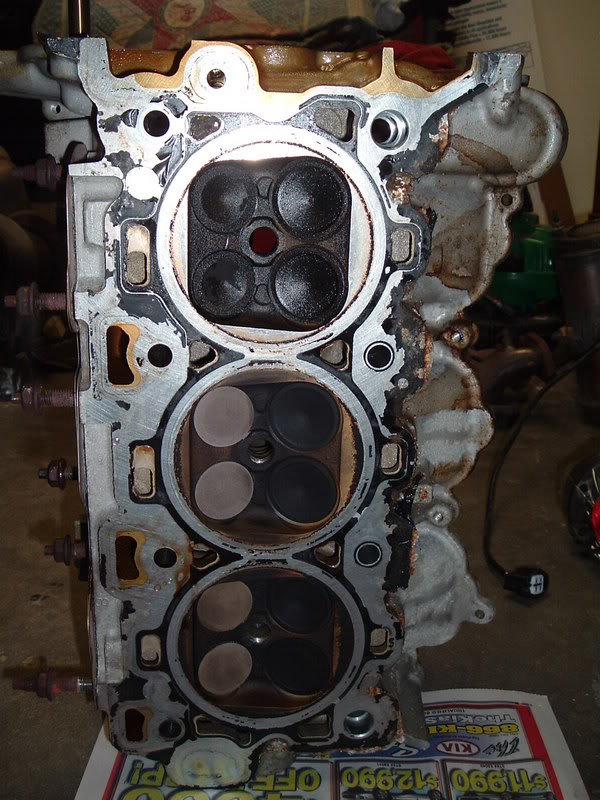
The cams and cam journals look great, so I really don't think they will need any attention. However, the first cylinder of the rear bank showed serious oil burning (see below pic of head standing on its end). I hope this is due to worn rings, and not a problem in the head. I really, really don't want to have to get into them.
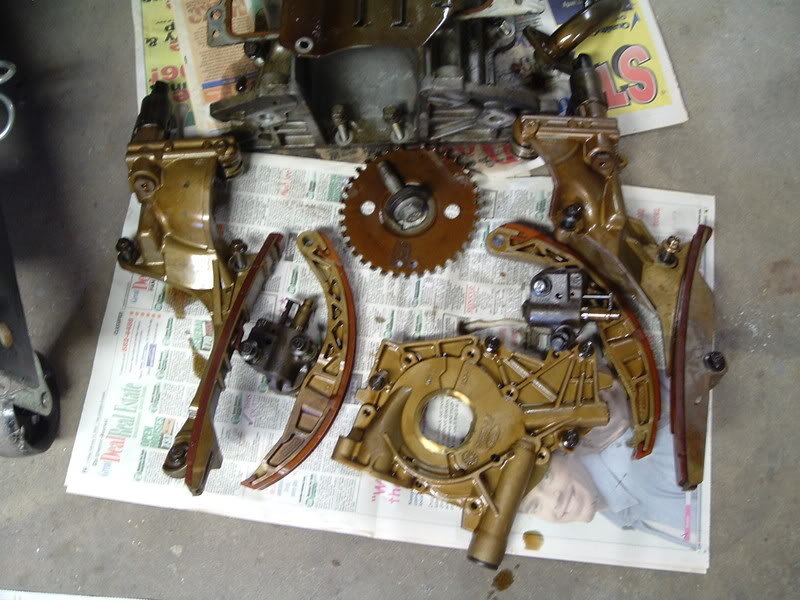
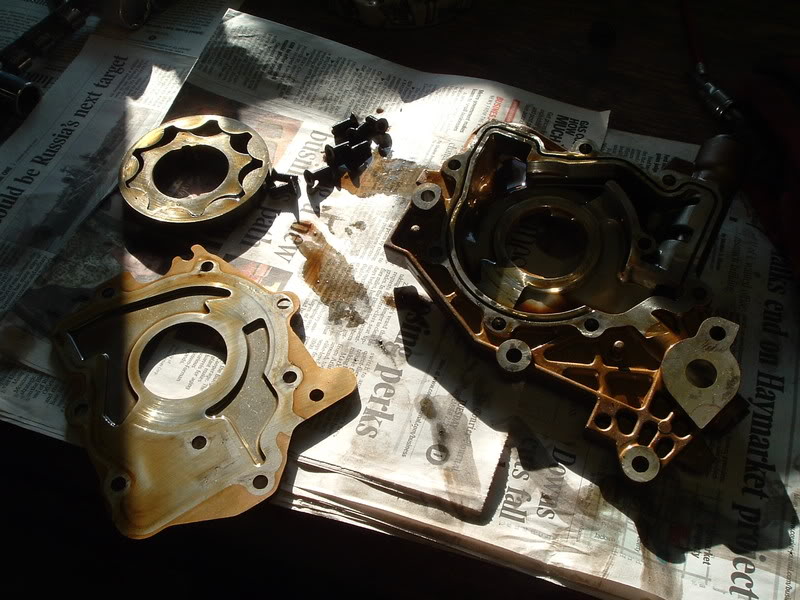
I took the oil pump apart, and despite some grit in the oil residue, all components are in great shape. It's certainly reusable with a good cleaning.
Every component to this engine (block, heads, cams, timing assembly, oil pump, etc. literally everything) has a bold Ford stamp on it. I'm really beginning to wonder how different these motors actually are from their supposed blue-oval counterparts.
Anyway.. enough taking. Onto the pics. I'm exhausted (as usual), and need sleep. I'm taking some bits to the machine shop tomorrow for inspection.
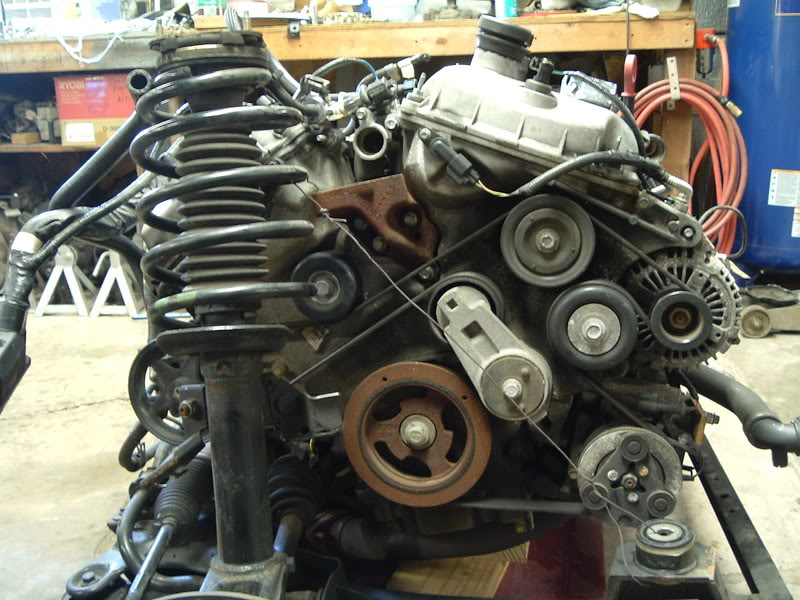
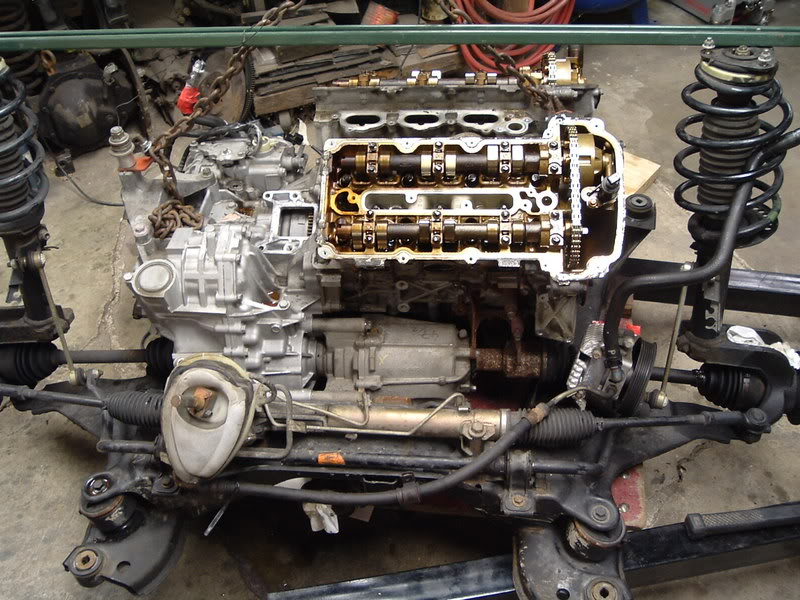
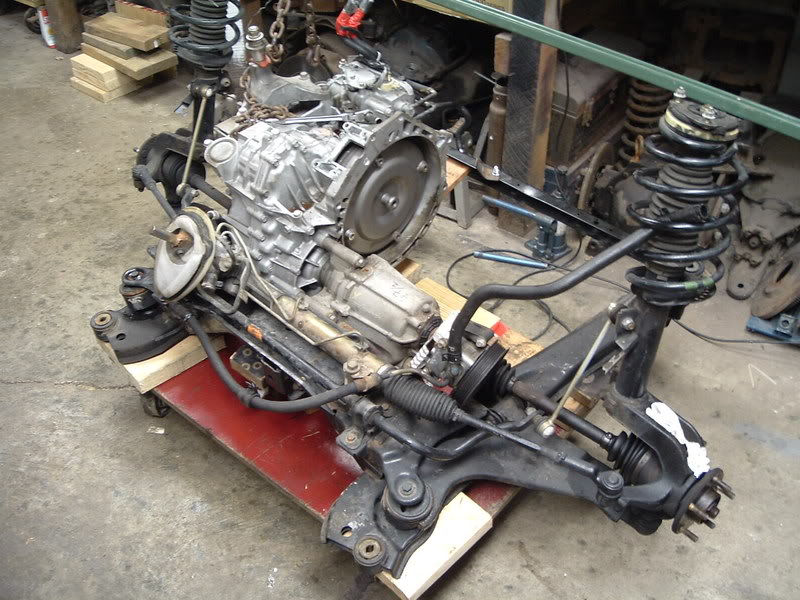
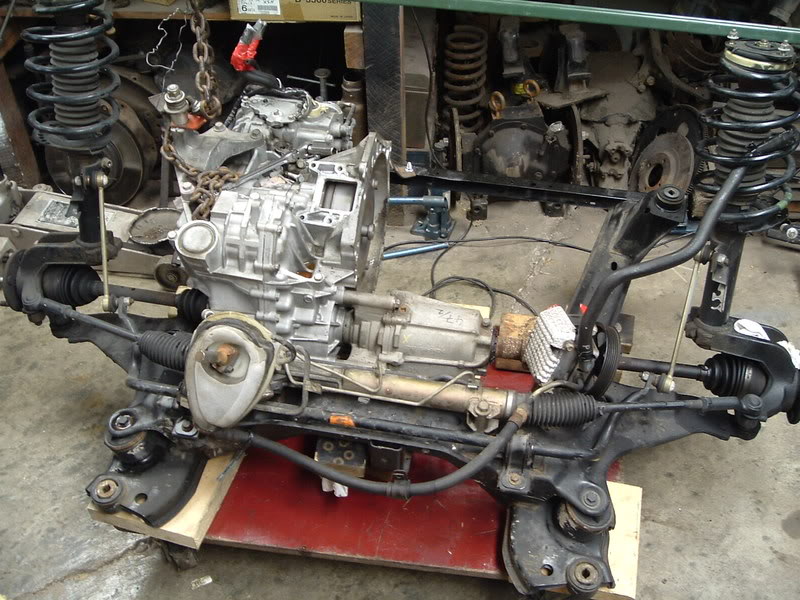
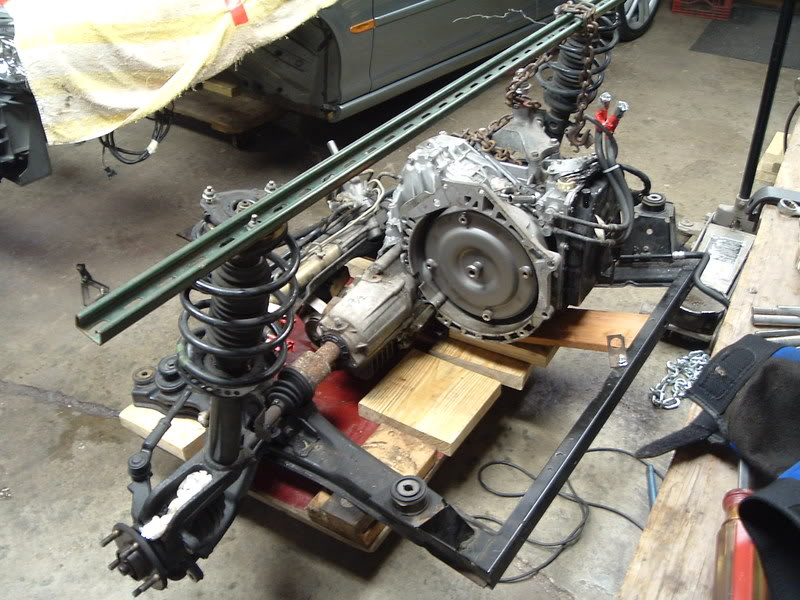
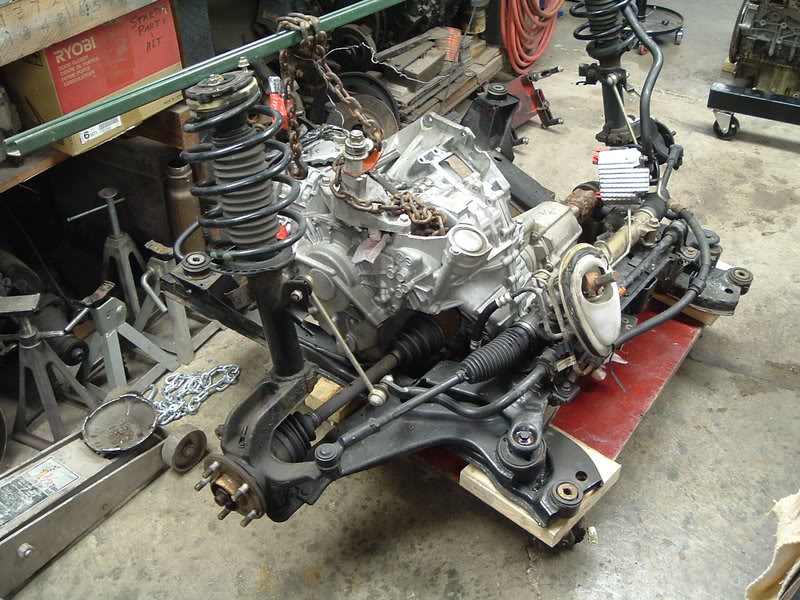
Just a quick bit on the removal of the engine itself from the subframe assembly-- it was very easy. If I had to do it again (which I PRAY I don't), it could probably get it down to 15 minutes. Keep in mind, that isn't considering the exhaust. It took close to two hours to "finesse" apart.


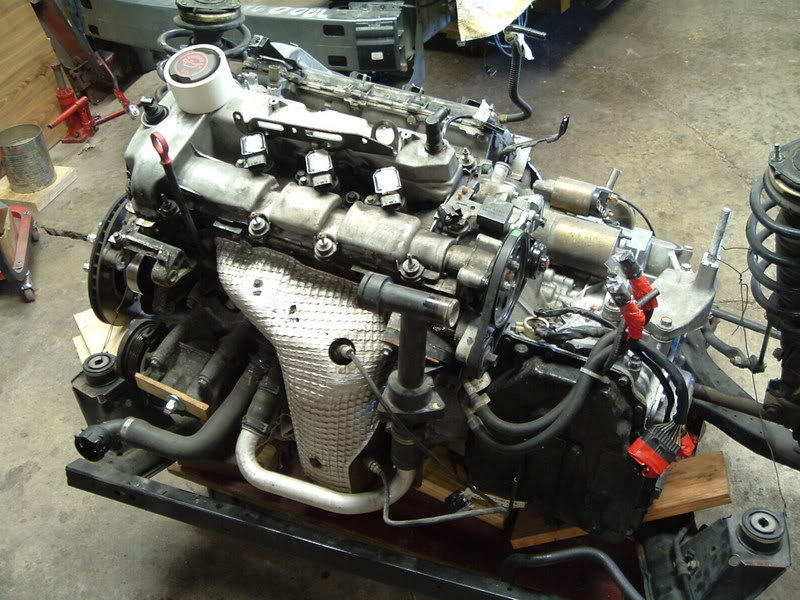

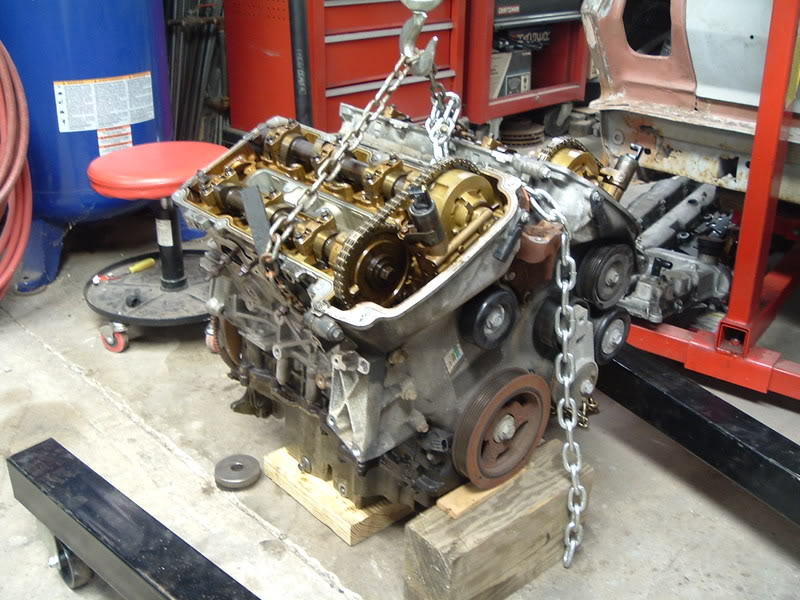
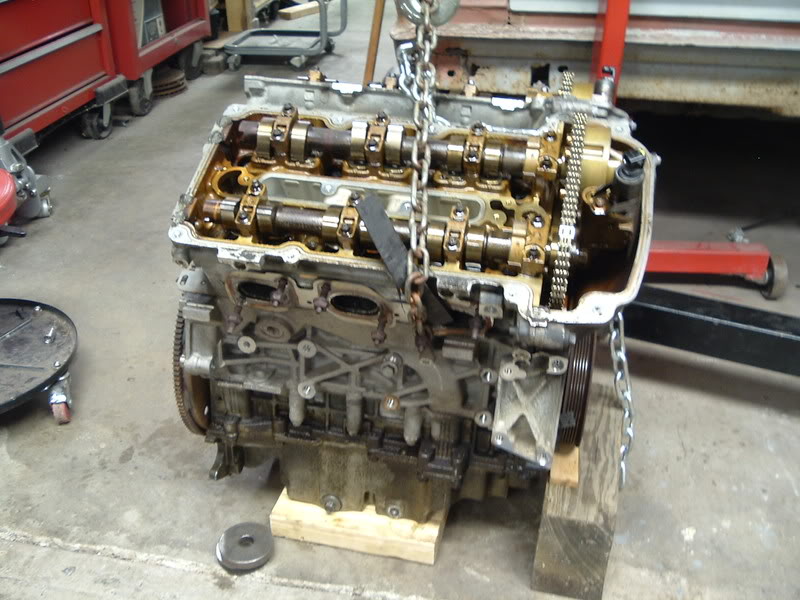
As of tonight, the engine is on the stand, and stripped down to just the bare block. It's amazing how small the block is when it's stripped down. Unfortunately I didn't take any pics of the engine with only the front cover to show the timing chains, but there are plenty of pics of them floating around. Once I got down to the rod/main bearings, I was quite surprised. All of the rod end caps had play in them before being broken loose. Every bearing showed serious wear. The first and last main bearing showed serious scoring, and two rod bearings showed serious wear. The worst one (pictured further down, on the workbench) was worn threw and spun, nearly identical to the ways James' looked. The end cap of this particular rod was VERY discolored from the heat. It was a very deep, gloss black.. whereas the others were a golden color. The lobes on the crank surrounding that rod were discolored to a bluish/green color.
The cams and cam journals look great, so I really don't think they will need any attention. However, the first cylinder of the rear bank showed serious oil burning (see below pic of head standing on its end). I hope this is due to worn rings, and not a problem in the head. I really, really don't want to have to get into them.
I took the oil pump apart, and despite some grit in the oil residue, all components are in great shape. It's certainly reusable with a good cleaning.
Every component to this engine (block, heads, cams, timing assembly, oil pump, etc. literally everything) has a bold Ford stamp on it. I'm really beginning to wonder how different these motors actually are from their supposed blue-oval counterparts.
Anyway.. enough taking. Onto the pics. I'm exhausted (as usual), and need sleep. I'm taking some bits to the machine shop tomorrow for inspection.
Just a quick bit on the removal of the engine itself from the subframe assembly-- it was very easy. If I had to do it again (which I PRAY I don't), it could probably get it down to 15 minutes. Keep in mind, that isn't considering the exhaust. It took close to two hours to "finesse" apart.

Thread Starter
|
Senior Member
Joined: May 2007
Posts: 351
Likes: 72
From: Louisville, KY
It's actually a FujiFilm Finepix A210. The thing is yeeeears old, and a total brick. I'm pretty sure you can't even buy them anymore they're so old. It takes fairly good pics, though.
As far as a crank, my machine shop said they can polish mine, and use one step larger bearings. There are three size of bearings available; stock, and two increasingly larger sizes. They are going to see if it is bent as well, and straighten it if need be.
Here are a couple more pics..
Everything loaded up and on it's way to the machine shop
(Upper and lower block, oil pan, pick up, windage tray, front cover, heads, cams, pistons/rods, and valve covers)
I should have a price for everything tomorrow.
I'm going to need upper and lower gasket sets, head bolts, lower block bolts, rings, and bearings. They're going to hot tank all of the parts, rebuild both heads, and adjust the valves. I'll do the actual assembly of the engine here.
James, you're definitely going to want to buy new head/lower block bolts. They are torque to yeild, and cannot be reused. I confirmed this today.
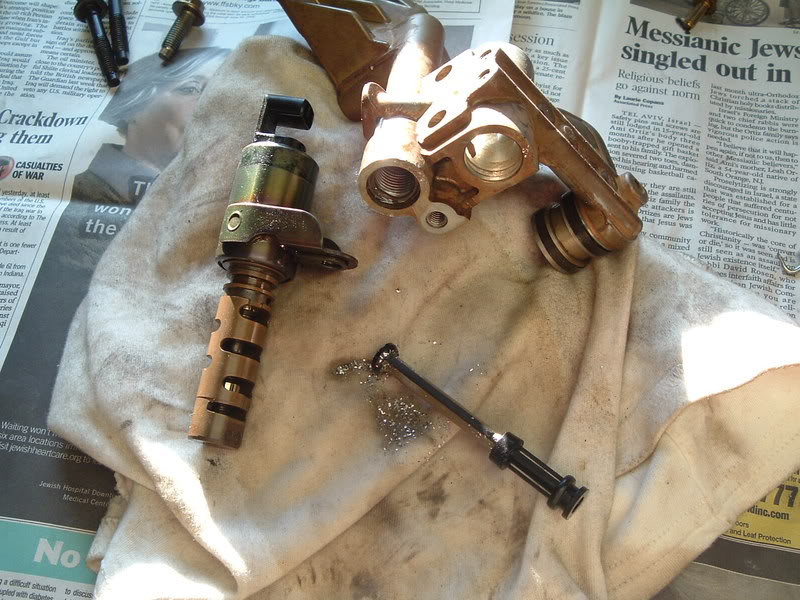
Here is what I found when I took the VVT solenoids out of the top of the out timing guides. Pretty.
As far as a crank, my machine shop said they can polish mine, and use one step larger bearings. There are three size of bearings available; stock, and two increasingly larger sizes. They are going to see if it is bent as well, and straighten it if need be.
Here are a couple more pics..
Everything loaded up and on it's way to the machine shop
(Upper and lower block, oil pan, pick up, windage tray, front cover, heads, cams, pistons/rods, and valve covers)
I should have a price for everything tomorrow.
I'm going to need upper and lower gasket sets, head bolts, lower block bolts, rings, and bearings. They're going to hot tank all of the parts, rebuild both heads, and adjust the valves. I'll do the actual assembly of the engine here.
James, you're definitely going to want to buy new head/lower block bolts. They are torque to yeild, and cannot be reused. I confirmed this today.
Here is what I found when I took the VVT solenoids out of the top of the out timing guides. Pretty.
Last edited by 310jag; Mar 2, 2009 at 06:28 PM.

Lovin this post more n more.....great pics and I reckon a wealth of info before its finished too....probably end up being FAQ'd I reckon.
Lookin forward to the next instalment


Senior Member
Joined: Feb 2009
Posts: 119
Likes: 40
From: OKLAHOMA, USA
310Jag ,
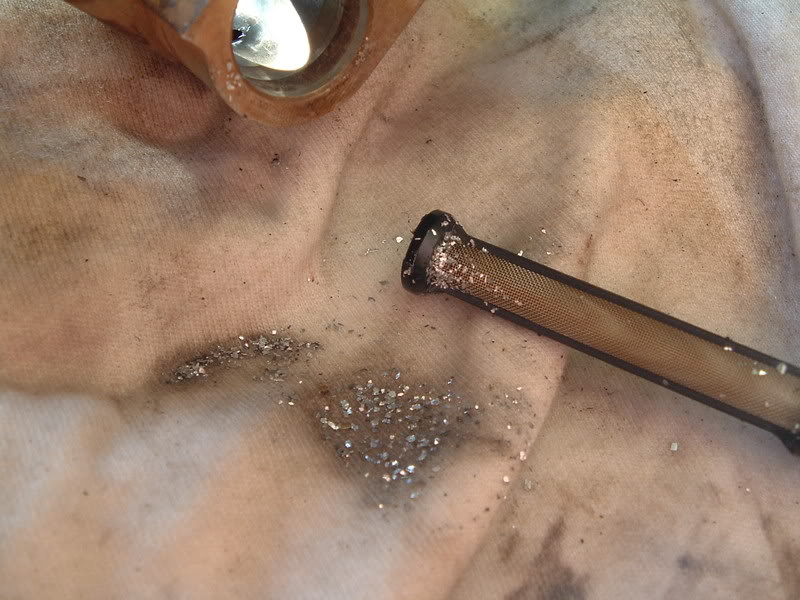
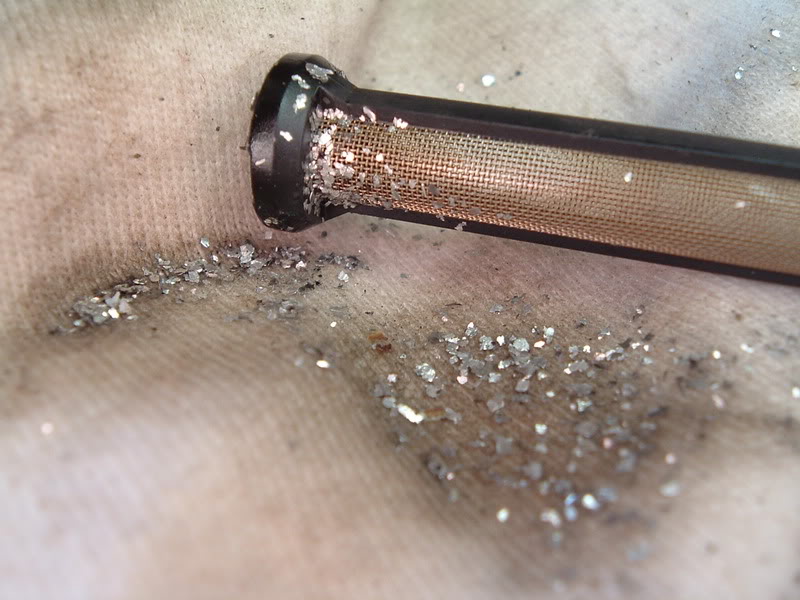
You even have my camera!!! What up with that! I use the same camera. I was told by my machinist that indeed the bolts are torque to yield. He also said a new oil pump would be a very good investment. Something failed, right. I've investigated "re-built" motors for $3700 and they all tout that they have "new head bolts and oil pumps" so they can offer you a 3 yr unlimited mileage warranty. My VVT oil screen looked very much like yours, maybe a little worse. I am going to take a shot of my "glitter" that is now in the bottom of my parts washer, just to get an idea of how MUCH was in there. I wish I still had the oil filter.
Everyone,
My shop got back with me finally and the damage is 1 rod, to be replaced and the Crank turned one size smaller than stk, I believe he said that I would need bearings to be 20 thousandths oversized.
I found the Oil-Pump and a Rod at http://www.jaguarparts.com/ for a very good price. Dealer/(JaguarParts) quote $272.50/($185.30) for the oil pump, Head Bolts $20.59 ea (16 req.)$329.44/($71), and a Rod for $188.69/($127): Total $728.94/($383.30) savings $345.64 almost 50%. I purchased FelPro Head Bolts ES 72208 from http://www.autopartsgiant.com/ for $35.50 for a set of 8 (2 sets req.) for a total cost of $71.00 for the bolts.
Take a look at the jaguarparts.com site and you can also find the rings, rod bearings and main bearings in stk, .20mm and .50mm along with a WIDE VARITY or other parts you might need.
I took my heads over to the shop yesterday and he said they looked fine. So I gave him the go ahead to hot tank the parts, turn & straighten the crank, rebuild the heads including valve adjustment, re-assemble the block and set timing. I will end up spending a total of approx $1200 at my shop and this will include the parts I have purchased. I believe the labor was just about $650. THIS MADE MY DAY!!!
I did have to educate the guy on the Duratec motor, ie Taurus, RX6, Lincoln LS. Once past the valve covers they are pretty much the same core. My shop does allot of BMW and Jaguar XJ/XK work but not so much on this stepchild called the X. ITS A FORD!!!!!!
I have stated it before and I will say it again. This car an engineering marvel. It rides high on the curve of performance and handling. It's the high end curve of performance that drives us so crazy with Transfer Case explosions, Heat related issues, sealed for life Transmission and some other annoyance like the cost cutting measures in the headlamps� adjustment screw made from PLASTIC and the Fresh air vent gear made in plastic. Why do you get that whining sound? Cost cutting measure, inferior bearing choice. This vehicle is a joy and a pleasure to drive, if you know what I mean. 60mph in a clover leaf with no tire squeal and the feeling of total control, I love it!
I think to own a Jaguar, it takes more attention than I have been giving to it, more care and maintaince. I believe now, that to properly maintain peak performance you need to fix the poor choices, made during development, with some of the FIXES you find right here on this site. RE-GREASE that drive shaft center bearing. Rebuild that "plastic part" in the Headlamp assembly and do periodical maintaince on the Transfer Case and Transmission.
As far as fluids, well this is the butter that keeps the whole thing moving smoothly. Look at the damage you have seen in this Thread. I know 310jag changed his oil regularly and this still happened. It also happened to me. Mine looked just as bad. I stopped driving the vehicle within 48 miles, in four 12 mile trips spaced hours apart, after hearing my first chain rattle during a cold start one morning. So my advice to ALL of those who hear a rattle at start-up that you turn it off. Park it and do two things. Replace the oil and the oil filter. You are aware that the oil filter is important, right. If not, I will tell you that FRAM filters can and do collapse inside and can cut off oil flow. The purpose of the oil change is to help determine if something has failed. Do you have an oil pressure gauge???, It might just have to do with the oil/filter you have in there. Remember oil breaks down due to the heat caused by the friction of the tight tolerances the engine has on rods, bearings and cams. This engine has TWO large heaters in the engine compartment, the Catalytic converters. Your oil breaks down SOONER than you would think, even if like me you use top grade synthetic Castrol GTX 5w-20. I used to think that you could go 7.5K before oil change. But now after getting educated and realizing that those CATs operate at a temperature of about 1500 degrees Fahrenheit and that they also heat up the aluminum block/head and that hot exhaust is routed across the oil pan, well my conclusion is HEAT cooks that oil and it becomes in-effective. My service plan is now every 3K even with synthetic. I plan to "Wrap" my exhaust headers, cats and crossover tube with the DEI exhaust wrap. check it out: http://www.designengineering.com/pro...asp?m=sp&pid=9
Use a FACTORY oil filter or a WIX. Once you have changed the oil and filter, crank her up, if it still rattles at start then you have a problem that needs to be taken care of now. If you do it now, you won't have the "parts" cost later. It has taken countless hours to locate my parts and gaskets. Those "oil change" places may not be saving you as much time and $ as you think. Just a thought, if you don't want to roll under the vehicle and change the oil yourself then take a case of the RIGHT oil and filter with you and let them drain/dispose the used oil and pour in your brand. But if you never go under you vehicle you will never see those tell-tell signs of leaks, either re-torque is required or a seal is giving out. Take the time with this car brand. Give it your attention and you will be rewarded with relative trouble free miles.
Thread Starter
|
Senior Member
Joined: May 2007
Posts: 351
Likes: 72
From: Louisville, KY
I hate to say it but a single beer hasn't laid down it's life for this project. 
And Jagtech, I found the same info on oversized bearings, for the rods and mains. My machine guy has ones .010 and .020 available.
James - You've got pretty much the same report from your shop as I did mine. $1200 to rebuild/assemble the heads and set the vales, turn the crank .020, straighten it, supply new bearings, head bolts, all gaskets, and hot tank all of the components. My rear bank head has to be milled, as the first piston (the worst of the spun bearings) made contact with the head.
This price does not include piston rings, one (potentially two) connecting rods, and main bolts.
I priced these items at the dealer, and got these prices
Rods - $127 each
Rings - $398 for full set (yes, ridiculous, I know)
Main bolts - $150
As far as the mains, I may not need to replace all 22 bolts. I'm thinking I may only need to twos bolt on each side of the main bearings.. but.. just to be safe I'll probably end up replacing them all.
I called around locally and found a ring set for $86 at multiple places, but they're on backorder. I'm going to research this some more and try to find a less that $400 option.
jaguarparts.com has them listed for $62.69, but that's only $4 cheaper than the per cylinder price the dealer quoted me. I'll call them tomorrow for clarification as to whether that $62 is per cylinder, or for the entire set. I have a feeling it's per cylinder.
James did a good job of describing both of our feelings on these cars. They're great to drive, but incredibly over-engineered, and a pain to work on.
I also echo his words on being careful with your X, and listening very carefully to any noises it may make. They can certainly be an indicator of serious issues.
The problems I've had with a car this new of a car (major just, engine failure, transmission failure, wheel bearings, etc) is very discouraging. I planned on buying an 04+ XJ after this car is gone, but I'm seriously starting to question that decision.
Last edited by 310jag; Mar 3, 2009 at 06:07 PM.

Thread Starter
|
Senior Member
Joined: May 2007
Posts: 351
Likes: 72
From: Louisville, KY
This problem developed weeks after I put it up for sale.
When it was put up for sale it had NO mechanical problems, as advertised. When it's back on the market, it will be in impeccable mechanical condition.
When it was put up for sale it had NO mechanical problems, as advertised. When it's back on the market, it will be in impeccable mechanical condition.
Joined: Mar 2008
Posts: 2,521
Likes: 71
From: Powell, Ohio U.S.A. 43065
That's good to know about the bearings, I wasn't trying to be a ***** about it, I just saw a job go bad on a 4.0 a while ago for the same reason.
My machine shop called me looking for oversize rod bearings, they are a bigtime engine builder and couldn't find any for a shop's crank that they had cut. Nobody makes them. So I sold them a good used crank, calulated all the bearing sizes from my journal numbers and their block codes, and away it went. If you had to buy a new crank, you'd be looking at a total parts list that was getting close to 2K, that starts making me look for a low mileage used engine.
A new oil pump is not an option, the wear caused by all the particulates make that a necessity. Best clean the oil cooler out about a dozen times too. Bitchin' nice pictures, hope it all comes out good for you.
Thread Starter
|
Senior Member
Joined: May 2007
Posts: 351
Likes: 72
From: Louisville, KY
So it turns out the most difficult part of this procedure has been finding piston rings. Sure, they are available from the dealer.. at $76 PER cylinder. That's over $450 for piston rings. That's robbery. There's NOTHING magical about the piston rings in this car.
So after two weeks of searching the country, at this point in time, there are no aftermarket piston rings available for this car. Hastings, SealedPower (the two biggest piston ring manufacturers in the country), and Federal Mogul have none. All local part stores do show a listing for them, but they trace back to Federal Mogul. After many phone calls to them, I did get a response on why there are none availble. They told me that people have been ordering them, but they are "under development." So either they haven't actually been produced yet, or were produced at one point in time, were pulled, and are being redesigned.
All of our Jag specialty places (Welsh, Jag Bits, Terry's, Jag Graveyard, etc. either have no listing, or do say they can get them, but are simply sourcing them from the dealer and marking them up a bit.
Fortunately I'm on good terms with the guys in the parts department at my dealer, and managed to get a full set for $355 (which is still robbery for parts that should be less than $100). But at this point, I'm out of options and out of time. I need the car back on the road, and just had to bite the bullet. They will be here Monday.
The rest of the bits from the machine shop should be back early next week (tues/wed?), so reassembly should begin next weekend, maybe a day or two earlier.
So, onward and upward. James, I'd love to hear about your search for rings, and if you've found similar responses from people.
I'll keep you all posted, and thanks for reading.
