

my x-type projects and installs

Veteran Member
Joined: Apr 2009
Posts: 1,369
Likes: 18
From: Red Deer
the mesh on the new grille looks abit too wide, if u catch waht im saying, the holes are two big, but i still like it, im going to paint the mesh black on mine, and leave the bagde as it is, when i order it.

Thread Starter
|
Veteran Member


Joined: May 2006
Posts: 2,038
Likes: 587
From: connecticut
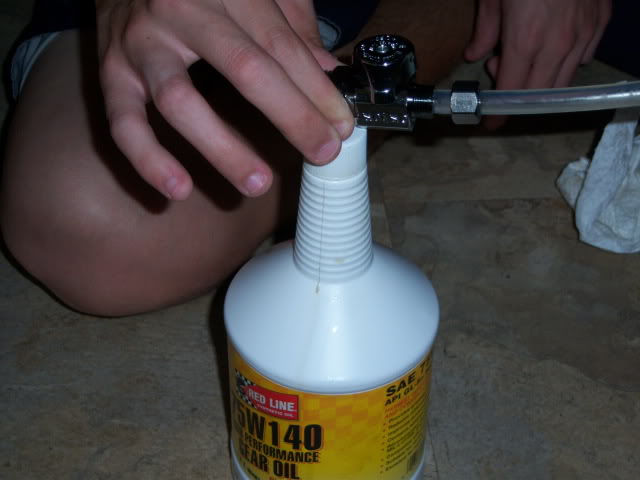
1..first jack up car and put the rear wheels on jack stands (to be safe use 4 jack stands)
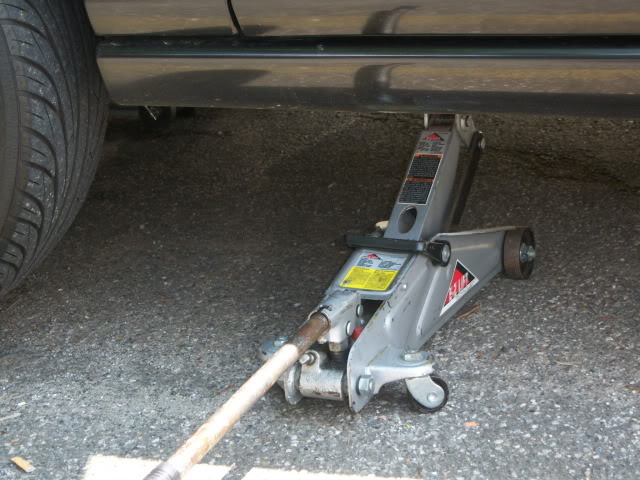
2..put a hydrolic jack on each side of the front of the car and jack the front up
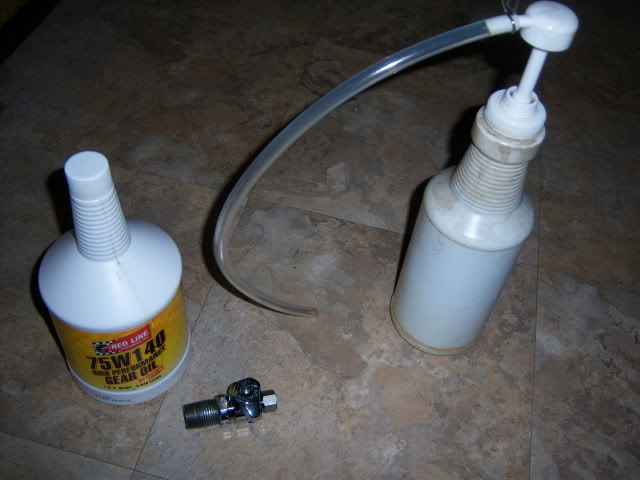
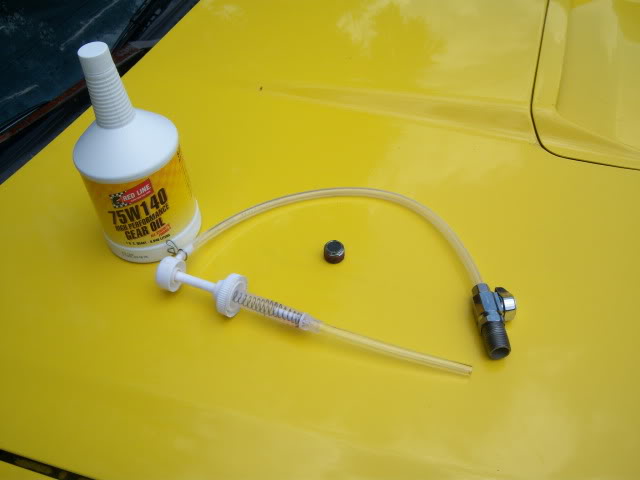
3..parts you need is a home depot straight 1/4 turn valve (1/2"inlet-3/8 outlet...pn#g2r12c1)and a 1/2 threaded hex nipple..
pump from advance auto parts $5
redline 75w140 gear oil
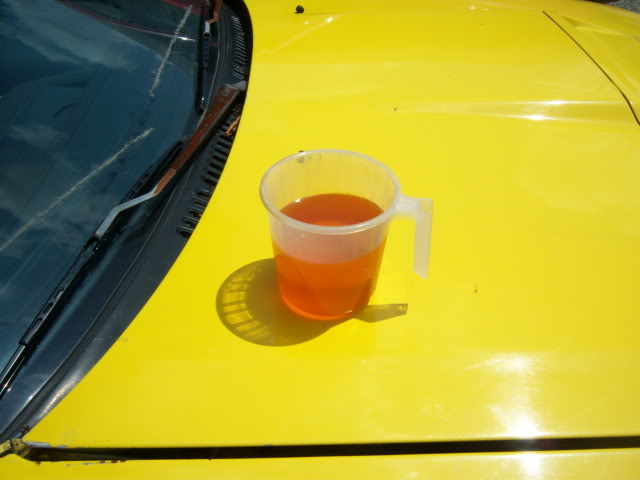
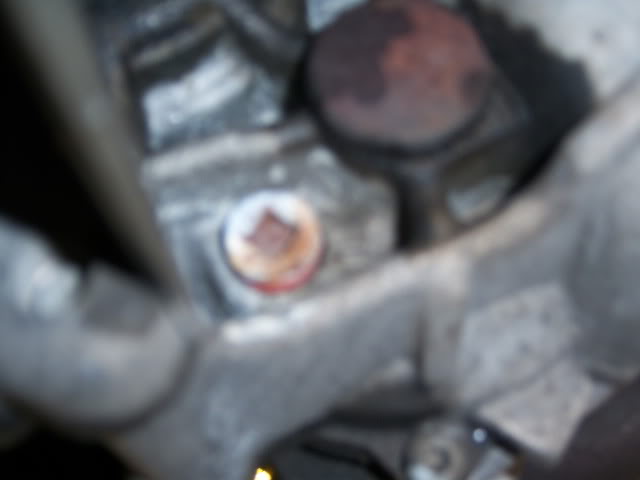
4..undo transfer case plug,,use a regular ratchet with a 3/8 small extension and drain...dont forget to lower the drivers side of the car i got out 200ml out of mine
 \
\
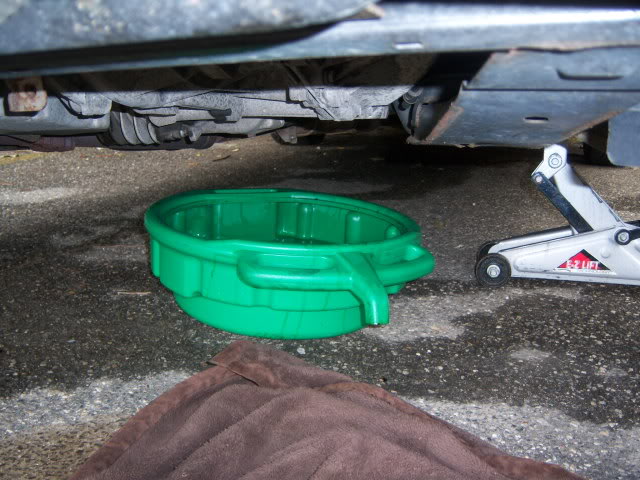
5..now screw in the turn valve only 1 turn then install hose from your pump
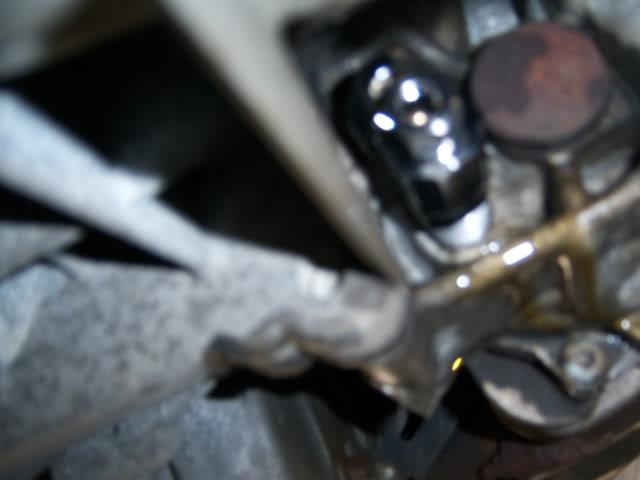
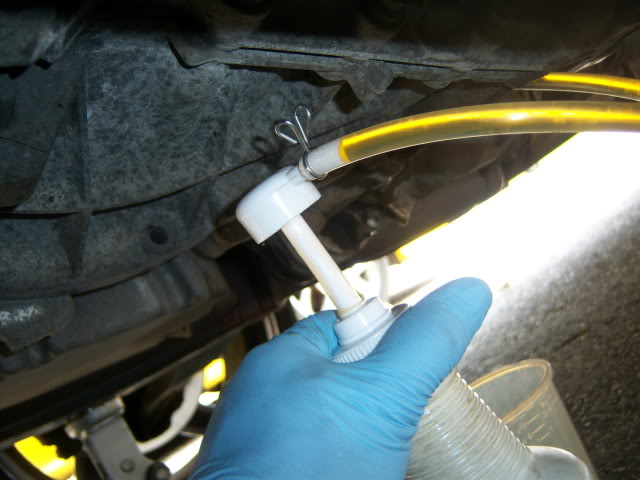
6.. i put in 700ml in the pump bottle
8..now pump it in ..once you have everthing in close the valve
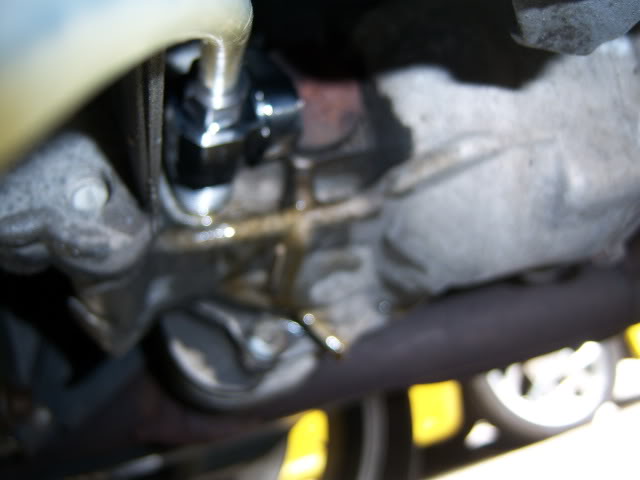
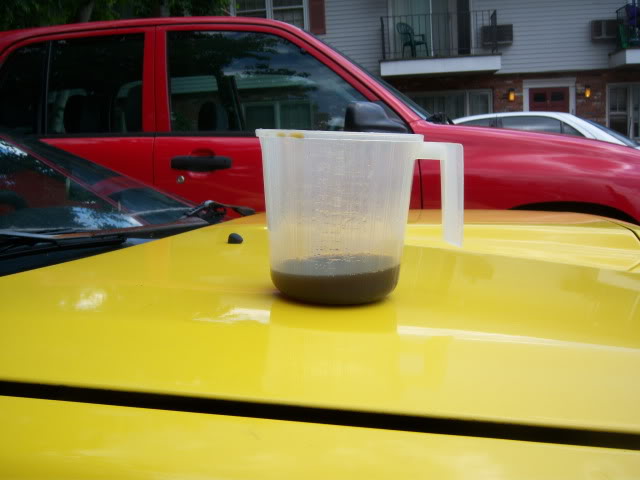
9..now heres the messy part put your measuring cup under the valve and now unscrew the valve and now quickly install back your plu now your done ..in your cup you should have lost about 150ml

i drove to florida from connecticut and whaaaaat a smooth drive
2..put a hydrolic jack on each side of the front of the car and jack the front up
3..parts you need is a home depot straight 1/4 turn valve (1/2"inlet-3/8 outlet...pn#g2r12c1)and a 1/2 threaded hex nipple..
pump from advance auto parts $5
redline 75w140 gear oil
4..undo transfer case plug,,use a regular ratchet with a 3/8 small extension and drain...dont forget to lower the drivers side of the car i got out 200ml out of mine
\5..now screw in the turn valve only 1 turn then install hose from your pump
6.. i put in 700ml in the pump bottle
8..now pump it in ..once you have everthing in close the valve
9..now heres the messy part put your measuring cup under the valve and now unscrew the valve and now quickly install back your plu now your done ..in your cup you should have lost about 150ml
i drove to florida from connecticut and whaaaaat a smooth drive
Last edited by dennis black; Jul 4, 2009 at 08:10 AM.

Thread Starter
|
Veteran Member
Joined: May 2006
Posts: 2,038
Likes: 587
From: connecticut
thanks...i have redline transmission oil in my mazda rx7 and i have it in the differential it is almost bullet proof ,i have pounded on my gears for the last 7 years i put in my rx7 ....but i will dump it out on my jag next year and see if i lost any and what condition it is in..
but let me tell you i love how smooooth it is now


but let me tell you i love how smooooth it is now
Thread Starter
|
Veteran Member
Joined: May 2006
Posts: 2,038
Likes: 587
From: connecticut
its the labour what hurts....so i try to extend the life of these mechanical boxes, by putting redline products in them,,,the lubrication needs to be able to handle the heat
my mazda rx7 turbo takes a beeting at the track...running low 11s all day
using redline on my rotary is a real benifit
on my x-type its a delight to drive
my mazda rx7 turbo takes a beeting at the track...running low 11s all day
using redline on my rotary is a real benifit
on my x-type its a delight to drive
Last edited by dennis black; Jul 5, 2009 at 04:10 PM.
Veteran Member
Joined: Apr 2009
Posts: 1,369
Likes: 18
From: Red Deer
hmm, i should probally do thats too soon., For some reason when i start my car, thers a knock/ thud, sounds like its coming from the passenger side, it only happens when i start it and the car seems to run normal.
Senior Member


Joined: Aug 2009
Posts: 217
Likes: 14
From: NYC/NJ Metro
Hey Dennis,
Just wanted to say your install of the double din has been a real inspiration for me to try it myself. It is the best mod I've seen for a car with few options. Just wanted to ask to triple check, the AVN550 fits flush without alteration and isn't blocked by the heating vent? I recently did a Pioneer AVIC-F900BT in my SUV and that thing needed so much room to work with I can't imagine trying to fit it in an X-type, but would love if it could. Thanks again and keep up the good work.
Just wanted to say your install of the double din has been a real inspiration for me to try it myself. It is the best mod I've seen for a car with few options. Just wanted to ask to triple check, the AVN550 fits flush without alteration and isn't blocked by the heating vent? I recently did a Pioneer AVIC-F900BT in my SUV and that thing needed so much room to work with I can't imagine trying to fit it in an X-type, but would love if it could. Thanks again and keep up the good work.
Thread Starter
|
Veteran Member
Joined: May 2006
Posts: 2,038
Likes: 587
From: connecticut
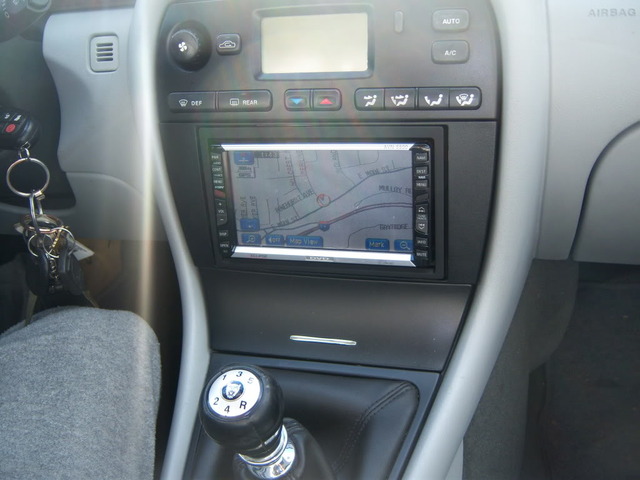
the avn5500 is the perfect fit theres no hacking...but i must say its tight but an 2year old could get it in lol all you have to do is get all the items listed and you are good to go ...if you need help ill be hear to help ....one note they have newer models now ,ill put a list what will work..with mine the navigation is incredible ,it plays movies while you are driving (not recomende) back up camera ,12disc changer sirius and a lot more
Thread Starter
|
Veteran Member
Joined: May 2006
Posts: 2,038
Likes: 587
From: connecticut
it cost $500
here are some models that fit
avn5500
avn5435
avn20d
avn6620
avn6600
avn5510
some are cheep and some are expensive make sure it says it can play dvds..the avn20d does not

here are some models that fit
avn5500
avn5435
avn20d
avn6620
avn6600
avn5510
some are cheep and some are expensive make sure it says it can play dvds..the avn20d does not
Veteran Member
Joined: Apr 2009
Posts: 1,369
Likes: 18
From: Red Deer

I was thinking of going with this one, ( at best buy) it plays all ur ipod stuff, inlcuding video's, slideshow photos and all the names of the songs on your ipod, there working on one that can use wifi to i belive, but im looking for something like this, do u think it will work.
Senior Member
Joined: Aug 2009
Posts: 217
Likes: 14
From: NYC/NJ Metro
Dennis, good to know it fit without much trouble. i think the depth of these units are the issue as that may vary between manufacturer. I would think that any wih the same as the Eclipses will work. Now I just have to find a deal...
Thread Starter
|
Veteran Member
Joined: May 2006
Posts: 2,038
Likes: 587
From: connecticut
disco stu55 what are the measurements
the eclipse navigation is precise to the t ...the back up camera has a clean look...plaing movies is amazing ..i try to find any cons but i cant find any..tip make sure when you buy it from ebay that you read all the specs because some units dont play movies ...like the avn20d...
the eclipse navigation is precise to the t ...the back up camera has a clean look...plaing movies is amazing ..i try to find any cons but i cant find any..tip make sure when you buy it from ebay that you read all the specs because some units dont play movies ...like the avn20d...
Veteran Member
Joined: Apr 2009
Posts: 1,369
Likes: 18
From: Red Deer
i don't have the specs, but its not a proirity upgrade, im picking up the k&N filter to install ( had to special order it) tommorrow, and cleaning her up. Then ordering the paint supplies, mud gaurds, and the 09 grille. Next week
Thread Starter
|
Veteran Member
Joined: May 2006
Posts: 2,038
Likes: 587
From: connecticut
well some of you may have run into check engine light problems...also cruise not available light
you may run into codes like
P-0171
P-0174
P-1000
THESE ARE THERE CODES
Manufacturer Specific Codes
P1000 OBD Systems Readiness Test Not Complete
P1104 Mass Air Flow Sensor Circuit Ground - Read Our Article On Automotive Circuit Testing For Help With This Jaguar Check Engine Light Code
P1111 System Pass
P1121 Pedal Position Sensor A Circuit Range/Performance
P1122 Pedal Position Sensor A Circuit Low Input
P1123 Pedal Position Sensor A Circuit High Input
P1136 Control Box Fan Circuit - Read Our Article On Automotive Circuit Testing For Help With This Jaguar Check Engine Light Code
P1137 Lack Of HO2S12 Switches - Sensor Indicates Lean - Read Our Article on Oxygen Sensor Codes For Help With This Jaguar Check Engine Light Code
P1138 Lack Of HO2S12 Switches- Sensor Indicates Rich
P1143 Air Assisted Injector Control Valve Range/Performance
P1144 Air Assisted Injector Control Valve Circuit - Read Our Article On Automotive Circuit Testing For Help With This Jaguar Check Engine Light Code
P1157 Lack Of HO2S22 Switches - Sensor Indicates Lean - Read Our Article on Oxygen Sensor Codes For Help With This Jaguar Check Engine Light Code
P1158 Lack Of HO2S22 Switches - Sensor Indicates Rich
P1171 System Too Lean- Banks 1 And 2 (Lean Fuel Fault)
P1172 System Too Rich - Banks 1 And 2 (Rich Fuel Fault)
P1174 System Too Lean - Banks 1 And 2 (Suspect HO2S)
P1175 System Too Rich - Banks 1 And 2 (Suspect HO2S)
P1176 Long Term Fuel Trim Too Lean - Banks 1 And 2 (FMFR) - Read Our Article on Oxygen Sensor Codes For Help With This Jaguar Check Engine Light Code
P1177 Long Term Fuel Trim Too Rich - Banks 1 And 2 (FMFR)
P1178 Long Term Fuel Trim Too Lean - Banks 1 And 2 (AMFR)
P1179 Long Term Fuel Trim Too Rich - Banks 1 And 2 (AMFR)
P1185 O2 Sensor Heater Circuit Open - Hardware Fault
P1186 O2 Sensor Heater Circuit Shorted- Hardware Fault
P1187 O2 Sensor Heater Circuit Open - Inferred Fault
P1188 O2 Sensor Heater Circuit Resistance
P1189 O2 Sensor Heater Circuit Low Resistance Fault 1
P1190 O2 Sensor Heater Circuit Low Resistance Fault 2
P1191 O2 Sensor Heater Circuit Open - HArdware Fault
P1192 O2 Sensor Heater Circuit Shorted
P1193 O2 Sensor Heater Circuit Open - Inferred Fault
P1194 O2 Sensor Heater Circuit Resistance Fault
P1195 O2 Sensor Heater Circuit Low Resistance Fault 1
P1196 O2 Sensor Heater Circuit Low Resistance Fault 2
P1198 Fuel Level Input Circuit High
P1199 Fuel Level Input Circuit Low
P1201 Cylinder # 1 Injector Circuit Open/Shorted - Read Our Article On Automotive Circuit Testing For Help With This Jaguar Check Engine Light Code
P1202 Cylinder # 2 Injector Circuit Open/Shorted
P1203 Cylinder # 3 Injector Circuit Open/Shorted
P1204 Cylinder # 4 Injector Circuit Open/Shorted
P1205 Cylinder # 5 Injector Circuit Open/Shorted
P1206 Cylinder # 6 Injector Circuit Open/Shorted
P1207 Cylinder # 7 Injector Circuit Open/Shorted
P1208 Cylinder # 8 Injector Circuit Open/Shorted
P1221 Pedal Demand Sensor B Circuit Range/Performance
P1224 Electronic Throttle Control Position Error
P1226 Mechanical Guard Circuit Range/Performance
P1227 Mechanical Guard Circuit Low Input
P1228 Mechanical Guard Circuit High Input
P1229 Electronic Throttle Control Circuit
P1230 Fuel Pump Relay
P1235 VSV 1/2/3 Circuit Range/Performance - Read Our Article On Automotive Circuit Testing For Help With This Jaguar Check Engine Light Code
P1236 VSV 1 Circuit
P1237 VSV 2 Circuit
P1238 VSV 3 Circuit
P1240 Sensor Power Supply
P1241 Sensor Power Supply Low Input
P1242 Sensor Power Supply High Input
P1243 Analog Ground
P1245 Crank Signal Low Input
P1246 Crank Signal High Input
P1250 Throttle Valve Spring
P1251 Throttle Position
P1252 VSV Stuck On VA/VV
P1253 VSV Stuck On VR
P1260 Theft Detected, Vehicle Immobilized
P1313 Misfire Rate Catalyst Damage Fault - Bank 1
P1314 Misfire Rate Catalyst Damage Fault - Bank 2
P1315 Persistent Misfire
P1316 Misfire Rate Exceeds Emissions
P1336 Crankshaft/Camshaft Sensor Range/Performance
P1340 Camshaft Position Sensor B Circuit - Read Our Article On Automotive Circuit Testing For Help With This Jaguar Check Engine Light Code
P1341 Camshaft Position Sensor B Circuit Range/Performance
P1361 Ignition Coil, Cylinder # 1, No Activation
P1362 Ignition Coil, Cylinder # 2, No Activation
P1363 Ignition Coil, Cylinder # 3, No Activation
P1364 Ignition Coil, Cylinder # 4, No Activation
P1365 Ignition Coil, Cylinder # 5, No Activation
P1366 Ignition Coil, Cylinder # 6, No Activation
P1367 Ignition System Failure Group 1
P1368 Ignition System Failure Group 2
P1370 Insufficient RPM Increase During Spark Test
P1371 Ignition Coil - Cylinder 1 - Early Activation Fault
P1372 Ignition Coil - Cylinder 2 - Early Activation Fault
P1373 Ignition Coil - Cylinder 3 - Early Activation Fault
P1374 Ignition Coil - Cylinder 4 - Early Activation Fault
P1375 Ignition Coil - Cylinder 5 - Early Activation Fault
P1376 Ignition Coil - Cylinder 6 - Early Activation Fault
P1384 Variable Valve Timing Solenoid A Circuit - Read Our Article On Automotive Circuit Testing For Help With This Jaguar Check Engine Light Code
P1392 Variable Valve Timing Solenoid A Circuit Low Input
P1393 Variable Valve Timing Solenoid A Circuit High Input
P1396 Variable Valve Timing Solenoid B Circuit
P1397 Variable Valve Timing Solenoid B Circuit Low Input
P1398 Variable Valve Timing Solenoid B Circuit High Input
P1400 Exhaust Gas Recirculation Valve Postion Control
P1401 Exhasut Gas Recirculation Valve Postion Circuit
P1408 Exhaust Gas Recirculation Thermister
P1409 Exhaust Gas Recirculation Valve Circuit - Read Our Article on EGR Valve Codes For Help With This Jaguar Check Engine Light Code
P1440 Purge Valve Stuck Open
P1441 ELC System 1
P1447 ELC System Closure Valve Flow
P1448 ELC System 2
P1453 Fuel Tank Pressure Relief Valve Malfunction
P1454 Evaporative Emission Control System Vacuum Test
P1475 Fan Relay (Low) Circuit
P1476 Fan Relay (High) Circuit
P1508 Idle Air Control Circuit Open
P1509 Idle Air Control Circuit Shorted
P1514 High Load Neutral/Drive Fault
P1516 Gear Change Neutral/Drive Fault
P1517 Cranking Neutral/Drive Fault
P1534 Restraint Deployment Indicator Circuit
P1565 Speed Control Command Switch Out Of Range High
P1566 Speed Control Command Switch Out Range Low
P1567 Speed Control Output Circuit - Read Our Article On Automotive Circuit Testing For Help With This Jaguar Check Engine Light Code
P1568 Speed Control Unable To Hold Speed
P1571 Brake Switch
P1582 Electronic Throttle Monitor Data Available
P1600 Loss Of Kam Power, Circuit Open
P1603 EEPROM Malfunction
P1605 Keep Alive Memory Test Failure
P1606 ECM Control Relay Output Circuit
P1607 MIL Output Circuit
P1608 Watchdog Malfunction
P1609 Internal Control Module CPU To CPU Communication Failure
P1611 Throttle Target Malfunction 1
P1612 Throttle Offset Malfunction
P1637 CAN Link ECM/ABS Control Module Circuit/Network
P1638 CAN Link ECM/INSTM Circuit/Network
P1641 Fuel Pump Primary Circuit
P1642 CAN Link Circuit
P1643 CAN Link Engine Control Module/Transmission Control Module Circuit/Network
P1646 Linear O2 Sensor Control Chip (Bank 1)
P1647 Linear O2 Sensor Control Chip (Bank 2)
P1648 Knock Sensor Input Chip
P1696 CAN Link Engine Control Module/Cruise Control Module Circuit/Network
P1697 Cruise Control Distance-Control Input Circuit
P1700 Transmission Indeterminate Failure (Failed To Neutral)
P1720 Vehicle Speed ( Meter) Circuit
P1722 Stall Speed
P1726 Engine Overspeed
P1730 Gear Control Malfunction 2,3,5
P1731 Inconsistent Gear Ratio
P1734 Gear Control Malfunction
P1745 Pressure Regulator 1
P1746 Pressure Regulator 2
P1747 Pressure Regulator 3
P1748 Pressure Regulator 5
P1758 Pressure Solenoid Control System Incorrect Current
P1775 Transmission System MIL Fault
P1776 Ignition Retard Request Duration
P1777 Ignition Retard Request Circuit - Read Our Article On Automotive Circuit Testing For Help With This Jaguar Check Engine Light Code
P1778 Transmission Reverse I/P Circuit
P1779 Load Control
P1789 Ignition Supply Malfunction
P1790 Ignition Supply Malfunction
P1791 Ignition Supply Malfunction
P1792 Ignition Supply Malfunction
P1793 Ignition Supply Malfunction
P1794 Battery Voltage Circuit
P1795 Inconsistent CAN Level
P1796 CAN Controller Circuit (Bus Off)
P1797 CAN TCM/ECM Circuit Malfunction - Read Our Article On Automotive Circuit Testing For Help With This Jaguar Check Engine Light Code
P1798 CAN TCM/INST Circuit Malfunction
P1799 CAN TCM/ABS Circuit Malfunction
P1882 Engine Coolant Level Switch Circuit Short To Ground
P-0171
P-0174
P-1000
NOW those codes may meen alot of things but the most common
are vac leaks
the brake booster hose may have got brittle and break
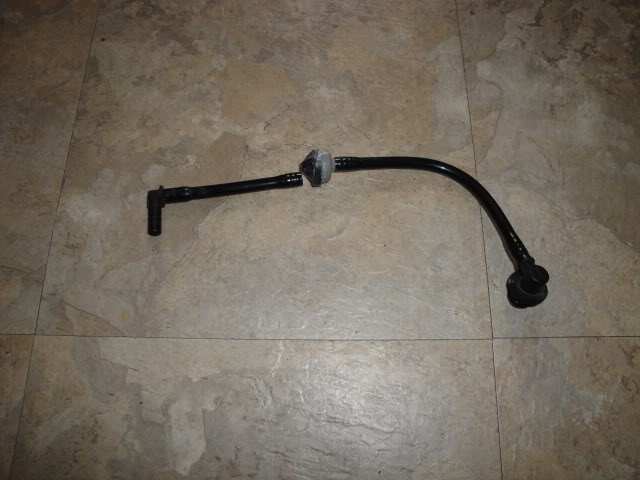
heres a few areas were you may a vac leak

when the check engine light comes on it goes into limp mode ,
to clear codes and get the check engine light of ,you need a code checker
there real cheap ,they pay for them self after one use
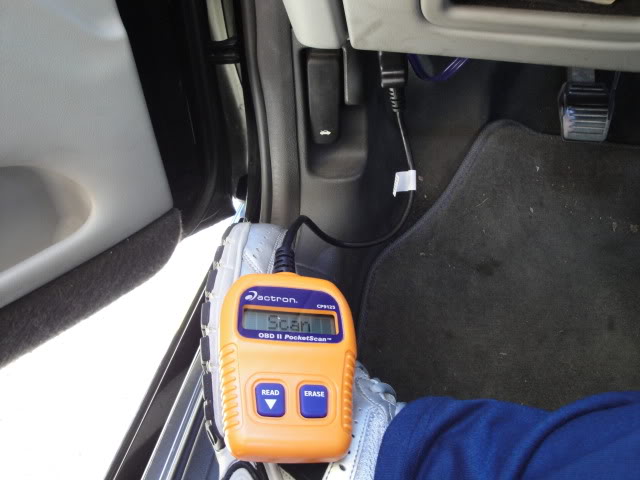
you plug it where the arrow is
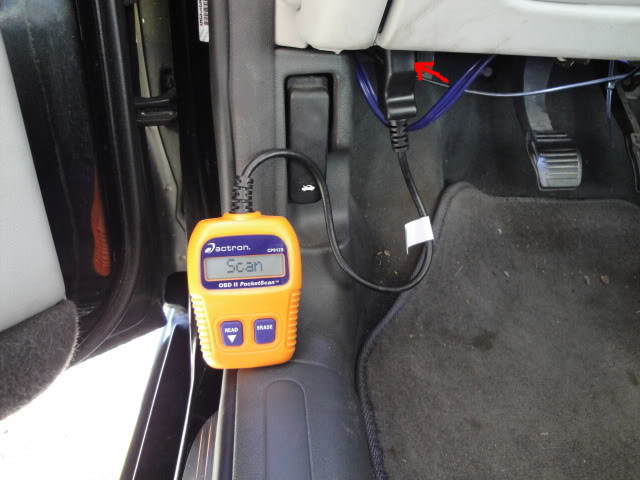
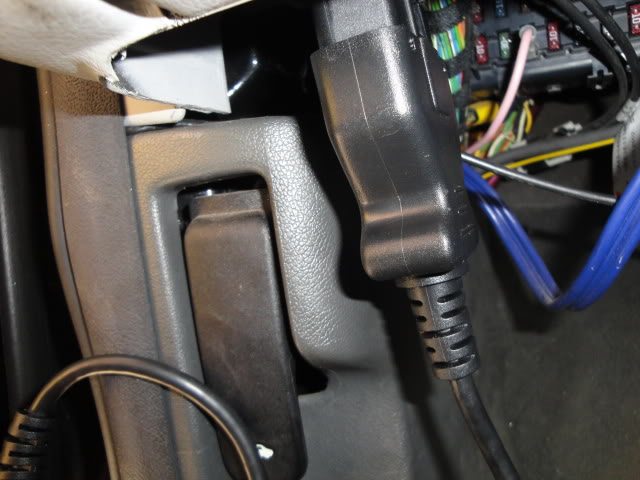
$40 from autozone..actron obd ll cp9125
to check codes and clear codes heres the procedure with actron code reader
1.Turn Ignition Key to the Off Position.
2. Locate and Plug in Data Link
Connector (DLC.)
NOTE: The data link connector
should be located under
the dashboard on the
driverside of the vehicle.
If the data link connector is not located under the
dashboard as stated, a label describing the location of
the data link connector should be there.
3. Observe Display toggles between
“Pocket” and “Scan”.
NOTE: For a correct reading for
Diagnostic Trouble Codes and I/M Monitor Status,
ignition key must be in the ON position and Engine does
not require starting.
To get a correct reading for MIL Status, Engine must be
started.
4. Start Engine.
5. Press READ/Scroll Down Key
and Release.
OFF
ON
! WARNING
Pocket
7
NOTE: If diagnostic trouble codes (DTCs) are already being
displayed from a previous read operation, press and hold
READ/Scroll Down key for 3 seconds and release.
6.Observe a Moving * on Display.
NOTE: If a “No Link” message
displays, cycle ignition key to
the OFF position for 10
seconds, then back ON and repeat “Reading Diagnostic
Data.”
7. View Codes on Display
NOTE: If there are no codes present,
the tool will display “0
Codes” and proceed to
display MIL Status when READ/Scroll Down is
pressed.
• To View Codes press and
release READ/Scroll
Down key.
• If the code is a Pending
Code a ����will be displayed.
*
No Link
P0443
P0452 ��
0 Codes��
3 Codes��
����
����
8
MIL ON ����
8. View MIL Status
• Press and release
READ/Scroll Down
key.
9. View I/M Monitors that are
Incomplete.
• Press and release
READ/Scroll Down
key.
NOTE: If there are no more I/M
Monitors that are Incomplete,
the tool will then display Ready
Monitors when READ/Scroll Down key is pressed.
10. View I/M Monitors that are Ready.
• Press and release
READ/Scroll Down
key.
NOTE: Pressing the ERASE key will scroll up to review
Diagnostic Trouble Codes and Data.
NOTE: Holding READ /Scroll Down key for 3 seconds
will read Diagnostic Trouble Codes and Data again.
Monitrs����
5 Ready
O2 Htr
2 Inc
Misfire
����
����
����
����
9
Erasing Diagnostic Trouble Codes and Data
Erasing allows the PocketScanTM Code Reader to delete the codes
and I/M Monitor status from the vehicle’s computer modules.
Only Erase Diagnostic Data after checking
system completely and writing down results.
Avoid Cooling Fan! Fan may turn on
during test.
1.Turn Ignition Key to the Off Position.
2. Locate and Plug in Data Link
Connector (DLC.)
NOTE: The data link connector
should be located under
the dashboard on the
driverside of the vehicle.
If the data link connector is not located under the
dashboard as stated, a label describing the location of
the data link connector should be there.
3. Observe Display toggles between
“Pocket” and “Scan”.
4.Turn Ignition Key to the ON Position
leaving Engine Off.
NOTE: Make sure that the Ignition Key is
ON and NOT in the Accessory
Position.
IMPORTANT
! WARNING
OFF
ON
OFF ON
Scan
10
5.Press and Hold ERASE Key for
3 Seconds and Release.
6.Observe “ERASE?” Displays.
7.Press and Hold ERASE Key
for 3 Seconds and Release.
8.Observe a Moving - on Display.
NOTE: If a “NO LINK” message
displays, cycle ignition key to
the OFF position for 10
seconds, then back ON, and
repeat “Erasing Diagnostic Data.”
9.Observe “DONE” Displays.
NOTE: If the problem causing Diagnostic Trouble Code(s) still
exists, the code will return. The Diagnostic Trouble
Code may return immediately or may return after vehicle
has been driven.
NOTE: Pressing READ /Scroll Down key will read
Diagnostic Trouble Codes and Data and Holding
ERASE key will erase results again.
11
ERASE?
you may run into codes like
P-0171
P-0174
P-1000
THESE ARE THERE CODES
Manufacturer Specific Codes
P1000 OBD Systems Readiness Test Not Complete
P1104 Mass Air Flow Sensor Circuit Ground - Read Our Article On Automotive Circuit Testing For Help With This Jaguar Check Engine Light Code
P1111 System Pass
P1121 Pedal Position Sensor A Circuit Range/Performance
P1122 Pedal Position Sensor A Circuit Low Input
P1123 Pedal Position Sensor A Circuit High Input
P1136 Control Box Fan Circuit - Read Our Article On Automotive Circuit Testing For Help With This Jaguar Check Engine Light Code
P1137 Lack Of HO2S12 Switches - Sensor Indicates Lean - Read Our Article on Oxygen Sensor Codes For Help With This Jaguar Check Engine Light Code
P1138 Lack Of HO2S12 Switches- Sensor Indicates Rich
P1143 Air Assisted Injector Control Valve Range/Performance
P1144 Air Assisted Injector Control Valve Circuit - Read Our Article On Automotive Circuit Testing For Help With This Jaguar Check Engine Light Code
P1157 Lack Of HO2S22 Switches - Sensor Indicates Lean - Read Our Article on Oxygen Sensor Codes For Help With This Jaguar Check Engine Light Code
P1158 Lack Of HO2S22 Switches - Sensor Indicates Rich
P1171 System Too Lean- Banks 1 And 2 (Lean Fuel Fault)
P1172 System Too Rich - Banks 1 And 2 (Rich Fuel Fault)
P1174 System Too Lean - Banks 1 And 2 (Suspect HO2S)
P1175 System Too Rich - Banks 1 And 2 (Suspect HO2S)
P1176 Long Term Fuel Trim Too Lean - Banks 1 And 2 (FMFR) - Read Our Article on Oxygen Sensor Codes For Help With This Jaguar Check Engine Light Code
P1177 Long Term Fuel Trim Too Rich - Banks 1 And 2 (FMFR)
P1178 Long Term Fuel Trim Too Lean - Banks 1 And 2 (AMFR)
P1179 Long Term Fuel Trim Too Rich - Banks 1 And 2 (AMFR)
P1185 O2 Sensor Heater Circuit Open - Hardware Fault
P1186 O2 Sensor Heater Circuit Shorted- Hardware Fault
P1187 O2 Sensor Heater Circuit Open - Inferred Fault
P1188 O2 Sensor Heater Circuit Resistance
P1189 O2 Sensor Heater Circuit Low Resistance Fault 1
P1190 O2 Sensor Heater Circuit Low Resistance Fault 2
P1191 O2 Sensor Heater Circuit Open - HArdware Fault
P1192 O2 Sensor Heater Circuit Shorted
P1193 O2 Sensor Heater Circuit Open - Inferred Fault
P1194 O2 Sensor Heater Circuit Resistance Fault
P1195 O2 Sensor Heater Circuit Low Resistance Fault 1
P1196 O2 Sensor Heater Circuit Low Resistance Fault 2
P1198 Fuel Level Input Circuit High
P1199 Fuel Level Input Circuit Low
P1201 Cylinder # 1 Injector Circuit Open/Shorted - Read Our Article On Automotive Circuit Testing For Help With This Jaguar Check Engine Light Code
P1202 Cylinder # 2 Injector Circuit Open/Shorted
P1203 Cylinder # 3 Injector Circuit Open/Shorted
P1204 Cylinder # 4 Injector Circuit Open/Shorted
P1205 Cylinder # 5 Injector Circuit Open/Shorted
P1206 Cylinder # 6 Injector Circuit Open/Shorted
P1207 Cylinder # 7 Injector Circuit Open/Shorted
P1208 Cylinder # 8 Injector Circuit Open/Shorted
P1221 Pedal Demand Sensor B Circuit Range/Performance
P1224 Electronic Throttle Control Position Error
P1226 Mechanical Guard Circuit Range/Performance
P1227 Mechanical Guard Circuit Low Input
P1228 Mechanical Guard Circuit High Input
P1229 Electronic Throttle Control Circuit
P1230 Fuel Pump Relay
P1235 VSV 1/2/3 Circuit Range/Performance - Read Our Article On Automotive Circuit Testing For Help With This Jaguar Check Engine Light Code
P1236 VSV 1 Circuit
P1237 VSV 2 Circuit
P1238 VSV 3 Circuit
P1240 Sensor Power Supply
P1241 Sensor Power Supply Low Input
P1242 Sensor Power Supply High Input
P1243 Analog Ground
P1245 Crank Signal Low Input
P1246 Crank Signal High Input
P1250 Throttle Valve Spring
P1251 Throttle Position
P1252 VSV Stuck On VA/VV
P1253 VSV Stuck On VR
P1260 Theft Detected, Vehicle Immobilized
P1313 Misfire Rate Catalyst Damage Fault - Bank 1
P1314 Misfire Rate Catalyst Damage Fault - Bank 2
P1315 Persistent Misfire
P1316 Misfire Rate Exceeds Emissions
P1336 Crankshaft/Camshaft Sensor Range/Performance
P1340 Camshaft Position Sensor B Circuit - Read Our Article On Automotive Circuit Testing For Help With This Jaguar Check Engine Light Code
P1341 Camshaft Position Sensor B Circuit Range/Performance
P1361 Ignition Coil, Cylinder # 1, No Activation
P1362 Ignition Coil, Cylinder # 2, No Activation
P1363 Ignition Coil, Cylinder # 3, No Activation
P1364 Ignition Coil, Cylinder # 4, No Activation
P1365 Ignition Coil, Cylinder # 5, No Activation
P1366 Ignition Coil, Cylinder # 6, No Activation
P1367 Ignition System Failure Group 1
P1368 Ignition System Failure Group 2
P1370 Insufficient RPM Increase During Spark Test
P1371 Ignition Coil - Cylinder 1 - Early Activation Fault
P1372 Ignition Coil - Cylinder 2 - Early Activation Fault
P1373 Ignition Coil - Cylinder 3 - Early Activation Fault
P1374 Ignition Coil - Cylinder 4 - Early Activation Fault
P1375 Ignition Coil - Cylinder 5 - Early Activation Fault
P1376 Ignition Coil - Cylinder 6 - Early Activation Fault
P1384 Variable Valve Timing Solenoid A Circuit - Read Our Article On Automotive Circuit Testing For Help With This Jaguar Check Engine Light Code
P1392 Variable Valve Timing Solenoid A Circuit Low Input
P1393 Variable Valve Timing Solenoid A Circuit High Input
P1396 Variable Valve Timing Solenoid B Circuit
P1397 Variable Valve Timing Solenoid B Circuit Low Input
P1398 Variable Valve Timing Solenoid B Circuit High Input
P1400 Exhaust Gas Recirculation Valve Postion Control
P1401 Exhasut Gas Recirculation Valve Postion Circuit
P1408 Exhaust Gas Recirculation Thermister
P1409 Exhaust Gas Recirculation Valve Circuit - Read Our Article on EGR Valve Codes For Help With This Jaguar Check Engine Light Code
P1440 Purge Valve Stuck Open
P1441 ELC System 1
P1447 ELC System Closure Valve Flow
P1448 ELC System 2
P1453 Fuel Tank Pressure Relief Valve Malfunction
P1454 Evaporative Emission Control System Vacuum Test
P1475 Fan Relay (Low) Circuit
P1476 Fan Relay (High) Circuit
P1508 Idle Air Control Circuit Open
P1509 Idle Air Control Circuit Shorted
P1514 High Load Neutral/Drive Fault
P1516 Gear Change Neutral/Drive Fault
P1517 Cranking Neutral/Drive Fault
P1534 Restraint Deployment Indicator Circuit
P1565 Speed Control Command Switch Out Of Range High
P1566 Speed Control Command Switch Out Range Low
P1567 Speed Control Output Circuit - Read Our Article On Automotive Circuit Testing For Help With This Jaguar Check Engine Light Code
P1568 Speed Control Unable To Hold Speed
P1571 Brake Switch
P1582 Electronic Throttle Monitor Data Available
P1600 Loss Of Kam Power, Circuit Open
P1603 EEPROM Malfunction
P1605 Keep Alive Memory Test Failure
P1606 ECM Control Relay Output Circuit
P1607 MIL Output Circuit
P1608 Watchdog Malfunction
P1609 Internal Control Module CPU To CPU Communication Failure
P1611 Throttle Target Malfunction 1
P1612 Throttle Offset Malfunction
P1637 CAN Link ECM/ABS Control Module Circuit/Network
P1638 CAN Link ECM/INSTM Circuit/Network
P1641 Fuel Pump Primary Circuit
P1642 CAN Link Circuit
P1643 CAN Link Engine Control Module/Transmission Control Module Circuit/Network
P1646 Linear O2 Sensor Control Chip (Bank 1)
P1647 Linear O2 Sensor Control Chip (Bank 2)
P1648 Knock Sensor Input Chip
P1696 CAN Link Engine Control Module/Cruise Control Module Circuit/Network
P1697 Cruise Control Distance-Control Input Circuit
P1700 Transmission Indeterminate Failure (Failed To Neutral)
P1720 Vehicle Speed ( Meter) Circuit
P1722 Stall Speed
P1726 Engine Overspeed
P1730 Gear Control Malfunction 2,3,5
P1731 Inconsistent Gear Ratio
P1734 Gear Control Malfunction
P1745 Pressure Regulator 1
P1746 Pressure Regulator 2
P1747 Pressure Regulator 3
P1748 Pressure Regulator 5
P1758 Pressure Solenoid Control System Incorrect Current
P1775 Transmission System MIL Fault
P1776 Ignition Retard Request Duration
P1777 Ignition Retard Request Circuit - Read Our Article On Automotive Circuit Testing For Help With This Jaguar Check Engine Light Code
P1778 Transmission Reverse I/P Circuit
P1779 Load Control
P1789 Ignition Supply Malfunction
P1790 Ignition Supply Malfunction
P1791 Ignition Supply Malfunction
P1792 Ignition Supply Malfunction
P1793 Ignition Supply Malfunction
P1794 Battery Voltage Circuit
P1795 Inconsistent CAN Level
P1796 CAN Controller Circuit (Bus Off)
P1797 CAN TCM/ECM Circuit Malfunction - Read Our Article On Automotive Circuit Testing For Help With This Jaguar Check Engine Light Code
P1798 CAN TCM/INST Circuit Malfunction
P1799 CAN TCM/ABS Circuit Malfunction
P1882 Engine Coolant Level Switch Circuit Short To Ground
P-0171
P-0174
P-1000
NOW those codes may meen alot of things but the most common
are vac leaks
the brake booster hose may have got brittle and break
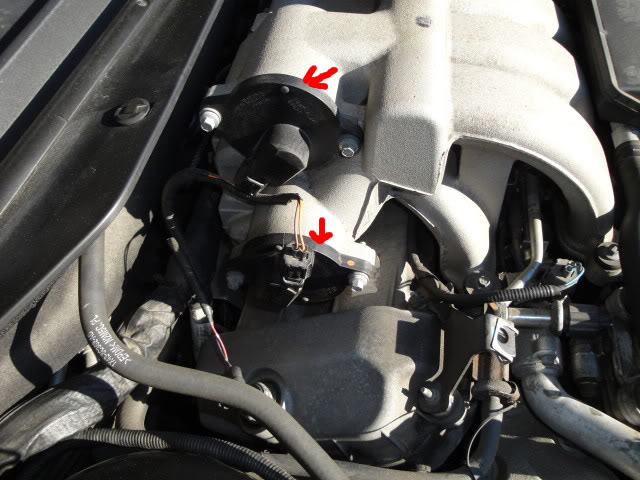
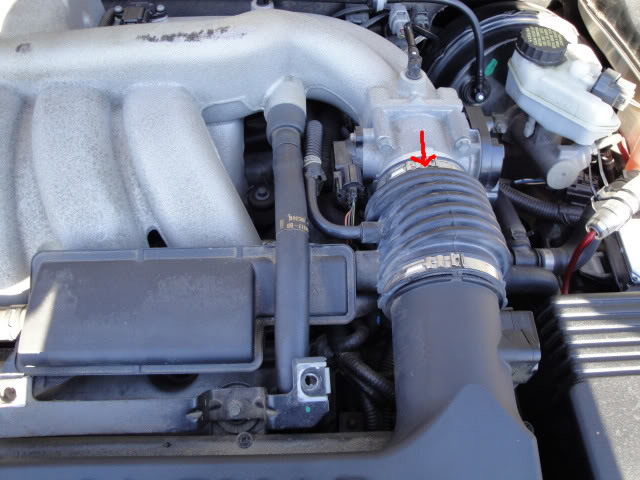
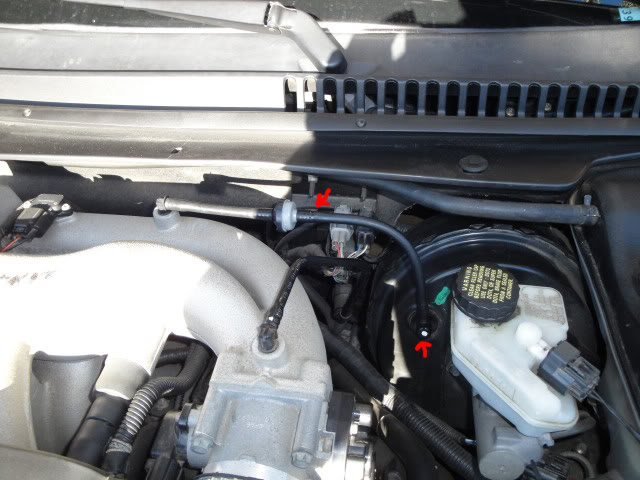
heres a few areas were you may a vac leak
when the check engine light comes on it goes into limp mode ,
to clear codes and get the check engine light of ,you need a code checker
there real cheap ,they pay for them self after one use
you plug it where the arrow is
$40 from autozone..actron obd ll cp9125
to check codes and clear codes heres the procedure with actron code reader
1.Turn Ignition Key to the Off Position.
2. Locate and Plug in Data Link
Connector (DLC.)
NOTE: The data link connector
should be located under
the dashboard on the
driverside of the vehicle.
If the data link connector is not located under the
dashboard as stated, a label describing the location of
the data link connector should be there.
3. Observe Display toggles between
“Pocket” and “Scan”.
NOTE: For a correct reading for
Diagnostic Trouble Codes and I/M Monitor Status,
ignition key must be in the ON position and Engine does
not require starting.
To get a correct reading for MIL Status, Engine must be
started.
4. Start Engine.
5. Press READ/Scroll Down Key
and Release.
OFF
ON
! WARNING
7
NOTE: If diagnostic trouble codes (DTCs) are already being
displayed from a previous read operation, press and hold
READ/Scroll Down key for 3 seconds and release.
6.Observe a Moving * on Display.
NOTE: If a “No Link” message
displays, cycle ignition key to
the OFF position for 10
seconds, then back ON and repeat “Reading Diagnostic
Data.”
7. View Codes on Display
NOTE: If there are no codes present,
the tool will display “0
Codes” and proceed to
display MIL Status when READ/Scroll Down is
pressed.
• To View Codes press and
release READ/Scroll
Down key.
• If the code is a Pending
Code a ����will be displayed.
*
No Link
P0443
P0452 ��
0 Codes��
3 Codes��
����
����
8
MIL ON ����
8. View MIL Status
• Press and release
READ/Scroll Down
key.
9. View I/M Monitors that are
Incomplete.
• Press and release
READ/Scroll Down
key.
NOTE: If there are no more I/M
Monitors that are Incomplete,
the tool will then display Ready
Monitors when READ/Scroll Down key is pressed.
10. View I/M Monitors that are Ready.
• Press and release
READ/Scroll Down
key.
NOTE: Pressing the ERASE key will scroll up to review
Diagnostic Trouble Codes and Data.
NOTE: Holding READ /Scroll Down key for 3 seconds
will read Diagnostic Trouble Codes and Data again.
Monitrs����
5 Ready
O2 Htr
2 Inc
Misfire
����
����
����
����
9
Erasing Diagnostic Trouble Codes and Data
Erasing allows the PocketScanTM Code Reader to delete the codes
and I/M Monitor status from the vehicle’s computer modules.
Only Erase Diagnostic Data after checking
system completely and writing down results.
Avoid Cooling Fan! Fan may turn on
during test.
1.Turn Ignition Key to the Off Position.
2. Locate and Plug in Data Link
Connector (DLC.)
NOTE: The data link connector
should be located under
the dashboard on the
driverside of the vehicle.
If the data link connector is not located under the
dashboard as stated, a label describing the location of
the data link connector should be there.
3. Observe Display toggles between
“Pocket” and “Scan”.
4.Turn Ignition Key to the ON Position
leaving Engine Off.
NOTE: Make sure that the Ignition Key is
ON and NOT in the Accessory
Position.
IMPORTANT
! WARNING
OFF
ON
OFF ON
Scan
10
5.Press and Hold ERASE Key for
3 Seconds and Release.
6.Observe “ERASE?” Displays.
7.Press and Hold ERASE Key
for 3 Seconds and Release.
8.Observe a Moving - on Display.
NOTE: If a “NO LINK” message
displays, cycle ignition key to
the OFF position for 10
seconds, then back ON, and
repeat “Erasing Diagnostic Data.”
9.Observe “DONE” Displays.
NOTE: If the problem causing Diagnostic Trouble Code(s) still
exists, the code will return. The Diagnostic Trouble
Code may return immediately or may return after vehicle
has been driven.
NOTE: Pressing READ /Scroll Down key will read
Diagnostic Trouble Codes and Data and Holding
ERASE key will erase results again.
11
ERASE?
Last edited by dennis black; Oct 4, 2009 at 03:51 PM.

Junior Member
Joined: Feb 2008
Posts: 21
Likes: 2
From: Ohio


Do you think this would work? http://www.sonicelectronix.com/item_...S-BTA200-.html