When you click on links to various merchants on this site and make a purchase, this can result in this site earning a commission. Affiliate programs and affiliations include, but are not limited to, the eBay Partner Network.
A few weeks ago I replace my radio/CD player with a used one (TY Dr.). The display came up and worked fine, unlike my old one that had no desplay.
This weekend I drove my car at night, for the first time, and could not read the raido display. It was 50% less light then the display on my heator/AC display. Yes, I made sure that the dash light POT was all the way up (it does adjust the raido when turned).
Thinking that a burned out lamp/LED maybe the problem I took apart my old raido to see what it looks like. The display is soldered to the mail board. I will need to remove it to see if any thing is servicable from the back. But dought it is servicable.
I have read many posts that have this same dim display problem. Is this just how they all work????
Larry, was the display just dim or did it seem to flicker at all? Reason I ask is that maybe one of the solder joints is cracked on the display causing it to be dim. Without seeing it I can't say with any certainty, but I am guessing that if you are handy with a soldering iron and have some patience you could remove the display and find another through an electronics distributor. Chances are that display would be pretty generic. On the other hand, buying another used radio might be the way to go to avoid the time and hassle of doing all that. They aren't very expensive and appear readily available. You could always ask Dr. Dome.
No flickering at all. I do some board level repair at work and will pull this apart to see how the display works. The display may have been an off the shelf display, but that was 13 years ago. In the electronics world that may as well be 200 years ago. But I will still try.
"The DR" is who got me this radio. : )
Does anyone know who makes the radio or have a schematic for it?
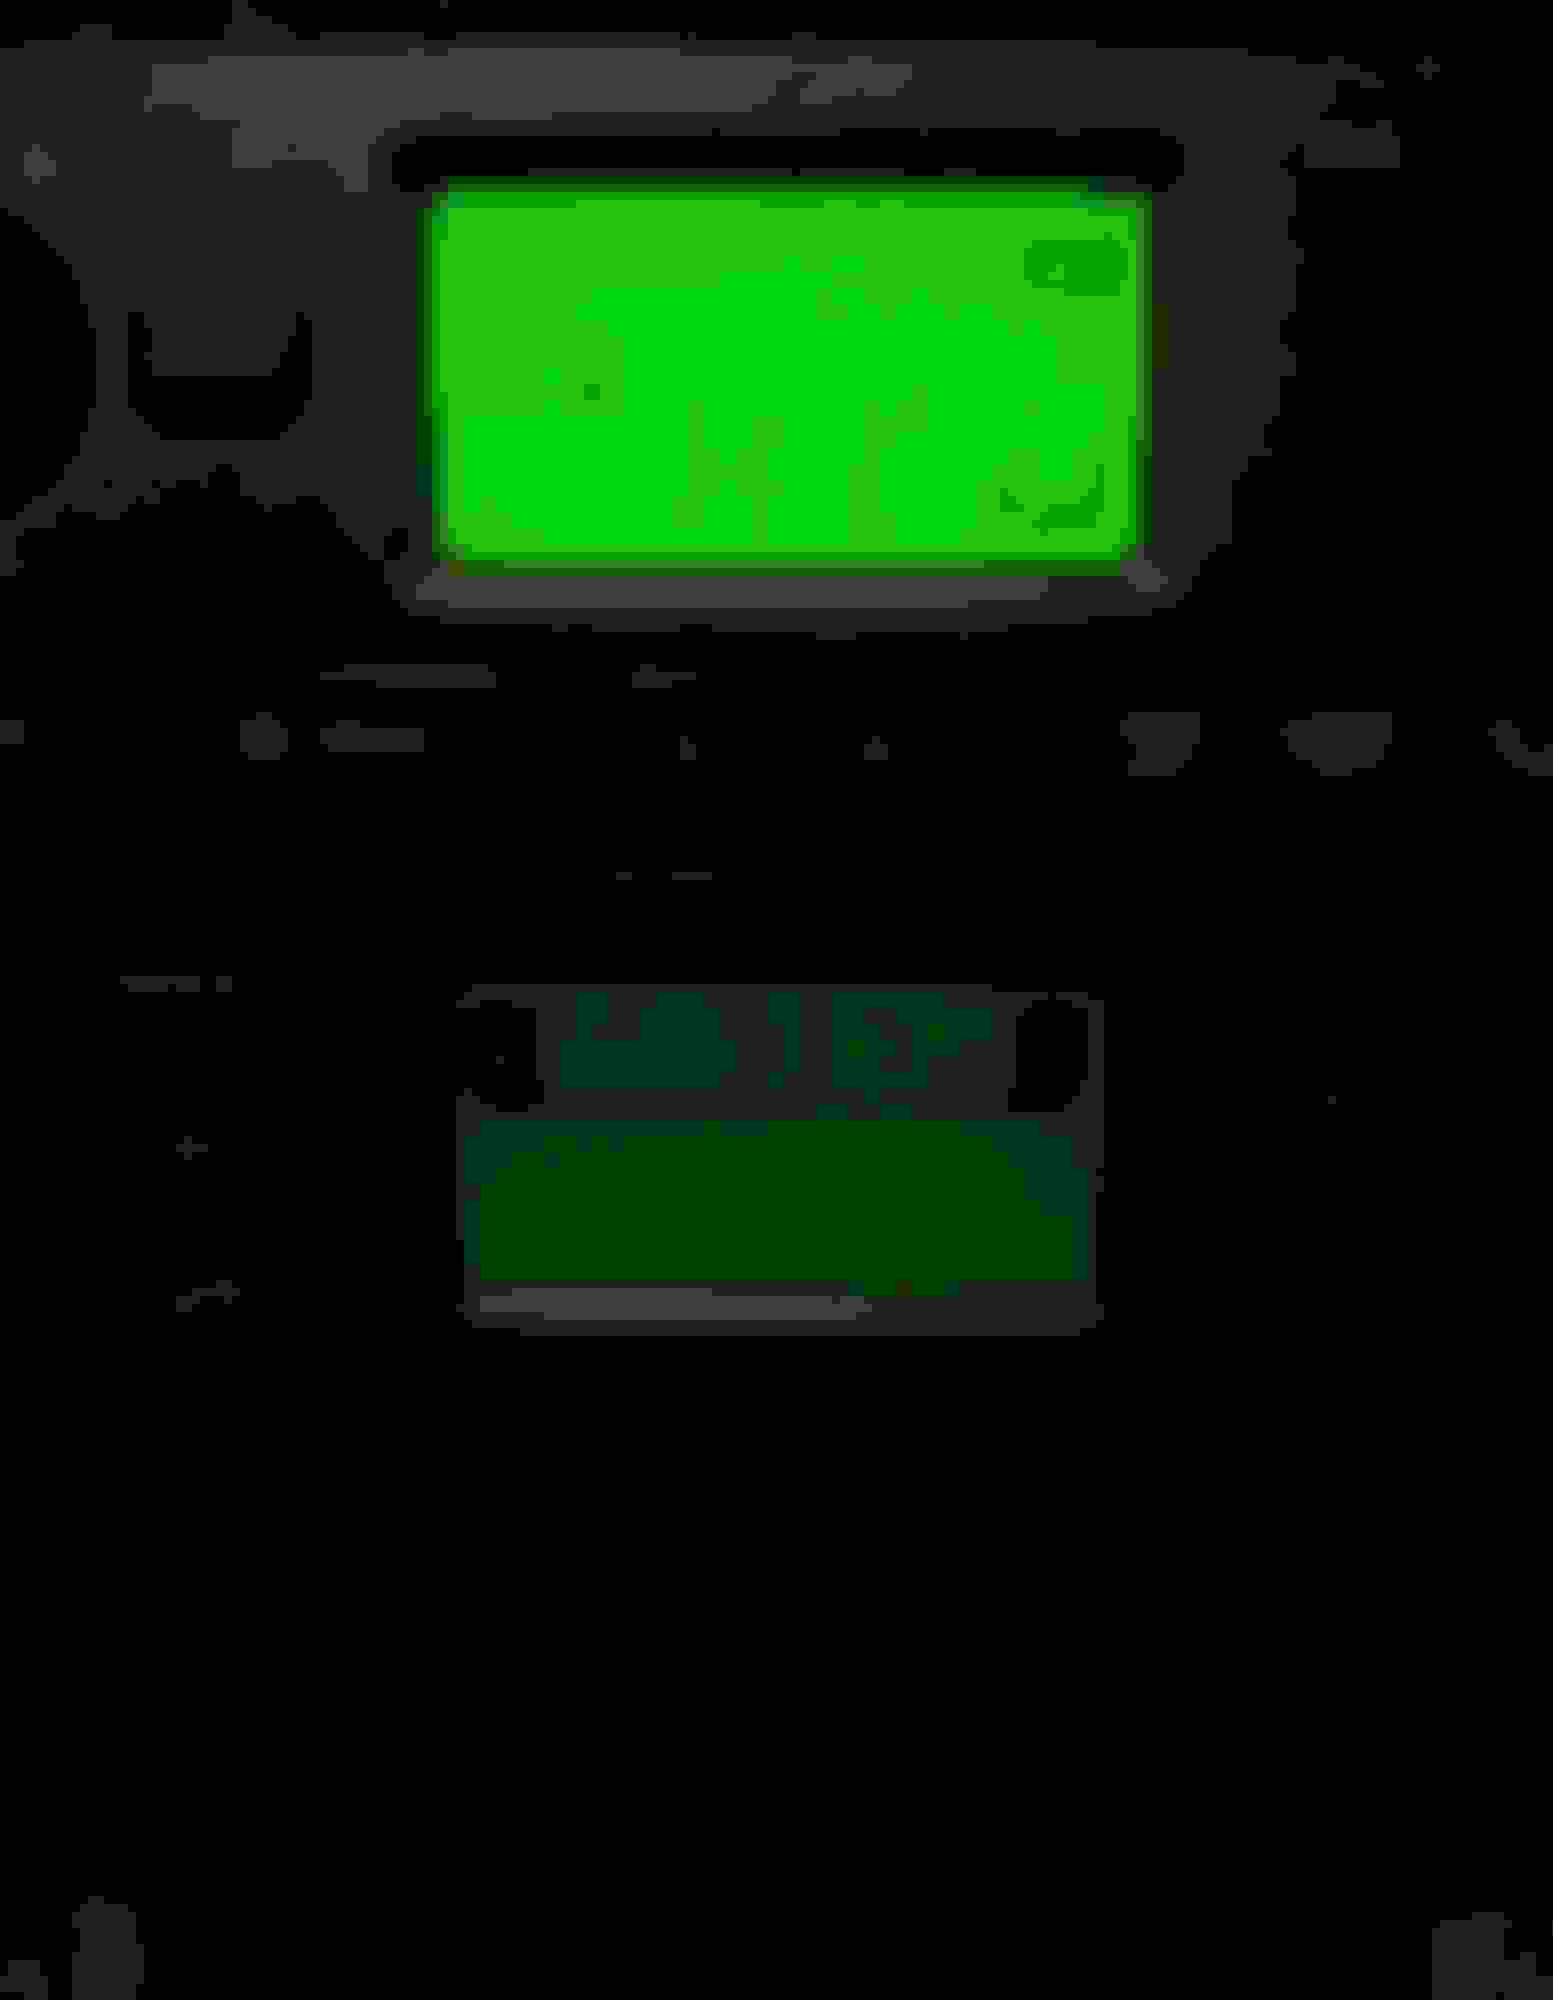
Lets see if this photo shows the problem...
Last edited by Larry-Cleveland; Jan 6, 2016 at 11:07 AM.
Reason: sphellin
I am anxious to see result here. My lower display where clock and radio frequency are will not light up when headlights are on. Otherwise in daytime it works fine. Mine isn't dim, it won't light up at all
I don't know how the two are related but I took out the bulb in my glove box which was not lighting when the glove box was opened and tested it for continuity and meter showed bulb was good. I firmly reinserted the bulb in glove box fixture and next time I opened glove box the light works. Now so does my audio system display screen!
Not good news at all. I found time to disassemble the radio display. It comes apart EZ if your use to working on circuit boards. As you will see in the photos there are NO lamps, at all, in the display. Everything is built into the LCD display.There are no markings on the display. I did not see and manufacture markings on the radio. I feel it would be rather hard to find this display without more info.
Well at least this put to rest all the postings about changing out the lamps L Should the admins want this to be a sticky let me know and I will clean it up.
Hope the photos show up...
Last edited by Larry-Cleveland; Feb 4, 2016 at 11:50 AM.
Working then not working is then likely a bad connection. But where?? From a bad solder joint in the radio to a poor connection on one of 100 plugs under the dash.
When I am done putting the radio back together I will test it in my car to see if any of the solder joints i worked on fixed it....never know. I will also check out the plug from the display panel onto the radio.
It was time to clean off my work bench. Sitting there was the Heat/AC control panel (non nav). I decided to take it apart on the chance that the LCD display is the same as the radio. It is EZ to take apart, but you do need a small spline wrench to remove the screws. The LCD is different. It looks to be from the same manufacture as the radio LCD but has a different connection. It to does not have lamps to light it up. It is all in the LCD panel.
An other thing that is different from the radio is that it has a plastic screen in front of the LCD. Taking it apart allowed me to clean some crud that was on the screen.
Last edited by Larry-Cleveland; Feb 18, 2016 at 11:33 AM.
don't know if its still relevant to you guys on here, but i found a way around the problem, mine flickered for a while, then stopped working all together, i took mine apart as i was fed up with not being able to see the display at night.. as we all know, you don't need the backlight during the day as the display is clear enough without it, and my bodge doesn't require you to remove the LCD either, just dismantle enough to get at the circuit board, it is possible to connect the screen backlight to your button lights circuit and have it come on with your side lights like the buttons do, if you're half handy with a soldering iron and a Stanley blade you can do the job in 5 minutes once you can get at the board.. ok so it doesn't work like it originally did, but lets face it, you only need the backlight in the dark.. lol.. its not quite as bright as the heating unit display, but is bright enough to see clearly, i did take pics of where to change the circuit and the end result after refitting the stereo if anyone needs them
(you only need a piece of wire about 1.5 inches long, a soldering iron and a sharp blade to seperate the original circuit)
As requested for future users who have the same problem...
You do not need to strip it down this far to do my work around, this next pic is for info only..
You don't even need to remove the plastic fascia with the buttons etc in.. just remove the front complete from the unit to get at the back of the circuit board..
this bit is for safety, to prevent power going to the wrong places
cut through the circuit track to separate the circuit from the rest (make sure there is no connection between the two parts of the track)
clean off the protective coating on the two tracks shown in the picture (I used a Stanley blade) ready to solder a link across the two..
if you have successfully soldered the two tracks as shown your screen back light is now connected to the button light circuit and should work when you turn your lights on
Its not as bright as the heater control screen, but is bright enough to see clearly (picture was taken in the dark with no flash on my phone, looks better in the car) and the back-light comes on with the side lights..
Thanks Les R, Possibly the voltage reaching the row of LEDs is not sufficient. I will try to make the same connection but directly to 12 volts. Mine is not turned off at all, just very low lighting.
Bonjour,
Avez-vous trouv� si l�alimentation en 12v permet de retrouver un �clairage correct ?
Good morning,
Have you found out if the 12v power supply provides correct lighting?