

Is there a "how-to" on battery cable building for the x-type?


Thread Starter
|
Member
Joined: Apr 2010
Posts: 71
Likes: 1
From: DFW
I'm pretty sure that my problem is the common cable issue our cars have, so rather than spend $200 on way over-priced cables I thought I would try to buy some after-market ones. Problem is, that none of them look like ours!
I think I need to make my own. I'm pretty handy with that kind of stuff, but I need a picture and measurements at least to get this started. I can't really take it off my car, because my wife drives it to work everyday. Any help would be wonderful. I may just upgrade the wire size all around to help the system out too (do the big 3 upgrade). I've done it on other cars and it's helped increase performance a touch.
I think I need to make my own. I'm pretty handy with that kind of stuff, but I need a picture and measurements at least to get this started. I can't really take it off my car, because my wife drives it to work everyday. Any help would be wonderful. I may just upgrade the wire size all around to help the system out too (do the big 3 upgrade). I've done it on other cars and it's helped increase performance a touch.


Joined: Dec 2011
Posts: 120,439
Likes: 17,003
From: Durham, UK
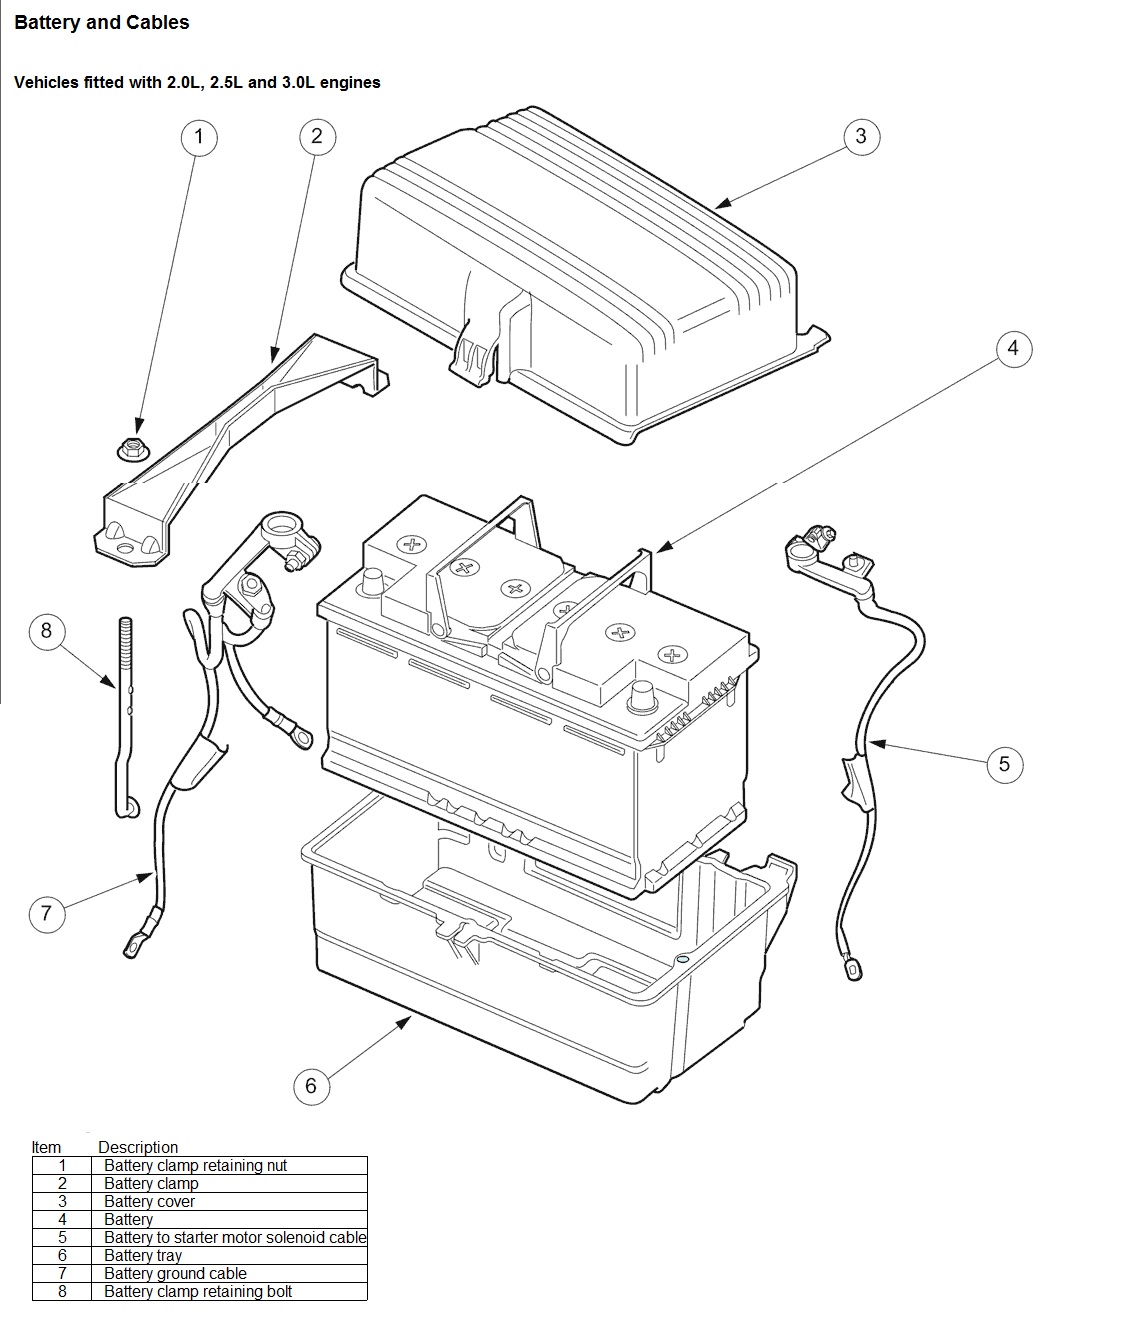
This diagram from JTIS showing the shapes of the cables for the 2.0 , 2.5 and 3.0 litre engine models might help:
(click on the image to enlarge it)
The Ground Cable looks to be a complicated shape!
Graham
(click on the image to enlarge it)
The Ground Cable looks to be a complicated shape!
Graham

Its not the neg but the positive that goes from batt, to alt, to starter. Neg is 2 point grounds. Personally ide just find the cheapest oems and be done. Every connection you make thats not soldered/molded increases resistance and chance of failure down the road
Thread Starter
|
Member
Joined: Apr 2010
Posts: 71
Likes: 1
From: DFW
Any idea if they've improved the cables, though? It has roughly 65,000 miles on it and I'd hate to think that it would fail again. Especially since I'm now in the Texas heat to accelerate things.
I've found a set for $145 shipped. Is that the lowest price that any of you have seen?
I've found a set for $145 shipped. Is that the lowest price that any of you have seen?
Veteran member


Joined: May 2008
Posts: 14,803
Likes: 4,100
From: Great Mills, MD
slenser, I would say your best bet would be to first start off at a car stereo shop and ask them for about 6 feet of both red and black 2 gauge wire. This is going to be a little pricey as it will probably cost you about $5 a foot to get this cable. If you are trying to save money, you may want to get a more precise measurement and then give yourself say an extra 6" or so to play with. From there, you can run to your local auto parts store or marine/boat store and get yourself the cable ends. From there, I would say to get yourself a propane torch and some 63/37 rosin core solder. From there, you can use the torch to heat up the connector (apply heat to the end of the connector) and then let the heat travel up the connector and into the cable. You can touch the solder to the connector (on the inside) to allow it to fill the gaps between the connector and the cable. Do this to each spot you need to attach something.
Then, as a final touch, where you have the metal connector getting close to the plastic insulation, get yourself some "Raychem WCSF-500". This is essentially shrink tubing on steroids. When you see it, you will understand what I am meaning by this. Cut yourself 2" pieces, slide them so the Raychem is just starting where the connector becomes a round tube and then let the rest of the Raychem rest on the insulation. You can use a hair dryer or the propane torch to shrink this down. What you are wanting is to get it hot enough that it will form a little orange "donut" where the Raychem ends. This will seal the insulation to the connector and not allow water to get under the insulation and corrode the wiring from the inside (which is what happens to the factory wiring).
You can probably get away with say 4 gauge wire, but I would not recommend going any smaller than that. You can step up to 0 gauge wire, but you may find that the cost of that will start to get pretty high. But, take a look. Never know. The reason why I recommend the car stereo wiring over some of the other cabling out there (you can pick up cable that would work at Lowes/Home Depot) is that the car stereo cabling will be very soft and will bend very easily where the other stuff will be very stiff and hard to manipulate if you ever have to do something with the battery. Granted, the stiffer stuff is nice as once you form it, it will stay right where you put it. The other down side is that the stiff wire will also be more prone to breakage if you are taking it across the motor as the motor does flex a little bit as you drive the car, stressing the wiring.
If you have any other questions about cabling, let me know.

Thread
Thread Starter
Forum
Replies
Last Post
Wolfy
XJ ( X351 )
58
May 28, 2024 08:06 AM
Guy-Pierre Boucher
XJ XJ6 / XJ8 / XJR ( X350 & X358 )
7
Sep 16, 2015 05:55 PM
Currently Active Users Viewing This Thread: 1 (0 members and 1 guests)