Replaced front lower control arms on 2009 XF
#1
#3
#5
#6
#7
Trending Topics
#8
#11
Just did this job on one of my XF's with 77K miles.
It's not so easy on the 2011 XF with the 5.0L engine because the dummies mounted the transmission cooler on the driver's side with a bolt that goes down and blocks the suspension bolt on the front end of the control arm from coming out.
And that bolt is not accessible without removing the transmission cooler. Once you release the cooler, it's still in the way of accessing that bolt. I used a long pry bar to keep it raised up while I used one of my specially angled 13mm wrenches to undo the bolt a 1/5 of a turn at a time until there was clearance.
Real pain in the butt. The passenger side is a breeze.
The following users liked this post:
Reaxions (03-04-2022)
#12
Just did this job on one of my XF's with 77K miles.
It's not so easy on the 2011 XF with the 5.0L engine because the dummies mounted the transmission cooler on the driver's side with a bolt that goes down and blocks the suspension bolt on the front end of the control arm from coming out.
And that bolt is not accessible without removing the transmission cooler. Once you release the cooler, it's still in the way of accessing that bolt. I used a long pry bar to keep it raised up while I used one of my specially angled 13mm wrenches to undo the bolt a 1/5 of a turn at a time until there was clearance.
Real pain in the butt. The passenger side is a breeze.
It's not so easy on the 2011 XF with the 5.0L engine because the dummies mounted the transmission cooler on the driver's side with a bolt that goes down and blocks the suspension bolt on the front end of the control arm from coming out.
And that bolt is not accessible without removing the transmission cooler. Once you release the cooler, it's still in the way of accessing that bolt. I used a long pry bar to keep it raised up while I used one of my specially angled 13mm wrenches to undo the bolt a 1/5 of a turn at a time until there was clearance.
Real pain in the butt. The passenger side is a breeze.
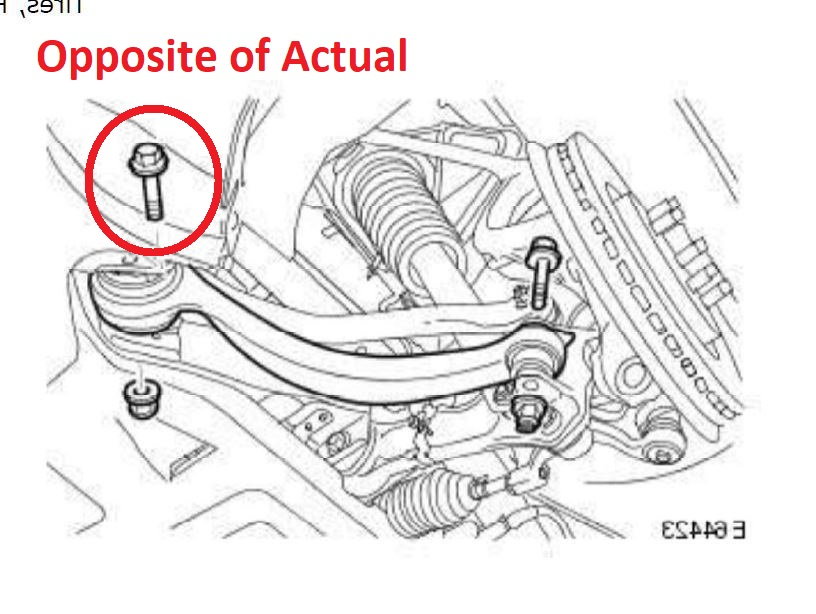
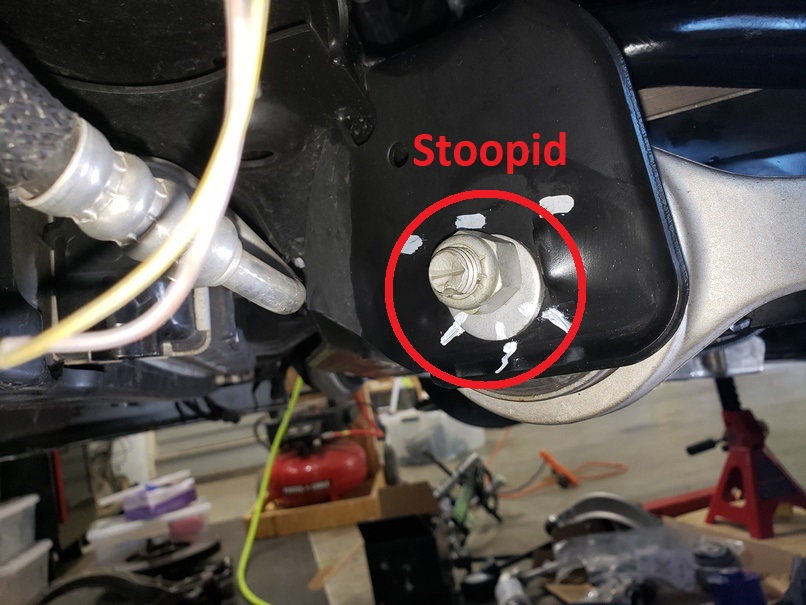
For those yet unafflicted, I'll explain a little more... the driver-side (U.S.) lower front control arm on my XFR (and apparently other models with the 5.0 engine) has a bolt that has to be accessed through the subframe. It wasn't designed that way, but the way it was stoopidly assembled means that the bolt was installed through the subframe, rather than the nut, which is reverse of what it was meant to be.
It wouldn't be so horrible, except that the transmission cooler prevents removal of the long control arm bolt. So, to remove the control arm bolt, the trans cooler AND the trans cooler base (two separate parts) have to be lifted (but not completely removed). Why? Because the trans cooler slides into, and is then bolted onto, the trans cooler base, which is subsequently bolted onto the subframe. To make it worse, the trans cooler base doesn't actually bolt onto the subframe, but rather some sort of floating/rotating nut inside of the subframe (again, why???), which blocks the control arm bolt from being pulled through the subframe.
So, because of the oompa-loompa assembly, I had to grab the floating trans cooler base nut inside of the small subframe hole with some small vice grips while trying to remove the control arm bolt with a flex-head ratchet, while also keeping the trans cooler jacked up off of the base.
What gave away that the assembly was screwed up (besides toddler-age common sense), was when I looked it up in the workshop manual out of sheer confused exasperation. In the manual, it clearly has the bolt going the other way through the control arm, with the nut being closer to the subframe, etc. As it's on the driver-side in the U.S., I flipped the image taken from the manual to make it clearer - the image from the manual is how it should've been done, so that the trans cooler bolt doesn't interfere with the control arm bolt removal. The image below the image from the manual is how it was mistakenly assembled. This assembly error was a complete time burglar. Boooo!!!


Thread
Thread Starter
Forum
Replies
Last Post
Currently Active Users Viewing This Thread: 1 (0 members and 1 guests)


