When you click on links to various merchants on this site and make a purchase, this can result in this site earning a commission. Affiliate programs and affiliations include, but are not limited to, the eBay Partner Network.
I installed this exact kit a few weeks ago.
It's really easy.
The four side pieces are simply placed over the top (in front of) of the existing black plastic pieces then held on with small stainless steel self tapping screws, which come supplied with the kit. Just be sure to line the pieces up spot on before you start putting the screws in. I put two screws in each piece, one at each end.
The central piece involves a little more work, as you need to remove the plastic front undertray and then the rectangular plastic "box" under that, to access the back of the existing black plastic grille piece (which again stays in place). No need to remove the bumper/grille. Once the two bits of plastic are removed the central piece is fitted via three bolts and nuts. The piece has three bolts/threads welded onto it which pass through the holes/gaps in the existing plastic grille piece. You attach two small black painted mounting blocks to each bolt, one in front of the existing grille piece and one behind it, with washers, then put the nuts on the back and do them up. Sounds complicated but it's actually quite easy. Just make sure your have it evenly placed as is it's not a real tight fit and there is a little room to move side to side.
I made my own six months ago and they're holding up well.
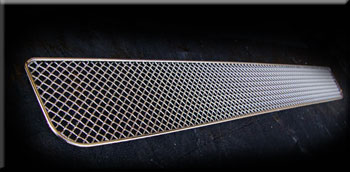
"Right from the start I was a little horrified that the grille on a premium car was... chromed plastic and not woven stainless mesh.
I hate the black plastic under grilles too. They just look cheap and dirty.
At first I plast dipped the main grille black to see how I liked it, but in the end I decided I liked the 'bright' look better,s o stripped it off.
Then I was stuck with the black plastic below.
I decided to get some stainless mesh and do it myself as the ones you can buy, although nice, are close to, well, they cost a lot a for a bit of mesh.
Yesterday I'd had enough and went down to the local AutoBarn and bought a sheet of universal alloy mesh. I've used it before as a radiator guard on my bikes, and a grille insert on a Honda Accord Euro.
Ir cost $25.
Then I went to the rubber shop and bought 4 metres of pinchweld rubber beading.
$20.
I went home and made some paper templates, cut the mesh with heavy scissors, applied the beading and siliconed them in.
About an hours work.
For a grand total of $45 I probably saved $400 or more.
I still intend to get some proper stainless wire mesh to do it properly, but at least the alloy is better than plastic for the time being."
I like the mesh grill - nice work
You mention that you made your own DRLs but I don't see them on the car. How did you make them? And can you post pictures?
No that was somebody else. I don't have the DRLs. I do remember seeing a thred somewhere though of someone who drilled out the stock blades and inserted a light strip though.
Good afternoon I really like what you did to your vehicle. I have already purchased one out of the five pieces lol would you happen to know where I could get some more or a whole set? I have a 2010 jaguar XF just trying to make it look better either way thank you for your time.