When you click on links to various merchants on this site and make a purchase, this can result in this site earning a commission. Affiliate programs and affiliations include, but are not limited to, the eBay Partner Network.
All of this information is out there to find if you search through lots of different forum threads on various sites, but I thought a single up-to-date (as of May 2016) walkthrough would be useful for others. Sorry for the length - I wanted to cover all the detail in one place.
Background on IAMs
The X351 from launch was fitted with an IAM v2.1 Ford Integrated Audio Module as the heart of the infotainment system. The same modules were fitted to the original XF (X250) from launch. I believe the XJ was only ever fitted with the CD option, but I am not sure about the XF.
With the 2013MY the module was replaced with an IAM v2.1 Level 3 module. The XF and F Type also got that module around the same time.
With 2016MY the incontrol software was offered and the infotainment hardware changed to two types of module - an IAM or a new audio module that moved to the boot. I don't have a car with that latter option so have not been able to test with that. I would expect the process to be very similar if not identical.
The IAM2.1 and 2.1 Level 3 have been fitted to most PAG vehicles - Ford, JLR, Mazda, Volvo, etc. They are not the same modules as the hardware is not totally identical. You can tell by the model number which is printed on the top. If it starts "BVJ" it was built for JLR, if it starts "BVV" it was built for Volvo, etc.
I've done identical DAB retrofits to two X351s, one with model BVJG101A and one with BVJG101B IAMs, both Level 3s. The latter was actually sourced from a Range Rover and retrofitted in place of the IAM 2.1 fitted to the 2010 X351 in my signature when I upgraded from the dangerously slow touchscreen fitted to earlier vehicles form the factory.
Adding DAB consists of two steps:
1) Adding the hardware and wiring.
2) Enabling the option in the car's CCF data.
Step 1 - hardware
Some markets may have come with a "DAB prep" option, which means the wiring will be present and the optical MOST network will have a loopback plug fitted. Check your vehicle details for free on TOPIx by entering the VIN and then clicking on the "detailed info" icon. If it mentiones "DAB prep" you only need to buy the DAB module itself as I believe the antenna will be preinstalled for your market. For the rest of us we need to add the wiring and antenna. I don't think there was an SDARS prep option, even though the wiring is identical the antenna are not.
There are two antenna - one fits in the sigma pod on the rear windscreen for early cars (or in the sharkfin for later ones) and one that is located in the LH C pillar and uses the antenna printed onto the rear glass.
To find out which antenna part numbers you need to source use JEPC. The 12/2013 version is freely available on the Internet, but you can find up to 04/2016 from Russian sources for a small fee.
For the UK pre-sharkfin the parts are C2D3004 for the sigmal pod and C2D2984 for the printed antenna module. They are about �50 each. If you only want UK radio then you can omit the first as we don't broadcast on that band in the UK.
The connectors are all standard fakra ones. For the DAB antenna in the sigma pod you want the pink/H variant and for the printed antenna you want the purple/violet/D variant. SDARS will be different. All are females, and the Molex 73403 series are readily available for little money. Use RG174/50ohm coaxial cable and some 3.175mm hexagonal clamps to mount them. Nipex 97 52 50 are nice ones. If they are too expensive then you can solder the retaining rings onto the rear of the main connector.
If you have a maplins or equivalent who can make lengths of terminated cable for you then even better. The length of the roof pod antenna cable is apprximately 1.8m and needs a fakra/H on one end and any fakra on the other, and the other cable is 1.2m and needs a fakra/D (for DAB) on one end, and any on the other. All are female. (The reason for the 'any' bit is that you will not retain the plastic part, only the inner connector.
Run the roof cable along the headlining and then down the C pillar with the second one. Then tape both to the existing harness and feed through the bulkhead behind the rear left seat back. Run along the same harness until you see the branch off for the amplifier and that is where the DAB module will mount. Some Tesa fabric harness tape is a good idea for areas where the cables contact metal or plastic trim to stop rattles and protect against wear.
The DAB module is WERS #-14720-B#. The ones ending revision A will still work, but have different power connectors. The ones with green connectors are the later ones, and AFAIK should all be DAB+ but someone who can cross reference WERS with JLR part numbers can confirm that. Earlier ones will have black connectors. As with the IAMs the same basic hardware is used across lots of PAG vehicles. Expect to pay �70 on eBay. Both of the ones I have fitted came from Land Rover vehicles. I don't know about the SDARS modules, but on TOPIx they look identical (obviously different part nos).
The green connector for the wiring is part number YPC108210. I've not been able to identify the series to get the pin part number, however if you search for YPC10526 you will find a kit for a 5 way variant of the same series which comes with pins.
I think the connectors are JAE IL-AG5 Series or similar. http://www.jae.com/jccom/en/connecto...AG5/Automotive
Use the wiring schematics to locate a suitable power feed. If you have TV fitted then the OEM supply is the same and the module is nearby so easy to splice into, otherwise you can use the power feed from the amp. The ground is the one nearest the module. The two antenna cables plug in (remove the plastic housing and use tape to ensure they wont pop out). From testing it didn't seem to matter which one was connected to which socket.
The MOST optical link connector is the standard part used on every MOST-equipped car I have ever worked on, so the connectors and spare optical links are readily available for peanuts. You will need 1 male connector and one length of fibre approximately 40cm long. If you don't know what to look for then the first eBay numbers that came up in a search are 181950971187 and 222087200315 respectively, but you may find cheaper if you look around. The order of the modules on the MOST network is important, and is based on the different modules in your car. Use the schematic to work out which in/out (rx/tx) sequence you need, and configure yours to match.
You can buy the OEM mounting bracket C2D39188 for �30, or screw it to the rear of the side carpet with some M6 screws/bolts.
That is it for the hardware side. Once you've got all the bits it takes about 30 minutes to install.
Step 2 - software
Start by testing your original FM radio still works. If it doesn't then the wiring (or quite likely the MOST ring) is not right so fix that first. Once that it working you need to tell the car that DAB/SDARS is fitted so it shows the options. This is done by editing the CCF data to show it is fitted. CCF data is basically the DNA of the car, with each byte being equivalent to a gene which determines a characteristic. There are hundreds of bytes you can set, but be extremely careful that you do not accidentally change something unintended and brick your car.
It is easier to get it wrong than right because there is a lot of ambiguity between byte names. For example there are three DAB bytes, but only 1 is used by the IAM to enable it.
I use SDD and a VCM interface. I would highly recommend using SDD (you can use cheaper interfaces). You can download it for free from JLR, but you will need to buy a programming license from TOPIx in order to use it. (There are downloads available with software cracks that enable the functionality without a license, however they are older versions and personally I would not try and flash software to my car using an older version.)
Open a new SDD session and once the vehicle has been scanned start a diagnostics session. Click on the yellow key icon on the left to gain access to the coded access password screen. It will contain two bits of information - the vehicle VIN and the session seed number. You need to use both to obtain a password. Dealers can phone tech support and get a code but independants cannot, so you will need to use an unofficial method. I won't link to the password generator here but you can find it by searching online for "sdd seed password". It costs a few � to generate the password but it is not expensive. Once you have the password enter it carefully and you will find the session bar at the base of the SDD window will change to yellow to indicate you have full access to all of SDDs functionality.
Note if you enter the password incorrectly when you reopen the window to enter it again the seed will have changed and you will need to buy a new password. Therefore double check it (copy/paste is a good idea).
There is a way to gain access to the CCF editor without gaining coded access via a method you can find by searching online for "SDD CCF SoftwareDownload". I do not recommend using that approach if this is the first and only time you will be editing the CCF as it makes it incredibly easy to brick your car. If you take that route, pay particular attention to the following:
BACK UP YOUR CCF ON PAPER BEFORE CHANGING ANYTHING.
When you started your SDD session it connected to JLR's servers and downloaded a copy of your AS-BUILT CCF data. In the session folder on your hard disk it will contain the CCF data that was coded to your car when it left the factory. You can use that to restore damaged CCF data, however you will lose all personalisation and will need to go through the new car prep process again. Whilst that file is good to have, I always print out a human-readable copy of the CCF options before changing anything so I have a permanent reference that is not dependant on having an active SDD programming subscription on TOPIx. To get the printed version click on "Session" at the top of SDD and then find the view basic info option. Scroll down to the CCF bit and click the button to show it. You can then copy that table into Wordpad or similar and print it out neatly formatted into a table.
Back to SDD - once you have gained coded access move to the Service menu at the end and run the 'Edit current car configuration file' option. Follow the prompts carefully. Remember to have a battery conditioner connected, or ideally jump leads from another car with its engine running. The CCF download takes about 5 minutes and you do not want the battery to drop low while doing it. (Quick note - you upload the CCF from the car into SDD and you download it from SDD into the car.)
The byte you want is labelled Digital radio receiver and change it from "Without digital radio system" to whichever option is relevant for your market. In the UK that is normally "DAB with PTY for EU" or similar, for the US it will be an SDARS option. Do not change the settings under the "Digital audio broadcasting." or "Satellite digital audio receiver." sections which will be shows as "Not fitted" and/or "Undefined". The correct one is near the bottom, the others are near the top.
Once you've done that click on the tick to apply the changes and download the new CCF into the car. The systems will all drop offline initially and you will get some lovely error tones from the instrument panel, but one by one they will come back online and at the end DAB will magically appear in your radio sources.
Chances are you will need to upgrade the firmware on the DAB/SDARS module itself. Once the CCF changes have been made you can rescan the car in SDD and it should pick up the new module (if not click on the OEM icon as it may be filtered out by the AS-BUILT data). It will likely be reporting 1 or 2 persistant DTCs about misconfiguration. To reflash the software and code it to your vehicle pick a suitable symptom (i.e. radio not tuning) and then use the Recommendations screen to reflash the software to the DAB/SDARS module. It will put the entire infotainment/MOST network into diagnostics mode so the screen will go off, and the flash takes about 10 minutes. Afterwards the car will instruct you to clear the DTCs but you can skip that if you have other faults that need investigating.
And then you are done! You just need to tune it in then set up your new radio presets. SDARS I think may have some licensing thing, but DAB is good to go.
Total cost of hardware is around �150 if you don't need to buy the coxial crimpers which add about �100. A 1h SDD programming subscription costs �171, 1 day is �200, up to 1 year for �900. That will be your biggest expense, but as mentioned earlier there are ways around that if you are comfortable with the risk. The password generator cost about �4.
I've attached the referenced schematics and workshop manual pages to this post. I used a 2013MY X351 as they use the DAB+/SDARS modules with the green connectors. I've included the digital TV schematic to show the pin location to source the power from if fitted.
Why did I include the info about the IAM at the start? Well if you have any of those modules in your XF, F Type, Range Rover, Mazda, etc, the hardware is very close and the software step will be the same.
Thanks to Cambo's effort with his LR - you can buy the antenna harness as an overlay under LR part no LR005457. The lengths may be different to the XJ, but from photos it looks pretty close. It is pretty cheap at only �3.
The DAB module is WERS #-14720-B#. The ones ending revision A will still work, but have different power connectors. The ones with green connectors are the later ones, and AFAIK should all be DAB+ but someone who can cross reference WERS with JLR part numbers can confirm that. Earlier ones will have black connectors. As with the IAMs the same basic hardware is used across lots of PAG vehicles. Expect to pay �70 on eBay. Both of the ones I have fitted came from Land Rover vehicles. I don't know about the SDARS modules, but on TOPIx they look identical (obviously different part nos).
There were different DAB modules depending on the vehicle model, for example the X150 XK had a different module to the XF/LR2, the Disco's/LR3/LR4 had different ones again, but after 2013MY they all were standardised.
So far as I can tell they are all interchangeable though...
The changeover from DAB to DAB+ in JLR vehicles was in 2013MY.
These are the modules used in the XF, Freelander 2 (early vehicles)
The DAB modules are;
6H52-19C032-AC
6H52-19C032-AE
6H52-19C032-AF
6H52-19C032-AG
6H52-19C032-AH
The DAB & DAB+ modules post 2013MY are;
CPLA-14F720-BD
CPLA-14F720-BF
CPLA-14F720-BG
CPLA-14F720-BH
CPLA-14F720-BJ
CPLA-14F720-BK
CPLA-14F720-BL
CPLA-14F720-BM
CPLA-14F720-BN
Any of those modules with the CPLA number will work in an X351, X250, L359, and so far as I can tell the L319, L320 and L322.
Originally Posted by xdave
The green connector for the wiring is part number YPC108210. I've not been able to identify the series to get the pin part number, however if you search for YPC10526 you will find a kit for a 5 way variant of the same series which comes with pins.
I think the connectors are JAE IL-AG5 Series or similar. JAE Technology to Inspire Innovation / Series Search / Detail / IL[h]AG5/Automotive
You can buy an adaptor lead as a Land Rover spare which sorts the green power connection to the DAB+ modules, but as you pointed out it's not the same plug as the earlier modules. LR032814
Originally Posted by xdave
Thanks to Cambo's effort with his LR - you can buy the antenna harness as an overlay under LR part no LR005457. The lengths may be different to the XJ, but from photos it looks pretty close. It is pretty cheap at only �3.
Yep!
OK but if you want to retrofit a SDARS / Sirius system, the coaxial cable is not the same as the DAB ones (it's a single connector only).
SDARS modules are;
6W83-19A028-AB
6W83-19A028-AD
6W83-19A028-AF
Then they changed to
CH22-18C963-BB
CH22-18C963-BC
CH22-18C963-BD
The later ones are dual-branded Jaguar and Land Rover module. The 6W83 actually branded FoMoCo.
The p/n for the SDARS antenna coaxial cable is LR047946 CABLE CONNECTOR C4ME41C TO CONNECTOR C9ME46B
I think the power connector (the green one on the later model DAB modules) is also the same as the later model SDARS module too.
The sharkfin / roof dome is also a different part for SDARS.
The concept is the same as fitting the DAB, just different parts.
If you need to extend the coaxial cables then it's possible to buy cables with Universal Fakra connectors that will extend any type of Fakra, they are quite useful.
Last edited by Cambo; Aug 16, 2016 at 04:54 PM.
Reason: additional info
Dave, thanks for this explanation. Why did you do the retrofit? I just purchased a 2012 XJL Supersport. Love the car but hate the infotainment center. What benefits did you derive by upgrading?
In this thread I added the DAB+ option because my car was not built with it from new.
I believe your question is more linked to my main infotainment/touch screen upgrade (Upgrading the 2010/2011 slow touch screen display), in which case I did that because the earier system was horribly (dangerously) slow to respond to touches and thus incredible frustrating to use. The 2012 and 2013 MY* touch screens were much more responsive, and are backwards compatible as far as we know based on member feedback.
The functionality is the same, but the response and general UI is greatly improved.
* UK MYs may be different to US/ROW ones. The other thread (linked above) has some discussion on that.
Just wanted to post up to say thanks for this thread. I have a 60 plate XF-R and used the guide to install the hardware and update the CCF using SDD. I got lucky - my car was pre-wired for DAB so the aerial cables were already present behind the headlining, and there was a plug under the passenger seat for the short Land Rover harness for the green DAB+ power connector. I used a DAB+ unit from a Range Rover, the Land Rover loom as mentioned, a grey aerial amplifier replacing the green one that was already present behind the C pillar, and swapped the contents of the shark fin with a DAB one - not strictly necessary in the UK but as it was so easy it seemed a shame not to do a proper job. I used a MOST bypass loop and pulled one end of it out of the connector, so I could loop it into the other MOST plugs under the seat. My car already had the portable audio module and the Bluetooth module under there so there was plenty of MOST already present.
Also discovered in the process that my car is pre-wired for the TV and top-end stereo. I have a TV in my E46 BMW and never use it so I'm not too fussed about that one. Might investigate the stereo upgrade though, especially if it's just a case of fitting the speakers and amp, and then a CCF update.
So I am going to add DAB to my 2012 XJ x351 that I recently bought. I admit that I made a mistake when I bought it- all the vehicle I had looked by chance all had DAB, so I thought it would be standard and if a car has TV the you might think it would have DAB too- but no.
I added DAB to my previous 2016 S-Type, so I fairly confident. So far I have a DAB unit (6H52-14D401-AH) from a 2012 Freelander that came with the connectors, the 4-way arial amplifier for the rear screen (that is all I need in the UK), MOST cables (my old S-Type don’t fit) and various FAKRA connections and leads. I have still to identify a power source in the boot yet, but probably going to go with the TV- although the lead looks a bit thin.
However, I have a question and that is which is the +ve connector in the DAB? My previous build used a more recent one with a green 4-way connector, which had ground pin being the one nearest the edge of the DAB box. The one I have now has a black power connector and , from what I can find out has ground connector closest to the centre of the box? Anyone know if that is correct?
Also, I am afraid that I don’t have the gear to reprogram the software. Any ides as to how I might get this done? I line in Newark, Notts. Main dealer? Costs?
The earlier black 2 way connectors are pin 1 vbatt, pin 2 gnd. Diagram attached.
The power wire to the TV is the same as the one to the factory DAB module. It is spliced in the harness. You can take it from the GN-RD wire (NB colour may be different) at pin 1 on the C4ME33A main TV connector(20 way grey).
It's been a while since I looked at this - are the earlier (black) modules DAB and the alter (green) modules DAB+?
Yes, you are right. The unit I have is DAB, not DAB+. When I did the upgrade to my 2006 S-Type, back in 2016/7, there was not much difference in the UK between them. However, having now (belatedly) checked, it seem that there has been a switch to DAB+ in the UK over recent years. So if I am to listen to Heart on the DAB radio I shall need a DAB+ unit. So I have just bought one on eBay. At least I know the wiring and have connectors for this one. Anyone want a DAB unit?
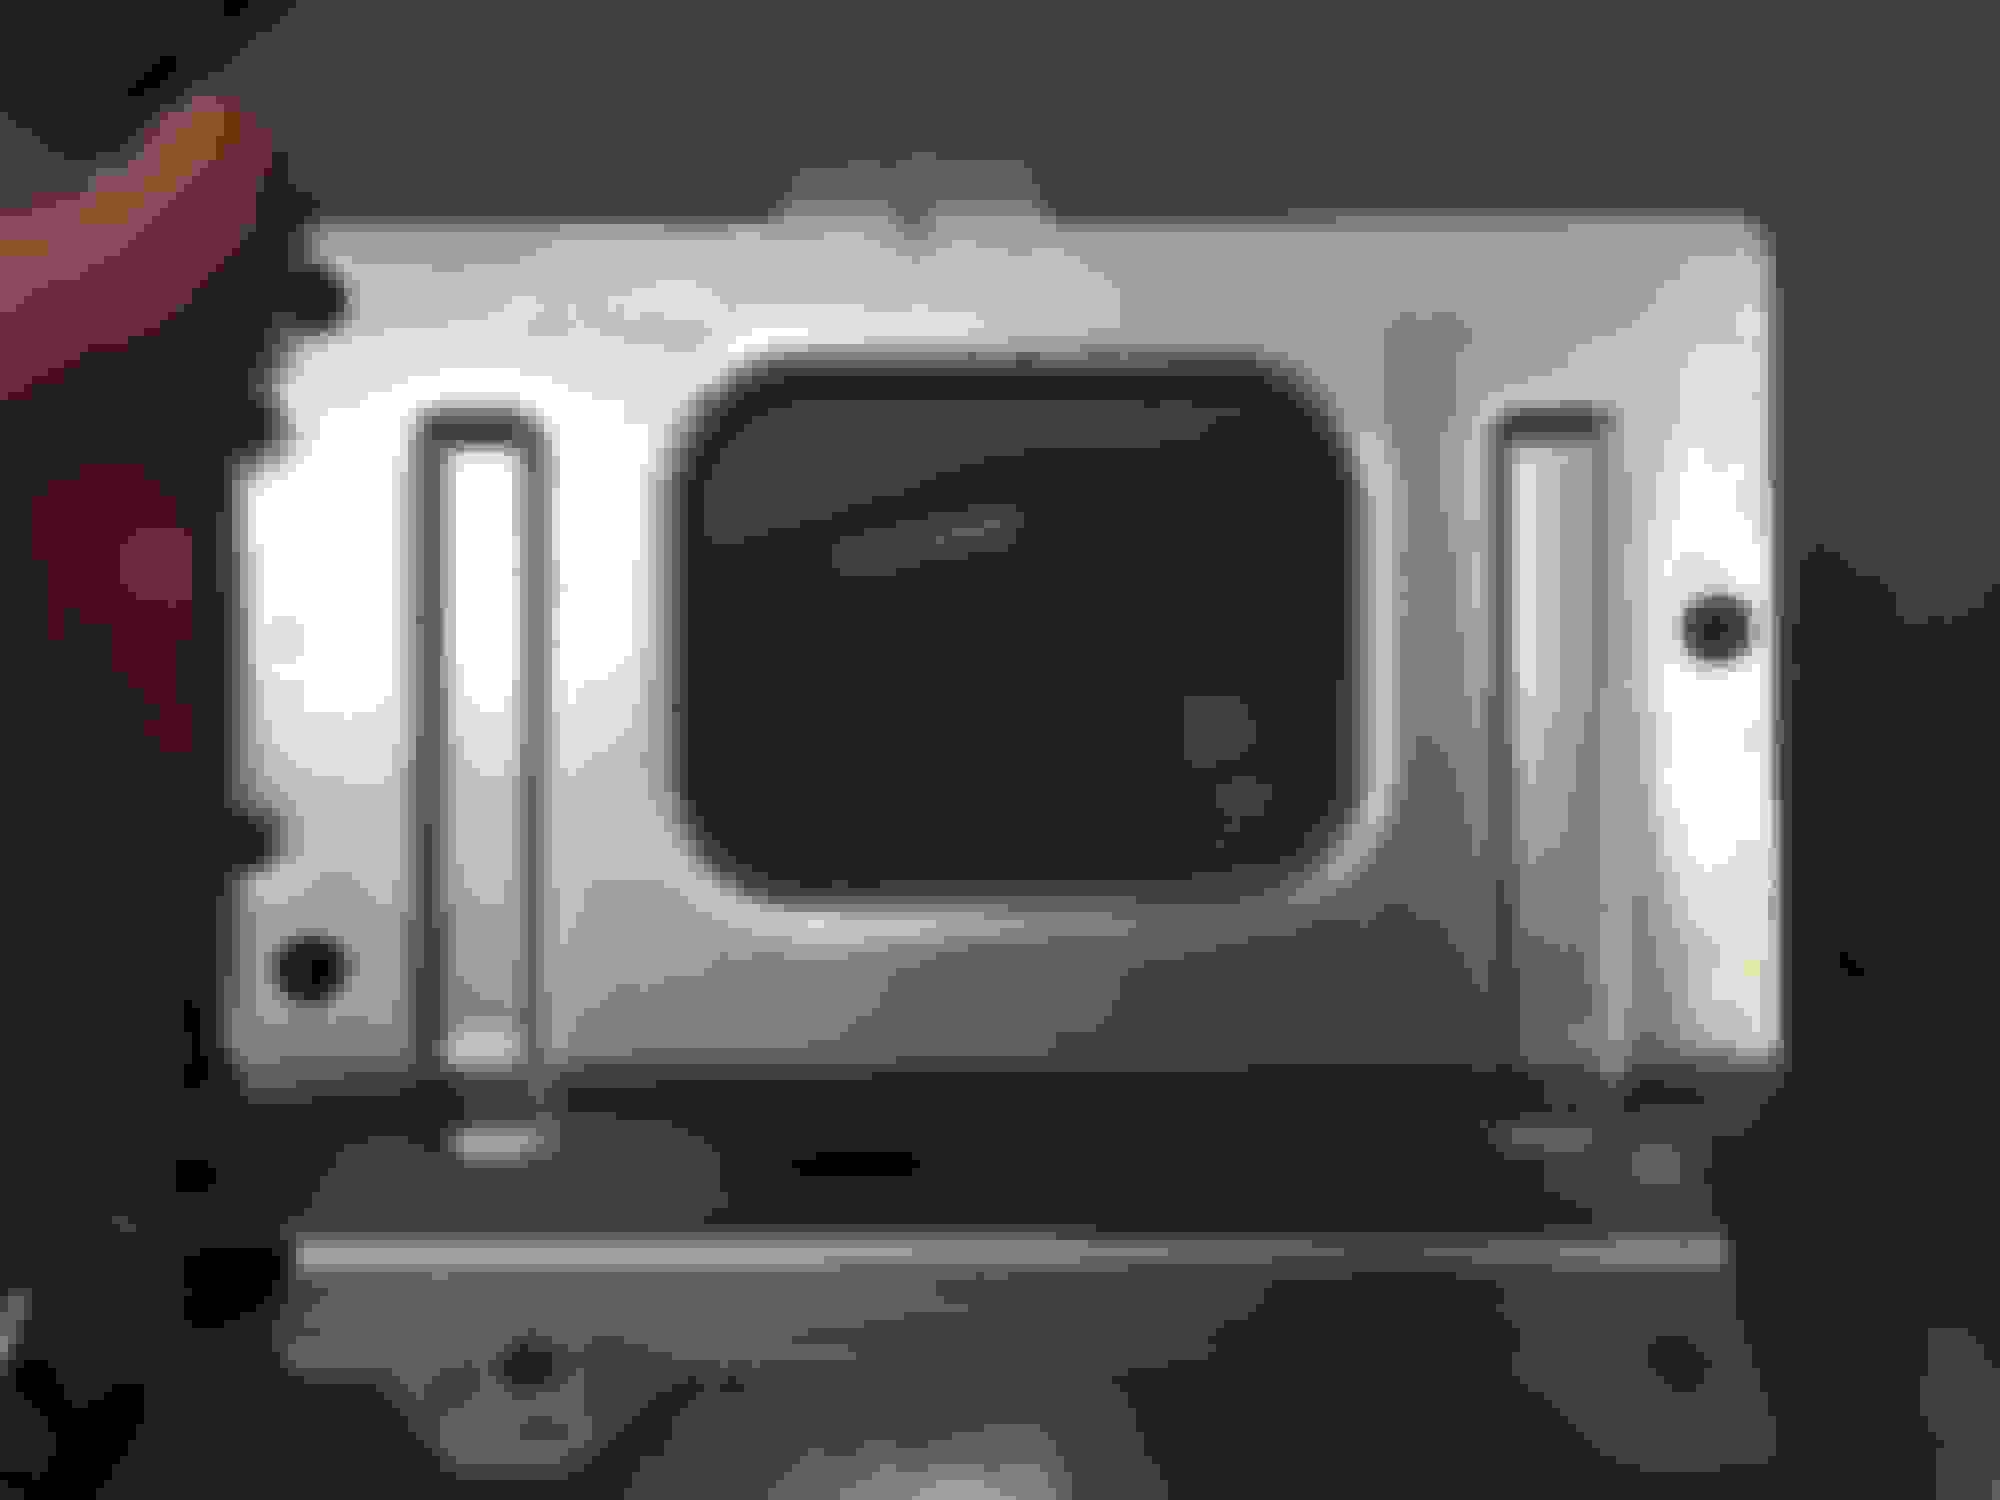
I now have part C2D39188, which is meant to be the mounting bracket? Have not looked to see how it fits in the XJ yet, but I can not see how the DAB unit fits?
Just looks wrong?
If you compare the second diagram this this one, it is part 8:
This is where it gets confusing...
In my EPC (December 2017) is shows part 8 as being:
Mounting bracket, navigation module, From VIN (V90866), C2D39188
and part 7 as:
Digital audio receiver, DAB, with bracket, From VIN (V90866), T2R21183
So I am unsure which is the correct part number.
T2R21183 would have been introduced with the F-Type which came after the X351, but it may have been superseded as my EPC only shows this part post-V90866 (2016MY).
Personally, given that T2R21183 is almost �700 (yes, not a typo, that is seven hundred pounds sterling) then I would just make a bracket from 1.5/1.6mm sheet aluminium. You can fold that in a vice to make the shape you want. (Template it in cardboard.)
But both seem to refer to the plate/tray which the DAB unit fits into, but imply the tray comes with or without the DAB/satellite radio fitted to the tray as one unit, but it is more expensive to buy the tray without satellite radio than with (obviously some sort of mistake?) The actual DAB/satellite radio unit seem to be called a “control module”. Nothing looks like the part I have been sent though. Unfortunately I cannot find any parts list/ diagrams for an XJ/ diagrams from any UK supplier.
Regarding making my own, yes I had to make my own fitting plate out of aluminium when I added DAB to the S-type, so it seem easiest to do that again and I have ordered some aluminium sheets from eBay, which cost a couple of pounds.
From CAMBO’s pictures, I can fit the plate directly to the right hand side of the audio unit.
So what bracket have I bought then? I can not find anything that looks like it in any parts list. Well, the only place it seem to fit is as “boxing” over the audio amp and TV unit. There are two threaded studs in about the right place on the far right that I could fit the DAB holding plate to. However, as a simple bracket to hang the DAB plate on, it seems well over engineered, being made of at least 2mm thick steel. It is very strong and heavy. I wonder if is also intended to act as screening, and protect the DAB unit from stray electronic interference from the TV and audio amp? Just in case I think I may fit it and hang the DAB unit off it. I will post photographs when I do, but it will be in a week or twos time.
For anyone doing this later on in the UK, as none of the DAB units for sale on eBay seem to come from an XJ, or have any fixing plates attached to them, I agree that it might be worthwhile them talking directly to someone breaking an XJ that has DAB and get all the parts from them.
Hi all, just got me a X351 and wanting to do the DAB upgrade, i have just purchased the DAB unit, i am just looking for clarity on what other parts i require, i have a 12 plate with no DAB pre fit according to Topix, i am in UK. I know things are listed above, but i believe it covers US cars too.