When you click on links to various merchants on this site and make a purchase, this can result in this site earning a commission. Affiliate programs and affiliations include, but are not limited to, the eBay Partner Network.
The left front HID headlight on my 04 XJ8 flickers pretty often. It will usually stop. Sometimes I notice the flicker right after the headlights come on, but other times I notice it after they've been one for a while. Occasionally, the headlight will go completely out for a few seconds, then come back on. Sometimes, it just flashes off, then back on.
I've read that this could be the capsule going bad. But I've also read (and a friend told me) that it could be a poor connection on the earth or ground post near the headlight.
I have not gone to great lengths to find that earth post, but I have looked around behind the headlight from the top after taking the shield off that goes all the way across above the grill and headlights. So far I have not spotted it. I looked in the shop maintenance manual and saw a diagram that showed the general locations for all the earth points. But I did not see a photo or drawing to point it out specifically.
It's a possibility that I've run my flashlight across it without recognizing it. I would appreciate if someone can tell me exactly where to look for it. Can I reach it from the top side? Or do I go in through the fender well. (The top route sounds like a more enjoyable option.)
Here are some photos of the ground points behind the X350 headlamps and some tips for servicing them and accessing the lower one behind the right headlamp. The corrosion that forms naturally on aluminum when it is exposed to atmospheric oxygen is called aluminum oxide (Al2O3).
While the layer is very thin, only about 4 nanometers in thickness, aluminum oxide is an electrical insulator, so even this thin layer adds resistance to the electrical circuits, some of which are quite sensitive to even minor voltage variations. So periodically the grounds must be cleaned.
The ground point behind the left headlamp (arrow) is relatively easy to access:
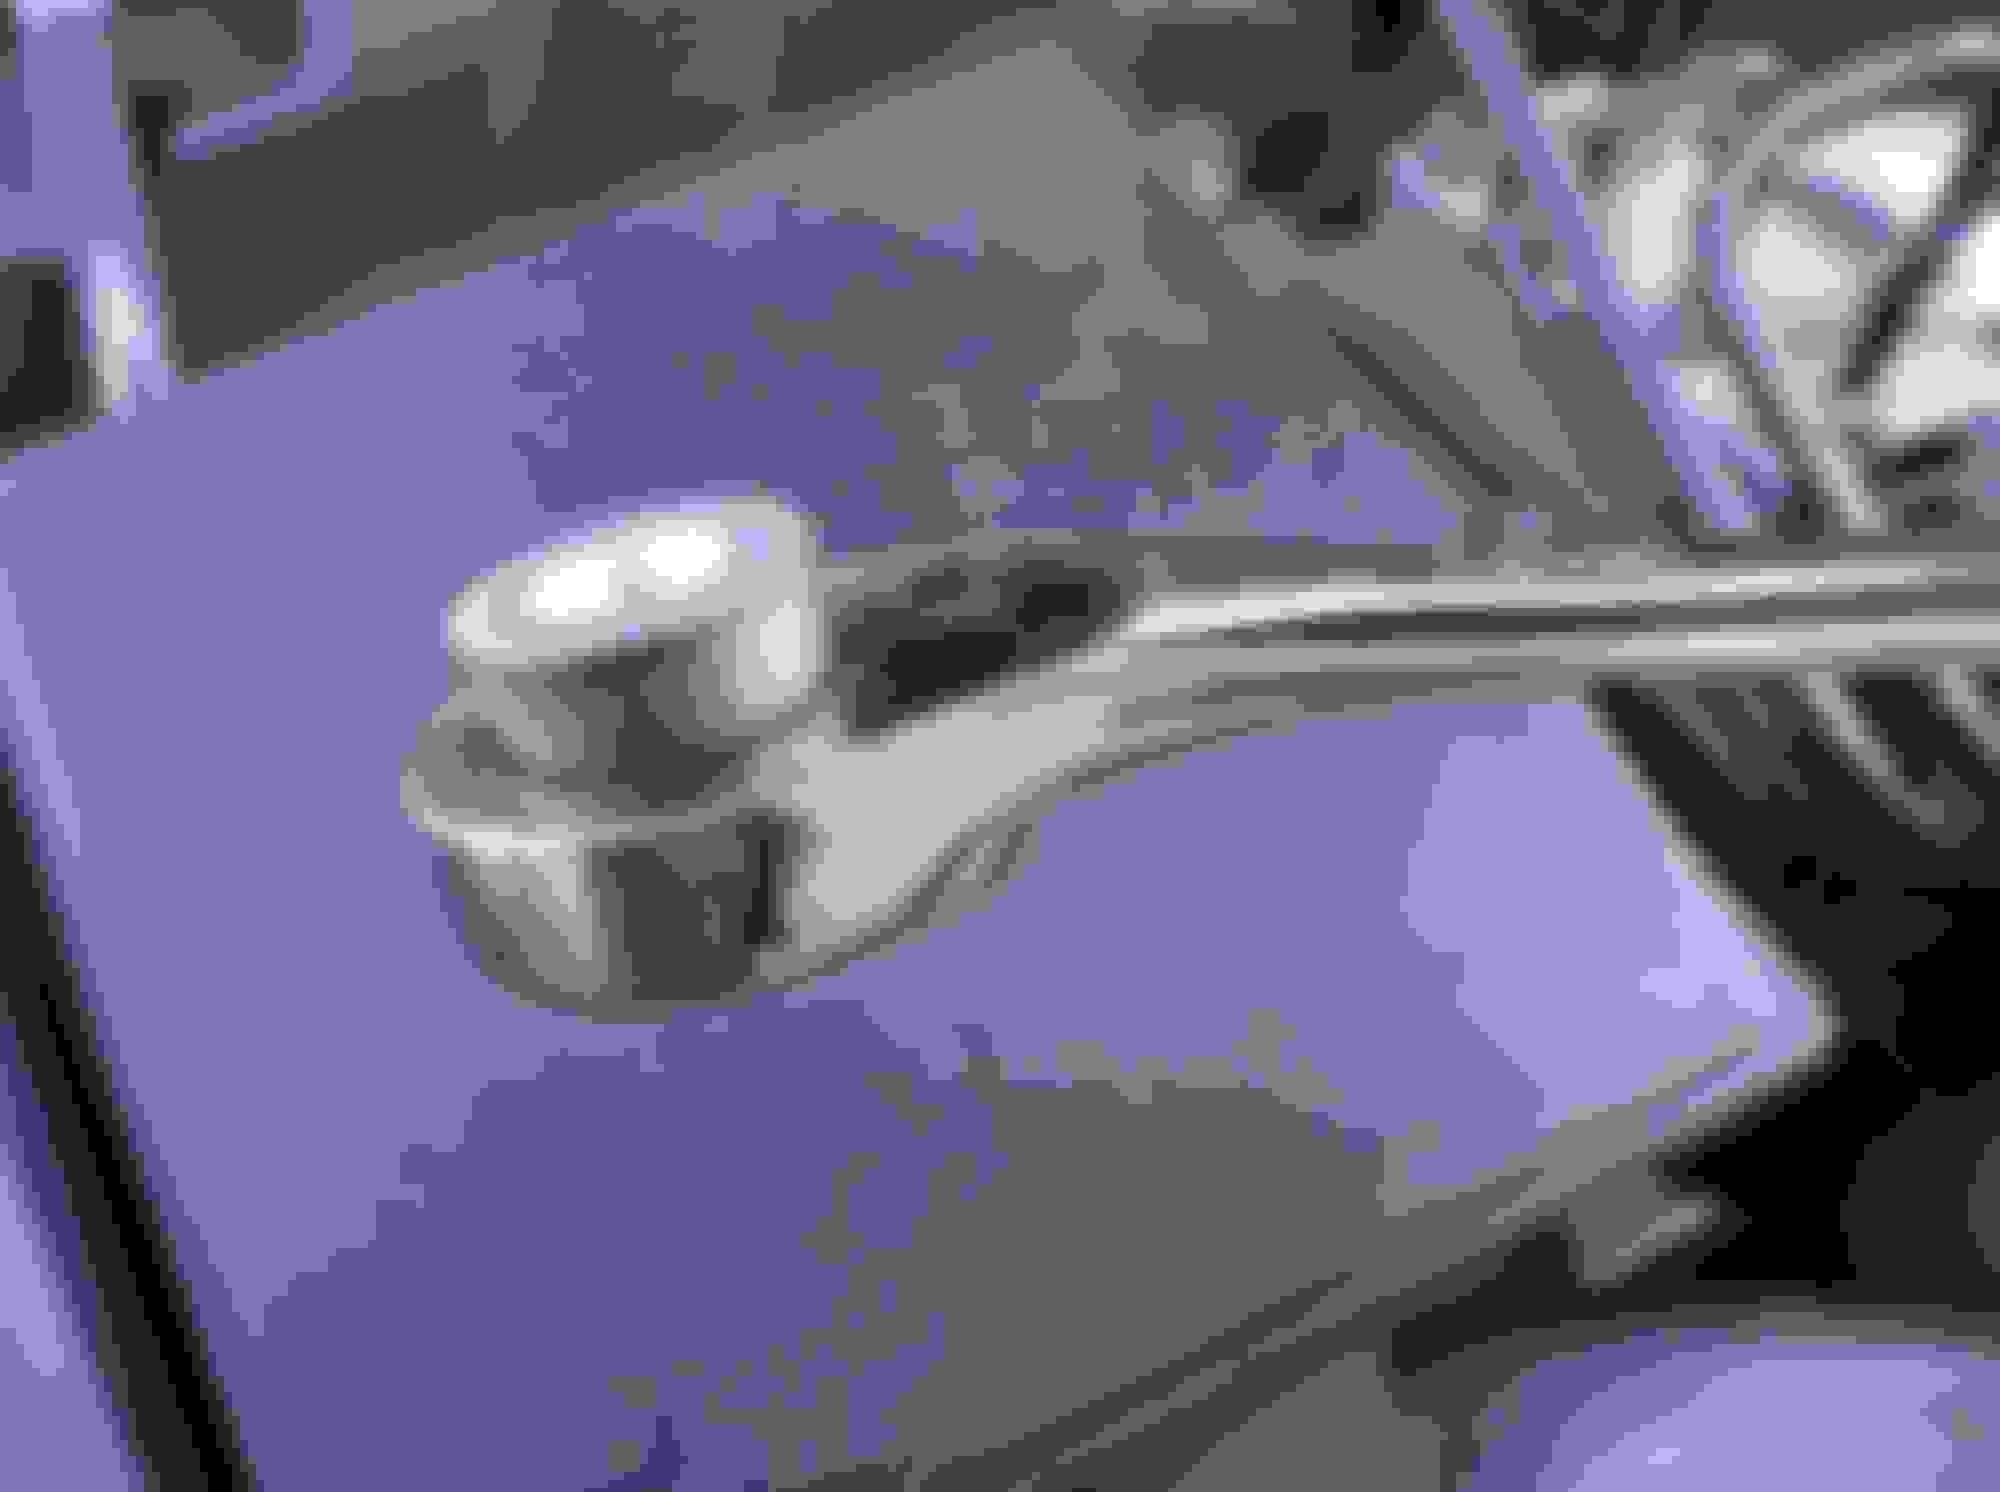
The best tool I know of for removing and reinstalling the nuts is a 13 mm ratcheting box-end wrench/ring spanner:
There are two ground studs behind the right headlamp. Remove the top nut and wires first, then the lower ones. According to the Dealer Training manual, the threaded posts are "Fire On Studs," attached to the body-in-white by an electrical process similar to spot welding.
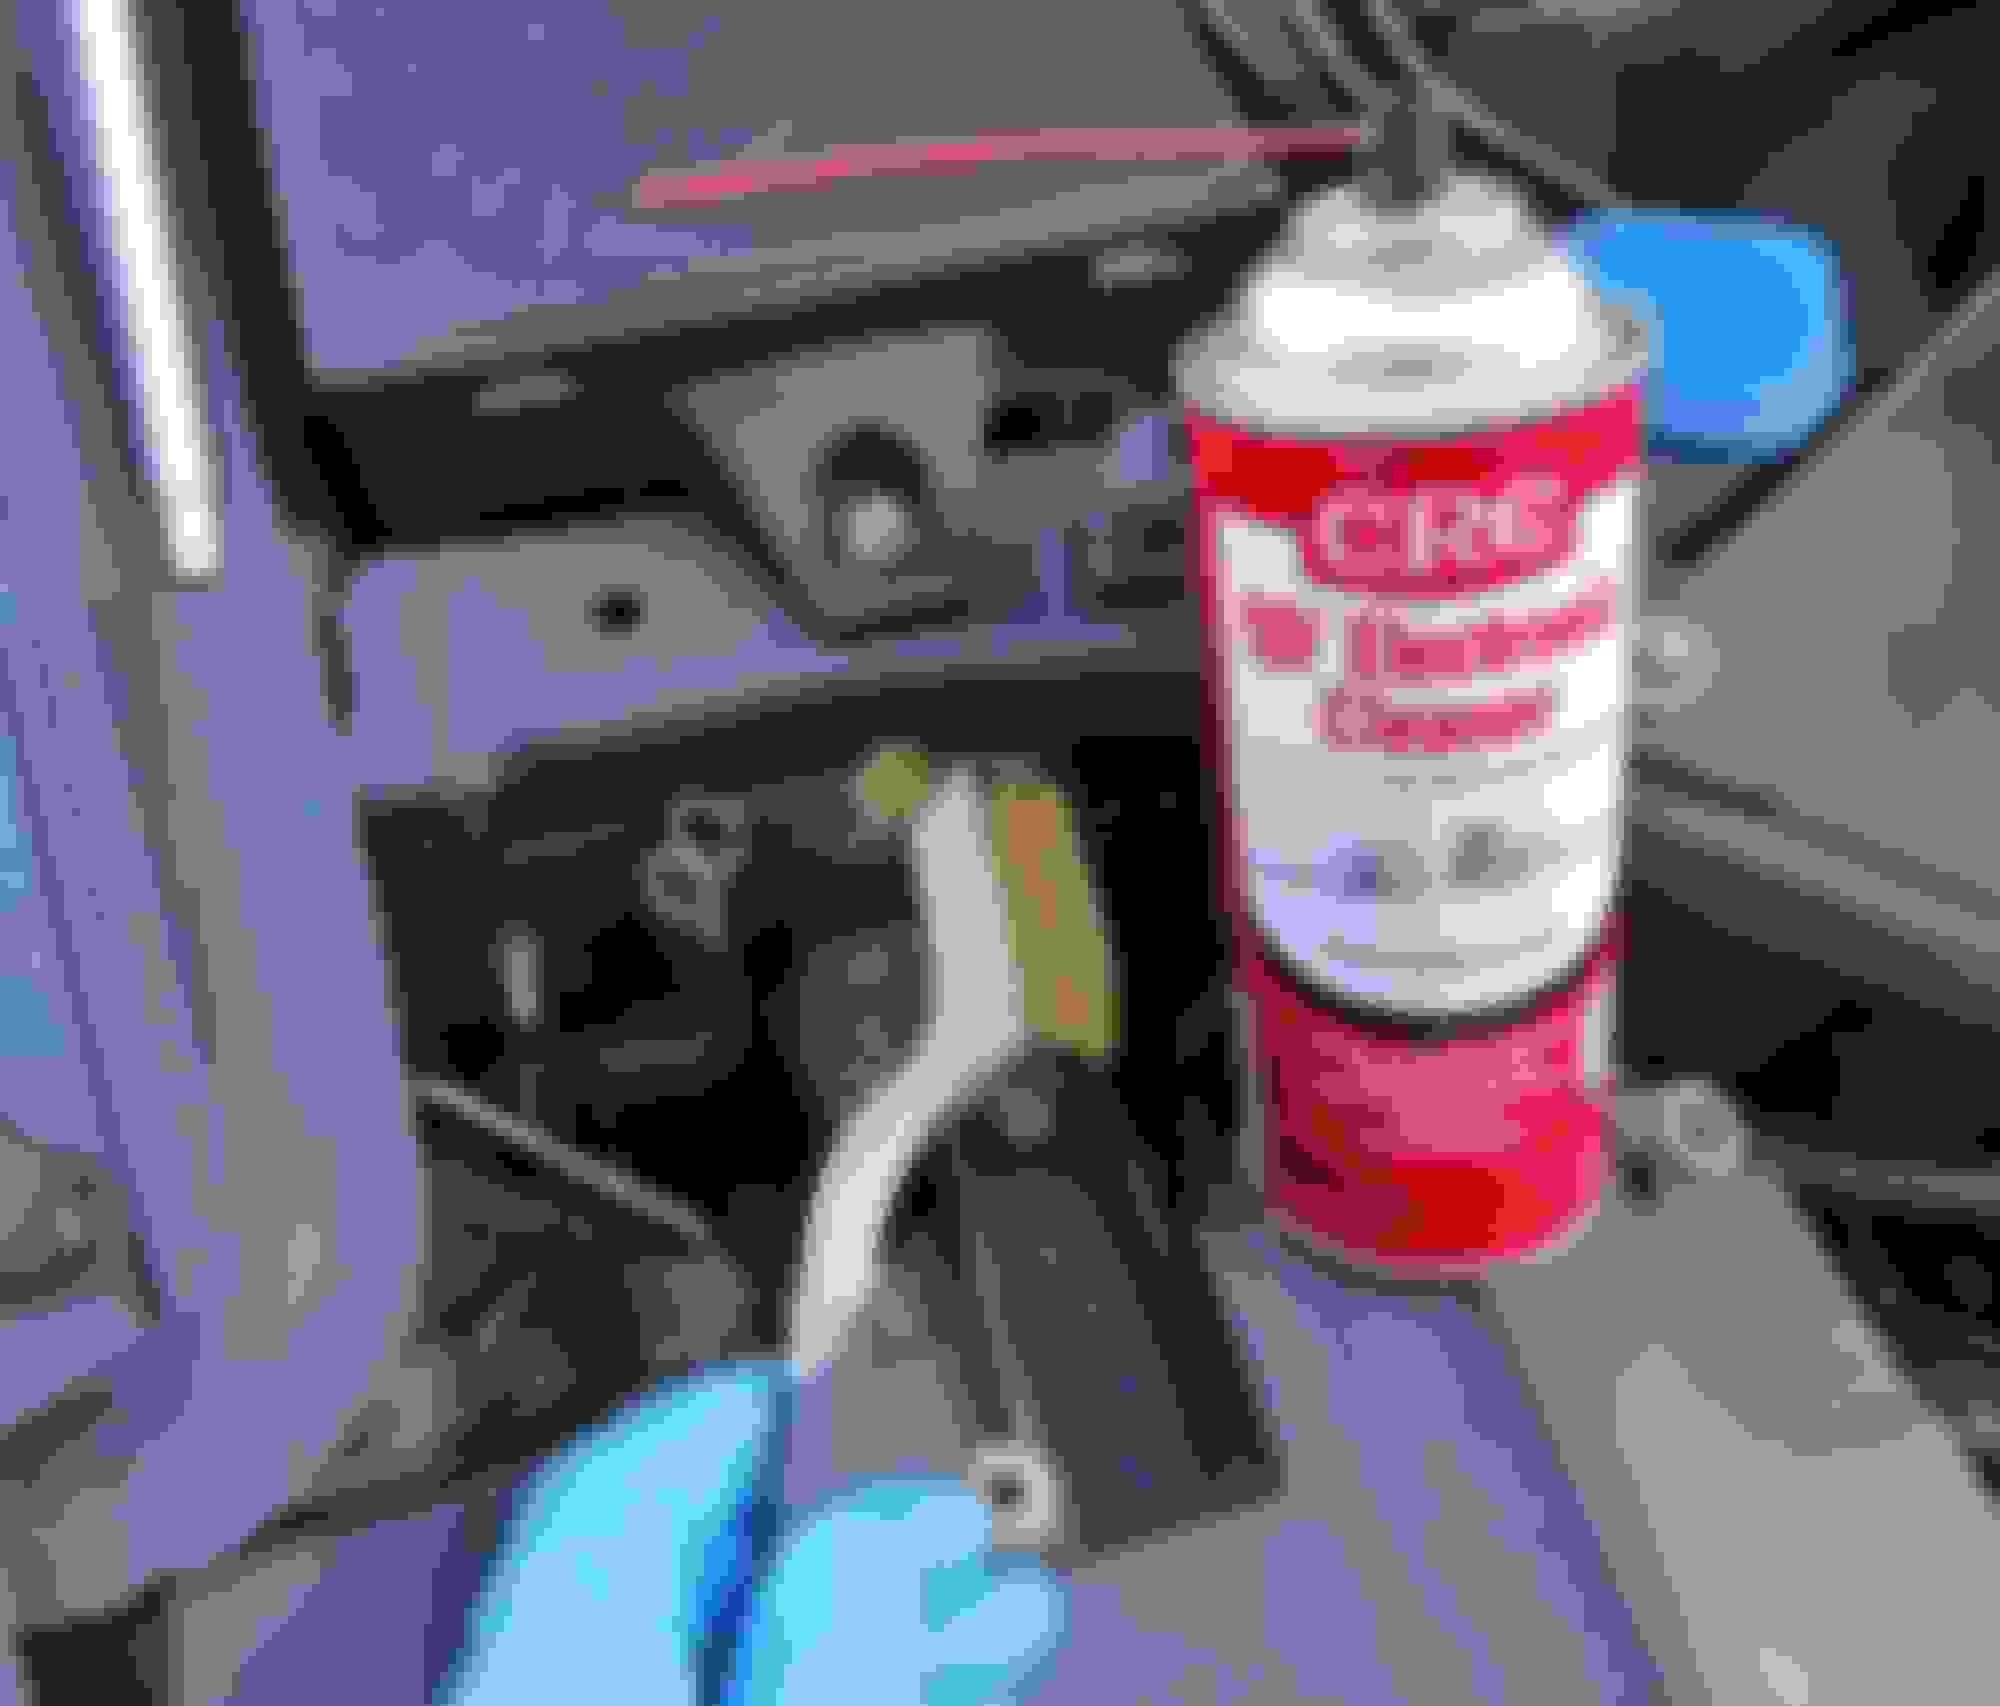
The ground studs, wire ring-/eyelet-terminals and nuts are all made of aluminum/aluminium, so they are easily scratched. Scratches can promote future corrosion, so I used a soft brass brush and zero-residue electrical contact cleaner to clean all the parts thoroughly. Sandpaper or any other abrasive might leave scratches, unless the grit was very fine (2000 or higher?), but sandpaper can't adequately clean the threaded studs like a brass brush can.
Reinstalling the lower nut behind the right headlamp is an especially frustrating task due to the limited access on some models like our '04 XJR with HID headlamps. The method I came up with was to use the ratcheting wrench and a plastic rod with a rubber tip from a louvered or Venetian blind. A wooden pencil with an eraser might work if it was long enough. A wooden dowel might possibly work, but it helps to have a rubber tip so the nut won't slip as you ratchet back the wrench:
I placed the nut in the ratcheting wrench and carefully moved it down into position and offered the nut up to the stud. I moved the wrench handle to the right to turn the nut clockwise (CW) as far as possible, then used the long rod to prevent the nut (arrow) from rotating backward when I ratcheted the wrench handle leftward. I repeated this process until the nut was properly started on the stud. I set the wrench aside and tightened the nut the rest of the way by hand. I then snugged it up with the wrench, taking great care not to overtighten. The factory torque specification is just 6.5 lb. ft. / 9 Nm, so it is truly just "snug." Several members have learned the hard way how little force it takes to snap off one of these studs.
I have photos of the other engine bay grounds as well as the trunk/boot grounds, and I'll try to get them uploaded. I haven't worked on the passenger compartment grounds yet but it's on my (very long) list of things to do.
With the top cover off, and looking towards the rear, you should see two earthing points behind the RH headlight unit, and one the LH side. The cables terminating at these points are easily seen. If you are thinking of checking be prepared for the nut to just fall off due to the stud corroding.
With the top cover off, and looking towards the rear, you should see two earthing points behind the RH headlight unit, and one the LH side. The cables terminating at these points are easily seen. If you are thinking of checking be prepared for the nut to just fall off due to the stud corroding.
If you look above the wire clip that holds the left hand low beam back cover in place you can see the nuts on the earth cable. For some reason I could not add this comment in my previous reply.
2 weeks ago my RHS low beam was very dim. I fiddled with the connection under the bulb capsule and the beam brightened but was still not as brite as it should be. So I think it was that connection maybe that caused the issue with that bulb, I replaced both HID low beam bulbs and now the high beams look "dull" by comparison. So now I am waiting on new bulbs from Ebay that I hope will be a better match. BTW the HID DS1 bulbs were $53 for the pair with free shipping on Ebay.
Bookman,
The ground can be part of the problem and I would make sure they are clean after changing a bulb but the behavior of you lights is textbook behavior of a HID bulb last stand.
I snapped two of mine off and had to drill holes to put a nut and bolt in. They are fragile, I mean really fragile.
Be careful..
trosty,
You're not the only one - several of our members have had the same experience. It took me a while to find the torque spec for those ground/earth nuts, and it's just 6.5 lb.-ft. / 9 Nm, which is really just "snug." Another way to think about that is 78 inch-pounds, so it's one of the lowest torque specs of any component. This must be due to the fact that the studs are aluminum and they are bonded to the aluminum body by a special process (I can't recall the exact term from the Dealer New Model Introduction Manual, but it evokes the idea of spot welding).
bookman,
I have photos of those front grounds/earths showing a tip for reinstalling the lower right ground nut, which is a pain due to the proximity of the headlamp housing. I'll try to get them uploaded.
Is the headlight the only component that uses that earth/ground post? I wonder what else might be affected if it were to break off while tinkering with it.
I plan to look again over the weekend for it. It would be nice if there were a way to stabilize the stud while turning the nut, but with wires already on it, I don't see that being a possibility. I certainly don't want to twist it off.
Here are some photos of the ground points behind the X350 headlamps and some tips for servicing them and accessing the lower one behind the right headlamp. The corrosion that forms naturally on aluminum when it is exposed to atmospheric oxygen is called aluminum oxide (Al2O3).
While the layer is very thin, only about 4 nanometers in thickness, aluminum oxide is an electrical insulator, so even this thin layer adds resistance to the electrical circuits, some of which are quite sensitive to even minor voltage variations. So periodically the grounds must be cleaned.
The ground point behind the left headlamp (arrow) is relatively easy to access:
The best tool I know of for removing and reinstalling the nuts is a 13 mm ratcheting box-end wrench/ring spanner:
There are two ground studs behind the right headlamp. Remove the top nut and wires first, then the lower ones. According to the Dealer Training manual, the threaded posts are "Fire On Studs," attached to the body-in-white by an electrical process similar to spot welding.
The ground studs, wire ring-/eyelet-terminals and nuts are all made of aluminum/aluminium, so they are easily scratched. Scratches can promote future corrosion, so I used a soft brass brush and zero-residue electrical contact cleaner to clean all the parts thoroughly. Sandpaper or any other abrasive might leave scratches, unless the grit was very fine (2000 or higher?), but sandpaper can't adequately clean the threaded studs like a brass brush can.
Reinstalling the lower nut behind the right headlamp is an especially frustrating task due to the limited access on some models like our '04 XJR with HID headlamps. The method I came up with was to use the ratcheting wrench and a plastic rod with a rubber tip from a louvered or Venetian blind. A wooden pencil with an eraser might work if it was long enough. A wooden dowel might possibly work, but it helps to have a rubber tip so the nut won't slip as you ratchet back the wrench:
I placed the nut in the ratcheting wrench and carefully moved it down into position and offered the nut up to the stud. I moved the wrench handle to the right to turn the nut clockwise (CW) as far as possible, then used the long rod to prevent the nut (arrow) from rotating backward when I ratcheted the wrench handle leftward. I repeated this process until the nut was properly started on the stud. I set the wrench aside and tightened the nut the rest of the way by hand. I then snugged it up with the wrench, taking great care not to overtighten. The factory torque specification is just 6.5 lb. ft. / 9 Nm, so it is truly just "snug." Several members have learned the hard way how little force it takes to snap off one of these studs.
I have photos of the other engine bay grounds as well as the trunk/boot grounds, and I'll try to get them uploaded. I haven't worked on the passenger compartment grounds yet but it's on my (very long) list of things to do.
Thanks for detailed photos. That left side post appears to be so obvious that I'm not sure how I missed it. I think I was under the impression that it was deeper and half hidden. I will take a look at it today.
Thanks to your help, I found the earth posts behind the left side headlight today. The nut appears to be tight. The post and cable ends appear slightly dusty more than anything else. There does not appear to be any corrosion or breakdown in the cable ends.
I have heard that the cables can develop a whitish coating that is similar to corrosion. But from the way they look to me, I'd say my issue is probably the HID bulb (as the manual calls it) or capsule.
I wonder what brightness the factory bulbs were? 5,000 maybe?
I have heard that the cables can develop a whitish coating that is similar to corrosion. But from the way they look to me, I'd say my issue is probably the HID bulb (as the manual calls it) or capsule.
Hi bookman,
Your issue may be the bulb itself or looseness in the socket, but the white corrosion that forms on the ground components is very thin and hard to see unless you look very closely, so we can't just assume our grounds are okay.
I wonder what brightness the factory bulbs were? 5,000 maybe?
According to the Dealer Training Manual for the 2004 New Model Introduction, the HID headlamps have a color temperature of 4100K.
Great coverage of a major problem with 350. I have a 2005 VDP that has never been in salt/corrosion but one of the right studs just "fell off" due to corrosion. Rest of car looks new but right HID started being intermittent then quit. Inspection revealed no upper ground connections.nSo I am in the same boat as earlier gentleman - have to re-establish connection. Thanks for the help and photos guys.