
Headlight bulb replacement xj8 2005


Member
Joined: Apr 2008
Posts: 39
Likes: 7
From: California
I would definitely recommend removing the socket off the bulb BEFORE releasing the retainer clip (especially if you've never done it before). When you remove the socket from the bulb, it's easy to see that the clip is held in place by a little hook that you have to unhook it from.
Once you get the clip "unhooked", the bulb will come out and it'll be easy to replace it.
Removing the socket from the bulb may not be that easy either. It will come off (being that it's only held in place by friction), but I was scared that I was going to break off the bulb connectors.

Senior Member


Joined: Mar 2011
Posts: 140
Likes: 37
From: USA - CT
My driver's side front turn signal bulb blew this morning on the way to work. After the bulb goes the yellow dash light illuminates and the message center reads LFT FRONT TURN LAMP FAILED. With such an urgent message under my nose I was inclined to change the bulb immediately. Plus the blinker blinks at double speed inside the car which is highly annoying.
Following the instructions in the owner's manual it was within my abilities but don't attempt this if you have Fred Flintstone hands. It's a mighty tight spot and I ended up with a couple scrapes.
Hardest part was the last step: twisting the assembly clockwise into its housing.
I located the replacement bulbs at Advanced Auto Parts, amber Sylvania 7507, $5.99 a pair.

Member
Joined: Jan 2010
Posts: 82
Likes: 5
From: Tennessee
XJ8JR, followed your instructions and they really helped but man what a time for the first time changing out a bulb. Mine is an 04 XJ8. Don't consider my hands large but is a cramped space to work in. Releasing the cover no problem; getting the cover out the way a bit of a problem-finally held it back off the side with a large screwdrive pinched in so it would be out of my way; getting the plug off was difficult (probably not removed in quite a while); got the plug off and went for the spring retainer which took me some time to get off; got the old bulb out without much problem. Putting new bulb in not much of a problem but trying to put the clip back on to hold the bulb took forever and I still did not get it on...came close a couple of times....putting the clip on was all blind and feelbecause I couldn't see-my hand covered the area. Using three fingers, feeling for the little hook at the bottom for the bottom of the spring to slip on really hard to do. Finally lost the spring retainer..fell into the Jag abyss of unknown. I could barely see a bit of it but could not get it. Tried to get another one-not available..could not get from dealership..Jag's answer buy the whole light assembly. Finally next day after driving guess I bounced it up some and was able to see it and pull it out with a magnet. Got smart this time...don't know why I didn't do this first....put a shop wrag around the open area of the light so if the retainer fell again it would not get lost.So bulb back in started the process all over. This time managed to get the retainer on in about ten minutes. Talk about someone being happy to get that accomplished.  Back on the road. I pity the person that loses one of these...finding them is next to impossible unless you can find a wrecked Jag.
Bill
Bill


Senior Member
Joined: Aug 2012
Posts: 193
Likes: 38
From: Jhb
Similar to XJ8RJ's instructions, check the last post from this thread where I provided step-by-step pictorial instructions.
Good luck
https://www.jaguarforums.com/forum/x...-xenons-78298/
Good luck
https://www.jaguarforums.com/forum/x...-xenons-78298/


Junior Member
Joined: Oct 2013
Posts: 2
Likes: 0
From: NJ
Here is a way to do the HID bulbs. Take off the cover between the grill and the radiator support. you will be able to see the back of the lights. Now for the part that would only makes sense to Jaguar owners. Take off the front wheel and remove the inner fender well cover, it only take 10 minutes, you will now be able to see the back side of the light and be able to remove the clips, plug and bulb with very little effort.
Member
Joined: Jan 2010
Posts: 82
Likes: 5
From: Tennessee
Had to do this twice on my 04 XJ8...pain in the rear...very poorly designed...need the hands of a small child. Got it done through contorsional moves and some choice words. Oh and yours truly did drop that stupid clip a couple of times and on one occasion took me forever and a good strong flexible magnet to get it off of the place it chose to hide on the frame. Next attemp took a shop rag and blocked the space so if and when it fell again I could easily get it.....and oh yes, fell several times before getting it back on. What they were thinking in design I don't know.
Senior Member
Joined: Sep 2013
Posts: 703
Likes: 228
From: Dallas, Texas
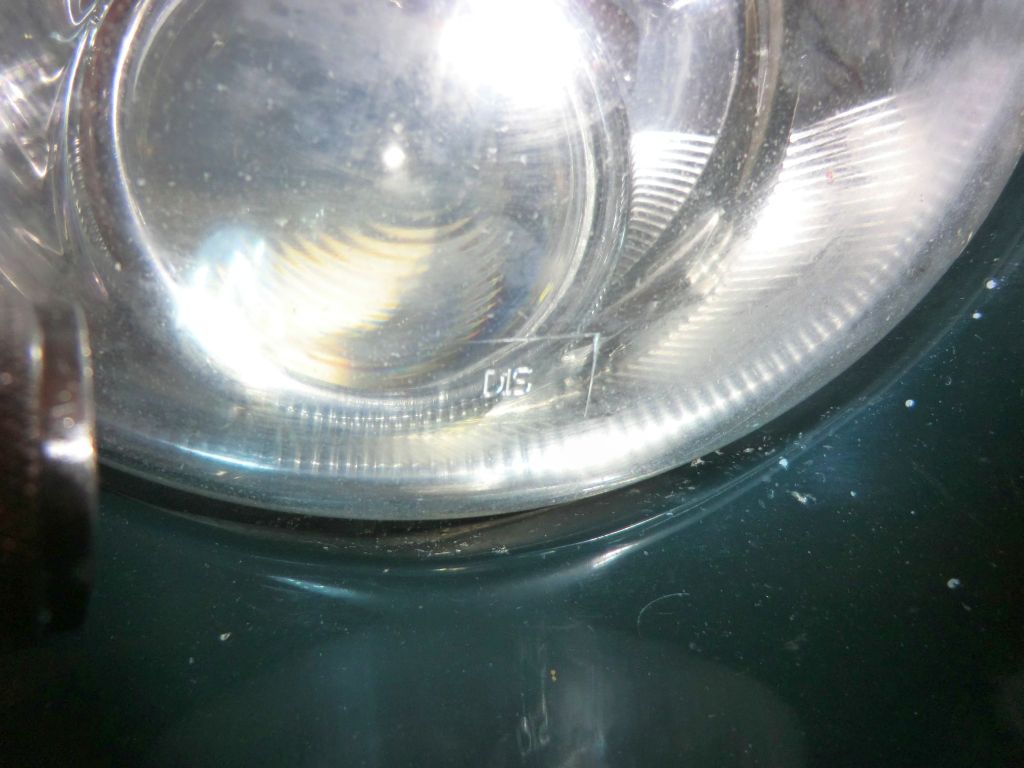
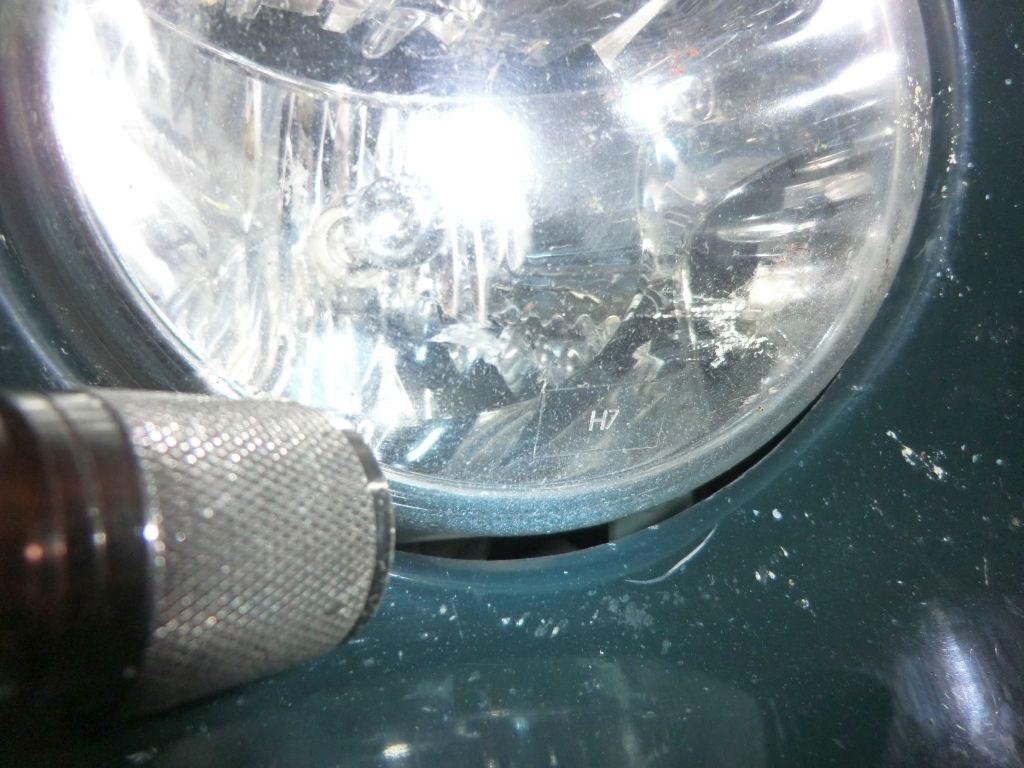
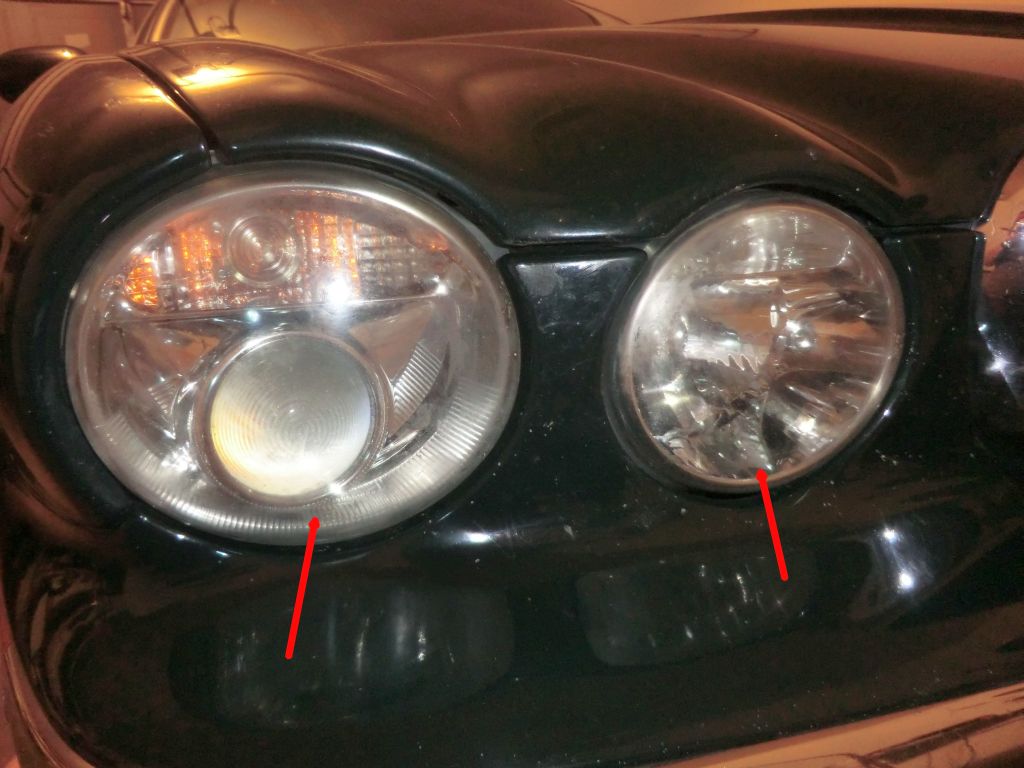
Just for reference I took these photo's of the location of the vehicle headlight types.
D1S:

H7:

Headlight showing location of type:

Hope that helps.
D1S:
H7:
Headlight showing location of type:
Hope that helps.
Last edited by trosty; Sep 15, 2014 at 05:41 PM.


Joined: Feb 2014
Posts: 20,541
Likes: 15,311
From: Crossroads of America
Hi trosty,
It may be the security settings on my computer, but I couldn't get the attachments to open.
Cheers,
Don

Senior Member
Joined: Mar 2014
Posts: 677
Likes: 107
From: Michigan
I have a bulb burned out on my 2005 Jaguar XJ8L, and I'm assuming that this is the low beam headlight (as it's the farthest one out on the passenger side)? Also, I'm not certain if there is simply a halogen bulb in it, or a HID (as a HID was described as a 'big round projector' in a prior post). What I'm seeing is an approximately 2.5" long 0.75" diameter tubular structure inside the lens. I'm not sure that I would describe that as a 'big round projector' so perhaps someone can enlighten me. Also, can someone provide me with a part number for it? Thanks.
Last edited by Rickkk; Sep 3, 2015 at 03:35 PM.

Senior Member
Joined: Aug 2015
Posts: 905
Likes: 105
From: NorthWest Arkansas
I have a bulb burned out on my 2005 Jaguar XJ8L, and I'm assuming that this is the low beam headlight (as it's the farthest one out on the passenger side)? Also, I'm not certain if there is simply a halogen bulb in it, or a HID (as a HID was described as a 'big round projector' in a prior post). What I'm seeing is an approximately 2.5" long 0.75" diameter tubular structure inside the lens. I'm not sure that I would describe that as a 'big round projector' so perhaps someone can enlighten me. Also, can someone provide me with a part number for it? Thanks.
Senior Member
Joined: Mar 2014
Posts: 677
Likes: 107
From: Michigan
Upon removing the main headlight bulb from the passenger side of my 2005 Jaguar XJ8L this morning (farthest light out), I quickly discovered that it was simply an Osram 64210 (H7) 55 watt halogen bulb. I picked up another one (Wagner Part No. BP1255) at my local NAPA dealer for $9.75 total.
Disassembly procedure that I used:
1. Remove top shroud from engine bay area
2. Dislodge top spring from back cover
3. Tilt the back cover towards the radiator so as to partially free it from the bottom retainer spring, and wiggle the cover in a sidewise motion to complete the process
4. Remove back cover
5. Disconnect electrical jack from bulb
6. Disconnect bulb retainer spring from bottom latch
7. Remove bulb
Assembly procedure that I used:
1. Insert new bulb
2. Reinstall bulb retainer spring onto the bottom latch
3. Reconnect electrical jack onto bulb
4. Reattach back cover
5. Disconnect one leg of the top retainer spring from the hinge, place spring over the back cover retainer grooves, and reconnect the leg of the top retainer spring into the hinge using needle nose pliers
6. Reattach shroud from engine bay area
Note: In my case, the rubber gasket to the back cover wouldn't stay in place so I had to apply some rubber cement to secure it to the back cover. After allowing the cement to dry 1.5 hours, I then reattached the back cover.
Additional Note: A small LED flashlight & hand mirror are useful.
Pictured below: Burned out Osram 64210 (H7) 55 watt halogen bulb
Last edited by Rickkk; Sep 8, 2015 at 10:25 AM.
Junior Member
Joined: Oct 2020
Posts: 13
Likes: 5
From: Phoenix, AZ USA
chiming I�m on this old thread to concur that changing the low beam bulb is much easier/quicker on the driver side than the passenger. My 2005 XJ8 L needed the pass side last year and today I swapped out the drivers side. Embarrassed to say how long it took last year on the passenger side. It took me 15 total minutes to change the drivers side, though.
NOTE: The switch was not xenon/HID lights. Standard OEM Halogen.
I didn�t take off the bumper cover. Instead:
� pop hold
� remove radiator cover
� pull �bar� that secures headlamp casing back towards the front of the car
� peel back the cover
� press down and gently pull retaining clip that secures bulb in place
� gently �unplug� old bulb
� plug in new bulb
� reverse procedures to reassemble
� CAUTIONS: Either wear some thin gloves (you�ll need tactile feel) or be super careful you don�t touch the new bulb. Even the smallest amount of oil or dirt can
compromise the fidelity of the bulb
� ANOTHER CAUTION: it�s easy to drop the retainer clip and lose it down in the abyss of the motor compartment.
OVERALL DEGREE OF DIFFICULTY: 2 out of 10. I�d say 1 but access is a really bitc$h. That said, though, aside from swapping out new trunk hydraulic arms, this is about as easy of a DIY job on this car.
I eventually figured out how to do it shortly after writing my last post on this thread. And now its the simplest thing, I can do both sides in less than 10 minutes. I even installed HID lights. All without removing the bumper.
You may have trouble if you have larger than average hands, but here goes:
1 - Remove the plastic cover that hides the grille/radiator and headlights area
2 - Starting on either headlight, locate the metal retaining bar that holds the back cover in place. A good tug towards the front of the car will do the trick, but if the lights havent been changed in a while the bar may need a real strong pull.
3 - Open up the back cover and pry it all the way out. Doing this instead of just sliding it to the side will free up a few more inches of hand room.
4 - Now you'll have access to the bulbs and wires in the housing. The top bulb will be the signal repeater, the bottom will be the main headlamp. There will be a thin metal clip holding the bulb in place which releases from beneath the bulb. If you push the bottom of this clip to the side and up, it will come free but be careful not to let it drop out completely. You should be able to gently lift it up and have it stay in its place.
5 - Another way of releasing the bulb would be to pull the wire socket off the bulb before releasing the clip. Just be careful not to pull too hard on the wires.
6 - Now just simply pull out the bulb.
7 - To put in a new bulb I find its easier to plug it into the wire socket first and then put it into its housing, followed by securing the metal clip. Replace the back cover by inserting the bottom part into its mate (youll be able to see where to put it with a flashlight). Make sure its secure, then push the metal bar back until it pops (or clicks, whatever).
You're done and you've saved yourself energy, time and expense. And the next time you do it itll be even easier.
Now this only applies to regular H7 halogen headlamps, NOT the factory xenon HIDs.
Hope this helps. I had a lot of trouble at first because the instructions I found on the forum weren't too detailed. Alot of "remove cover, remove clip, pull out bulb, reverse"...and to a beginner thats not really any help.

Junior Member

Joined: Jan 2018
Posts: 14
Likes: 3
From: PA, USA
Had to do this today to replace HID bulbs on X350 2007 XJ8. The driver side was easier but the passenger side was a real pain due to not having as much space behind the bulb cover. There are 2 neutral bolts and wires I had to remove to get the space needed to remove the cover. But then the issue is the cover wouldn't go back on!!. I used too much force and the lower retainer metal clip, fell off. Now it's impossible to get the retainer clip back in position. So I just put the cover back on without the lower clip. Hope the seal is still ok.
Taking off bumper and wheel just to replace a light bulb?? what a disaster in engineering
Taking off bumper and wheel just to replace a light bulb?? what a disaster in engineering
Senior Member
Joined: Aug 2009
Posts: 217
Likes: 14
From: NYC/NJ Metro
Just did this as a 1st timer with no experience on the passenger side headlight (2004 XJ8). It took me 25 minutes tops.
You DO NOT need to remove the bumper. A flashlight you can angle in the hole will be your biggest friend.
Once you pull forward the handle to loosen the cover, you should remove the cover by angling it DIAGONAL toward the radiator/center of the car until it releases from the metal clip on the bottom. Once it is released you can further angle the cover to fit inbetween the opening and the mounting screw for what I assume is a ground wire. The cover will slip through the opening fine at the right angle.
Before you start pulling anything out use the flashlight and peek in the hole to familiarize yourself with the setup. You simply pull off the plug with a light tug before releasing the bulb from the clip. Once the plug is off on the bottom of the bulb there is a retainer clip that swings up after releasing. The clip is held by a tiny hook groove. Squeeze the clip and pull slightly toward the center of the car and swing the clip up. The bulb will release.
Slide out the old bulb and slide in the new then reverse your steps to finish. Hardest part was reseating the cover back in place. Reseat the gasket back into the underside of the cover first then angle back into the hole. With the flashlight pointed in the hole guide the notch back into metal clip at the bottom. With the flashlight there is enough line of sight to tell if you have caught it or not. If you are not sure if you have caught it, move the cover forward and see if it seats flush to be clipped in. If not, then it is not properly seated at the bottom.
Mine are Halogen H7, I replaced it using 12V 55W. The old one was Sylvania 64210SU2 12V 55W. Both apparently made in Germany.
Last edited by queensnewbie; Nov 29, 2025 at 10:14 AM.