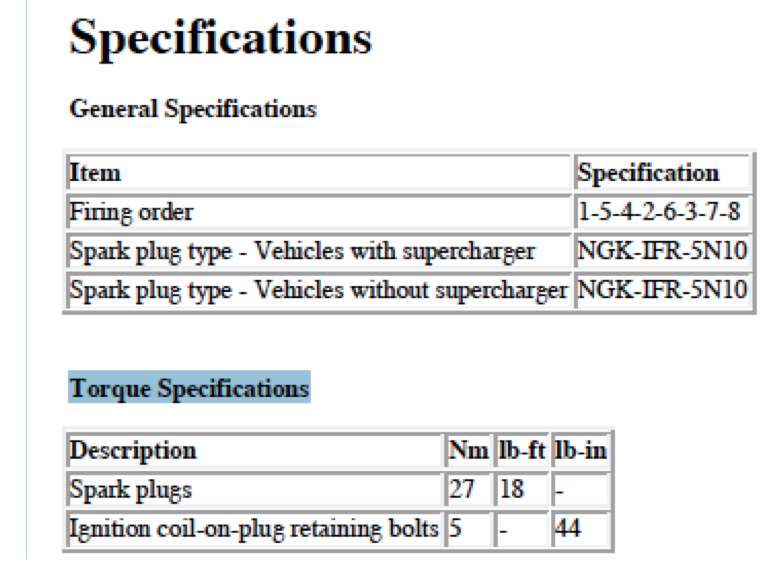
Plugs: NDK IFR5N10 Laser Iridium
Tools:
� Spark plug socket (with rubber in the tip to pull the plug out, using another plug socket that doesn�t grip so hard is better for putting the new plug in (so when you pull the extension out, it comes with the socket rather than the socket staying on top of the plug)
� 3/8 socket wrench and 3/8 torque wrench (ft/lb) and � torque wrench (in/lb)
� Two short extensions (instead of one long one)
� 8mm wrench/socket for coil bolts
� Compressed air for cleaning out holes prior to removing plugs (not necessary if coils sealed hole well)
� Anti-seize for spark plug threads.
1. Remove top engine cover (Philips screwdriver, four screws that turn 180 degrees). Remove oil fill cap first (replace cap until you are ready to reinstall the engine cover)
2. Remove the left and right coil covers. They snap in/ snap out. The two snap fasteners are evenly spaced, so about 1/3 in from the left and 1/3 in from the right. Pull near these locations and they�ll pop out. You have to maneuver them out, especially on the left side (pull the crankcase recirculation hose from the top of the valve cover, then slide forward and up).
3. Use compressed air to clean the area.
4. Undo connector to each coil. Undo bolt and pull/twist off. Cylinder #4 is very hard due to fuel lines. It can be pulled by moving the fuel lines down. Be careful not to damage fuel lines. Cylinder 8 (rearmost on left side is difficult; cuts into and tears the insulation on the body but it can be maneuvered to get it out).
5. Use compressed air to clean out the spark plug hole.
6. Use 5/8 plug socket to remove plug. In most cases, you�ll need to put the socket on one of the short extensions, lower it in, and then connect the second extension).
7. Use anti-seize on the bottom half of each plug when replacing
8. Install plugs, torque to 18 ft/lb per below chart. However, because of the friction of the anti-seize, it was hard to feel when the plugs seated. I torqued all to 10ft/lb which seemed plenty tight (and someone said to do 30% less if you use anti-seize, so close enough to how I�d do them by feel).
9. Reinstall the coil, torque to 44 inch/lb (I did it by feel; did not use the in/lb wrench)
10. Maneuver in and snap back in each coil cover. You have to look underneath them from over the engine to see the pins that they go into
11. Reinstall the top engine cover.
You can put new plugs in using plastic tubing (like you use for brake bleeding) that fits snugly over the tip. Twist till the plug starts in then pull and the tubing comes off. Then torque to spec (which is not tight at all).
The good thing about the tubing is you can feel whether the plug is screwing in without damaging the thread. You can see past it, too, if you need to.
(Don't use the plug socket you used for taking out the old plug! It tends to leave its rubber part on the plug.)
Great idea! I use two sockets right now. One has the rubber that holds the plug when pulling it out. For putting the plugs back in, I use another socket that doesn't hang on to the plug. So the hose is a great idea for installing them. Thanks. I'll put that in my instructions for next time.
Access to the back ones (#7 & #8 i.e. the rear on each bank) is a bit awkward on the STR but with a UJ (universal joint), light & mirror was quite easy. (One was more of a pain as I had to unbolt some stuff that's in the way - EVAP vale or whatever). I was sure I'd break it or cause an air leak but seems I got lucky.
Oh - a tip - do it with the engine quite hot. The plugs come out much more easily. I put the new ones in after it had cooled and torqued then. I guess you could put them in loose and torque later and would do that in future as leaving holes into an engine always scares me (I put something in that cannot fall in, thinking is vital here). Do not overtighten. Really.
You can put new plugs in using plastic tubing (like you use for brake bleeding) that fits snugly over the tip. Twist till the plug starts in then pull and the tubing comes off. Then torque to spec (which is not tight at all).
The good thing about the tubing is you can feel whether the plug is screwing in without damaging the thread. You can see past it, too, if you need to.
(Don't use the plug socket you used for taking out the old plug! It tends to leave its rubber part on the plug.)
Ah....the old plastic tube trick eh ;o)
Even better than that is I have Lisle tool with flexible shaft and a rubber boot on the end that is like a spark plug boot.
It fits tightly over the ceramic portion of plug and is dead easy to centralise
and safely start thread just by feel.
I have just finished servicing a Honda Jazz with the eight plug head and the rear set are a real pig to get to!
Thank the 'Service Gods' for multi length extensions, swivels and the Lisle Plug Installer....you can curve the shaft any which way and all done by feel.
Certainly makes the job easier;o)
When replacing plugs always use nickel ant-sieze on l80deg. of lower portion of
plug thread ad tighten to 18nm.
haven't seen that. I know that copper speeds corrosion on aluminium alloys, so would not be a good choice on these cars.
I have some "anti-seize spray" for stainless steel fittings, which prevents galling, it comes out dark grey, but the label doesn't say what it is.
edit
found it on fleabay now! the nickel grease is advertised as suitable for stainless and high temp 1450C, I shall order a little tub. Big tubs are about �100 per 500g !!!!!!!
ta.
Nickel anti-sieze is reccomended by the factory for just this reason ;o)
Permatex is the brand I use with a small artists brush to place just enough on the plug threads.
ben using it for years and works a treat.
It has also been found that the electrical properties for this are much better.
That's why I always use di-electric grease on el;ectrical components like conectore, lightbulbs, battery terminals....far superior to pet. jelly and other bits of rubbish ;o)
dumb question, have things changed? It has been many years since I worked as a mechanic but back in the 70's it was a no no to use anti-siege on spark plug threads. It cut down on the heat transfer from the plug to the head.
dielectric grease
Web definitions
Any insulating grease that prevents corrosion of electrical connectors (and spark plugs etc) by preventing access by water
I know this is a slightly older thread guys but still relevant. Two things, dielectric grease and plumbers silicone grease are not the same formulation. Secondly, current NGK spark plugs have a coating and NGK specifically advise against the use of anti seize because they say that it affects the heat transfer and the torque profile which is critical.
Plugs: NDK IFR5N10 Laser Iridium
Tools:
� Spark plug socket (with rubber in the tip to pull the plug out, using another plug socket that doesn�t grip so hard is better for putting the new plug in (so when you pull the extension out, it comes with the socket rather than the socket staying on top of the plug)
� 3/8 socket wrench and 3/8 torque wrench (ft/lb) and � torque wrench (in/lb)
� Two short extensions (instead of one long one)
� 8mm wrench/socket for coil bolts
� Compressed air for cleaning out holes prior to removing plugs (not necessary if coils sealed hole well)
� Anti-seize for spark plug threads.
1. Remove top engine cover (Philips screwdriver, four screws that turn 180 degrees). Remove oil fill cap first (replace cap until you are ready to reinstall the engine cover)
2. Remove the left and right coil covers. They snap in/ snap out. The two snap fasteners are evenly spaced, so about 1/3 in from the left and 1/3 in from the right. Pull near these locations and they�ll pop out. You have to maneuver them out, especially on the left side (pull the crankcase recirculation hose from the top of the valve cover, then slide forward and up).
3. Use compressed air to clean the area.
4. Undo connector to each coil. Undo bolt and pull/twist off. Cylinder #4 is very hard due to fuel lines. It can be pulled by moving the fuel lines down. Be careful not to damage fuel lines. Cylinder 8 (rearmost on left side is difficult; cuts into and tears the insulation on the body but it can be maneuvered to get it out).
5. Use compressed air to clean out the spark plug hole.
6. Use 5/8 plug socket to remove plug. In most cases, you�ll need to put the socket on one of the short extensions, lower it in, and then connect the second extension).
7. Use anti-seize on the bottom half of each plug when replacing
8. Install plugs, torque to 18 ft/lb per below chart. However, because of the friction of the anti-seize, it was hard to feel when the plugs seated. I torqued all to 10ft/lb which seemed plenty tight (and someone said to do 30% less if you use anti-seize, so close enough to how I�d do them by feel).
9. Reinstall the coil, torque to 44 inch/lb (I did it by feel; did not use the in/lb wrench)
10. Maneuver in and snap back in each coil cover. You have to look underneath them from over the engine to see the pins that they go into
11. Reinstall the top engine cover.
Just got my new plugs! Safe to say I�m nervous as heck about -#7 & #8. GREAT Post, thank you!!!
Just got my new plugs! Safe to say I�m nervous as heck about -#7 & #8. GREAT Post, thank you!!!
indy, loved the picture with the watches background. I shall be showing it to my wife, " Of course I need more watches". Even my daughter bought me a display case to put some of my watches in a few years ago. Thanks.