
LED side mirror swap with pics

Hi all I have been owner of my XJ for few months now and really wanted to do some upgrades and maintenance that i think the car has needed. One of the first things was upgrading the licence plate bulbs to LED just to give that nice modern look and i was missing bulb covers so good time to do all at once. The next thing on my list was to add LED puddle lights on the side mirrors are the standard bulb were not as flashy as i wanted. I noticed that there is no simple bulb swap under the cover, so i made this little guide for owners that want to change but were worried about breaking anything.
First step is to fold mirror forwards
http://flic.kr/p/dSHqwV
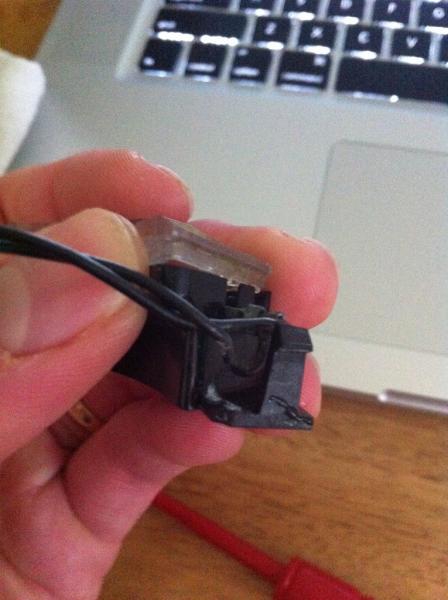
Then you will have to pull the small cover towards you till it drops reveling the wiring, which you simply pull down slightly then disconnect. You made find a build up what looks like sand but is in fact corrosion form the mirror frame. I didnt have any or much in my photos due to cleaning a few weeks ago when i had a suck mirror in the cold.
http://flic.kr/p/dSNZSf
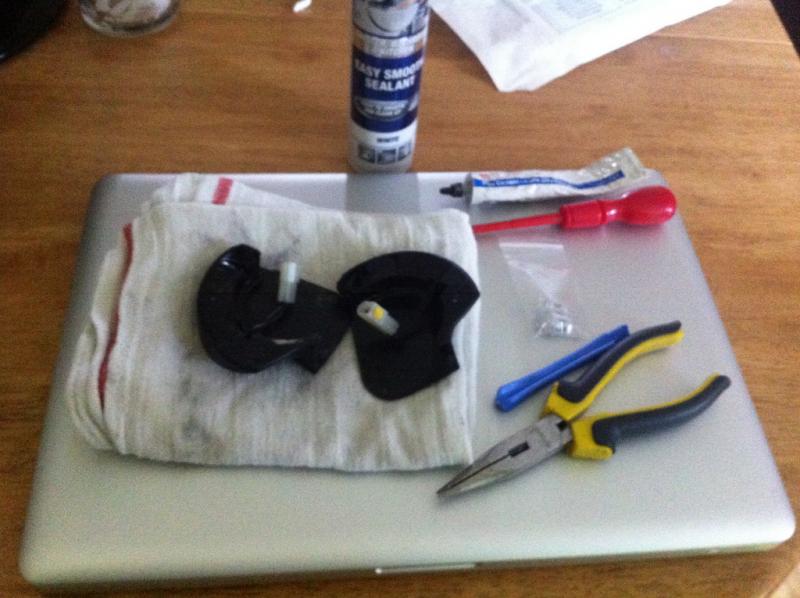
Next you will need a few tools including:
small flat head
ipod plastic pry tool as they leave no marks
tape
sealer or glue (I used both due to english rain)
2 new bulbs 501 LED side lights not sure what US size is but same as sidelight and license plate
Also wifes hairdryer when she is not looking
http://flic.kr/p/dSNZLA
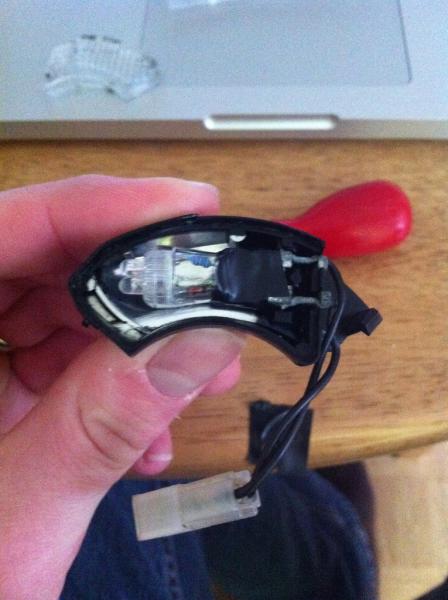
First take the bulb unit out the cover then chances are glue will not be to strong due to time on the car so start with the corner and slowly work along the edge pulling up gently until cover pops off
http://flic.kr/p/dSHqf4
Then everything will be out and should look like so
http://flic.kr/p/dSHy4T
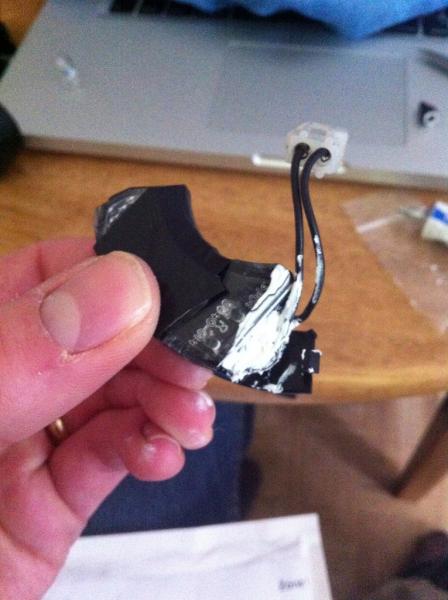
Next job is to remove the old bulbs and put new LED bulbs on the wiring and take to the car to test with the lights on. Just due to finding out which way round bulb should be this is harder once you have sealed everything and put it back on the car.
http://flic.kr/p/dSNZzf
If all went well It is time to get everything back together. Once i knew which way round the bulbs wanted to be i wrapped the ends up in electrical tape. This was because i had condensation inside the hosing when i took them off and also stops bumps loosening the connection.
http://flic.kr/p/dSNZkG
With the glue apply a small amount on the lip then place on the housing and i wrapped with tape to keep uniform. I then when wrapped added more glue to outside and sealant to wire the wires are to fill any holes to stop water. My wifes hair dryer came in here as it allowed quicker drying.
http://flic.kr/p/dSNZdm
When all is dry place housing back in the cover and attach back to the cars wiring then push wires back up the hole may need a wiggle if corroded. Then sit back and enjoy no more wet feet and car looking 10 years younger.
First step is to fold mirror forwards
http://flic.kr/p/dSHqwV
Then you will have to pull the small cover towards you till it drops reveling the wiring, which you simply pull down slightly then disconnect. You made find a build up what looks like sand but is in fact corrosion form the mirror frame. I didnt have any or much in my photos due to cleaning a few weeks ago when i had a suck mirror in the cold.
http://flic.kr/p/dSNZSf
Next you will need a few tools including:
small flat head
ipod plastic pry tool as they leave no marks
tape
sealer or glue (I used both due to english rain)
2 new bulbs 501 LED side lights not sure what US size is but same as sidelight and license plate
Also wifes hairdryer when she is not looking
http://flic.kr/p/dSNZLA
First take the bulb unit out the cover then chances are glue will not be to strong due to time on the car so start with the corner and slowly work along the edge pulling up gently until cover pops off
http://flic.kr/p/dSHqf4
Then everything will be out and should look like so
http://flic.kr/p/dSHy4T
Next job is to remove the old bulbs and put new LED bulbs on the wiring and take to the car to test with the lights on. Just due to finding out which way round bulb should be this is harder once you have sealed everything and put it back on the car.
http://flic.kr/p/dSNZzf
If all went well It is time to get everything back together. Once i knew which way round the bulbs wanted to be i wrapped the ends up in electrical tape. This was because i had condensation inside the hosing when i took them off and also stops bumps loosening the connection.
http://flic.kr/p/dSNZkG
With the glue apply a small amount on the lip then place on the housing and i wrapped with tape to keep uniform. I then when wrapped added more glue to outside and sealant to wire the wires are to fill any holes to stop water. My wifes hair dryer came in here as it allowed quicker drying.
http://flic.kr/p/dSNZdm
When all is dry place housing back in the cover and attach back to the cars wiring then push wires back up the hole may need a wiggle if corroded. Then sit back and enjoy no more wet feet and car looking 10 years younger.
Last edited by James Lewis; Feb 6, 2013 at 12:29 PM. Reason: messed pics up


Thank you for re posting my pictures I have figured out how to do it now. Will take photo tonight if rain eases off . I am please with results nice blue glow down the door makes car really stand out. I think I will keep interior bulbs stock I like how the make a warm glow. My Lexus Gs had all led bulbs and was nice went we'll with the black leather.


Senior Member


Joined: Feb 2018
Posts: 561
Likes: 230
From: Wexford
Just completed this mod this evening
One of the mirror lamps had gone so I thought I 'd replace both with LEDs
I've used the osram LED 5W5 unit successfully in my front park lights some time ago
Used the RING equivalent one here. 14 Euro for two so not cheap but not had good experience with the cheapo ebay ones
Anyway turned out the bulb I thought was bad was OK and the connector within the mirror was all cruded up.
Replaced both lamps with LEDs following the advice above. Cleaned the connectors and back together
Took less than an hour
Looks great
Senior Member

Joined: Aug 2012
Posts: 404
Likes: 155
From: Wake Forest, NC
Just completed this mod this evening
One of the mirror lamps had gone so I thought I 'd replace both with LEDs
I've used the osram LED 5W5 unit successfully in my front park lights some time ago
Used the RING equivalent one here. 14 Euro for two so not cheap but not had good experience with the cheapo ebay ones
Anyway turned out the bulb I thought was bad was OK and the connector within the mirror was all cruded up.
Replaced both lamps with LEDs following the advice above. Cleaned the connectors and back together
Took less than an hour
Looks great
One of the mirror lamps had gone so I thought I 'd replace both with LEDs
I've used the osram LED 5W5 unit successfully in my front park lights some time ago
Used the RING equivalent one here. 14 Euro for two so not cheap but not had good experience with the cheapo ebay ones
Anyway turned out the bulb I thought was bad was OK and the connector within the mirror was all cruded up.
Replaced both lamps with LEDs following the advice above. Cleaned the connectors and back together
Took less than an hour
Looks great
Trending Topics
Senior Member
Joined: Feb 2018
Posts: 561
Likes: 230
From: Wexford
I used silicone sealant/adhesive to refit the lenses
You will need an LED which is no bigger than the existing 5W5 lamp
A lot of the LEDs on sale are much larger and won't fit
When you get the lens off and bulb out don't be tempted to clean the reflector, as its very delicate and you'll end up wiping some of it off!!
You will need an LED which is no bigger than the existing 5W5 lamp
A lot of the LEDs on sale are much larger and won't fit
When you get the lens off and bulb out don't be tempted to clean the reflector, as its very delicate and you'll end up wiping some of it off!!

Thread
Thread Starter
Forum
Replies
Last Post
Currently Active Users Viewing This Thread: 1 (0 members and 1 guests)