When you click on links to various merchants on this site and make a purchase, this can result in this site earning a commission. Affiliate programs and affiliations include, but are not limited to, the eBay Partner Network.
Replacement of rear subframe bushings / A-frame bushings
Hello everybody!!!
I just wanted to ask if somebody could give me any advice on how to replace the rear subframe bushings....I already did some research, but I'm not 100% sure on the procedure yet.
Can I just put the car on jack stands, remove these 4 bolts, pull the A-frame down and replace the bushing this way? Or is there more to it?
I read that it needs a press to put the new bushing in place. Is that correct info? Or can I install it without a press as well?
From memory, I think you have it pretty right, although I think it's no harm to support the diff with a trolley jack or similar, as the A frame supports it. I might be wrong here, but working from a failing memory!
You will need to remove the two outer supports, or at least slacken the bolts enough to allow the A frame to be removed. These are the two large brackets that the long bolt goes through, up through the bush itself.
The bushes are a press fit but might be released and re-installed using the long bolt and socket/spacer method, if you're familiar with this.
Give any bolts a spray and soak with releasing fluid beforehand as they can be quite stiff.
I just wanted to ask if somebody could give me any advice on how to replace the rear subframe bushings....I already did some research, but I'm not 100% sure on the procedure yet.
Can I just put the car on jack stands, remove these 4 bolts, pull the A-frame down and replace the bushing this way? Or is there more to it?
I read that it needs a press to put the new bushing in place. Is that correct info? Or can I install it without a press as well?
Replacing the subframe bushes requires removal not only of the large screws that secure the end brackets to the body of the car (Parts 18 in the first diagram below), but also four or more screws and/or bolts/nuts that secure the front edge of the lower subframe to the front differential mounting A-bracket and four screws that fix the subframe to the bottom of the differential.
The first couple of photos in this album may be helpful:
You typically don't have to support the differential from below. The rear end of the diff is supported by the dogbones or "bushed differential struts" (Parts 13), the upper ends of which attach to brackets on the body:
Before removing the old subframe bushings, take photographs of how they are oriented so you can install the new bushes correctly. There are two curved rubber "tabs" on the top of the bushing that must be oriented correctly relative to the seam on the underedges of the body.
Removing the old bushings is easiest if you use a reciprocating saw or hack saw to saw around the inner rubber section and push it out. Then use your hack saw to cut through the outer metal sleeve of the bushing, taking care not to cut into the subframe. Once it is cut through, the bushing sleeve will push out easily unless it's corroded, in which case it may take some encouragement with a drift punch and hammer.
Clean the subframe bushing bores with a wire brush to remove old rubber residue and corrosion that may make it difficult to press the new bushings in. Put the new bushings in the freezer for at least 30 minutes before you're ready to press them in. While their steel outer sleeves are cooling and contracting, prepare your hydraulic press setup to support the underside of the subframe and center the bore under the ram.
Remove one bushing from the freezer and apply soapy water to its outer circumference to help lubricate it. Place the bush in the subframe bore in its proper orientation. Place a thick metal plate over the bush to help spread the pressure, then carefully press the bushing home.
Thank you very much Don!!!
So there is a little more to it than I thought - but it seems manageable....I will get on it this weekend and take some pictures of the different steps again.
I have two more questions:
#1: I don't have a press - so should I have a shop press the bushings in place? Or could I manage this with the freezer-method, a strong bolt, a couple of washers and a nut?
And #2: Do you happen to know of any torque requirements for all these bolts?
1: I don't have a press - so should I have a shop press the bushings in place? Or could I manage this with the freezer-method, a strong bolt, a couple of washers and a nut?
I don't know if you can press these bushings in with the bolt/nut method. They are so large and the surface area of rubber that has to be pushed into the subframe bore is so large that there is tremendous resistance. Years ago I bought a small hydraulic press from Harbor Freight for $70, and it has paid for itself many times over. They still sell a small press for that same price, the last time I checked. The other option is to take the subframe and bushes to a local auto machine shop and have them press them in. Shouldn't cost much at all. Just be sure you have taken photos of the orientation of the original bushes so you can have the new ones installed with those rubber tabs aligned correctly.
And #2: Do you happen to know of any torque requirements for all these bolts?
If you don't have the X300 Workshop Manual DVD from the Jaguar Daimler Heritage Trust (that and the Supplementary DVD are two of the best investments you can make for servicing your Jag), I believe the torque figures are listed in the XJ40 Haynes Manual, which is available for download from the 'HOW TO' quick links thread at the XJ40 forum home page.
BTW, I have a new pair of these big bushings I bought for my XJR but didn't end up replacing. Mine looked completely intact so it wasn't worth the effort.
Be happy to sell them to you for a discount to get them off my shelf if you need them.
I don't know if you can press these bushings in with the bolt/nut method. They are so large and the surface area of rubber that has to be pushed into the subframe bore is so large that there is tremendous resistance. Years ago I bought a small hydraulic press from Harbor Freight for $70, and it has paid for itself many times over.
Don - coincidentally there is a similar conversation about these bushes on the XK8 subforum (https://www.jaguarforums.com/forum/x...-131715/page3/).
I gave up with the threaded bar approach last week as it was clear these needed a lot more force to push out.
Don - coincidentally there is a similar conversation about these bushes on the XK8 subforum (https://www.jaguarforums.com/forum/x...-131715/page3/).
I gave up with the threaded bar approach last week as it was clear these needed a lot more force to push out.
Yes, my press is similar to that one, but with a rectangular welded frame. It originally came with a 5-ton bottle jack, but when that failed, I replaced it with a 6-ton version of the same size. The one on ebay appears to have slightly less vertical room between the bottom end of the ram rod and the lowest setting of the crossbar support, which could limit its usefulness for some jobs, like differential output shaft bearings, but it ought to work just fine on the subframe bushes.
The second photo in the album at the link below shows my press. I've done lots of jobs on our '88 and '93 XJ40s, including the rear and front subframe bushes, differential output shaft bearings, and all control arm bushes, not to mention plenty of other jobs on other vehicles. Maybe the best $70 I ever spent:
BTW, to get the old bushes out, it is usually easiest to first cut the central rubber section out with a hack saw or power reciprocating saw (Sawzall), then use a manual hack saw to cut through the outer steel ring of the old bush just until you cut through the ring without cutting into the subframe. The old ring and remaining rubber will then easily press out. Before installing the new bushes, see my earlier notes about the freezer, soapy water, and proper alignment of the bushes.
Thanks again for all your replies!!! And sorry for my late update, but I was out the the country for a few weeks...
Everything went very smooth with the repair.
The most difficult part was for sure to remove the old bushings from the frame. I don't think I would have gotten this done without your suggestions! These babys are really really tough, and it took me a lot of work to get them out - but in the end, it worked out. I used a reciprocating saw.
I took some pictures in the process - hopefully they will be helpful for whoever is taking on this job in the future....
These 4 bolts in the front need to be removed
The bolts need to be removed as well
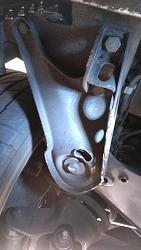
This bolt was the trickiest one to access - it was the last one I removed - but I think it's probably better to do this one first
The A-frame after I removed it from the car
The bushings appeared to be in decent shape, even though they were the original ones from 1996
I cleaned up everything real nice....
...and had the new bushings pressed in by a machine-shop. They charged me $20 per bushing, which is a fair price I think. It took them about 45 minutes for both sides to complete the job.
Installation was easy - and everything looked nice and clean after I was done...
These are the torque requirements for all the different bolts - taken from the X300 Workshop Manual
Thank you again for all your help and expertise!!!
Your original bushings looked good to me, and mine look the same, so wonder if you found that in fact the old ones were degraded.
I'll be interested in hearing Ingo's impressions too. On our '88 and '93 the old bushes looked fine too, but they were sagging and allowing the subframe to touch the body, so differential gear whine was transmitted directly into the passenger compartment. Replacing the bushes not only eliminated the audible gear whine, but the rear end felt tighter and the real surprise was that the steering seemed more direct and responsive.
I'll be interested in hearing Ingo's impressions too. On our '88 and '93 the old bushes looked fine too, but they were sagging and allowing the subframe to touch the body, so differential gear whine was transmitted directly into the passenger compartment. Replacing the bushes not only eliminated the audible gear whine, but the rear end felt tighter and the real surprise was that the steering seemed more direct and responsive.
Cheers,
Don
Ahh, that is interesting. I have a new set in a box, so with this write up showing how easy this is, maybe I'll add it to the list.
There are some poly bushings out there too, I wonder if those would be a good fit for this application for longevity?
Since this isn't a rotating assembly, perhaps this is one area where poly may be beneficial and squeaks and other poly related drawbacks are not an issue?
There are some poly bushings out there too, I wonder if those would be a good fit for this application for longevity?
Since this isn't a rotating assembly, perhaps this is one area where poly may be beneficial and squeaks and other poly related drawbacks are not an issue?
That's a very interesting question, Al. Poly bushes might really help make the rear end feel more solid, especially on an XJR. It might come at a cost of increased harshness, though. Personally, I might be willing to accept that tradeoff.
I've also been thinking about replacing the subframe bushings with the poly ones from powerflex.
I'm still waiting on my sway bar bushings from them which were ordered over a month ago though.
I've got a press at home but is there a special way to push the new bushings in?
I've got a press at home but is there a special way to push the new bushings in?
Hi AlbBolivar,
Here are a few tips:
1. Before you cut the old bushes out, take photos and note the orientation of the curved rubber "tabs." The gaps in the tabs must be aligned properly to clear the underedge of the body.
2. Before you press the new bushes into the subframe, put them in the freezer for 30 minutes or more to contract the diameter of the steel core. Take one bush out of the freezer just before you press it in, then the other one.
3. Just before you press the bush in, apply some soapy water to the outer circumference and inside the bores in the subframe. This will serve as a lubricant that will dry after you get the bushes pressed in.
4. Take care to place the bush in the bore with the rubber tabs properly aligned.
5. Place a flat steel plate over the top of the bush so the pressure applied by the ram is distributed evenly on the entire outer rim of the bush.
6. Before the bush has a chance to warm up, check to make sure it is fully seated. If not, put it back in the press and finish the job while the bush is still cold.
Your original bushings looked good to me, and mine look the same, so wonder if you found that in fact the old ones were degraded.
Thanks again for the detailed installation info!
.
Hello everybody!!
I'm not really sure if I can tell any difference in the stability or comfort of the car.
The reason for me to change them was that I was hoping I would get rid of a wining noise ( like Don said, some people experience noise transmitted into the cabin if the bushings are bad or degraded )....But unfortunately, this problem still persists....
I have seen but not used a technique for replacing the a-frame bushing described
fully at xj40.com
- raise vehicle
- drop a-frame at bush on one side a couple of inches
- insert two sockets of equal height between bush and body
- jack up a-frame away from bush or use a receiver
- bush should eventually pop out the bottom, sometimes overnight
A quick comment re the A frame bushes. As has been mentioned above, it is important when refitting the bushes to ensure that the slots/voids in the rubber are aligned as shown in the manual. Interestingly, on the XJR the alignment of the slots/voids is different, so there are some subtleties in the effects they have on handling.
The bushes ingo replaced looked fine to me too, but I have yet to be disappointed when replacing bushes on the X300. These cars seem to love bushes, the newer and fresher the better.
Since this isn't a rotating assembly, perhaps this is one area where poly may be beneficial and squeaks and other poly related drawbacks are not an issue?
.
I've been looking at them.
The sticking point is that the pictures don't confirm that the upper side hole matches the conical spigot.