
Driver's door went POP! Part? HOW TO

Thread Starter
|
Member
Joined: Jan 2010
Posts: 84
Likes: 2
From: Las Vegas, NV
Hey guys. Does anyone know what this part is called so I can start looking for one? It's really a door stop or something like that. Mine went snap crackle and pop the other day. Also is the door panel hard to remove so I can replace this?

Popular Reply
Oct 11, 2010, 05:40 PM
I just did this repair today.It took 2 hours. Here's the damage-
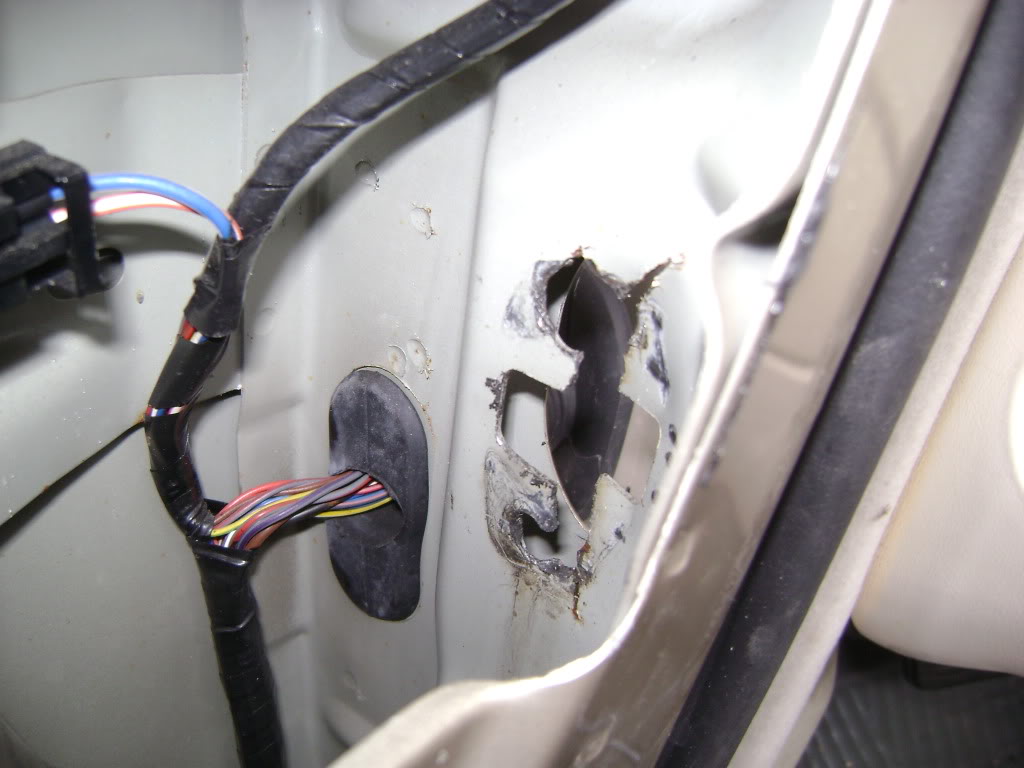
The door panel is relatively easy. Use a wide tool like those paint tools for opening cans, etc. The only two screws were by the tweeter, and under the door pull. There is a strong clip by the door handle that makes you think you missed a screw, but you just have to pull hard and off comes the panel.

Two Torx #30 screws hold the arm to the chassis. I could not get the bolt out at the hinge point, so I removed the bracket instead.
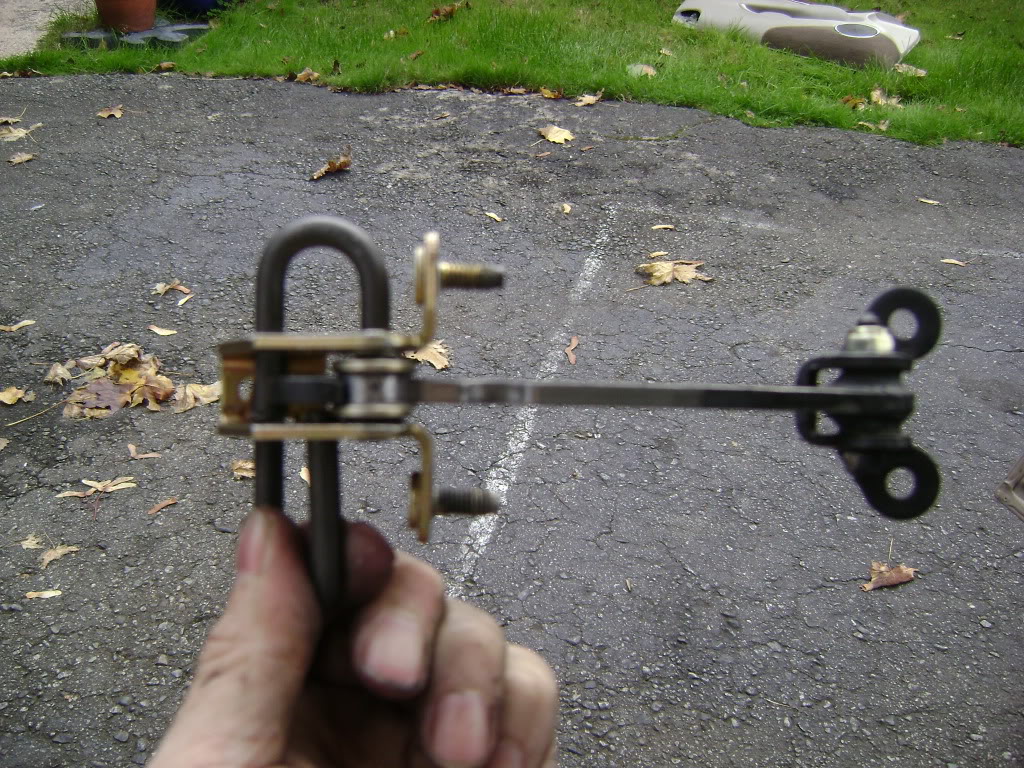
You have to pry the spring mechanism off the check arm to get all the bits out the door if you can't get that darned hinge point bolt out. A bit of hassle, but it worked ok.
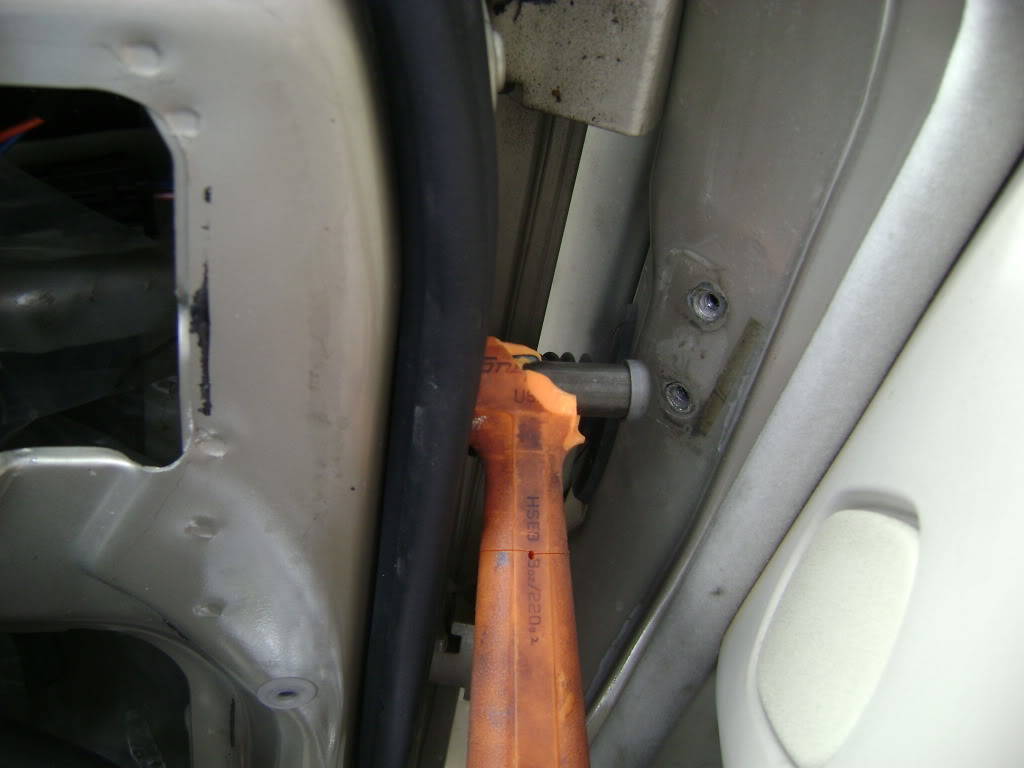
At that point I used a hammer to bend the sheetmetal back flat, it was badly deformed. There is no room to swing a hammer, so I put the hammer in place and closed the door on it as shown.
My bracket was also bent with a crack in it. If I had a new one to hand I would have replaced it, but felt it was ok to reuse after straightening.
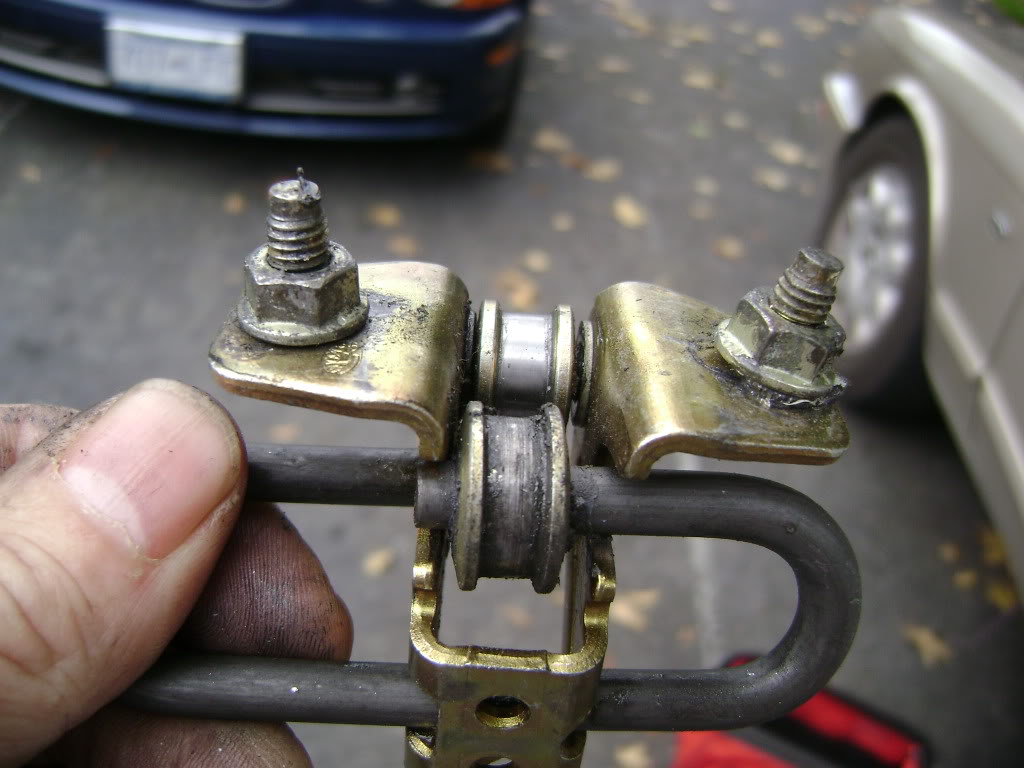
Four flat washers ( not too thick or there's not enough thread sticking through) did the job.
The door panel is relatively easy. Use a wide tool like those paint tools for opening cans, etc. The only two screws were by the tweeter, and under the door pull. There is a strong clip by the door handle that makes you think you missed a screw, but you just have to pull hard and off comes the panel.
Two Torx #30 screws hold the arm to the chassis. I could not get the bolt out at the hinge point, so I removed the bracket instead.
You have to pry the spring mechanism off the check arm to get all the bits out the door if you can't get that darned hinge point bolt out. A bit of hassle, but it worked ok.
At that point I used a hammer to bend the sheetmetal back flat, it was badly deformed. There is no room to swing a hammer, so I put the hammer in place and closed the door on it as shown.
My bracket was also bent with a crack in it. If I had a new one to hand I would have replaced it, but felt it was ok to reuse after straightening.
Four flat washers ( not too thick or there's not enough thread sticking through) did the job.
Last edited by avt007; Oct 11, 2010 at 05:43 PM.

Veteran Member
Joined: May 2007
Posts: 2,533
Likes: 23
From: Houston, Texas

Member
Joined: Mar 2010
Posts: 91
Likes: 18
From: Kansas
It is likely that the bolts holding the check arm to the door actually pushed or pulled through the metal in the door. It happened on my 99 XJ8 - driver's side. I removed the door panel and used two large washers to reconnect the check arm to the door. It is a little tedious getting your hand into place to re-fasten the bolts, but not impossible. The door panel is not too hard to remove, but the fastener's at the bottom of the panel may not come out cleanly. Probably using a (strong) plastic lever would help. It's been a while since I did this, but I think the procedure is to first remove the covering around the door handle, then pop the fastener's at the bottom, then lift the panel upward (there's a lip at the window). Disconnect the speaker/window control module connectors. It is possible there is another screw somewhere holding the panel on that I have forgotten, but it will become obvious if you haven't removed everything required.
Senior Member
Joined: Feb 2009
Posts: 629
Likes: 120
From: California, USA
There is in fact an additional screw under the pull handle. I didn't see it at first, and I struggled with it for a few minutes. Bend way down and you will see it underneath the handle. Other than that, as said above, it's a pretty easy removal.
I also did the washer trick and my door has been solid since.
I also did the washer trick and my door has been solid since.
I just did this repair today.It took 2 hours. Here's the damage-
Attachment 176400
The door panel is relatively easy. Use a wide tool like those paint tools for opening cans, etc. The only two screws were by the tweeter, and under the door pull. There is a strong clip by the door handle that makes you think you missed a screw, but you just have to pull hard and off comes the panel.
Attachment 176401
Two Torx #30 screws hold the arm to the chassis. I could not get the bolt out at the hinge point, so I removed the bracket instead.
Attachment 176402
You have to pry the spring mechanism off the check arm to get all the bits out the door if you can't get that darned hinge point bolt out. A bit of hassle, but it worked ok.
At that point I used a hammer to bend the sheetmetal back flat, it was badly deformed. There is no room to swing a hammer, so I put the hammer in place and closed the door on it as shown.
Attachment 176403
My bracket was also bent with a crack in it. If I had a new one to hand I would have replaced it, but felt it was ok to reuse after straightening.
Attachment 176404
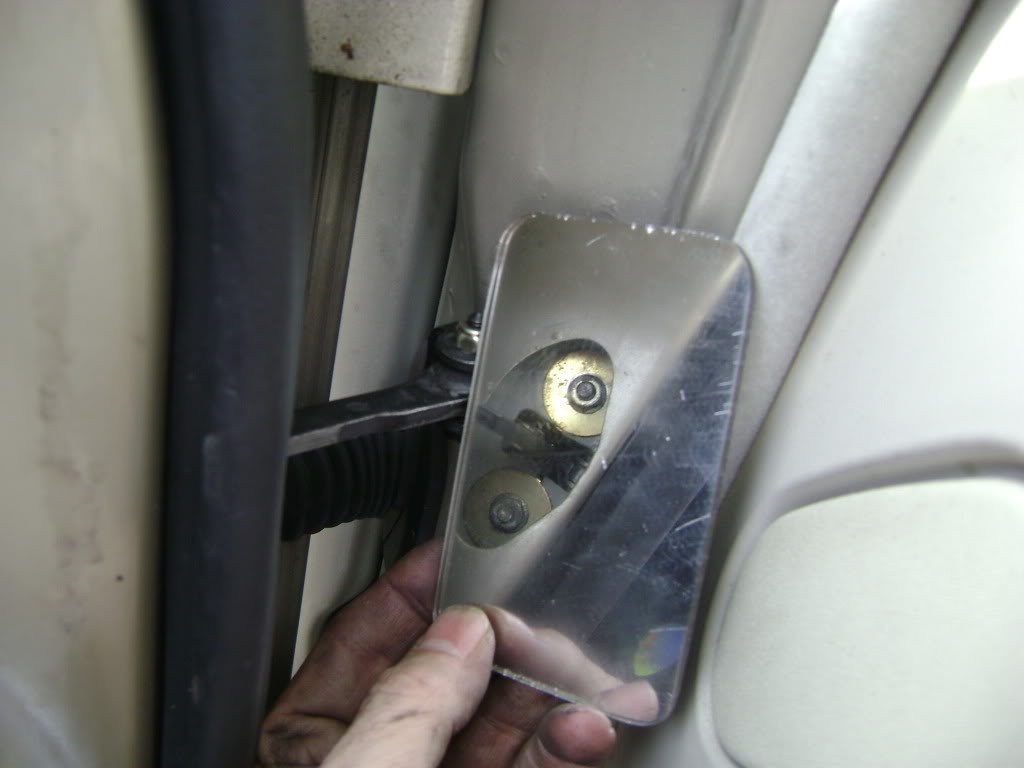
Four flat washers ( not too thick or there's not enough thread sticking through) did the job.
Attachment 176405
Attachment 176400
The door panel is relatively easy. Use a wide tool like those paint tools for opening cans, etc. The only two screws were by the tweeter, and under the door pull. There is a strong clip by the door handle that makes you think you missed a screw, but you just have to pull hard and off comes the panel.
Attachment 176401
Two Torx #30 screws hold the arm to the chassis. I could not get the bolt out at the hinge point, so I removed the bracket instead.
Attachment 176402
You have to pry the spring mechanism off the check arm to get all the bits out the door if you can't get that darned hinge point bolt out. A bit of hassle, but it worked ok.
At that point I used a hammer to bend the sheetmetal back flat, it was badly deformed. There is no room to swing a hammer, so I put the hammer in place and closed the door on it as shown.
Attachment 176403
My bracket was also bent with a crack in it. If I had a new one to hand I would have replaced it, but felt it was ok to reuse after straightening.
Attachment 176404
Four flat washers ( not too thick or there's not enough thread sticking through) did the job.
Attachment 176405
Last edited by avt007; Oct 11, 2010 at 05:43 PM.
Senior Member
Joined: Feb 2009
Posts: 629
Likes: 120
From: California, USA
Nice write-up. That's exactly what I did with mine. The flat washers seem to hold the metal together enough that it feels like it will last a while.
Trending Topics

Senior Member
Joined: Feb 2010
Posts: 556
Likes: 46
From: TEXAS
Good call on closing the door on the hammer. I wish I would have thought of that at the time. Maybe with a rag to protect my door jambs! I used a prybar and a few crappy blows from a hammer to straighten it out to about 75% and used fender washers on both sides of the cracked metal to help support the load. I found the info on here 
Glad to be of help. I've founds tons of good information here, and it's really nice to be able to pay some back, so to speak.
I would suggest being gentle with the door even after it's fixed, because I noticed the chassis sheet metal flexes, too.
I would suggest being gentle with the door even after it's fixed, because I noticed the chassis sheet metal flexes, too.


Great foto walk-thru,....so, I'm thinking that it might be a good idea for those of us that have not experienced this problem yet to go ahead and reinforce with the body washers to prevent this from happening eh?.....thanks for taking the time to post!
Last edited by tesla4all; Jan 24, 2011 at 12:56 PM. Reason: additional thought
Tesla,
That wouldn't be a bad idea. Even if you just put washers on the outside of the door (quick and easy) that would help it last longer.
The best thing you can do is be gentle with it. As I said before, the chassis isn't that strong either. Just watch it flex when you move the door....
That wouldn't be a bad idea. Even if you just put washers on the outside of the door (quick and easy) that would help it last longer.
The best thing you can do is be gentle with it. As I said before, the chassis isn't that strong either. Just watch it flex when you move the door....
Veteran Member
Joined: Feb 2011
Posts: 9,733
Likes: 2,203
From: on-the-edge
One of these went from "pop" to completely torn mounting arm in very short order.
And now, it occurs to me that this check arm is something completely out of the Rube Goldberg School of Engineering.
Why?
You might not have noticed because they have never been a source of trouble, but look at some other cars ... the door check mechanism is integrated into the hinge itself and not a separate part. Therefore, its forces are applied through the hinge plates which had better be at least strong enough to hold the weight of the door if warranty claims and recalls are to be avoided. Doors blowing off cars tend to be regarded as a hazard.

Senior Member
Joined: Nov 2010
Posts: 710
Likes: 87
From: West Central Mass. USA
We are always very careful when opening the doors to keep them short of the stop. Not only for saving the detent, but also for avoiding parking lot dings in the door edge.
The design of the detent is another Jaguar engineering mystery. I suppose recent graduates have to do something as a first project.
The design of the detent is another Jaguar engineering mystery. I suppose recent graduates have to do something as a first project.

Member
Joined: May 2011
Posts: 62
Likes: 5
From: Oregon
Hi Just the answer I was going to search for. Thanks for photos
My old body don't like those odd positions that are required to see in hard places.
My problem is there is no snap or any noise. probably broken loose or similar, no noise, no stop, and when moved by hand just flops back and forth. I have a new closure arm and also got a reinforcement plate on e bay. Hope this will repair.
Any ideas would be appreciated. Thanks


Junior Member
Joined: Dec 2012
Posts: 20
Likes: 1
From: Greer, SC
I just replaced the driver door check arm on my 1999 XJ8L using the helpful tips in this message list. Excellent. It took about 2 hours but it would have been less had I not installed the arm backwards. Oops! That's right, there is a right way and a wrong way. My advice is to take a picture of the old arm before you remove it.
Also, you can easily let a washer or a nut irretrievably drop into a door cavity while doing this job. I lost one of the 10mm fine thread nuts holding the check strap to the door doing this. I just replaced it with 7/16" one. (Not many metric nuts in my spare parts box.)
So take care and plan your moves.
All and fairly simple and straightforward.
Next fix: the center console cup holder!
Thanks!
Paul W.
Last edited by 1999XJ8L; Jan 19, 2013 at 12:53 PM.