When you click on links to various merchants on this site and make a purchase, this can result in this site earning a commission. Affiliate programs and affiliations include, but are not limited to, the eBay Partner Network.
Removing my overhead console for LEDs now I can't re-install it. The end towards the windshield fits fine into it's tangs but the (front/eyeglass holder) dangles. Looking @ the diagram it looks like a locking nut or nodule was there but mine never was, nor has it fallen during the install.
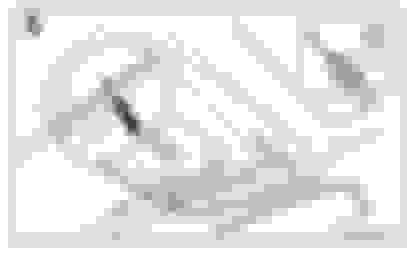
It was held securely before I removed it so what can I do to have it back secure without the piece. Also where can I find the part or # for it pictured below.
Never had so many issues replacing light bulbs, from brittle plastics disintegrating upon touch, to temperamental holders/sockets lol.
Edit :
I need # 5 from the diagram below.
Looks to be Part #: BBC7531PA
Last edited by King Charles; Jan 10, 2018 at 07:40 PM.
That is the correct part in your second diagram, it's a black plastic "screw" with 2 flats along the threads so you can push it in then turn it 1/4 CW to "lock" the console in place.
Agreed on the issues with working on those, such a pain to swap out bulbs, I crushed a bulb trying to pull it out of those insanely tight holders (mostly my fault but...) while trying to not break the plastic housing itself. Trying to R/I LED bulbs fought me even more. All the foam isolation stuff was also disintegrating into a sticky gooey mess that got everywhere.
Indeed, I even have one of the console's map lights that refuses to illuminate a LED bulb, but works fine w/ the old OEM bulb ?! Not sure what that's all about lol.
I'd like to know how part 9 (in the 2nd diagram) gets held in, and couldn't get any sensible answers from SNG B about it. Mine had fallen off, and was previously only glued in by the looks of it.....
For now I have just used double sided tape to make it stay there, but the proper information would be good to know.
If you just need that 1/4 turn plastic locking �screw� that goes inside the glasses holder, I have an extra one.
Yes that's all I need, I found one on E-Bay but the seller's non-responsive. I'll give them until this evening which will be 24 hours, if no reply, I'll take you up on yours, thanks !
Indeed if I'd discovered it sooner I wouldn't be on X308 #3 lol. All the issues I gave up on my 1st one for, are easily remedied by reading threads or asking here lol.
With regard to this forum, I have certainly received more than I've given.
Same here, absolutely.
What did people do before forums and internet? Not only for its availability, but also for the number of sources that respond to you with their own experiences, and in such quick fashion.