When you click on links to various merchants on this site and make a purchase, this can result in this site earning a commission. Affiliate programs and affiliations include, but are not limited to, the eBay Partner Network.
The ac guy sent me this link to a good article that describes the compressor that uses the superheat switch and the thermal fuse as well as the hslp and how to rewire the superheat/thermal to an hslp. I hope the link will transfer to this forum as a click on.
I need a little help understanding if I currently have a superheat compressor and buy a hslp compressor can I change the connector wire harness from the superheat to hslp? And if so how? Again, I am pretty good at unbolting old and installing new, I'm just a little foggy on the switchover electrical stuff.
I need a little help understanding if I currently have a superheat compressor
The answer is in the article you linked. Remove the switch and note the location of the small hole behind the switch. You may have to remove the compressor to get a clear view.
and buy a hslp compressor can I change the connector wire harness from the superheat to hslp? And if so how?
The article shows how...but there is an even easier way. If you go that route we'll help you through
An easier/better choice is to disregard what you presently have and simply get an HSLP compressor. You'll have to order a switch, too. Compressors typically don't come with the switch
Doug,
I don't mean to interfere with this thread, but are you saying that I need another part (safety switch) to attach to my rebuilt compressor before it will work
?
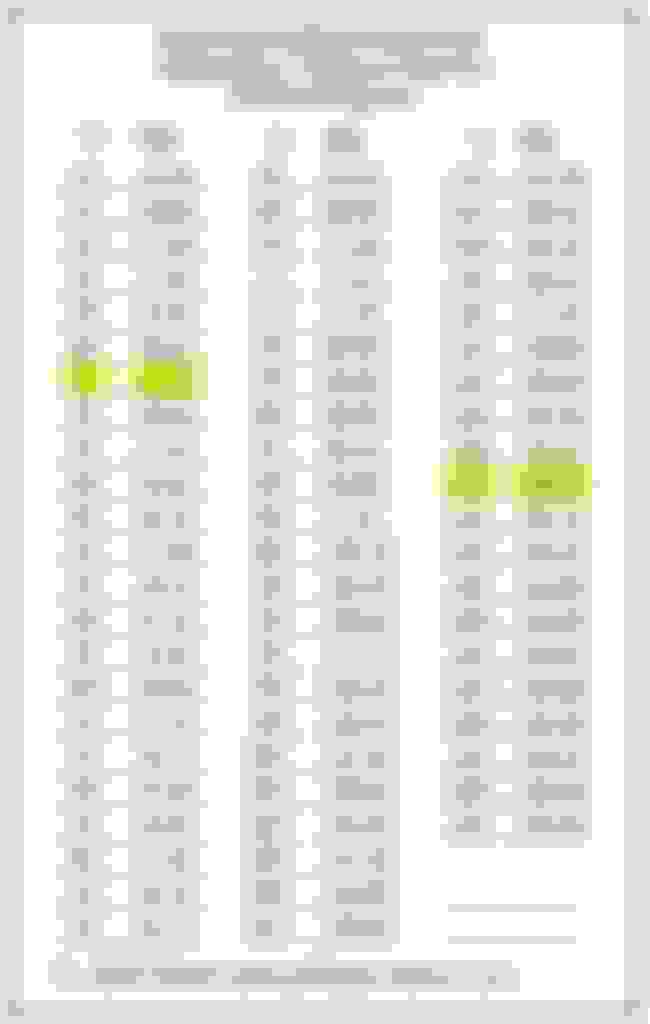
An easy way I�ve found to help diagnose A/C problems is to check the static pressure. You do it when the car is cold (no burned fingers) and you can use a gauge on either the high side or the low side port. You are measuring the pressure or amount of refrigerant in the system in a very accurate way. Any temperature even with the garage door closed. It doesn't tell you if the compressor is working or anything other than �does it have the right amount of refrigerant�. Below is the chart; just check the ambient temperature and find the right line on the chart.
Ok, this weekend I removed the drier and the tricky expansion valve. Now I've got the remove the compressor itself. I'm getting ready to order parts. Rockauto is showing 2 compressors: 58096 hslp for $268 and 7511249 superheat for $498.79. I guess I'll be getting 58096 and rewiring to hslp I don't want to but maybe I should remove the compressor first to really see what I have. I'd be losing about 5 shipping days if I do this. I guess it's better to be safe.The drier 33492 was only $16.91. They did not offer the correct expansion valve. They show 3411292. I'll have to find another source, maybe Welsh.
LT1: I looked at the photo of 38872 and the probe that inserts into cavity and held in place by two phillips screws is not the corkscrew that I removed. Is 38872 large enough to fill the cavity so it can be tightened by the 2 screws or does that black tar gupe hold it in place?
My old one had the "cork screw" end also, original equipment. Yes, the bulb on the end will fit into the cavity on the side of the pipe and allow you to tighten the two screws. The goop in my photo is something called "duct seal" and is used to plug holes. It is the consistency of old fashion modeling clay (not the new synthetic stuff) and is non-hardening. The directions with the valve recommended covering the bulb with something to insulate and keep the bulb the same temperature as the pipe. Duct Seal is my go-to.
Of my hundreds of build pictures, this is about the only one that shows even part of that valve.
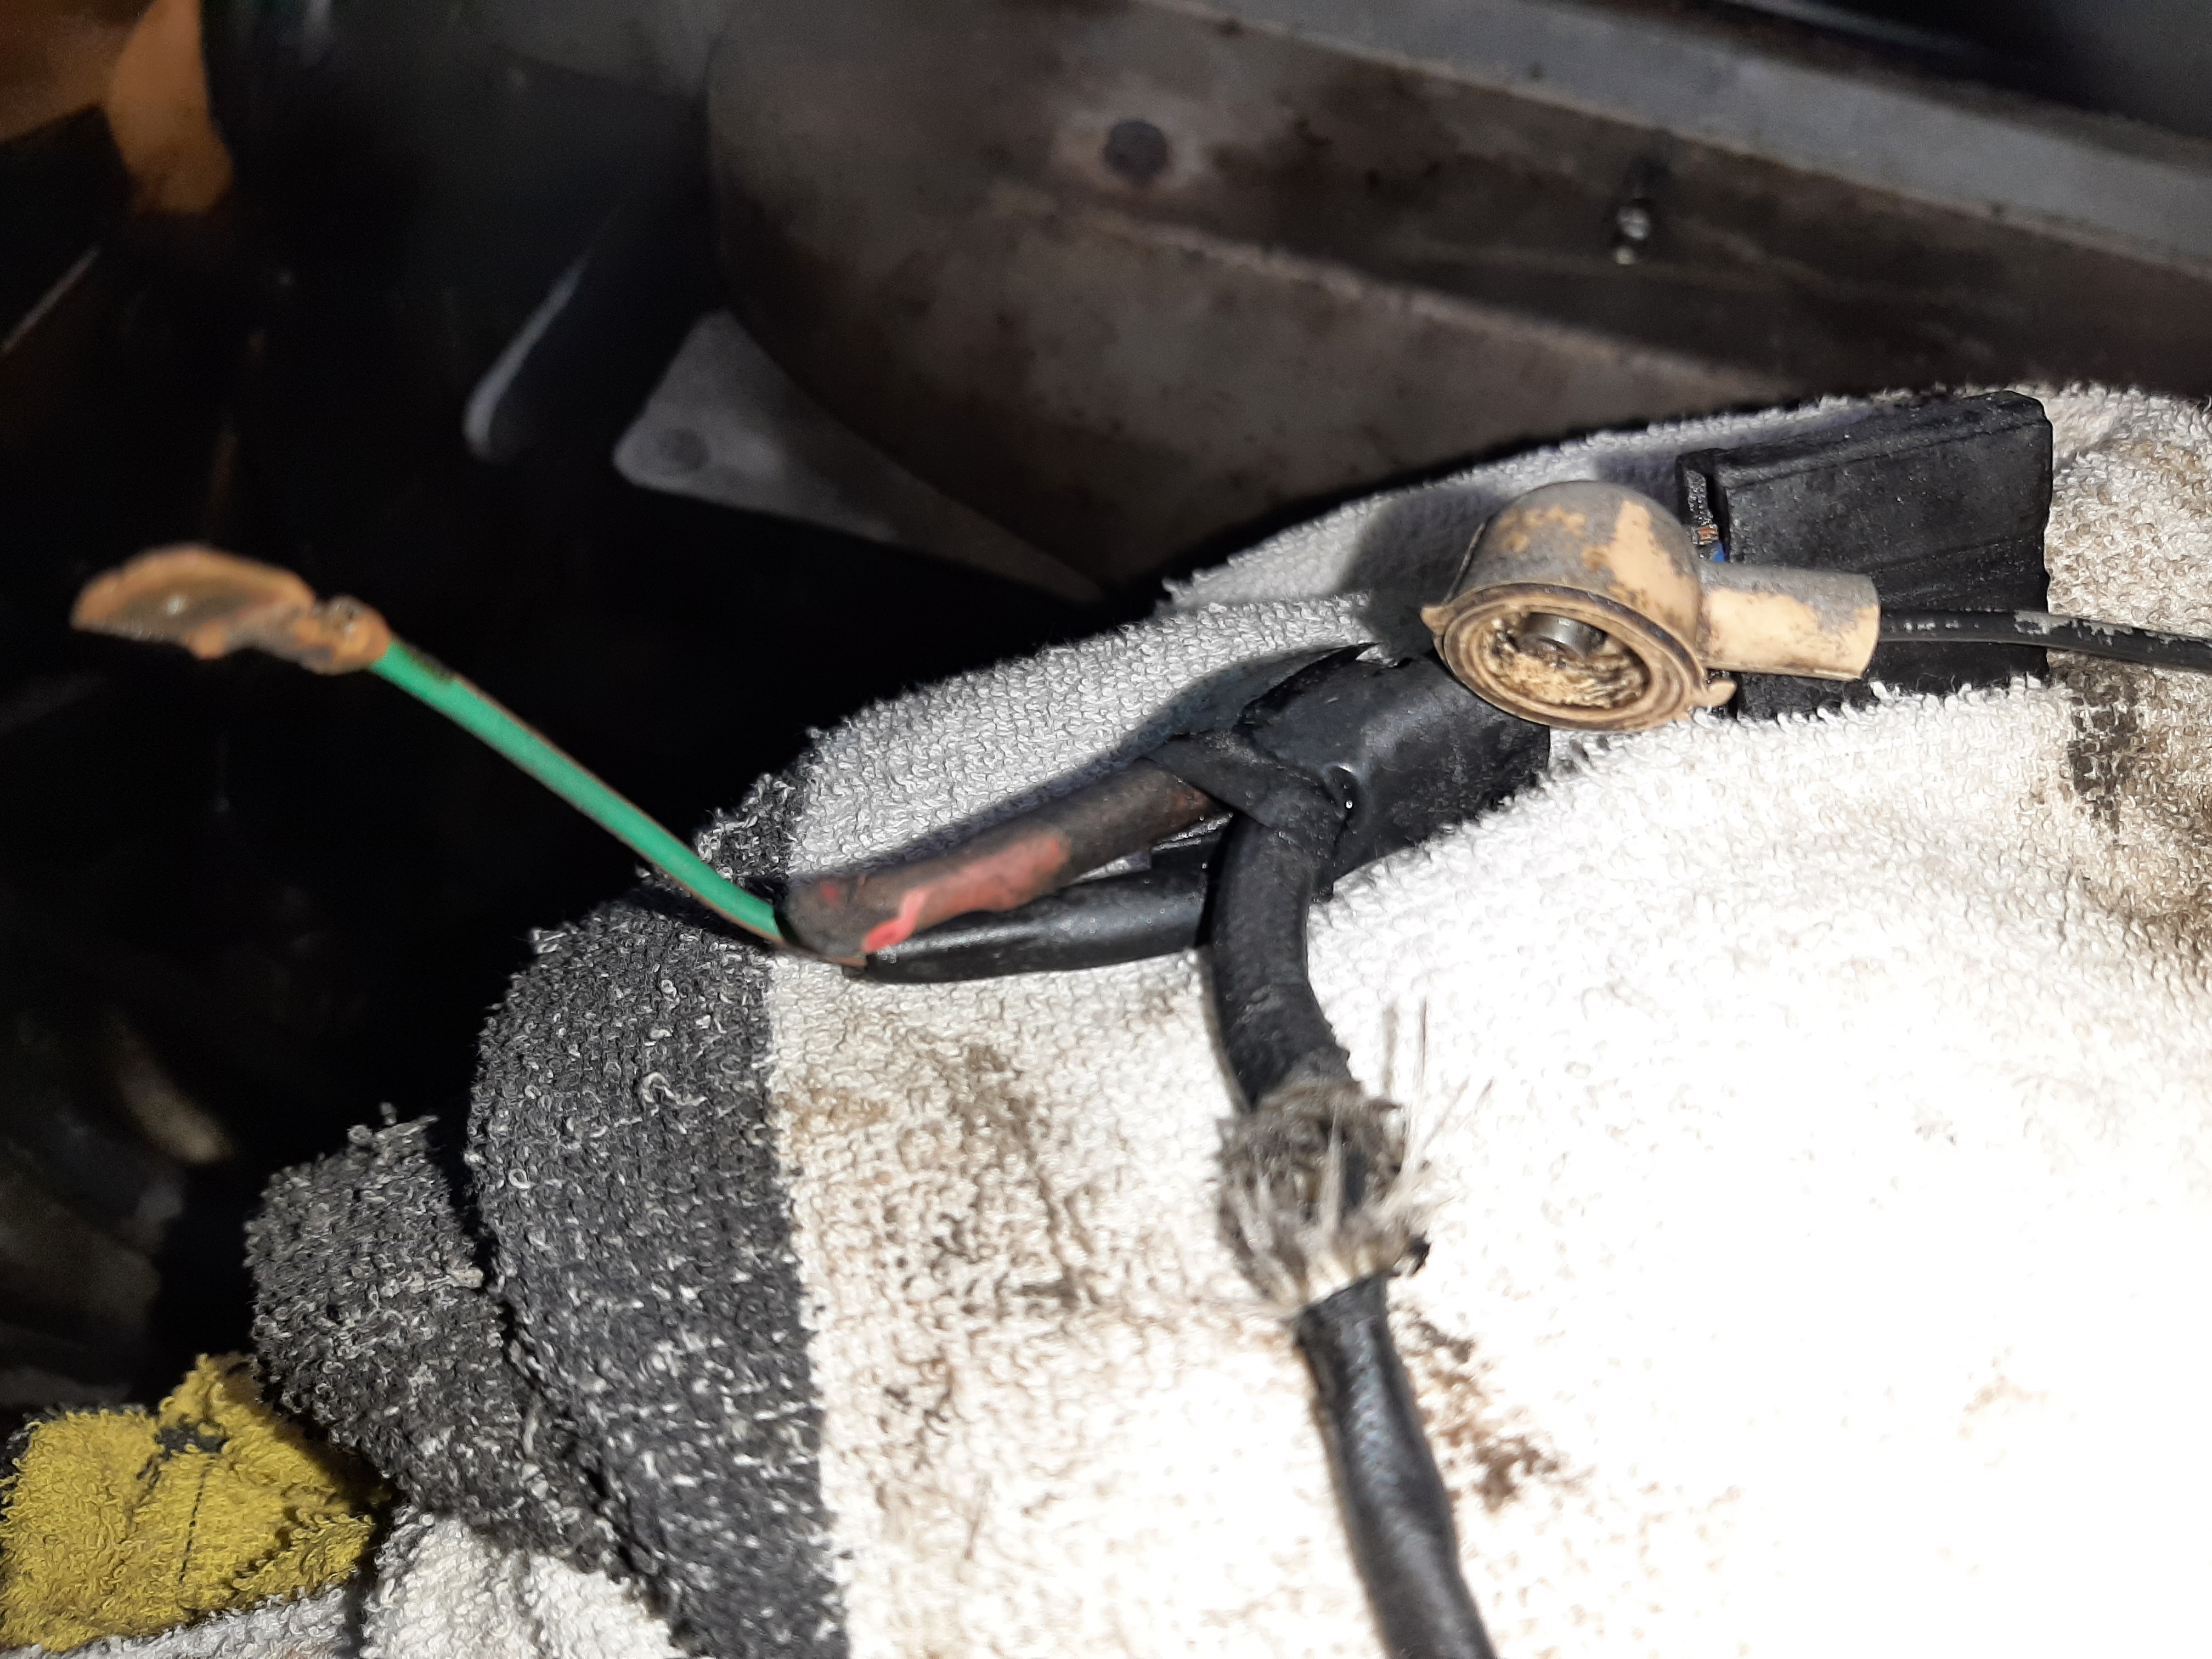
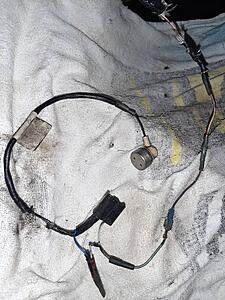
backside of the switch that's embedded in the compressor
front of the switch ( Doug was correct, both superheat and hslp switches can have the single prong)
Not sure but this looks to be where someone rewired the connector from superheat to hslp
Well it's finally out and now I can order the compressor, drier and expansion valve. The compressor was not original to the car but it had to have been a rebuild as it weighs at least 15 lbs.
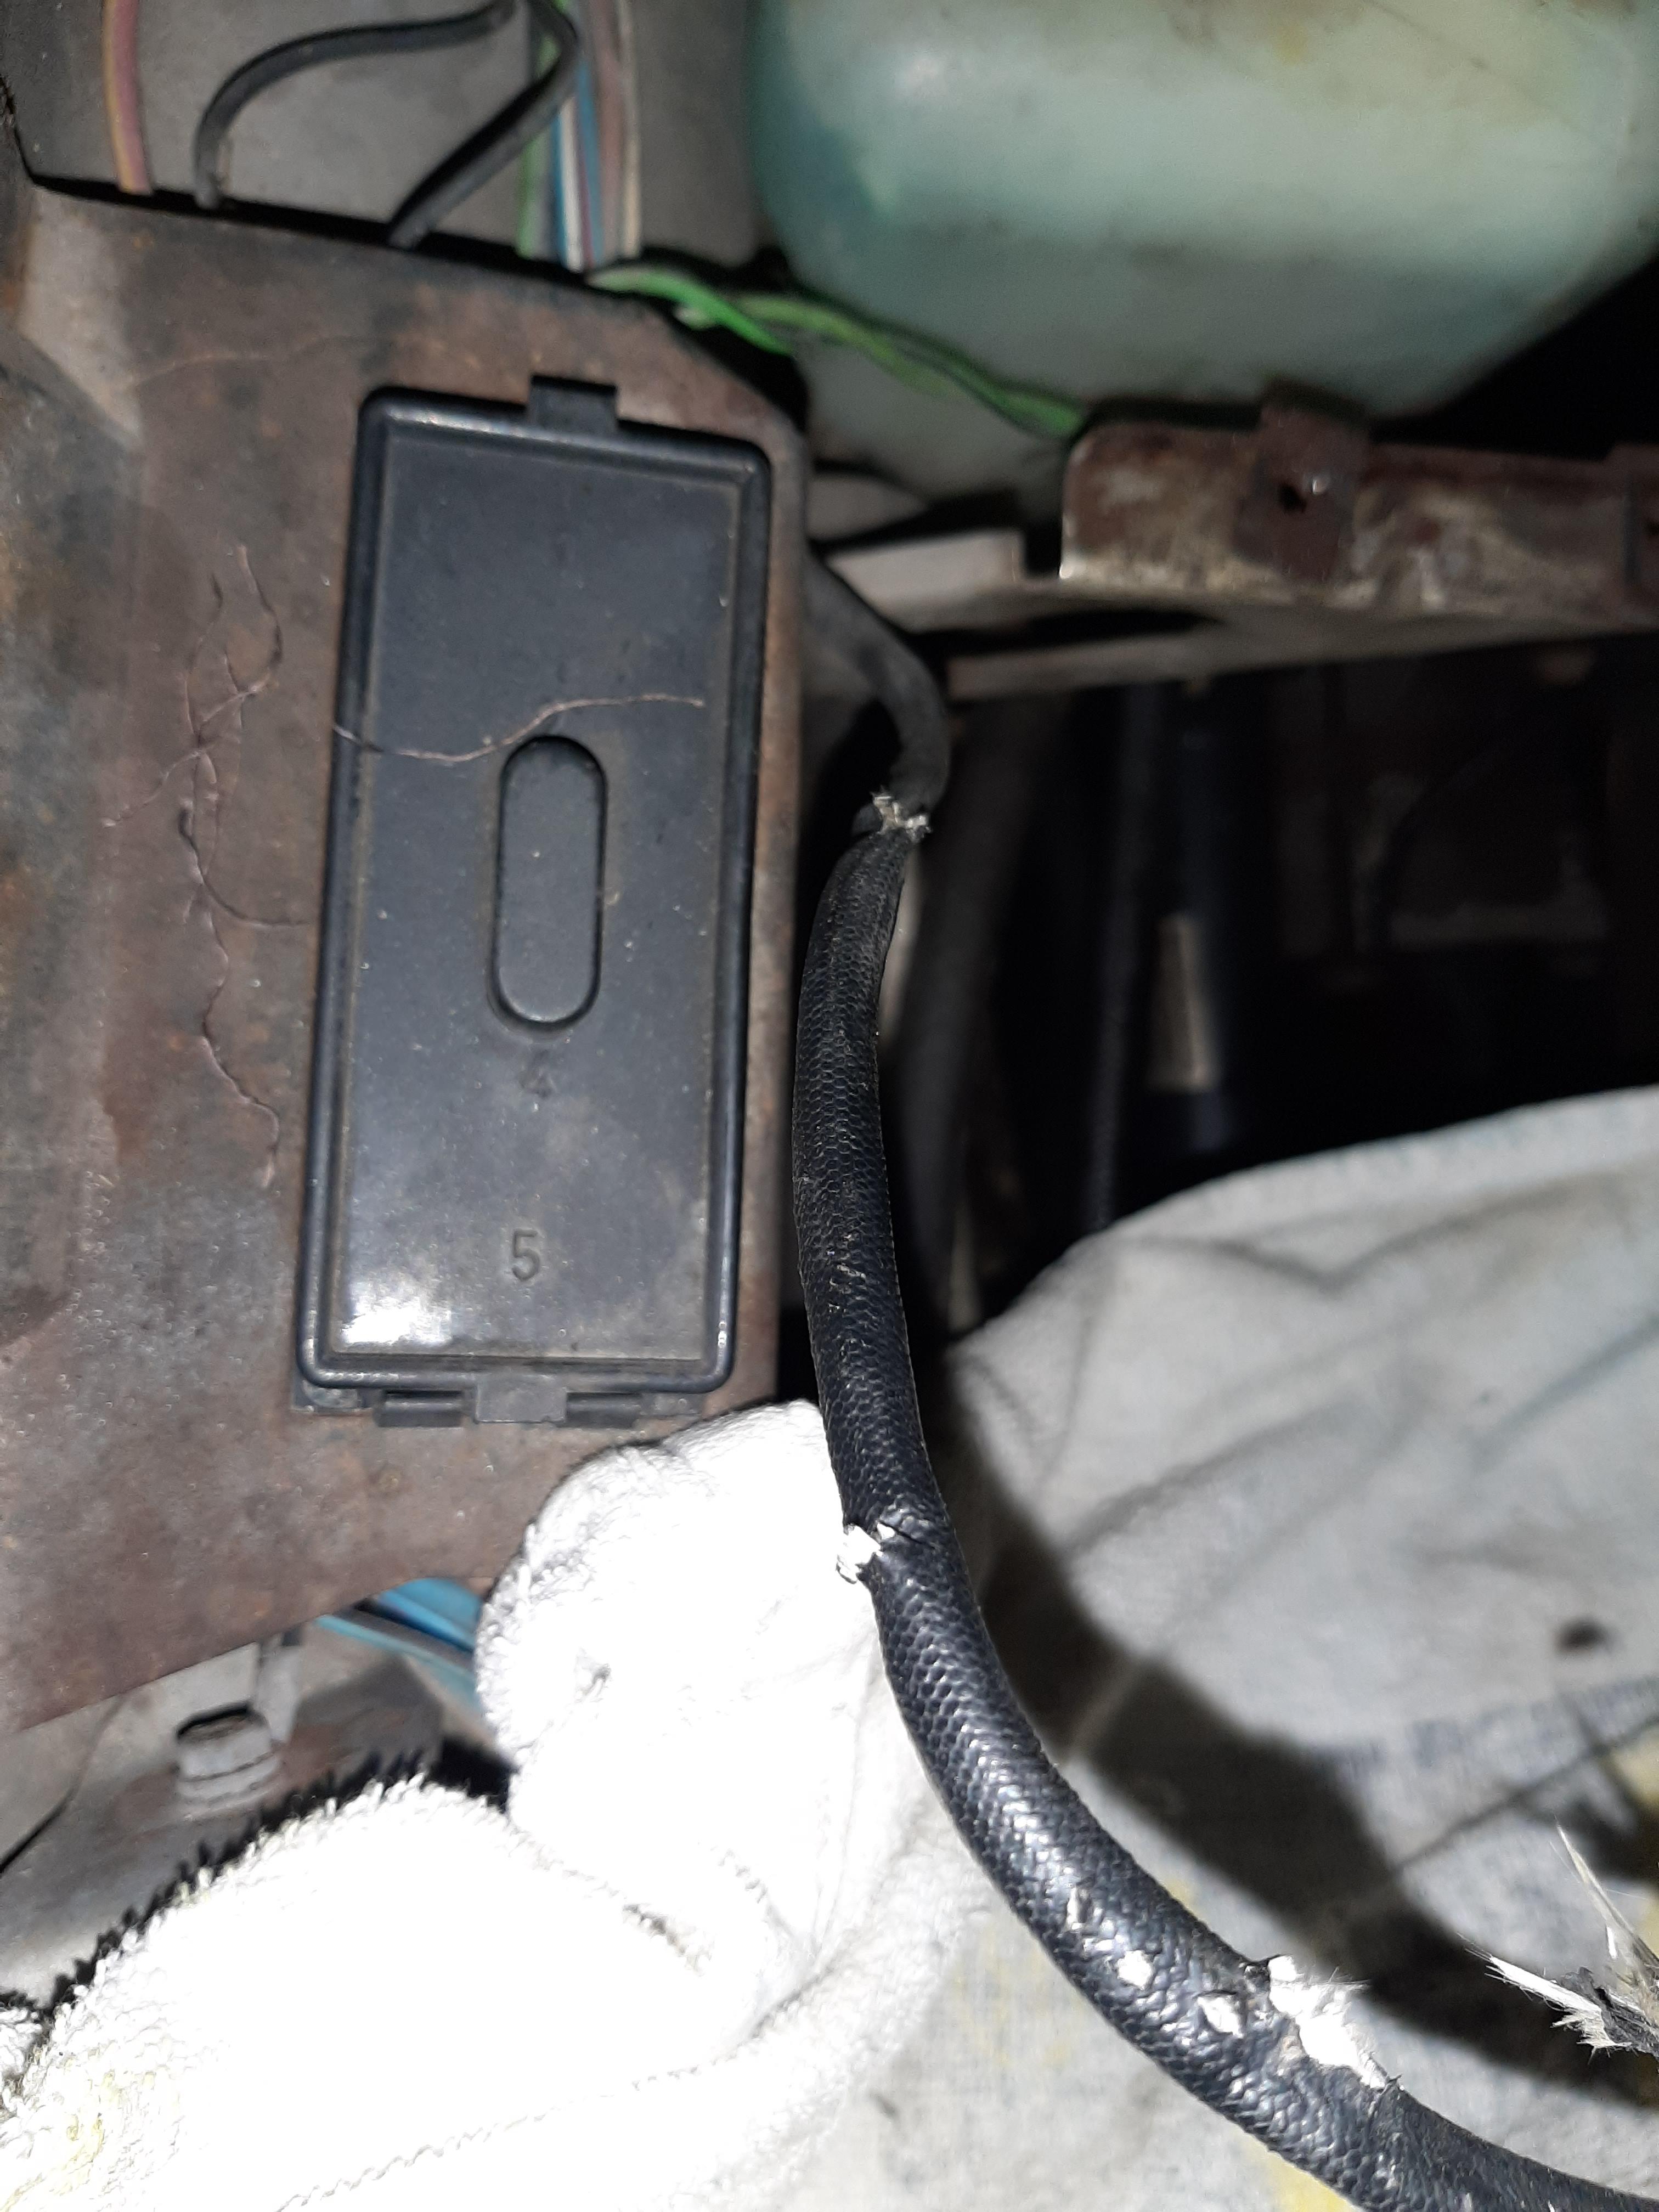
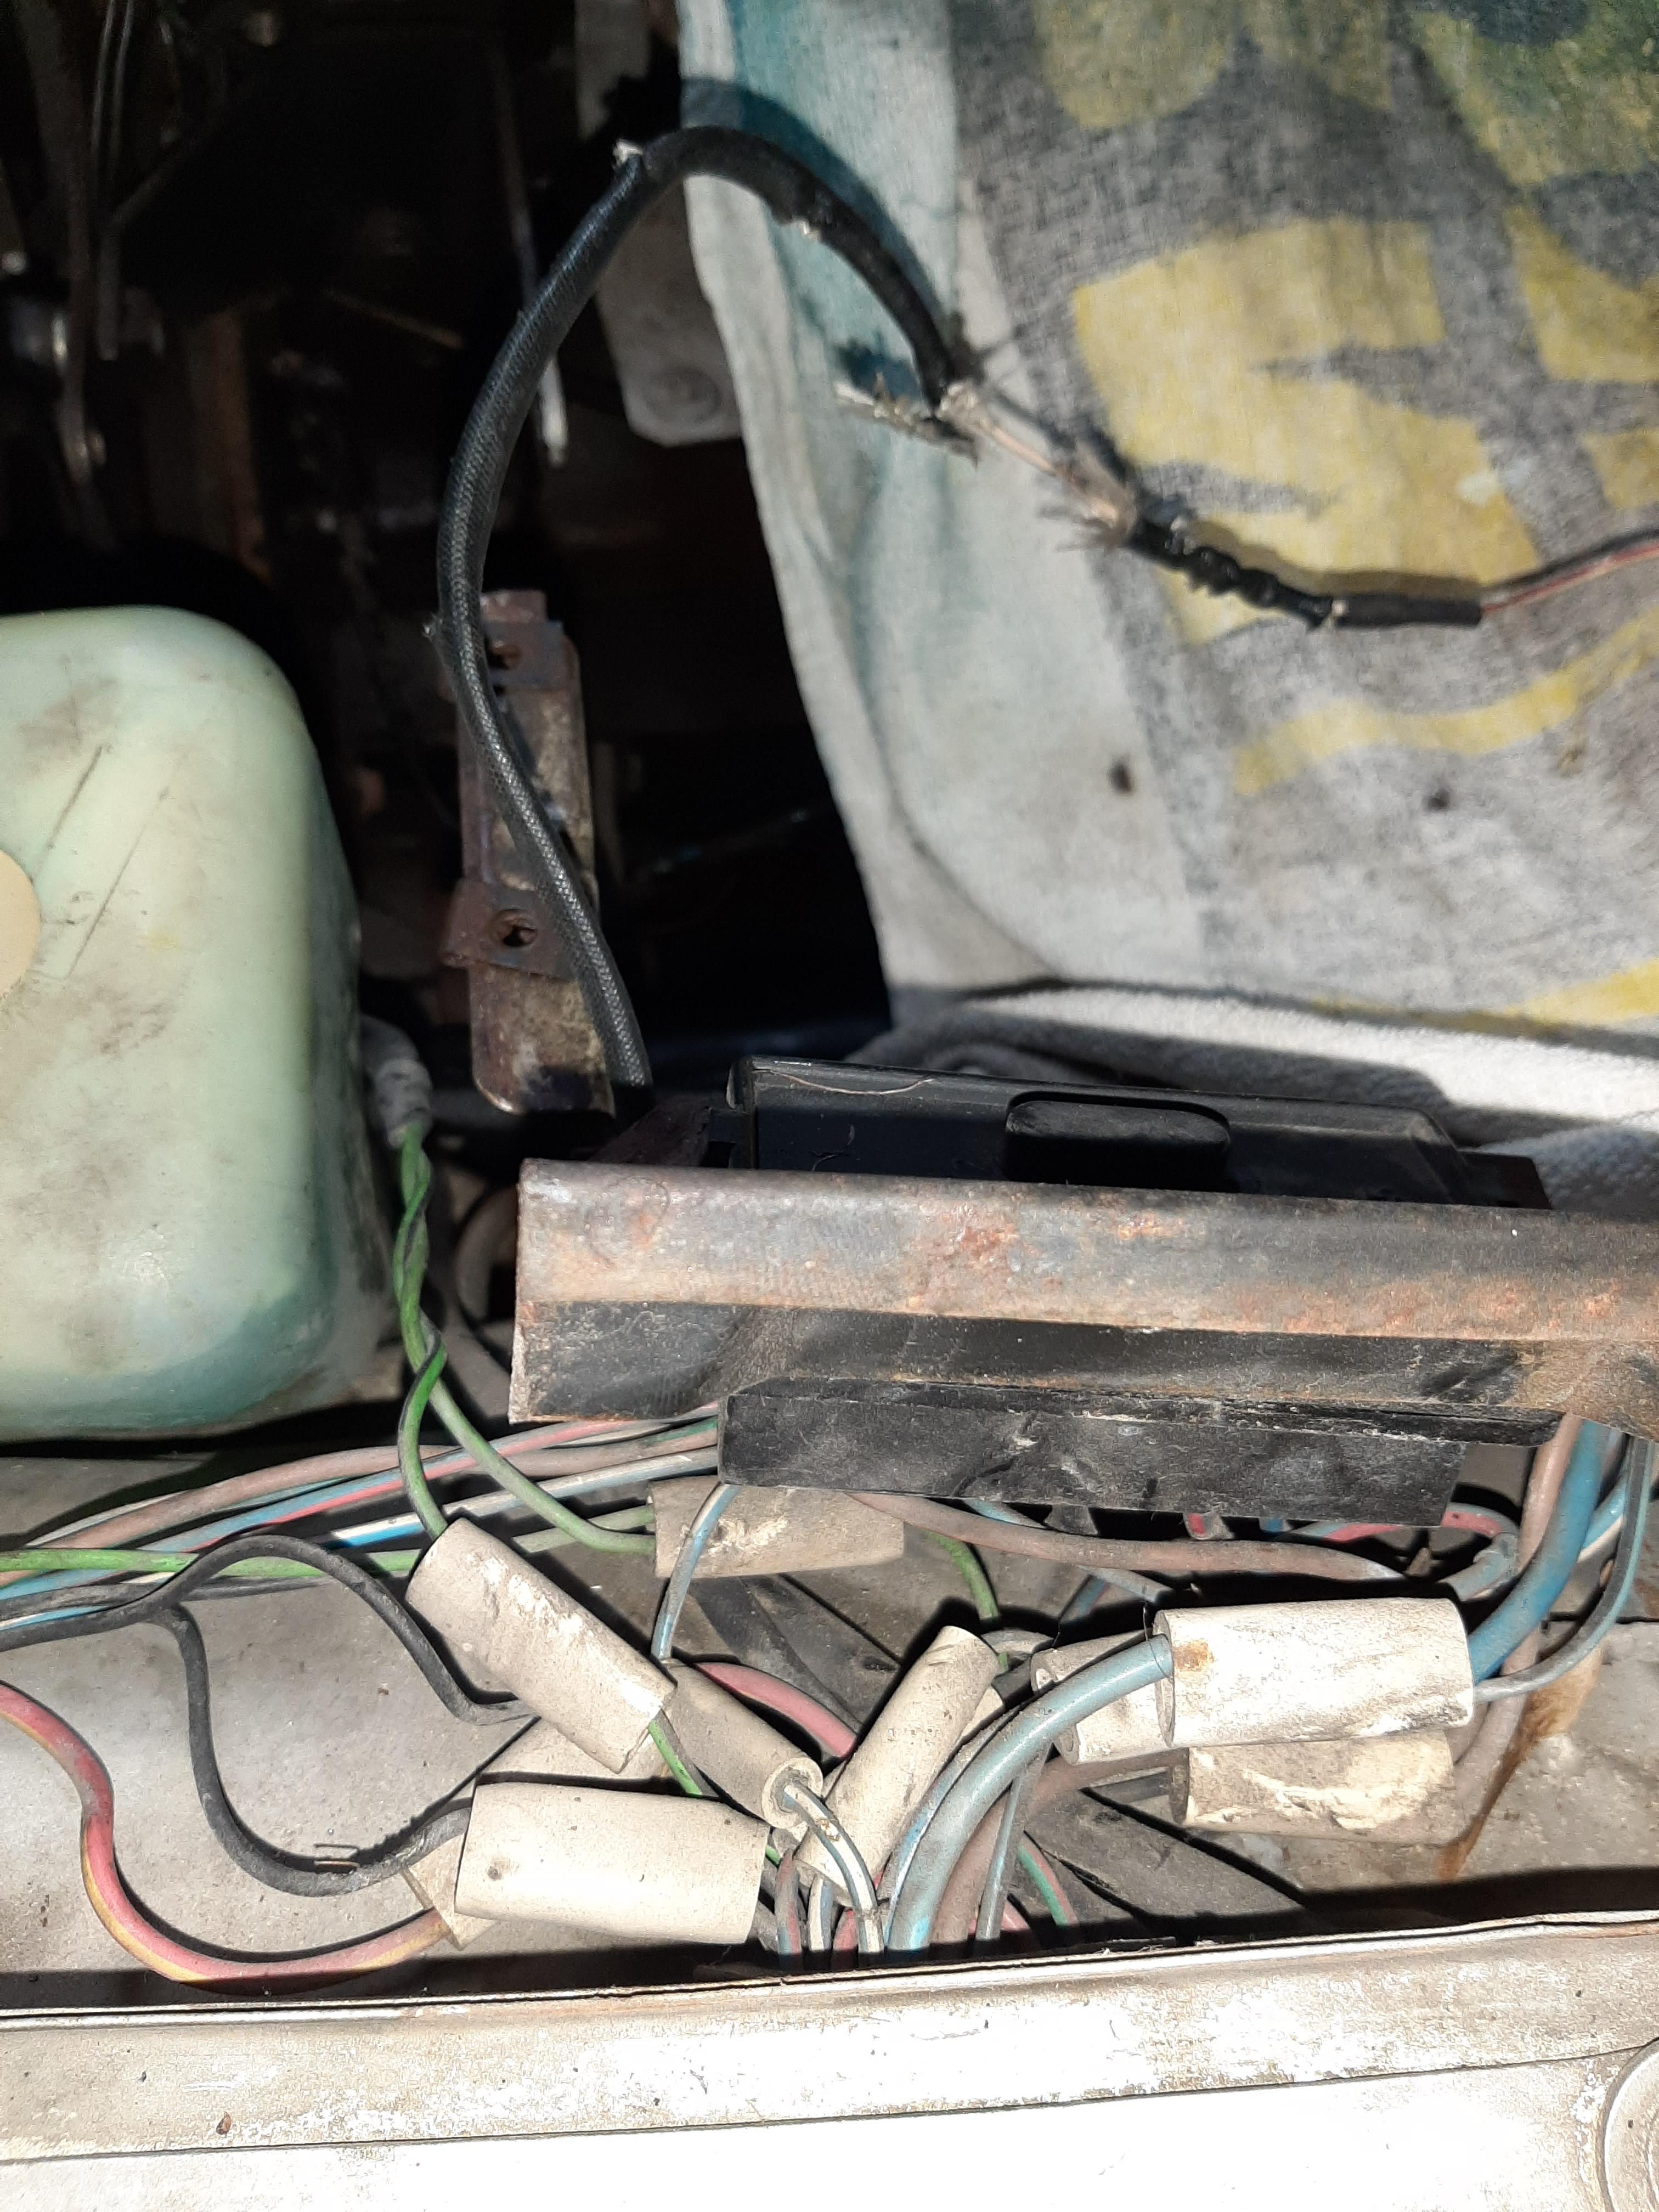
Can someone walk me through what I have here for my compressor wiring? I recognize the harness that plugs into the compressor itself and the switch with connector that is inserted into the compressor. What is the white wire that comes off the harness that leads to a connector that leads to a fusable link I think that in turn disappears under the fuse box and goes into the fender well?
The green/brown wire is (or should be) 12 volt "+" from the cabin control to the compressor clutch. it looks like this was spliced into a white wire at the connector. that connector is a replacement. The original probably crumbled to dust.
From the 6551358 switch is the black wire. This is a ground to the clutch.
Between those two wires we see a spliced-in device in a red-ish sleeve, white wire and blue wire. This is almost certainly a diode which protects the circuit from arcing damage when it (the circuit) is opened. This was probably an add-on. I don't recall ever seeing them used on the 6 cylinder cars....but are common on v12 cars. The rationale between have/have not is unknown to me.
What is the white wire that comes off the harness that leads to a connector that leads to a fusable link I think that in turn disappears under the fuse box and goes into the fender well
I can't tell.
That fuse box is for the headlights and the electric radiator fan. It almost looks like someone took 12v "+" from the fusebox and used it to supply the compressor. I'll speculate that this was done because the green/brown wire from the cabin was dead...for reasons not known by us (nor perhaps the person who made the changes!)
If you have a 12 volt test light (or test meter) see if the green/brown wire has 12v "+" with the climate control turned on
To wire-up an HSLP type compressor you just need to run a wire from the HSLP switch to one terminal of the compressor connector and 12 volts "+" to the other terminal of the connector.
The 12v "+" should come from the green/brown wire ....which goes to the cabin controls. If it doesn't have voltage check your fuses (4 of them for the climate control). If the fuses are good, bypass the Ranco thermostat switch. If the Ranco is defective the green/brown wire won't have voltage
The fuses are located as follows: two the the fuse box, one on the ground wire to the amplifier (which is behind the left "cheek panel" of the console) and one clipped to the side of the a/c case behind the right hand console cheek panel. The ranco switch/thermostat is near this last fuse, with green/brown and yellow/brown wires. You'll see it.
What a great mystery! And a mess. So we can now say for sure that you compressor is set up as an HSLP type. Or rather mis-setup? Because the switch you pulled out is is a Fiat/Hesston 160-90 HSLP 220-291 switch with a single male contact that is hooked to the original Jaguar Female connector. That little domed white connector is the original Jaguar plug! And what it should be hooked to is this:
Notice the difference? There's a single central probe on the back of the switch it is supposed to have and your's has no probe at all. We can also tell that the compressor is an HSLP type because the hole in the switch orifice is not central but rather is offset at about 11:00. Which begs the question as to why it is wired to a Superheat fuse, which it surely is! What you have is a bodge job! And most of what is there is crap that you don't need and will want to get rid of.
So. Job #1. Go to the sticky section of this site and Download Jose's Jaguar S57 Wiring Diagram. You are going to want Fig 25.1 which covers the climate control.
This will tell you what the wires mean. It has diagrams for both Superheat (where it says "Note:Early Cars") and the HSLP (where it says "Note: Later cars").
Wiring diagram says that The Green/Brown Wire should be the power from the AC Switch in the cabin. So this is the power needed to engage the AC. The Black wire is ground. And the Green goes from the thermal fuse to compressor. This would be for the Superheat setup.
What you have is looks like someone chopped out the green/Brown wire and spliced it in to the fuse plug. There appears to be a Red/White wire that doesn't belong in the AC compressor setup at all. The only wire in the general area that I can find on my car that looks like that goes to the Windshield washer.
So forgetting about all the mess what you want to do is find the Green/Brown wire in the engine compartment . This is power from the switch. You will need this. Since we can see the remains of it spliced into that tangle it may be cut off somewhere.
Your new compressor is going to have three electrical connections. Two at the compressor clutch and one at the rear of the compressor which is the HSLP switch. You will want to wire the Green/brown to the "Power in" connector on the compressor clutch and then you will take the ground (Black) from the compressor clutch and connect it to one of the wires on the HSLP switch (which will have TWO wires not one! -they have changed it!) and the other will go to a ground point. There should be an existing Black Ground wire in that tangle. I tried to get pictures of my set up for you but I cannot get a camera in there.
I also tried to find where that Green/Brown routes from. In my case, the green/brown to the compressor clutch disappears under the compressor and I can't tell exactly where it is tapped, but I THINK it comes from the passenger side harness and is part of the group of wires that crosses the front of the engine just below the Oil Breather. Originally it would be in cloth sheathing. I'm pretty sure this is where your power should be coming from. With the compressor out it should be fairly easy to find. The area I am talking about is underneath the connector in your second picture in your Post 14. Once all that's done you're going to need to solve the mystery of the red and white wire and where it is supposed to connect to.
It may be that there was a problem with the Amplifier or one of the climate control switches in the cabin which affected the power to the ac and the person redid this using power from some other place. In which case, even when you have it hooked up right, it may not work. Not to worry, you'll just need to get the switches working correctly. Fear not! Been there and done that too!