Finally getting some time to invest in the rear outboard brake swap.
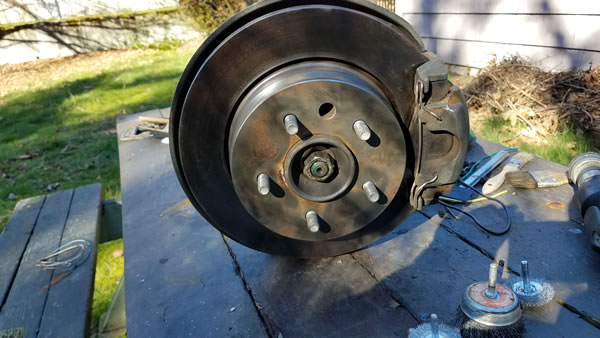
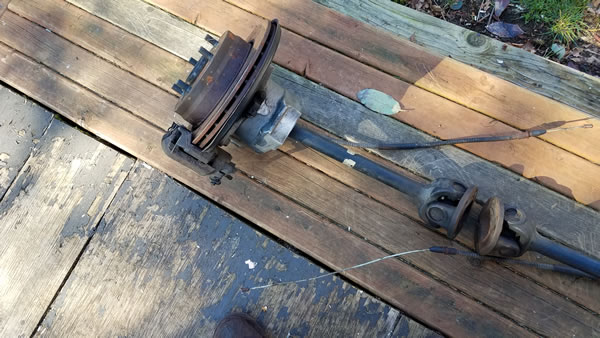
For those who are interested here are some pictures of the half shafts, uprights, disc brake with ventilated rotors, (2001 XJ8) and emergency brake cables.
The extras needed are,... 2 spacers that take the place of the inboard rotors, and the fulcrum pin that connects the lower control arm assembly to the upright.
New hydraulic brake lines will be provided for this new configuration.
Last thing is mounting my fabricated bracket on the cage to anchor the emergency brake cables, and connect them to the handbrake cable from the front of the car.
I am using 16 inch wheels from a 1996 XJ6 to accommodate the large rotors/caliper.
Is this really an upgrade?
I know the outboard calipers and rotors will be larger than the original inboard setup and it will make maintenance easier but it will harm the ride quality adding to the unsprung weight, which is the reason jaguar adapted that setup in the first place. Also are'nt these qurkie features part of what endears the xj series to us even if they are'nt the most convenient to work on?
Although its interesting technically what you are doing I will be interested to hear the result.
I once swapped steel wheels for alloys, and then back to steel, on a Series III XJ6. The steel wheel were much heavier; you could feel the difference...but it wasn't objectionable.
It's certainly an upgrade in brake performance. Perhaps too much so in some cases. This outboard setup will significantly increase the amount of work the rear brakes do. That's a good thing in some situations but in other situations too much rear brake bias can lead to instability becasue the rear brakes will tend to lock much sooner than the fronts.
Jaguar put something called "Pressure Conscience Reduction Valve" on the rear curcuit. It's a pressure limiting valve used on the Sedans' nearest relative, the XJS ,when they switched to the larger vented out board brakes. This renders the large pistons and swept pad area potential mostly unused. So why would Jag do this late in the XJS production cycle. The answer is traction control and parts number reduction. If the XJS continued on it would have gotten traction control and you need a very large brake rotor on the rear for effective traction control.
I've done this conversion in a different way and it's an easy first step but doing just the rear with out the fronts and many other considerations can make for an unstable vehicle.
As for unsprung weight, I have both an all origional coupe with fully serviced inboards and high performance coupe with outboards and any effects from the unsprung weight difference is undetectable to humans on the rear suspension.
The front's spindle are a very diffrent matter. They are very heavy and a weight reduction here significantly improves road dynamics that is humanly detectable. The front wheels carry more load and offer more feed back in the form of steering outputs. The large hub and iron block caliper add up to a significant about of weight.
A common part used on 4 wheel disc brake systems - adjustable rear bias valve.
My front brake system is stock series 3
The GM 350 is 200 lbs less weight over the front end and a heavier transmission - 700r4 moves the weight distribution more rearward.
Lighter engine and heavier trans
Most of my effort has been spent on adapting a functional hand brake system. Ended up designing a bracket that attaches to the cage.
The XJS system uses a special diff with built in attaching points for anchoring the handbrake cables and actuating the emergency brake shoes. Not practical to use that setup unless you swap the whole rear cage complete.
My goals were ease of servicing, better emergency brake holding power and no more boiling hypoid smell as it leaks onto the hot brake parts
Im keen on this conversion as well, and there are plenty of
xj40 axles out there in the pick a part places.
I know you have vented, but wouldn�t the solid rear rotors be a closer match to S3 front brakes? Would that setup still require a proportioning valve? Icsamerica? Any thoughts on this?
I drive a series 1 daily, and without a lift working on the rear calipers is not fun. I have done it 3 times already over the years.
the xjs setup has those ears on the diff for the e-brake system, the xj40 had one cable going to a lever that went to 2 cables per each side, I�d be curious to see what you�ve come up with for an e brake cable bracket if you�d like to share.
I too would like to know if one can use XJ40 front rotors and still retain the steering rack from a S1. Since I have the wheels already but have to use spacers to allow for clearance of the center wheel hub "cap" to clear the grease caps.
What parts would be involved if possible??
cds, where are you located in Los Angeles? I am east in Glendora off the 210 freeway.
Yes I have searched the internet for info about the spacers. You are right the XJ40 spacers would work. How well will depend.
After installation the fine tuning for rear alignment will tell how close they are - thickness wise. I have found info about different
thicknesses ranging from 4.5 mm to 6.0 mm. 4.5 seems to be what the XJ40 uses. Or cut the centers out of the old rotors and use
them with their shims. This is basically a rear wheel camber issue / adjustment.
As for the e brake. Different puzzle to solve, but a worthwhile exercise. The outboard rear brake setup has a traditional style
drum/shoe system that is easy to adjust and far superior to the cobbled up affair Jaguar offered on these older cars. It will
actually hold the car.
My thinking is to stay as close to stock as possible - meaning the main cable could be used but would need an adapter plate at the
rear cage area. I do not have this made yet, as I am still refining the idea. But this is a major factor to overcome when doing this
swap. The plate is a key piece to making it all work properly.
My thinking is to fabricate a 1/4 inch plate about 16 inches wide, and attach it to the rear cage.
The plate would be roughly the shape of an "H" with wide bottom "legs" top and bottom and a narrower "waist".
(If it were welded to the cage the cage would be stiffer.)
See rough drawing
Bottom legs would straddle the nose of the diff. Welded to this plate, would be 1/4 in thick tabs with holes that the cables from
the ebrake would pass through, but anchor the outer sheath of those cables, (yellow in rough sketch) and allow the inner portion
of the cable to connect to the opposite cable, a la XJ40... I have included my rough sketch made on my PC to give you some idea of
my solution. The method would allow the stock cable from the front of the car to be used as it is. It would need to have the outer
sheath of that cable anchored... another tab with a hole in it welded to the plate,.. (thick yellow lines in sketch) The factory
method anchored the outer cable to one of the e brake levers and the inner to the opposite lever....when you applied the e brake
the 2 levers would be forced together, applying pressure to the mini pads.
After you remove the inboard rear calipers along with the factory e brake apparatus, you can re use the cable with the new
bracket/plate. Position (weld) the locating tab approximately in the same spot as if was when it was connected to the old ebrake
lever. So 3 retaining tabs would be needed. One for the main cable and one each for the cables to the shoes.
This bracket would need to have an idler wheel for the inner cable to wrap around and then go down and attach to a lever ...the
lever would pull on cables from the e brake - just as it does with the XJ40. I have tried to adapt this plate to the cage as well as
the stock e brake cable at the cage. This plate is a key piece for the swap to work. If we all submitted " thought out" ideas or
improvements on this method,... maybe something really good can come of it. I am about to create a cardboard pattern /mock up
and then see what it would cost to fabricate it in metal. CNC 1/4 inch steel cutting + welding the tabs where best suited.
Hydraulic lines - I plan on removing the T junction that is located on the cage (center) and re installing it on the car body and
running the feed line to the leg of the T.
The other 2 outlets on the T would have lines going to each tab on the cage (on either side) to provide brake fluid / pressure for
the calipers.
Should work. If you try this and get yourself into a serious accident (parked your car on hill and it rolled down into someones
Tesla totaling it... because you screwed up)- it is not my responsibility. You simply asked how I was going to solve this portion of
the outboard swap, and I shared my thoughts on the matter.
FWIW my 86 VDP has ventilated front discs
Also the cage in the photo is not mine I needed a photo of a rear cage to design the plate. Do not know who owns this suspension but it is a really nice example.
That's a clean looking IRS I hope you don't mind me using it as a "helper" the picture you took was from the right angle and in focus. I can delete the photo if you desire. just let me know..
On another subject, I have followed some of your posts regarding a/c .
I am about to start to make an effort to get mine running. I need the hoses and connections from the evaporator, the dryer the switches , the mufflers any suggestions ? . I was wondering what you have done re: dryer, high side / low side valves Muffler? any input would be appreciated. I have a 350 with Camaro radiator and 1990 Z28 condenser. At the stage of collecting parts.
Using a serpentine system for pulleys and belt.
The photo will give you an idea of what I do not have as far as a/c goes. Engine / trans etc has all been installed since the photo was taken
1. Thanks for the great picture of the IRS, I've saved it to my Jaguar lore. Not that I'll be down under !!!!
2. The spacer thing caused me to muse a bit. As the IRS is an articulated parallelogram, I thought the change of length in one of the four parts might cause a bind. Seems not, and if any, acceptable as the next series did just that.
3. Side bar. My Jeep passed SMOG. Looking at the chart on th4e report, it ain't clean, but, clean enough, I took it for a freeway run sans OD to get the cat good and hot. Wasted effort, it sat awaiting it's turn long enough for the cat to cool. Decent guys there, they ran it a while before the sniff !!!
Some entertainment, though. A good looking gal awaiting her car in the wait room Alas, far too young for me!!
And after, the next car up, A gorgeous Yellow Corvette. A swap ? H... yes !!!!
I put the exhaust under the IRS on my '72 with LT1/700R. Use round stainless Magnaflow mufflers in the place where the resonator now live.. no other mufflers required. Use a "H" pipe up front with V clamps at the needed places to disconnect in case trans servicing is required... that is my next major chore on my '71. I have dual Jag mufflers and the resonators still in place on this car and only flanges that are always coming loose and blowing their gaskets.. V bands are the modern way to go.. my SWB car does not drag the exhaust system at all.
Be sure to change all the brake hoses when putting in your IRS... plus be sure to flush and and clean out all the brake lines before doing the needed bleeding with new fluid.
I used a large modern AC condenser and have dual Ford fans.. I also have a B&M trans cooler in front.. your car has a totally different AC system... S1 is very simple compared to S2/3 units. All hoses were made up at local AC shop...new ones were used as we converted to R134. Be sure you have removable fittings at the firewall connections...not hoses with clamps. My AC system has been totally modernized, GM fans replace the Jag fans for more air movement, I have dual vents in the parcel tray and used a Vintage Air electric servo heater water valve to turn on/off the heater flow.
Jagcad
the total length of the halfshaft remains the same. If you removed the inner rotor and bolted the half shaft flange (on the inboard end of the half shaft) directly to the diff,...then the top of the rear tire would be tipping in (severely) so when the inner rotor is removed, you must do something to maintain the correct geometry and fill this space. The solution is a spacer (Jaguar part ) installed in place of the inner rotor ( as on the inboard style rear suspension) (same thickness or have the center of the old rotor machined down to spacer size.) A spacer can be seen on XJ40s as they used the same layout. as did the late XJs , XJ8 , Xk8. then the thinner adjusting shims could be used to fine tune camber. Jaguar wants 60 bucks for this little spacer with 4 holes in it..... been watching the local pull a part for a Jag XJ40 to appear then I will snag these spacers. Opportunity to save 100 dollars
Hello all,
I know you have vented, but wouldn’t the solid rear rotors be a closer match to S3 front brakes? Would that setup still require a proportioning valve? Icsamerica? Any thoughts on this?
The inboards with a 43mm caliper on a 262mm rotor.
vs
The un-vented outboard with a 36mm caliper on a 292mm rotor
vs
The XJ8/XJS Vented outboards with a 42mm caliper on a 305mm rotor
Math says XJ inbaord and XJ40 rears are almost identical. This calculator assumes pad CF and pad area are the same. The pad area for XJ/XJ40 is nearly identical with the inboards being square and the outboards more rectangle.
So yes, XJ40 unvented outboards are a great replacement for inboards since brake work done is nearly identical given the same pressure. Vented are not a suitable replacement unless other changes are implemented to restore bias and balance. Mr. Math says so.
Summary... at 1000 PSI of fluid pressure
43mm piston on 10.38" rotor = 147.1 N/m of work
36mm piston on 11.5" rotor = 146.9 N/m of work
42mm piston on 12" rotor = Over 171 N/m of work
So Nonvented outboards and inboards are almost equal and well with in the margin of error to be considered effectively identical
I like the design you've come up with, seems like the simplest solution.
Roger Mabry,
I don't know if a xj40 front rotor will fit the existing XJ6 (thinking late S2 S3 with the 4 piston calipers) But you knowledge of AC has been helping me on my journey to find some
relief in the summer, yes im in LA, Los Feliz, Franklin Hills area.
A 40 dollar adjustable proportioning valve from any auto parts supplier easily solves the issue and allows the rear brakes to be fine tuned. No big deal as long as you realize this factor (more effective rear brakes) has to have a pressure "adjuster" Spliced into the rear hydraulic line and located near the master cylinder. Look at this as another improvement to the Jaguar stock system,..this is a resto mod and these things are a part of the exercise.
just re reading a post from ICSAmerica about traction control. I might like to install it on my 86 xj6 after I get the "outboard brakes" project done. Is this a free standing unit?
Looking at the outboard brake parts I have... I see the apparatus for traction control,... a little cogged wheel and a sensor (that has been snipped off by previous owner. And what is required of the front rotor ? Thanks for the diagram explaining all this.
Mine is a resto - mod so I do not have factory originality in mind, but a great road car is what I am shooting for. Quiet, smooth and reliable.. A freeway cruiser that will bring driving enjoyment on long-distance highway trips.