


Refining my XJ6.0 S3


Thread Starter
|
Senior Member


Joined: Jan 2022
Posts: 151
Likes: 162
From: WNY
 Refining my XJ6.0 S3
Hello all,
Some of you may be familiar with my 1984 lumped S3.
https://www.jaguarforums.com/forum/x...j6-0-a-255864/
I understand that this type of conversion may not be for everyone; but I like it, and have found it to compliment the chassis quite well. Rather than argue the merits of XK I6 vs GM V8, I would rather focus on celebrating and enjoying the S3 chassis Out of respect for the purists I will do my best to focus on repairs and projects not related to the engine (unless one insists!).
The engine swapping portion of the project was completed in late 2022 and I have found myself more recently fixing "Jag" things than "swap" things. I figured this might be a good place to pick up this portion of the project as it's easier to solicit specific advice as well as share my lessons learned with everyone.


Anyhow, a short introduction - I bought the car in non-running condition in late 2021 and have spent the last few years getting it back on the road. I do not drive the car in the wintertime, so from November until March every I usually take on some type of project with the car. This past winter, I dropped the IRS and rebuilt everything. 3.54 gears, Auburn LSD, new bearings and bushings in everything, reinforced hub carriers, new exhaust under the cage.


I recently convinced the stock tachometer and speedometer to read correctly. A few months of trial and error, and I went from this:

To this:

The game plan is to continue to refine the driving experience (read: tinkering) while still using the car as a fair weather daily driver and attending locals shows with my kids, who adore the car. Although they're still too young to truly get their hands dirty, I do my best to involve them (and my long-suffering wife) in the care and feeding of this cat

Some shots from the last few summers:


I do still have the original wheels (with Pirelli tires!) and am storing them.


Having recently finished the IRS rebuild, I plan to turn my attention to the front end, which exhibits an annoying wobble at some highway speeds. The steering rack is leaking, the subframe bushings are probably original, and the control arm bushings have seen better days...
Some of you may be familiar with my 1984 lumped S3.
https://www.jaguarforums.com/forum/x...j6-0-a-255864/
I understand that this type of conversion may not be for everyone; but I like it, and have found it to compliment the chassis quite well. Rather than argue the merits of XK I6 vs GM V8, I would rather focus on celebrating and enjoying the S3 chassis
Out of respect for the purists I will do my best to focus on repairs and projects not related to the engine (unless one insists!).The engine swapping portion of the project was completed in late 2022 and I have found myself more recently fixing "Jag" things than "swap" things. I figured this might be a good place to pick up this portion of the project as it's easier to solicit specific advice as well as share my lessons learned with everyone.
Anyhow, a short introduction - I bought the car in non-running condition in late 2021 and have spent the last few years getting it back on the road. I do not drive the car in the wintertime, so from November until March every I usually take on some type of project with the car. This past winter, I dropped the IRS and rebuilt everything. 3.54 gears, Auburn LSD, new bearings and bushings in everything, reinforced hub carriers, new exhaust under the cage.
I recently convinced the stock tachometer and speedometer to read correctly. A few months of trial and error, and I went from this:
To this:
The game plan is to continue to refine the driving experience (read: tinkering) while still using the car as a fair weather daily driver and attending locals shows with my kids, who adore the car. Although they're still too young to truly get their hands dirty, I do my best to involve them (and my long-suffering wife) in the care and feeding of this cat
Some shots from the last few summers:
I do still have the original wheels (with Pirelli tires!) and am storing them.
Having recently finished the IRS rebuild, I plan to turn my attention to the front end, which exhibits an annoying wobble at some highway speeds. The steering rack is leaking, the subframe bushings are probably original, and the control arm bushings have seen better days...




Senior Member

Joined: Aug 2017
Posts: 916
Likes: 648
From: Cincinnati Ohio
Great looking car and it’s great that your family is involved. No worries about the V8, a bunch of the folks that post regularly have V8 powered cars. I would suggest that you start a separate thread for each individual topic. The reason is years from now when someone is looking for help on their project they don’t have to scroll through dozens of posts to find what they are looking for. For example, if they are looking for information about replacing a gas tank and their search turns up a thread with gas tank in the title they can quickly find what they are looking for.
Thread Starter
|
Senior Member
Joined: Jan 2022
Posts: 151
Likes: 162
From: WNY
I am not much of a car show person as I prefer to be around cars when they're in motion, but my family enjoys these events so I decided to compromise:
Unfortunately the steering rack leak is not getting any better on its own, so I'll be killing two birds with one stone and dropping the front subframe to replace the control arm bushings and subframe mounts while I'm at it. Wish me luck on the steering rack rebuild...
Unfortunately the steering rack leak is not getting any better on its own, so I'll be killing two birds with one stone and dropping the front subframe to replace the control arm bushings and subframe mounts while I'm at it. Wish me luck on the steering rack rebuild...


Veteran Member


Joined: Mar 2014
Posts: 26,776
Likes: 10,318
From: Tehama County, California, USA
WAY more trouble with Jag stuff.
But to be fair, the Jag stuff is also WAY older!
I see that Pink Jeep still has its place of Honor, right next to Dad's Jag!
This is only Too Precious.
By the Way, be Sure you put on ONLY Metalastik fulcrum bushings! Otherwise, you'll be doing it all again in about 3 years.
I can tell you how I know that....
(';')
Last edited by LnrB; May 14, 2024 at 09:04 AM. Reason: Added Info
Thread Starter
|
Senior Member
Joined: Jan 2022
Posts: 151
Likes: 162
From: WNY
Notes for myself for later
Remove belt, rotate alternator, attach engine support
Remove front wheels, disconnect brake lines
Remove sway bar from end links
Remove PS lines from rack, drain
Remove PS reservoir cap
Remove Tie rod end nuts
Remove top shock nuts
Engine mount through bolts out
Snip zip tie for trans cooler lines to cradle
6 shooter bolts and rear cradle nuts out
Lift car UP
Remove belt, rotate alternator, attach engine support
Remove front wheels, disconnect brake lines
Remove sway bar from end links
Remove PS lines from rack, drain
Remove PS reservoir cap
Remove Tie rod end nuts
Remove top shock nuts
Engine mount through bolts out
Snip zip tie for trans cooler lines to cradle
6 shooter bolts and rear cradle nuts out
Lift car UP
Thread Starter
|
Senior Member
Joined: Jan 2022
Posts: 151
Likes: 162
From: WNY
I'm finally tackling my steering rack rebuild in my '84 S3. I have it all blown apart on the bench now and am working through things one by one.


Here's what came in the kit, which is FVP 9103 from Rockauto.

Are there any additional resources anyone can suggest for rebuilding the power steering rack? So far my strategy has been to disassemble and clean all components, then replace seals until there are none left in the new kit.
I have been following the video as a guide.
The aluminum tube was interesting to wrap my head around. I stared at the assembly for a good bit trying to understand how it was retained inside the rack housing. The set screws were removed but it stayed stuck, and there is no reasonable way to reach in and pull it out without damaging anything.
So, I put a block of wood on the ground and whacked the entire unit against it tube side down, and it came sliding out. Years of grease had formed a suction holding it in place. Tonight I'll uncrimp the tabs and work on those seals.
Last night I slid the pinion seals over an cut up plastic bottle acting as a sleeve. I actually omitted the sleeve while installing the first (top) seal as there was no obstacle, and the seal contracted nicely over the metal expanders. The next 3 seals seemed to have to stretch a bit more over the sleeve, and hung somewhat loosely over the expander once the seal was removed. I hope I didn't ruin those 3 seals by stretching too much but there doesn't seem like any other way to install them - either stretch them to avoid damage, or risk getting nicked on the spool lands.

Here's what came in the kit, which is FVP 9103 from Rockauto.
Are there any additional resources anyone can suggest for rebuilding the power steering rack? So far my strategy has been to disassemble and clean all components, then replace seals until there are none left in the new kit.
I have been following the video as a guide.
The aluminum tube was interesting to wrap my head around. I stared at the assembly for a good bit trying to understand how it was retained inside the rack housing. The set screws were removed but it stayed stuck, and there is no reasonable way to reach in and pull it out without damaging anything.
So, I put a block of wood on the ground and whacked the entire unit against it tube side down, and it came sliding out. Years of grease had formed a suction holding it in place. Tonight I'll uncrimp the tabs and work on those seals.
Last night I slid the pinion seals over an cut up plastic bottle acting as a sleeve. I actually omitted the sleeve while installing the first (top) seal as there was no obstacle, and the seal contracted nicely over the metal expanders. The next 3 seals seemed to have to stretch a bit more over the sleeve, and hung somewhat loosely over the expander once the seal was removed. I hope I didn't ruin those 3 seals by stretching too much but there doesn't seem like any other way to install them - either stretch them to avoid damage, or risk getting nicked on the spool lands.
Last edited by nsogiba; Aug 21, 2024 at 08:48 AM.
Thread Starter
|
Senior Member
Joined: Jan 2022
Posts: 151
Likes: 162
From: WNY
Last night I got the new seal kit in and got to work. If you don't respect the learning curve it can get expensive buying new seals, so some research indicated that resizing teflon rings is a common practice.
I started by getting a rough measurement of the OD of the spool lands.

And then transferred that measurement to my seal sizer, onto which I stretched the teflon pinion seals after soaking them in hot water for a bit.

The seals went onto the pinion valve easily, and I then installed my seal compressor to shrink them back down.

Installing the rack tube seals

Centering the rack bar after the housing and ends were assembled - 3/16" bit.

My solution to rotating the pinion. Worked perfectly with no damage.

Rack is back in the car and plumbed, test fire in a few days...
I started by getting a rough measurement of the OD of the spool lands.
And then transferred that measurement to my seal sizer, onto which I stretched the teflon pinion seals after soaking them in hot water for a bit.
The seals went onto the pinion valve easily, and I then installed my seal compressor to shrink them back down.
Installing the rack tube seals
Centering the rack bar after the housing and ends were assembled - 3/16" bit.
My solution to rotating the pinion. Worked perfectly with no damage.
Rack is back in the car and plumbed, test fire in a few days...
Trending Topics
Thread Starter
|
Senior Member
Joined: Jan 2022
Posts: 151
Likes: 162
From: WNY
This was my first time rebuilding a steering rack and it was easier than expected, just required attention to detail and cleanliness. The only special tool that I needed to buy was a spanner wrench which I got on Amazon.
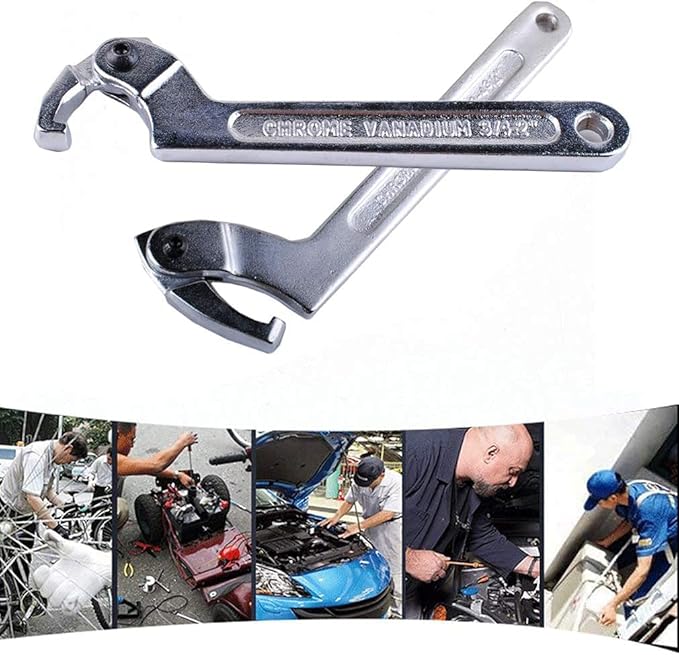
I found the following links particularly helpful.
This video was great for reassembly:
Instructions for a similar Triumph rack
https://triumphowners.com/resource/p...-instructions/
https://s3.ap-southeast-2.amazonaws....ck-Rebuild.pdf
Schematic:
https://parts.jaguarlandroverclassic...e=C06572794813
Seal shrinking technique:
https://www.jaguarforums.com/forum/xjs-x27-32/rack-pinion-seal-kit-installation-advice-needed-217567/
https://ls1tech.com/forums/automatic-transmission/1554005-how-install-teflon-seals-without-tools.html
Hope this helps someone in the future. I would have really loved to just swap the rack with a reman but everything seems to be NLA from the typical commercial sources like Rockauto, Advance Auto, Autozone, Napa, and O'Reilly. The prices for a reman rack from the Jag specialists were high enough that I tackled the rebuild myself.
I found the following links particularly helpful.
This video was great for reassembly:
Instructions for a similar Triumph rack
https://triumphowners.com/resource/p...-instructions/
https://s3.ap-southeast-2.amazonaws....ck-Rebuild.pdf
Schematic:
https://parts.jaguarlandroverclassic...e=C06572794813
Seal shrinking technique:
https://www.jaguarforums.com/forum/xjs-x27-32/rack-pinion-seal-kit-installation-advice-needed-217567/
https://ls1tech.com/forums/automatic-transmission/1554005-how-install-teflon-seals-without-tools.html
Hope this helps someone in the future. I would have really loved to just swap the rack with a reman but everything seems to be NLA from the typical commercial sources like Rockauto, Advance Auto, Autozone, Napa, and O'Reilly. The prices for a reman rack from the Jag specialists were high enough that I tackled the rebuild myself.
Thread Starter
|
Senior Member
Joined: Jan 2022
Posts: 151
Likes: 162
From: WNY
I was perusing the local pick a pull for GMT800 stuff and came across these two threats. Yo dawg, I heard you like Suburbans so we wrapped your Suburban with Suburban wrap

I always check out the Euro section as you never know what you're going to find. Sure enough:


1995 XJR with a 4.0 supercharged straight 6. I have no interest in the mechanicals, but I've been interested in refreshing the interior in my '84...
Black leather, heated, with power fore/aft, recline, power headrests (!!!) and lumbar pumps. Jackpot!

Grabbed the rear seatback and cushion also.

Also grabbed the wheels and MAF which are all XJR specific to resell. Dragging all this back a quarter mile to the office through a foot of snow was out of the question. Luckily some of the employees were nice enough to send a truck up to haul it back for me...which promptly got stuck.
Loader came by and picked him up by the bumper...which promptly ripped off, slamming the truck back down. After wrestling to removing all those parts in single digits temps I laughed wildly at the whole situation.

I always check out the Euro section as you never know what you're going to find. Sure enough:
1995 XJR with a 4.0 supercharged straight 6. I have no interest in the mechanicals, but I've been interested in refreshing the interior in my '84...
Black leather, heated, with power fore/aft, recline, power headrests (!!!) and lumbar pumps. Jackpot!
Grabbed the rear seatback and cushion also.
Also grabbed the wheels and MAF which are all XJR specific to resell. Dragging all this back a quarter mile to the office through a foot of snow was out of the question. Luckily some of the employees were nice enough to send a truck up to haul it back for me...which promptly got stuck.
Loader came by and picked him up by the bumper...which promptly ripped off, slamming the truck back down. After wrestling to removing all those parts in single digits temps I laughed wildly at the whole situation.
Thread Starter
|
Senior Member
Joined: Jan 2022
Posts: 151
Likes: 162
From: WNY
Dragged everything home and got it unloaded. The seats need a good cleaning and some leather conditioning, but are otherwise in good shape. Maybe a bit of black dye on the driver's bolster.

I cut the harnesses leaving myself enough to tinker with. Each seat has its own control module but the wiring ended up being surprisingly easy

Using my Jaguar factory pin removal tool (a sharpened screwdriver), I removed any wires that didn't supply the module with a battery or ignition power or ground. Wrap the powers with the powers and the grounds with the grounds

Install Jaguar factory test harness (GM side post battery and jumper cables) and watch all power seat functions work perfectly. I could mess with the heated function, but that requires yet another external module (timer) and a switch panel from the '95. Kind of ruins the feel of a vintage car and since I only drive this thing in the warm months, I'm not going to bother.


Pulled out the original seat and set it aside. I don't think it has any value other than the seat motors, so I might just scrap them.
The carpet was replaced in this car at some point but will get vacuumed at the very least. The good news is that with the rail feet cut off, the new seat rails are about an inch or so narrower than the chassis mounting points. That means I can just fabricate some brackets to weld onto the new seat rails, and leave the chassis side completely stock.

I cut the harnesses leaving myself enough to tinker with. Each seat has its own control module but the wiring ended up being surprisingly easy
Using my Jaguar factory pin removal tool (a sharpened screwdriver), I removed any wires that didn't supply the module with a battery or ignition power or ground. Wrap the powers with the powers and the grounds with the grounds
Install Jaguar factory test harness (GM side post battery and jumper cables) and watch all power seat functions work perfectly. I could mess with the heated function, but that requires yet another external module (timer) and a switch panel from the '95. Kind of ruins the feel of a vintage car and since I only drive this thing in the warm months, I'm not going to bother.
Pulled out the original seat and set it aside. I don't think it has any value other than the seat motors, so I might just scrap them.
The carpet was replaced in this car at some point but will get vacuumed at the very least. The good news is that with the rail feet cut off, the new seat rails are about an inch or so narrower than the chassis mounting points. That means I can just fabricate some brackets to weld onto the new seat rails, and leave the chassis side completely stock.

Thread
Thread Starter
Forum
Replies
Last Post
sunchip
XJ6 & XJ12 Series I, II & III
194
Aug 28, 2023 09:21 PM
MrJagSwag
XK120 XK140 XK150
2
Sep 1, 2018 09:15 AM
Currently Active Users Viewing This Thread: 1 (0 members and 1 guests)