When you click on links to various merchants on this site and make a purchase, this can result in this site earning a commission. Affiliate programs and affiliations include, but are not limited to, the eBay Partner Network.
In my post "Series 1 XJ12 starter circuit question" I mentioned I had snapped off four spark plugs. This is the documentation of the long and tedious removal process
I began work on the plugs mid October and finally finished their removal and plug thread refurbishment this weekend.
First a bit of the cars history
The car was given to me by a chap I had known for twenty plus years. It had belonged to his brother who had passed away and had previously attempted a restoration. It had been disassembled somewhat and painted in a haphazard fashion and I suspect at some point the task got the better of him and it has sat under a tarp and various carports for 13+ years. I don't know the exact length of time but his wife said they had been married 13 years and it's been like that all that time.
As they say, never look a gift horse...etc., so a trailer was arranged and a few weekends later it was deposited in my shed
My dilemma, if you could call it that, was what to do with it. Is it too far gone? Can it be a viable restoration project or is it simply a rolling spare parts bin?
More research began as did the search for the all revealing chassis number. It took a while to find, as the chassis plate was missing (removed to paint the engine bay I suspect) It was finally located stamped on the drivers side wing near the shock mount. It's car 25 of 750 RHD long wheelbase Series One XJ12s. A very early and rare, but not necessarily valuable Jaguar.
The knowledge that this was a very early car helped tip the balance toward attempting to save this old girl. The first hurdle though, was yet to be tackled. Will it run?
If the motor needs rebuilding, then to me that is where It stops.
I've already formed quite a bond with the old girl, but the reality of the cars value vs potential restoration expense is etched clearly on my mind.
Where to begin?
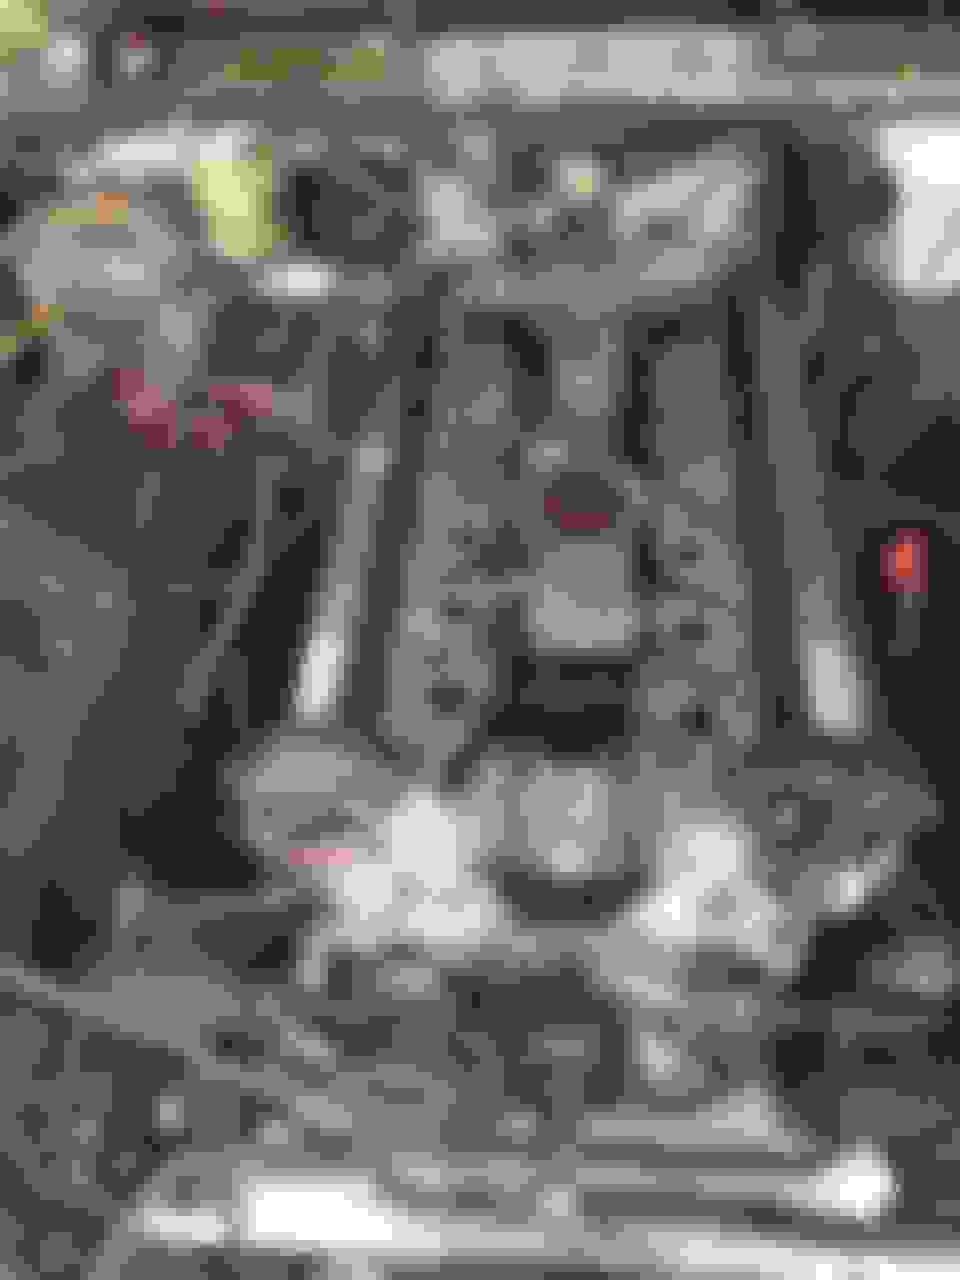
This was the state of the engine bay
As per my previous post, the motor was seized, and could not turn over on the key due to mice doing a number on the wiring.
The sump appeared to have a clean oil like substance in it and an inspection through the tappet cover showed the insides to be bright and shiny despite the external appearance.
In order to soak the bores I needed to remove the plugs.
Eight came out without too much fuss. Note the rusty mess at the bottom of the plug.
Four refused to budge. A3,4,5 and 6
Off came the carbies, ancillaries and manifolds (bar one...seized stud)
It's apparent that this end of the motor had been exposed to the elements more so than the rest and the plugs reminded me of one of those engines that's been lying in the back paddock for as long as you can remember.
This is where progress slowed....and stopped for several weeks.
Advice from this forum (thanks Grant F) and general googling saw a potent brew of ATF and acetone mixed and applied to the plugs, with diesel fuel added to the bores where the plugs have been removed so as to begin work freeing the pistons.
After several weeks of soaking, and checking and soaking some more, I attempted to remove the remaining plugs.
This was the result
The threaded portion was still stuck solid in the head on one plug, and on the other three the neck was also left behind.
Either the plugs themselves were so corroded they were severely weakened and snapped because of this, or the bond between the plug and the head was so strong they were going to break regardless, or a combo of both.
So, working on the first theory, I tried Ezyouts to remove the remains
Have you ever broken an Ezyout? Snapped off clean below the surface?
This at least showed the incredible bond that steel can have in aluminium after a decade or more in a moist environment.
So,....how do you remove a snapped Ezyout?
After trying everything in the toolbox, I fashioned an Allen key and mig welded this to the stub. All I needed to do was get an eighth of a turn Clockwise and it would be out.
It had other ideas
To get better access I had to get the stuck manifold out of the way. This entailed drilling through a manifold stud without damaging the soft aluminium manifold. Thankfully once I drilled it out and got the manifold off, the stud was removed easily from the head. Small mercies.
Now, back to the stuck Ezyout.
I read somewhere that tool steel could be drilled with a tungsten carbide bit.
I purchased a suitable bit for a surprisingly cheap $5.
With plenty of lubrication, pressure and slow speed, I managed to drill out the Ezyout.
Tool steel can indeed be drilled
Onwards.
You may be thinking at this point, "what about the debris dropping into the combustion chamber."
I was able to retrieve the metal shavings with a strong magnet on a flexible shaft, again courtesy of my favourite tool shop.
Next course of action was to try and find a solution that would eat away at the corrosion whilst leaving the steel and aluminium untouched. I plugged the plug holes with BluTac and tried coffee machine descaler, vinegar, rust dissolver, etc etc and what I was left with after a few weeks was much cleaner looking stuck spark plug ends.
BluTac plug
At about this time I had sorted out my wiring dilemma and all the bores had soaked for several weeks in diesel.
With a fully charged battery hooked up the motor cranked over on the second try for the first time in over a decade. It was two days before the diesel stopped dripping from the ceiling of the shed and a couple of weeks for the smell to go...but oh the elation when that whale like spout shot out of B6 on the compression stroke!
Once it let go I could turn the motor over normally on the crank allowing me to position the pistons of the cylinder I was working on in such a way that I could hook a vacuum to the inlet to remove debris as I worked on the plug stub with the only method left to me. Machining.
I had a couple of good quality tungsten burrs as well as an assortment of die grinders and drills. I started on A3 as this was the easiest to access and therefore fix if there was a requirement for a Helicoil. Of course my aim was to get what was left of the plugs out with no damage to the threads. Easier said than done.
My thinking was to first drill out the remainder to 10mm in order to give my largest Ezyout a try. Using a cardboard template to guide my angle, vac on the inlet and grease on the drill away I went. It drilled out surprisingly easily and I even managed to prevent the drill from plunging through and into the piston. This was the plug that only had the thread broken off. The Ezyout slotted in position about half way down and I was pretty confident it would do the job. I put as much weight behind that breaker bar as I thought it could take but the plug held tight. Bugger this. Out with the rattle gun.
Started on setting one, a gentle tap, and after a minute or two wound it up to maximum, but no cigar. Surely a rattle gun would break the bond! The ******* might as well have been welded in there, it just wasn't moving. Tried the same on A4 with the same result. This is where I also tried heat with a propane torch and two cans of freeze spray....fail..😕
I was getting nowhere trying to rotate the plug remnants. Next thought was to thin the remainder of the steel as much as possible and try and punch the plug steel inwards away from the thread.
I started on A4 that still had part of the plug body attached and began carefully milling it to the edges.
Note the condition of the aluminium 🙁
This proved effective and I was able to chisel away chunks of the plug with a modified punch.
Once I got to the thread it was just a matter punching it toward the middle and with about two hours of perseverance I had the first one out in several pieces.
The other three came out in much the same fashion with A6 coming out on the Ezyout
What I was left with was four plug holes that looked pretty manky.
A3 and A4 had suffered from slight over zealousness with the burr and both need Helicoils
Also the seats needed cleaning up and I found the perfect tool at Bunnings in the plumbing isle. A tap re-seating tool. It couldn't have been better if it was purpose made.
This cleaned the seats up nicely. Next job was to get a helicoil set. I used one from Bursons but have since seen sets at Repco. They are also available on line from$10 but I had serious doubts about the quality. I used a Recoil brand set up. I chose this one as the tap has about 12mm of the 14mm plug thread on its end which chases what's left of the thread and assists greatly with alignment.
All greased up and ready to go. This type of tap doesn't require any drilling. Another plus.
A few turns at a time and it was all done. Just had to make sure the inlet valve was out of the way as I wound it in.
Helicoil in place
Below using Churchill tool CB-001 to ensure correct alignment. (As named by brother Paul👍🏻
Only two helicoils were needed in A3 and 4. Numbers 5 and 6 just needed the threads chased and the seats cleaned
Happy days.
Some of the tools employed
So, whats next...
I need to:-
Check cylinders with boroscope just to make sure nothing has been left inside (I did drop a small burr in at one point. Magnet got it out)
Drain sump and change oil and filter.
Dizzy has been stripped, checked and refitted.
Wiring....valley of death has done its worst.. TBC
Carbs to be stripped and kitted if needed.
Refit bits
Start engine. Vroom😎
Have I missed anything?
That took me back. The only V12 Jaguar I've had was the same model back in 70's. It was my daily driver. Tremendous but I couldn't live with the fuel bills struggling to get into double figure mpg and it had to go after six months.
Congratulations on your dogged perserverence and success with the seized plugs. Looking forward to following progress.
That is PURE proof that we Aussies are a stubborn bunch. Many a Jag enthusiast would have tossed the towel at the broken plugs.
Only thing I see missing is the stack of empty stubbies from this adventure, ha.
Well done again.
Haha..Thanks Grant.
I'm sure I managed a few beers along the way. I've put down a couple of home brews in the process and will be celebration/commiserating with the opening of a few Hop Slam pale ales when I hear the beast roar to life in the near future.
Look out for some questions here as I start piecing it together.
Cheers. Alan.
Happy to throw a few extra ales in the fridge for the "firing up" party as long as you driving Fireball👍🏻
Just give me the date, "Miss Fireball" is always ready for an adventure.
I am sure Paulyling & 34by151(the usual suspects) would come along for the drive too.(both Sunny Coast guys)
Happy to bring the forum banner along for a signing too. Four of us would make more than enough numbers for a forum meet.
Thanks for taking the trouble to post the story and pics, quite a saga :-) I especially like the smooth transition to "It was two days before the diesel stopped dripping from the ceiling of the shed......."
Admire your perseverance greatly. Hope the beast lives.
One of my Grave concerns about those new alloy heads is exactly this.
Steel and aluminum do Not get along well!
I've broken off bolts and extracted them with Eze-Outs. I've broken Eze-Outs and drilled them with a left-twist bit which loosened it enough to get it out of the bolt.
In my work it's not uncommon for a galvanized pipe nipple to break inside the connector requiring extraction by hack saw blade and cape chisel. I'm Sure if I encountered the OP's situation I wouldn't have gone to this much trouble.
You get the prize of the day for Tenacity.
Good Job!
(';')
Agree, the alloy to iron joinings have always concerned me. I just finished daughter's Passat "fix". Alloy heads and the spark plugs re in deep wells ala Chrysler HEMI V8.
Luckily all six came out just fine. No corrosion bond. Partly courtesy of Jaguar like oil leakage.
On replacing the new spark plugs, I gave each a careful wipe of silver antiseize.
Mid fix daughter negotiated a "new to her" car!!!! The Passat had to drive on to the lot for credit as a trade in. It did...
When I did my Lump, I had a choice of a very nice L98 from a Corvette, Alloy heads,
or an all iron LT1. Because of the alloy headed XK engine had just failed, I went with iron....
Alloy does work, but is less forgiving and extra good maintenance is a "gotta be".
Elinor: You probably already know, but an "inside pie wrench" exists". Insert, expand and twist. I used to have one, but someone borrowed it and . I have a suspect in mind...
...Elinor: You probably already know, but an "inside pie wrench" exists". Insert, expand and twist. I used to have one, but someone borrowed it and . I have a suspect in mind...
Carl
Yes, Carl, I have one of those on the truck. Although it doesn't work at all well on galvanized, it's Great for most broken off ABS risers and even some PVC. But even some of those require hack saw blade and needle nose pliers.
(';')
The initial overall engine pic and the last one show the amount of lurv the old girl is getting. I had something similar with the old Morris I am working on (albeit with a third of the cylinders and 10 times less complexity). Just kept working on stuff and tidying up along the way each time and it all started to look maintained and like something that runs :-)
A bit of a hijack! But, as I mentioned it before, I'll just finish it, short version, anyway.
Son came over yesterday with a replacement fuel module for the Jeep. An in the tank
thing combination of pump and fuel level sensor. Many tools and determined and strong son and the old was out and the new in!!!
Alas, no start. We began to contemplate the obvious. It was out of gas!!!! WE siphoned in about 4 gallons and yowee, it fired right up.
Why? Daughter had it and told me she had filled the tank. And, when they came home on the flat bed and a day or two later, indeed, the guage showed 3/4. But on wrestling, it was zero.
Conclusion. Sensor failed and hung up at 3/4. Daughter kept going thinking all was well. Nope. It just ran out of gas.
So, all is well, that ends well. The pump part may have been OK, but the sensor part
not so. With the new in, guage registers and the Jeep runs.
Needs a clean up and fuel top off. Later today or....
The initial overall engine pic and the last one show the amount of lurv the old girl is getting. I had something similar with the old Morris I am working on (albeit with a third of the cylinders and 10 times less complexity). Just kept working on stuff and tidying up along the way each time and it all started to look maintained and like something that runs :-)
Yeah, I know what you mean. If I look at it as a whole it's a bit overwhelming. So as you did, I've been doing little bits here and there which is helping keep the enthusiasm and give me glimpses of how beautiful it can be when done.
To fix the mess the mice did on the wiring I had to take the dash out.
It was in pretty sad nick, though the veneer itself was ok. Just needed a bit of a sand, lacquer and the instruments cleaned.
Before
After
Ready to go back
Ok. Distraction ready to re fit. Time to get back to work on the engine-y thing😁