
Series I with AJ6 engine

Senior Member


Joined: Mar 2012
Posts: 305
Likes: 117
From: Sydney Australia
I already know what ever comment i make will be taken as offensive not constructive but is intended to hopefully rethink some or all of your work.....it's a good thing you're not in Australia as the car wouldn't have a hope of passing an engineers report, which I'm familiar with, the welding is not passable, your steering rack mod idea is dangerous, the fuel tank mod is seriously dangerous, hacking the alternator mount is a sure sign of "this will do till i get to a real workshop" , not knowing what " the thing behind the brake servo" is, you should have put the tools down and stepped away from the car ages ago, & i'm happy i don't have the chance to see more.
I'm sorry to have said all that but someone has to with the hope you'll take a deep breath, stand back & get someone in to advise you & then rectify. By now you & others are asking "could i do better?" yes i could & yes i have many times on engine mods with front & rear suspensions as well.
yes i know you want to reach through the monitor and rip my throat out but if you lived in my city i'd be offering to help you out with the professional knowledge & back ground i have, i'm not perfect but i'm not crap...............tom


Veteran Member

Joined: Apr 2012
Posts: 2,291
Likes: 1,466
From: New York City
EDIT: After further consideration please ignore this post. Its a bad idea because the frame front subframe is bushed and a solid cross member for the rack would make the rack a movement point and may be dangerous.
I'm gonna chime in here and say the rack mount is dangerous. A tubular solid cross member needs to be attached solidly to each side of the frame rail and the rack should attached to the cross-member using bushings. If you don't use bushings the vibration and stress will fatigue the metal and over time they it may fail somewhere. The cross member could also be made removable using some angle steel to capture the frame rail and secure with grade 8 nuts and bolts. The nuts could be welded to the frame with backing plates for added strength.
I'm gonna chime in here and say the rack mount is dangerous. A tubular solid cross member needs to be attached solidly to each side of the frame rail and the rack should attached to the cross-member using bushings. If you don't use bushings the vibration and stress will fatigue the metal and over time they it may fail somewhere. The cross member could also be made removable using some angle steel to capture the frame rail and secure with grade 8 nuts and bolts. The nuts could be welded to the frame with backing plates for added strength.
Last edited by icsamerica; Mar 1, 2014 at 10:47 AM. Reason: bad idea

Senior Member
Joined: Jul 2012
Posts: 287
Likes: 50
From: Canberra, Australia
I think a lot is often lost when you can only see a couple of pics posted up during these threads, I myself have posted pics in the past that haven't shown an area or item in the best light. That said, I completely agree that the Rack Mounts as they currently are don't look too robust and the need to isolate vibration is important.
It could be that once some more 'dynamic' testing has been dome, the flexing of brackets will become more apparent.
I for one am still very keen to see how this build progresses and If I was doing the build myself, I would appreciate everyone's opinions, even if I didn't agree with them.
Woz
It could be that once some more 'dynamic' testing has been dome, the flexing of brackets will become more apparent.
I for one am still very keen to see how this build progresses and If I was doing the build myself, I would appreciate everyone's opinions, even if I didn't agree with them.
Woz

Senior Member
Joined: Jan 2013
Posts: 160
Likes: 47
From: new zealand
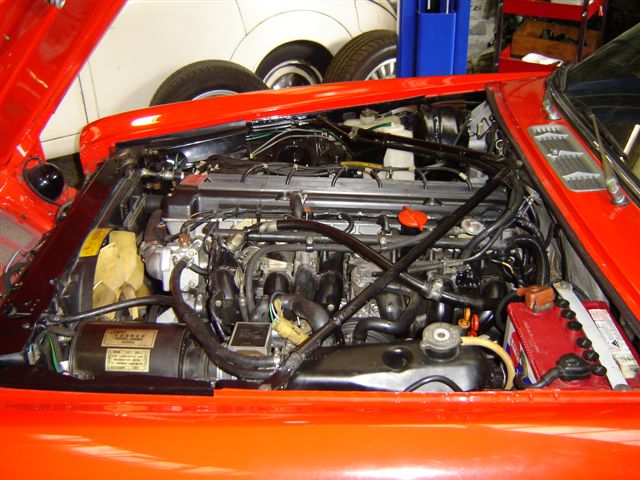


Hi here are some photos I have posted last year of a series 2 with AJ6xj40 engine fitted. Did not have to cut radiator cross member to lower radiator I did it by altering the top panel. The steering rack is a standard series 3 which handles the pressure ok. The fuel tanks I used were series 3 as they already have return pipes plus series 3 external high pressure fuel pump and filters also series 3 change over and return valves. You need to fit these return valves or solenoids so the fuel returns back to the tank you are using and does not over flo opposite tank. Unlike xj40 which only has one tank. I have the wiring codes for series 1-2-3 to match xj40 codes for ignition ;Fuel pump ;Temp Gauge' oil gauge' rev counter if any one is thinking of doing a similar project be glad to help. Its all about safe vehicles and safe driving.
Cheers Ray
Cheers Ray
Senior Member
Joined: Mar 2012
Posts: 305
Likes: 117
From: Sydney Australia
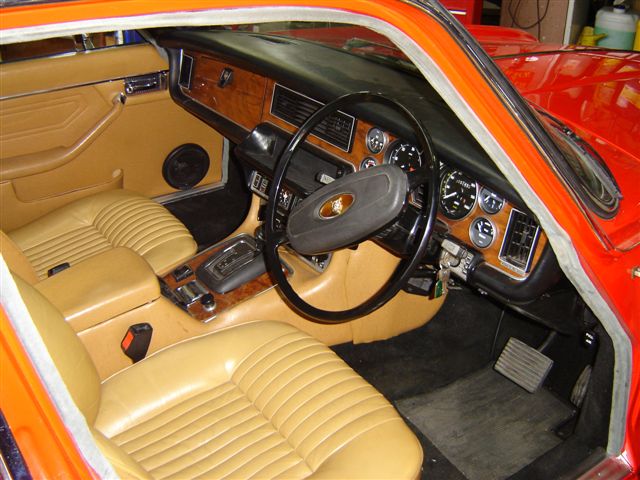
Ray, well done & thanks for giving a fine example of how things should be done, like the obvious solution to the steering rack and so on, I have a series 2 but no need for engine mod as it's going very well & good economy, just a mod of the interior with a couple of luxury add on's = remote control door locks & cruise control.........tom
HANG ON....let me get my magnifying glass out, thought i say a speck of dirt somewhere there......j/k
HANG ON....let me get my magnifying glass out, thought i say a speck of dirt somewhere there......j/k
Veteran Member
Joined: Apr 2012
Posts: 2,291
Likes: 1,466
From: New York City
I implore the OP. Go back to OEM rack and mounting. Your design and my previous idea to use a cross member are both defective because both don't account for the movement of the bushed front sub frame in relations to the chassis frame rails. You will certainty have death wobble and harshness at the least.
A much better idea... Use the XJS 6cyl rack.
The XJS came with the AJ6 3.6 / 4.0 straight 6 and used the exact same rack mounting design as the XJ series one two and three. They are exactly the same dimensionally. I put an ZF xjs rack in my series 2 so I know for sure. My parts catalogue shows the 6cyl XJS and XJ40 uses the same power steering pump so all you have to do is get a Rack from a later 6 cyl XJS and you're all set with pressures and OEM mounting. You probably need a rebuilt rack anyway.
Last edited by icsamerica; Mar 1, 2014 at 10:50 AM.

Thread Starter
|
Senior Member

Joined: Aug 2013
Posts: 309
Likes: 197
From: Groningen
Steering rack mounting points have been altered already, indeed because I realised it should be mounted in rubbers. I will take a picture later on. basically they are mounted on the same points, but now with rubbers. And the mounting points are made stronger.
And concerning the welding on the chassis... that is also not allowed in NL. I am just hoping I will pas. that will be in 1,5 years only, so hopefully all will be covered in dirt by then.
I might change the rack to xjs though. My original rack was so bad, I couldn't use it anyway. very poor steering.
I am going for the low budget conversion. It is just as you guys say. Backyard craftsmanship. But the weldings are fine.
I am just working my way through things, read your comments and take all the advice, tips and info very serious. Especially the tips about the rack are very useful.
This is what I did last week.
Okay, its weekend so time for an update. I found a place for all the stuff that has to go under the bonnet. it's getting busy there.


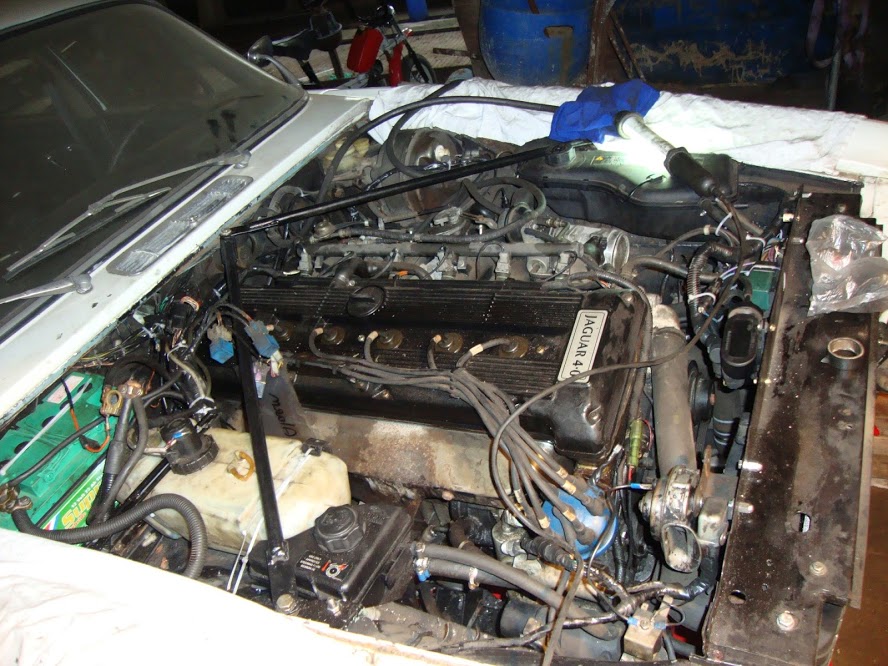
Not all would fit under the bonnet:

Some work waiting:

Computer room under passenger seat:

I have some questions now:
From where can I get vacuum for the brakes?
There are two little hoses coming from the inlet manifold, from the cilinders at the back. Where do these go? One goes up here:
But to where?
the other one connects to a pipe, close to the one you see above. The are clipped together. Where do they go?
And concerning the welding on the chassis... that is also not allowed in NL. I am just hoping I will pas. that will be in 1,5 years only, so hopefully all will be covered in dirt by then.
I might change the rack to xjs though. My original rack was so bad, I couldn't use it anyway. very poor steering.
I am going for the low budget conversion. It is just as you guys say. Backyard craftsmanship. But the weldings are fine.
I am just working my way through things, read your comments and take all the advice, tips and info very serious. Especially the tips about the rack are very useful.
This is what I did last week.
Okay, its weekend so time for an update. I found a place for all the stuff that has to go under the bonnet. it's getting busy there.
Not all would fit under the bonnet:
Some work waiting:
Computer room under passenger seat:
I have some questions now:
From where can I get vacuum for the brakes?
There are two little hoses coming from the inlet manifold, from the cilinders at the back. Where do these go? One goes up here:
But to where?
the other one connects to a pipe, close to the one you see above. The are clipped together. Where do they go?

I started the front grille treatment you have there once, but got sidetracked and didn't finish. The factory bodywork around the grille opening just begs to be finished and left exposed. You did a fine job, maybe you could post a few closeup pics in another thread?
Also, does the new motor have more power than the anemic 4.2l? These cars should have been built with more power from the beginning... Can a manual trans be fitted to the AJ6? Maybe even a T56? Where did you get the chrome strip down the hood?
OK, there is probably a build thread somewhere on this car right?
Thanks,
Bill
Senior Member
Joined: May 2012
Posts: 250
Likes: 54
From: Toronto, Ontario
Just wondering. Where are you going to install the "two" computers that you will need to control both the engine and transmission. When I did the conversion on my series III I used a 3.6 Ltr engine because it only needed the single computer. The 4 ltr engine requires both and I could not find enough room to hide both the computers plus all the wire they required.
Just as a couple of other posters have suggested I am also a little concerned about some of the other choices you have made. I used as much of the original set up as I could on mine. I just sorted out parts that offered what I wanted and would fit comfortably within the existing set up.
Thread Starter
|
Senior Member
Joined: Aug 2013
Posts: 309
Likes: 197
From: Groningen
Okay, apart from the steering mounting there is nothing wrong with my work. I am sure of that. I have to go cheap, so can't afford xjs steering rack. I also couldn't afford series 3 tank, so I had to work with what I had. Simple as that. I am student, so it's all low budget. Working place is an animal shed, with the animals actually still in it. So yes, it's a dirty job. On top of that, it's 80 kilometers from my house, but it was the cheapest. I don't even have a parking spot next to my appartment, so I have to deal with it. I know some stuff can be done neater, cleaner and better. Thats not an option for me. So I am going for cheap and good.
I am also very confident the new mounting system of the steering rack takes away all your concerns. (thank you for pointing them out though, withoud your feedback I would have left it the way it was, and I see now that is absolutely no good)
I took the 4.0 litre, because I like big engines, and it was the cheapest xj40 for sale at the moment, with acceptable kilometers on it.
computers will go under seats, in the tunnel between seats and passenger footwell, like the xj40 originally had. Yes, it is busy and lots of wires, but I think I can make it fit.

I am student, so it's all low budget. Working place is an animal shed, with the animals actually still in it. So yes, it's a dirty job. On top of that, it's 80 kilometers from my house, but it was the cheapest. I don't even have a parking spot next to my appartment, so I have to deal with it. I know some stuff can be done neater, cleaner and better. Thats not an option for me. So I am going for cheap and good.
I have been there, done that!! It's not optimal working conditions.
Just wait 20 years or so, it will be better.
The first car i restored was in my parents' carport duing the summer, that was more than 200 kilometers from where I was living at the time.
But NOW
Any way, you are doing good progress on the conversion. I like that it's a Jag engine you are installing.
Senior Member
Joined: Jan 2013
Posts: 160
Likes: 47
From: new zealand
Hi Slofut
The centre chrome is from a Series 2 Daimler series 3 the same.; I did this build in 2002 and 2003 but have only joined this forum in Jan 2013 so nothing on this thread about the build but have kept notes its is a 4 door LWB 1977 s/2. I have done others since one into a S/3 and one into an XJS which had a seized V12 so replaced it with 3.6AJ engine. On all conversions I have used the ZF 22Hp Auto box except on my race car XJS 3.6 has the 5speed getrag manual box. Engine power on the older 4.2 xj I think is about 165 H/P where the 3.6 AJ is 221 H/p. Here in New Zealand when doing these conversions they have to pass an engineers cert I think the same as Australia. With the series 1 that Wilfred88 is doing they would insist on uprating the front brakes from 3 pot calipers and solid discs to S/2.-S/3 or XJS 4 pot calipers and vented rotors because of the extra H/P if it is more than 20percent increase. The ideal set up for the series one would be a complete 3.6 xjs front subframe then you would have the steering rack that ( icsamerica) quoted plus the correct engine mounts and a good brake system.
Cheers Ray
Thread Starter
|
Senior Member
Joined: Aug 2013
Posts: 309
Likes: 197
From: Groningen
On all conversions I have used the ZF 22Hp Auto box except on my race car XJS 3.6 has the 5speed getrag manual box. Engine power on the older 4.2 xj I think is about 165 H/P where the 3.6 AJ is 221 H/p. Here in New Zealand when doing these conversions they have to pass an engineers cert I think the same as Australia. With the series 1 that Wilfred88 is doing they would insist on uprating the front brakes from 3 pot calipers and solid discs to S/2.-S/3 or XJS 4 pot calipers and vented rotors because of the extra H/P if it is more than 20percent increase. The ideal set up for the series one would be a complete 3.6 xjs front subframe then you would have the steering rack that ( icsamerica) quoted plus the correct engine mounts and a good brake system.
Cheers Ray
Cheers Ray
I also built a 1.9 TDI in a Volkswagen t2, which originally had i 1.6 petrol engine. BHP more than doubled. (50 to 110). For this job, there were some requirements. I took them into account, but once I had done that they were very helpful to get me through the last steps. They were really working for me, rather then annoynig me with all kinds of rules. Brake updates were not required, but I did change the drumbrakes to disc front and back. Plan is to alter them on the jag as well, but I am not that far yet.
Anyway, it's been a while. I completely changed the steering rack mounting, after your comments. You were right in saying I didn't do a good job on that. Now it hangs in mountings, which are connected to the subframe. No welding whatsoever, just used original mounting points. It's hard to take clear pictures now, with the engine in, but I can assure you that the mounting is very solid now, fully attached to subframe. At first glance, you won't be able to tell it's modified. I will take pic next time I'm at the car.
the tank has been sealed with epoxy from the inside, after all the rust was removed. It's now very neat and watertight. It's already back in place, fuel pump connected to the loom. Only the fuel lines need to be connected, I didn't have enough of it when I worked on the car last weekend.
Exhaust is connected, propshaft is shortened, balanced and installed. Fits nicely. The rear transmission mounting is made, and now the engine rests nicely on all the right mounts.
All electrics are connecte, only need to be integrated in the interior, but first I will try to start the whole thing.
As I said, I will only need fuel lines now to connect the tank with the engine, and then I can start. (hopefully :-) )
Thank you for thinking along. I really appreciate your comments and feedback.
Last edited by Wilfred88; Mar 23, 2014 at 11:31 AM.
Thread Starter
|
Senior Member
Joined: Aug 2013
Posts: 309
Likes: 197
From: Groningen
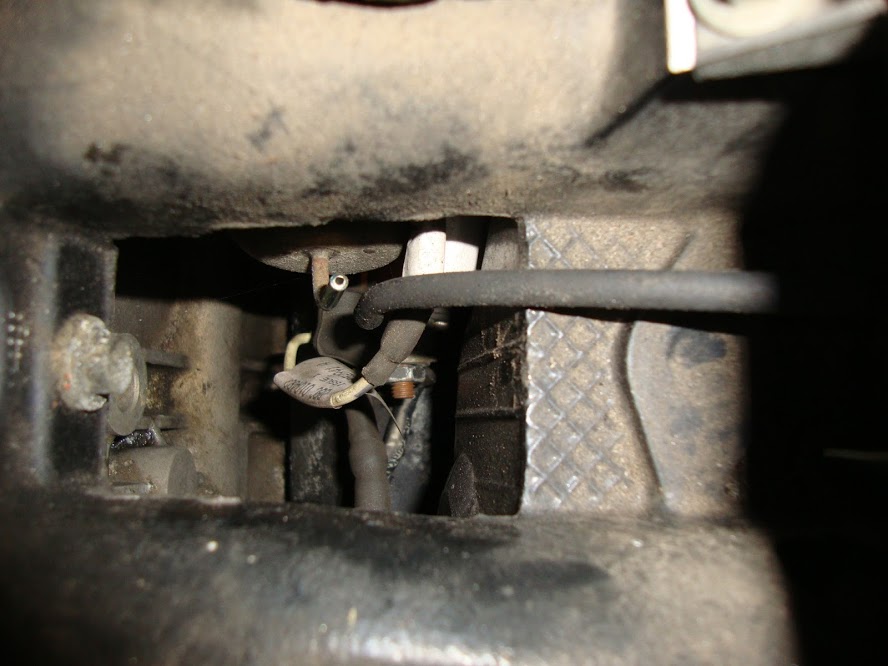
Okay, let me take away your worries about the steering rack mountings.
See the pic below.
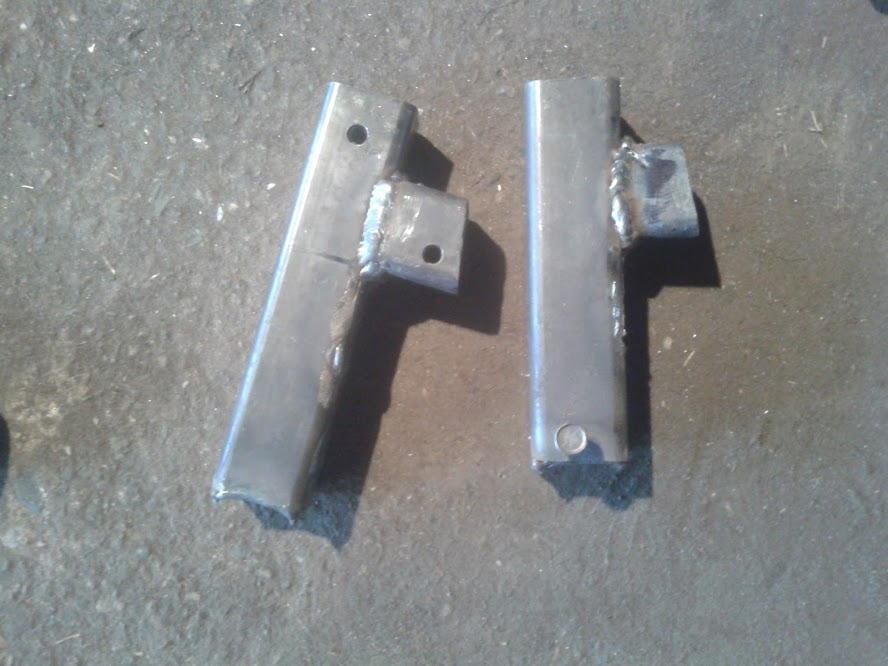
You see the left and the right mount. One from the top, other from the bottom. It's 40x40 mm steel.
You can see two holes in the left one. There are nuts welded underneath it. The bolts that go in there, are the ones that bolts the engine mount to the subframe. So a very good connection. On top of this, in the end of the short arm they have, I also welded a plate with a nut, and a bolt goes in there at the place where the original steering rack was mounted to the subframe. So this is an original steering rack mounting point.
the right one shows, at the very bottom, a bolt that will go through the steering rack to connect it to the mount.
Now seriously, this is a nice mount. the previous one was crap, the more I think about it the more I start to wonder how I came up with the idea. But this is good :-)
See the pic below.
You see the left and the right mount. One from the top, other from the bottom. It's 40x40 mm steel.
You can see two holes in the left one. There are nuts welded underneath it. The bolts that go in there, are the ones that bolts the engine mount to the subframe. So a very good connection. On top of this, in the end of the short arm they have, I also welded a plate with a nut, and a bolt goes in there at the place where the original steering rack was mounted to the subframe. So this is an original steering rack mounting point.
the right one shows, at the very bottom, a bolt that will go through the steering rack to connect it to the mount.
Now seriously, this is a nice mount. the previous one was crap, the more I think about it the more I start to wonder how I came up with the idea. But this is good :-)

Veteran Member
Joined: Jul 2012
Posts: 6,796
Likes: 2,403
From: Walnut Creek, California
To my view, any cracks between the bores pales when the arcs in the bores are viewed. What are those? Gouges in the bore wall or chunks or ring welded to the bore!!!
I've seen a lot of destroyed engines, but that is anew one to me!!
Carl
I've seen a lot of destroyed engines, but that is anew one to me!!
Carl