When you click on links to various merchants on this site and make a purchase, this can result in this site earning a commission. Affiliate programs and affiliations include, but are not limited to, the eBay Partner Network.
Never mind, i found that the link does indeed say s blade, still like to know about the noise though.
The noise is kind of high pitched. They sound loud at standstill standing beside the car, but I feel that's because it's a "new sound" that the car didn't make before. They certainly sound like they are moving a lot of air around :-) We haven't ran the car with the hood back on it yet..... that will be the real test. I don't think it will be an issue. With these things you kind of get used to them and tune the noise out, or at least that was my experience with my XJS when I fitted Efans to it.
Ok, some more updates after some real world trials. (ie Bay Area stop/go commute)
Noise : Is not an issue. When the car is running with the hood on (and closed) it is very difficult to even hear the first fan running. There is a very slight change in pitch when the second fan comes on, but it will be really useful to have the indicator light in the cabin as it's a very subtle change. (waiting on switches for that piece of the project). If you have the car in an enclosed space, ie your garage, the noise outside of the car is loud, but again, outside in the real world its perfectly fine.
Performance : In stand still traffic, ambient temps 70F, with the A/C on, the temp oscillates between 206F and 198F. The oscillation is due to the second fan turning off and on, controlled by the existing temp switch on the water pump. The temp drop from the second fan is pretty much instant and repeatable. When the car gets anything like a hint of fresh air (20mph+) the temp goes down to 195F and stays there (with only one fan on). Our A/C comp is the lightweight Aluminum A6 version. We have no foam around the rad, and there is a 1" space around the fans where the shroud doesn't cover the rad. I don't want to open the debate about foam or no foam, or shroud or no shroud. This is the condition of the car and as far as I am concerned, this set up is a workable solution for cooling on a V12. Total cost of parts was less than $1000 (rad, fans, trans cooler). If you got your existing rad re-cored, assuming that was all it was needing, you could give yourself a nice cooling system overhaul for less than $500.
Small modifications from the original design concept : The trans oil cooler looked cool where we mounted it, but it fouled the bonnet/hood. The Custom Modification Upgrade Design Planning Department (me) is currently under investigation into why this error occurred :-) The fix was to put it underneath the bracket it was on instead of on top of it. In truth, it looks neater like this. The fuse box also fouled the bonnet/hood so that had to be moved back about 1" towards the back of the rad top panel, and we took the plastic cover off.
That's it for cooling.
Next project is custom exhausts as all the sections for a SWB S2 car (ie a Coupe) appear to be unobtainium. Hopefully I can get as nice a job as @sanchez showed us recently ie https://www.jaguarforums.com/forum/x...2/#post1544121 I have these pictures saved on my phone and I'm going to show the shop these to hopefully give them some inspiration
Next up is some additional switchery trickery to control certain functions on the car.
The functions I added are :
1. A/C compressor manual turn off (On my car the A/C compressor comes on the minute you switch the HVAC on, even if you are asking for heat)
2. 2nd Electric Fan manual turn on (and an indicator light to show me if the 2nd fan is running, either because the switch is pressed, or if the temp switch has closed)
3. Forced Full Cool setting for the HVAC system. I often find that I want freezing air blowing at my face, even if it's not very hot ambient temps. I find that the current system tends to not give me full cool air if it isn't very hot outside.
As in my XJS, I used small rocker switches with indicator lights, which, with a bit of dremeling, fit nicely into the ashtray. The advantage of doing it this way is that I can hide the switches if needed (same principle as the 2 temp gauges we added)
This is the part number for the switches. https://www.delcity.net/catalogdetails?item=7500013 Note there are 2 different types. One for 125V AC and one for 12V DC. You need to get the 12V DC ones otherwise the indicator lights don't work. (Don't ask me how I know this)
Fitting takes a little bit if cutting of the ashtray, but eventually you get something that looks reasonable.
This is a great application for molex type connectors because you can solder the whole switch pack out of the car on the bench, which is quite convenient. Its also nice to be able to remove the center console and/or the switches easily if required.
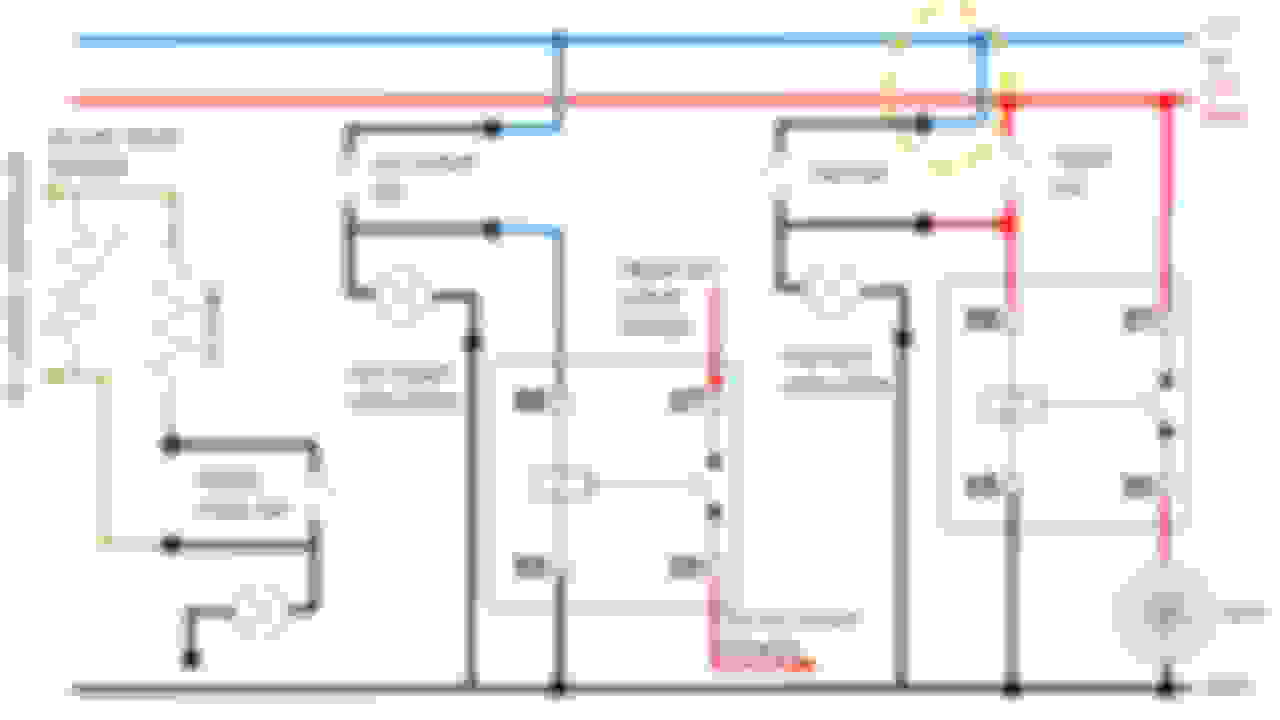
The circuitry is relatively straight forward, although the diagram is crowded.
The manual fan control was shown in the previous post about the Efan installation. The only change I made was powering the relay from an ignition live source, rather than a permanent live source (shown in the yellow circle). This means if you leave the fan switch on and shut the car off, the fan doesn't stay on forever (and drain the battery). Fan run on due to the temperature switch is still present however. The indicator light comes on if the switch is pressed, or if the temp switch closes.
The A/C compressor control is very simple. I just cut the power wire to the A/C compressor and routed it through a relay. This relay is energised when the switch is closed from an ignition live feed. The indicator light also comes on to show the compressor is running.
The forced cool was a little bit more interesting. I measured the resistance of the temperature sensor for the HVAC system, which, on our car is under the pencil tray. I found at ambient temps, the sensor showed 7k Ohm. When I gently heated it with a hair dryer, the resistance dropped to around 5k Ohm. So now we know "hot" = low resistance. I added a 3k Ohm resistor IN PARALLEL to the temp sensor, through the switch. When the switch is closed the overall resistance of the system (no matter what the temp sensor is reading) will be less than 5k Ohm, so the system thinks it very hot, and goes into full cool mode.
Finishing touches were vinyl printed lettering to note which switch is which.
It's completely Stupid that the system has to turn the car into an oven (when it's already 85F) before the compressor is triggered! So now that you've done all the measurements I can take time over the coming winter and wire this up too!
I Really like your "BRR" button. Nice touch.
I already have the compressor shut-off (*Very* simple mod) and it's quite handy I might add.
(';')
Well, the electrics are way out ahead of me. But, interesting? No doubt about it.
My ears are not that good, although my aids do a lot. My efans only energize when the car is stopped or moving very slowly. I no longer do the Bay area commute thing, so I don't know.
I notice them slightly when they come on and I am driving. Not annoying in the least. Out of the cabin, more noise. An issue to me, none at all. Just confirms, they work, always a good thing.
Mine are the straight blade variety, said to be less efficient, and not as efficient as the sexy curved blade version. I don't know....
Verification would be interesting, but no more.
I will not change the installation, unless forced to do so!!!
One of my better projects!!!
I have used him before for XJS seats and the quality was great. He has all of the original Jaguar colors and was the only person who could match the Isis Blue that I needed. I only want to do the front seats as my rears are fine, so a good color match was important.
There is another thread on seats on this forum where another vendor (Lseat) was discussed. A forum member is getting a set of seats for a Range Rover done, so hopefully he posts back and reports on the quality. The Lseat vendor was very good in presales, and his product is significantly cheaper, so if they quality is good, that could be another option for people. The only gotcha is he only has a few standard colors, not Jaguar specific, so it would have to be part pf a color change and/or re dieing exercise if you went that route
The Coupe has been in the shop this week, for only the second time in our ownership. You can buy a lot of things these days at Harbor Freight, but industrial pipe benders you cannot, so....... we took it to Babes and Lightning Muffler here in San Jose for a custom system from the cats back. This is an old school place that hand writes you your invoice on carbon copy paper. They had done a few Jags before so knew about the through the cage nonsense, which was more than some other "custom muffler" shops around here.
The finished product uses 4 glasspaks, 2 per side. You can hear the V12, which is nice, but once you get on the freeway, the noise leaves and the car settles into a quiet cruise. The workmanship looks very good and the system is well up out of the way.
He took quite a bit of time and asked a lot of questions about the tailpipes....... I think they turned our pretty good.
We also replaced the rear windscreen rubber seal as the original one was so hard and brittle, the glass was rattling around over bumps. No step by step because it wasn't pretty, but we managed to get it done.
Now..... hopefuly I get some time to do the seats.......
i sold a 1975 XJ12C ,factory manual 4 speed , in 2010, for $6500. USD.
without thinking to much about it,, BUT today the darn things are going up in value quickly.
car ran great, i tried that starting out thing in 4th gear,from dead stop,engine off, put in 4th,clutch out, turned the key ,car started, and pulled away up to 100mph, SMOOTH AS SILK, no shifting at all!
one other useless V12 trivia, the MAGIC engine!
course at the time i was retired with a static income, and a lot of rust in the 12C , and seemed like good idea!!??
i still got the XJS roadster modded V12, 4speed auto, keeps me busy tho! NO rust.
@ronbros
Rust would be a big concern for sure. The values do seem to be going up though......
Before we begin. I am not an upholsterer. I highly regard professional upholsterers because there is a lot of skill in what they do. My motto is if I think I can get it to within 70% as good as having it done professionally, I will have a go. The benefits to me are saving money, and getting to say “I did that” on the finished car. I am absolutely sure I don’t do certain things “properly” as a professional would do, but this is how I did it. Read on if you are brave.
My general rules of replacing seat leather.
1. Take pictures of everything as you go.
2. Never, ever cut the new seat leather until after you have it completely on the seat and in the right position. The way the new covers come is they have what appears to be a lot of excess material on them, but you will find that the material is there for a reason, so leave it all on until you have things fully reassembled and you are sure you know what you can and cannot cut.
Removing the seat from the car : Working from inside the car, remove the four bolts securing the seat frame to the car. These bolts are accessed from underneath the seat mountings. (“A” in the below picture). Be careful to retrieve the spring washer and large oval steel washer with each bolt. (“B” below). There are also 2 springs (One shown as “C” below) that provide the “automatic” seat moves forward function when you lift the bar that controls the seat distance. Once the 4 bolts are removed you can tilt the seat forward and unhook these. Seats are heavy and unwieldy. Make sure you have plenty of room to maneuver them out of the car. Be very careful not to catch the sharp metal seat rails on any part of the interior or the body.
Separating the seats into their 3 sections : From the underside of the seat, remove the 3 screws and brackets that hold the seat cushion on. There is one at the front (“D” below) and two at the back (“E” below)
The headrest just pulls up and out. If you’ve never done this before it may be pretty stiff the first time, but it will come out.
Now you have 3 parts. The headrest, the bottom seat cushion, and everything else, which is the mechanism and the seat back. I did not separate the seat back from the frame.
Re-covering the bottom seat cushion : working with the cushion turned upside down, carefully pry off all of the clips that are holding the cover on. They appear like little semi circles from the top (“F” below). There are 2 places where the cover is glued on to the seat base. (“G” below). Simply pry off the material to free it. You can now start to “unpeel” the leather cover off the foam. My cover was glued along 2 lines (“H” below), which made removal a little bit harder. Just go slowly and cut the cover and the foam apart as best as you can. You will then be left with the bottom seat foam. Note there are 2 pink pieces (“J” below) that are made of a softer type material. These go as shown in the recess of the foam. I used 3M 77 fabric spray adhesive to glue them down so I didn’t have to try and reposition them while putting the new cover on. There was also a piece of fabric in the center of the seat cushion (“K” below) so I glued that to the foam for reassembly.
As my leather had obviously been glued to the cushion, I repeated this process during reassembly. I used the same 3M 77 spray adhesive. Note : You have to work quickly to make sure you get the leather in the correct position before the glue sets. Realistically you have about a minute, so it’s a good idea to practice fitting the leather without the glue a few times till you get good at it. Once the new cover is on, pull the material tight around the edges and refit the semi circle clips. The last piece is to cut the material around the “G” sections and using the same adhesive, glue the material to the seat base, as it was before.
Re-covering the seat back : Remove the large screw from the center of the seat back adjuster handle. (“L” below) Remove the handle. Remove the single screw (“M” below) from the opposite side of the seat that is holding the “ear” of the seat back card in place. The seat back card is now only held in place by 4 metal grips (“N” below), the metal old fashioned version of a plastic fir tree fitting. Using a plastic pry tool carefully pop these 4 fasteners to release the seat back.
You will now be presented with things you have maybe never seen before….. isn’t this exciting ?! The “cushion” is made from some weird springy hair type material. There are a bunch of rubber straps to provide the “spring” of the cushion. The issue with our car was the rubber was hard, brittle and/or broken, so would need to be replaced. To remove the seat leather, remove all of the semi circular clips (“P” below). Unpeel the white strips of material (“R” below) from the hair type material. Untie all of the knots in the white material (“Q” below). Remove the small screw from the underside of the seat back tilt lever (This is a Coupe, remember). Working from the inside of the seat, remove the spring washers holding the plastic surround for the seat back tilt lever (“S” below). Hopefully you can get these washers off. One of mine was already broken off, and the other snapped while trying to remove it, so I drilled holes in the plastic surround, drilled new holes into the seat metal and screwed it back in that way. Not concourse, but it’ll do. You can now unpeel the leather from the seat back.
You know have something that looks like “T” below. I used bungee chords (did I mention I wasn’t a professional?) to replace the failed rubber webbing on my seats. (“U” below). Fit the new leather cover as best as you can and working from the back of the seat, find the white pieces of material the run vertically up and down the leather cover. Pull these pieces through the space between the seat foam and the hair type material. Using spray adhesive, glue these pieces tightly to the out edges of the seat back hair type material (“V” below). Find the other piece of white material that runs horizontally across the leather cover, about half way up. Pull that piece of material through to the back of the cushion and cut it into strips so you can thread it through the bungees and tie knots in it “W” below). The purpose of these white pieces of material is to pull in the leather cover along these lines to give the cushion some depth and profile, as per the original. Pull the cover tight and secure it with the semi circular clips as before.
Now you need to make some cuts in the new leather for the seat rake adjuster handle, the screw on the other side, the headrest and the seat back tilt lever. As mentioned previously, only do this once you have the cover completely in place. Replace the seat back card, the rake adjuster handle, the tilt lever surround and the tilt lever knob. On the original seat cover there was a chrome surround at the headrest opening (“X” below). I bought these…. https://www.etsy.com/listing/2316944...3N8aAg2J8P8HAQ and fitted them. They are a little bit bigger than the original ones, but it’s actually hidden by the headrest anyway, so it wouldn’t really matter if you didn’t want to add these.
Re-covering the headrest : Remove the 2 screws securing the plastic cover to the bottom of the headrest (“Y” below). Pull out all of the staples holding the leather in place (“Z” below). I removed the metal insert (“AA” below) then squished the foam (“BB” below) down to give enough room to remove the cover and put the new one on. I sprayed lots of adhesive on the metal insert before I put it back in to make sure it doesn’t move around. Pull the material tight, put new staples in. Reattach the plastic cover with the 2 screws.
Refit the bottom seat cushion to the frame and push the headrest home.
Final thoughts. That was only 1 seat!! That took about 8 hours. Still have the other side to do. I know the other side will be a lot faster because I now have the method and don’t need to take pictures and note stuff down (assuming the seat is the same, which I think it will be) The finished article looks pretty good. The color match is great (remember I am not changing the rear seats or the door cards). The seat feels comfortable, and the back is a little bit more supportive than before, probably because it now has a bunch of bungee cords in it rather than broken pieces of rubber. The finished article is probably 70% as good as an upholsterer, so I am happy. The creases will come out after a few days, or you can use a heat gun to work them out, but I usually just let it happen naturally.
We will have 2 fuel pressure gauges, one per fuel rail, as well as an oscilloscope to monitor fuel pulse width, so we should be able to see most things as we drive.
The current questions we are considering are :
1. New fuel tanks or not ?
2. Replace the racetrack fuel rail with a later rail.
We will keep this thread updated as we progress. I'm sure we will be asking a lot of questions. We have gotten this far using this forum, so charting our progress is our way of saying thanks to all!
As complicated as the fuel system is, and as much time as you have in this car, I would definitely replace both tanks. The reason for percussive maintenance starts at the rusty fuel tanks. And once a tank has introduced a bit of evil into the fuel system, all those new parts are... well, you get the picture.
And no, the main filter won't get it. BTDT
Good show Sarc!
Whatever you do, when you get it running don't stop driving it! Those damn changeover valves love to get sticky after even a few weeks of inactivity. Then you get an overfilled tank, and raw fuel spilling out the charcoal canister in the front fender! Saw a gorgeous, very low mile XJc on the net that burned at the front right fender the week they put it up for sale. The before and after pics were heartbreaking. I still have trouble with these valves and fuel in the canister ...everything new but for one tank! Bad mistake.
Sure does look like a professional upholsterer at work and the results thereof!!! Great job.
I've only entered into that field a few times.
1. T Ford. Mom sewed up some using a surplus GI hospital blanket. really nice grey wool. Rain, oh, oh, no top!!!
2. I wrestled on a set on my 37 Ford. Hung over, so the exercise was good. results, only fair.
3. Sears installed a nice set on my 41 Studebaker. Vinyl and straw of the period. In blue, kinda nice.
4. Sears installed a similar set in my 47 Ford, as the car was green, the covers chosen were green.
5. Decades later, I over paid for a 71 Mustang. Nice red interior, but
vandal cut seat! I got a nice set. And recalling a hint somewhere,
put them out in the sun to warm up and soften.
6. A new white vinyl top for the FJ40. Same idea. Warm it in the sun first.
7. Out of order. New vinyl top to replace the canvass top on the 60 VW Cabrolet. That was the toughest. ditched the head liner. Much trouble with the rear window. But, all in all neat...
8. Made a console for the IHC. Covered in real leather!!! A part of the "ditching" of the awful bench and replacing it with a pair of buckets from a Montalban Cordoba. Much more comfy, best yet, actually, Jaguar included...
we don't have any of the fuel change over valves anymore.
we got rid of them connected the fuel tanks together and use a tee piece with no return valves.