
ABS valve block fail, hard pull left

Veteran Member
Joined: Feb 2013
Posts: 17,809
Likes: 3,945
Hi David
If anyone knows how to fix this, I'm putting my money on you!
This is a related Master Cylinder Problem on my 1989 XJS V12
So Long Story Short
After an 8 year layup, got this Car out of 'mothballs' and took her for MOT
(1) Passed with flying Colors including the Brakes which came up A1 perfect on the rolling road.
(2) Lots of 10 mile to 20 mile Test Drives to try and shake down a rattle from the exhaust.
(3) A near disaster! as a half mile from home, White Smoke from Passenger Side (RHD Car) Front Wheel Arch, then Total Brake Failure!
(4) Pulled her up on the hand brake + 2nd Gear Auto and got off the road.
(5) At this point the Car was still smoking and nearly went up in flames!
(6) The road wheel was too hot to touch by hand
(7) Phoned a mate who came to the rescue
(8) We waited until the Wheel had cooled down, then tried the brakes off road but the pedal went down to the floor (engine switched off)
(9) Started the engine and the Brake Pedal came back and returned to normal.
(10) The following day I checked her over and discovered that the problem had been a stuck Caliper
(11) A no expense spared full rebuild of the Front Brakes.
New Calipers/Pads/Brake Hoses/etc
(12) Filled the Reservoir with 'New Dot4' and tried to bleed the Calipers in the correct order. (Two People)
(13) No fluid coming out
(14) Bought a Ezi Bleed (type) Power Bleeder that works off air from a spare tire at 15 to 20 psi
(15) Clear Bubble Free Brake Fluid from all Calipers, so this was looking good!
(16) Tried the Foot Brake (Nothing! It went straight down to the floor) with 'engine not running'
(17) Tried the Foot Brake 'with engine running' Hand Brake Light Went Out
and ABS Light Went Out.
But Brake Pedal Still went down to the floor.
(18) Reconnected the Self Bleeder to the Reservoir and pulled the little 'R' Clip out that holds the pipe into the Accumulator
(19) Jiggled this about (but did not pull it out) to try and get rid of a possible air lock as per the method described by 'Warrjon'
No Air or Fluid Came out (Still no pedal)
(20) Just by the side of the Reservoir is a high pressure connection that looks like a joiner with a brake pipe going into each end of it.
(21) Again no fluid or Air Coming out and Brake Pedal hitting the floor with or without the engine running.
But with the Ezi Bleed you can still Bleed the Calipers Clear.
From the Reservoir to the Calipers 'Clear Fluid with No Bubbles'
Its 'Only the Foot brake' that won't pump any Fluid
So I am assuming that No Fluid is getting into (whatever part of the master cylinder you call it) so that Fluid can be pumped by the Brake Pedal.
Having already messed one master cylinder up, when I put new Pads in on my other Car by sending fluid the wrong way up the brake pipe, I don't feel like experimenting in case I do it again.
But from what I can see your knowledge of Master Cylinder problems is second to none, as you did what very few people at least on here have done and rebuilt the Master Cylinder from Scratch.
During which time you must have had to re-bleed the whole System
This is driving me 'Crazy' as I don't know how to do this and get the Brake Pedal working.
Update: Just Thinking out loud, When installing New Calipers/Brake Pads/Flexible Brake Hoses etc
The Reservoir and or Master Cylinder probably lost all fluid and as a result the Brake Pedal has no Brake Fluid to Pump, so Maybe its the Master Cylinder that has an Air Lock and needs Bleeding but don't have a Clue how to do this.
Photo/s Appreciated if Possible as I have zero knowledge as to how to go about this.
So over to you, What do I do?
Please Help!
Last edited by orangeblossom; May 24, 2014 at 07:38 PM.

Member
Joined: Apr 2010
Posts: 65
Likes: 8
From: Michigan
Thought I might toss my humble hat into the ring: I had the same petal to the floor after having a caliper seize up. Put new fluid into the system, bled the brakes and petal still went to the floor. I immediately went to the forums and found a lot of advice but still had to look back at how I used to do brakes from my old Ford truck.
When all else fails...pull the master cylinder and rebuild it. That was the key for me. It had all sorts of clear sludge in it. Cleaned out the sludge and then took the valve body (contains the 6 electric valves) apart and it was just as bad, plus it had the bad electric foil in it. Rewired it and cleaned each valve (very sludgy) and threw it all back together.
The hardest part was getting the master cylinder off of the firewall. That was giving me fits until I stopped, had a good iced tea, took a walk around the vehicle, came back and saw 4 bolts holding the whole brake assembly to the firewall (master cylinder, brake petal and the lot). 4 bolts later and it was off. I also found out you can simply "pop" off the fluid container on top of the master cylinder. Sometimes I guess we over-think these cars.
All of the above is for my 93 XJS black convertible. My 87 XJS Hess & Eisenhardt uses the old type of brakes with no ABS and no problems either. As to the 93, the fluid was the original and it looked like root beer syrup coming out, no wonder my brakes were "wonky".
Veteran Member
Joined: Feb 2013
Posts: 17,809
Likes: 3,945
Thought I might toss my humble hat into the ring: I had the same petal to the floor after having a caliper seize up. Put new fluid into the system, bled the brakes and petal still went to the floor. I immediately went to the forums and found a lot of advice but still had to look back at how I used to do brakes from my old Ford truck.
When all else fails...pull the master cylinder and rebuild it. That was the key for me. It had all sorts of clear sludge in it. Cleaned out the sludge and then took the valve body (contains the 6 electric valves) apart and it was just as bad, plus it had the bad electric foil in it. Rewired it and cleaned each valve (very sludgy) and threw it all back together.
The hardest part was getting the master cylinder off of the firewall. That was giving me fits until I stopped, had a good iced tea, took a walk around the vehicle, came back and saw 4 bolts holding the whole brake assembly to the firewall (master cylinder, brake petal and the lot). 4 bolts later and it was off. I also found out you can simply "pop" off the fluid container on top of the master cylinder. Sometimes I guess we over-think these cars.
All of the above is for my 93 XJS black convertible. My 87 XJS Hess & Eisenhardt uses the old type of brakes with no ABS and no problems either. As to the 93, the fluid was the original and it looked like root beer syrup coming out, no wonder my brakes were "wonky".
When all else fails...pull the master cylinder and rebuild it. That was the key for me. It had all sorts of clear sludge in it. Cleaned out the sludge and then took the valve body (contains the 6 electric valves) apart and it was just as bad, plus it had the bad electric foil in it. Rewired it and cleaned each valve (very sludgy) and threw it all back together.
The hardest part was getting the master cylinder off of the firewall. That was giving me fits until I stopped, had a good iced tea, took a walk around the vehicle, came back and saw 4 bolts holding the whole brake assembly to the firewall (master cylinder, brake petal and the lot). 4 bolts later and it was off. I also found out you can simply "pop" off the fluid container on top of the master cylinder. Sometimes I guess we over-think these cars.
All of the above is for my 93 XJS black convertible. My 87 XJS Hess & Eisenhardt uses the old type of brakes with no ABS and no problems either. As to the 93, the fluid was the original and it looked like root beer syrup coming out, no wonder my brakes were "wonky".
Member
Joined: Apr 2010
Posts: 65
Likes: 8
From: Michigan
All of the foil connectors were bad, so I pulled all of them out, only after making a very nice wiring diagram so I would know how to put everything back as it should be. I then hard wired it and soldered it. No more problems...hopefully. Wish the cat did not have the ABS. But, life is still good and the road beckons.
Veteran Member
Joined: Feb 2013
Posts: 17,809
Likes: 3,945
All of the foil connectors were bad, so I pulled all of them out, only after making a very nice wiring diagram so I would know how to put everything back as it should be. I then hard wired it and soldered it. No more problems...hopefully. Wish the cat did not have the ABS. But, life is still good and the road beckons.
Thank you for that, I've got a 'Non Abs' system on one of my 'Scrappers' and am thinking of 'Retro Fitting' it into one of my later Cars.
With the ABS you can never relax and feel confident the Brakes will work when you need them.

Junior Member
Joined: Mar 2015
Posts: 15
Likes: 11
From: Somerset, UK
Hi to all you ABS sufferers out there! I've just been through the whole scenario of sending fluid the wrong way, jamming one of the solenoid valves in the valve block etc...... Djinaustin had it dead right and I can mirror all his thoughts and ideas. I can however offer 2 more tips which may help.
1. Another hobby of mine is repairing clocks for which I use an Ultra sonic cleaning tank. You can get one for �40-�50 on ebay. Each solenoid valve was put on a tray with holes in to allow free flow of the brake fluid and filled to a level just below the coil. I hope this helped to clean out the interior of the valve better than just syringing. I syringed the valves as well to make sure. Rewiring the coils and getting rid of that stupid foil thing is an absolute must.Aerosol brake cleaner did a good job removing the crud from the filter screens.
2. At the ABS pump end everyone is told to remove the securing clip and pull out the low pressure line from the pump. This is bound to cause air to get into the pump. If there is nothing wrong with rear brakes or the pump then there is a quicker method. Don't remove the pipe at that union but remove the flexible line from the rigid line 6" further back. As you split them keep the rigid line upright and then cover or plug the pipe. When you want to reconnect just top up the rigid line if necessary and introduce the flexible line while fluid is coming through. No air should enter the system at all so no need to bleed the pump line or rear brakes. It worked for me beautifully and so far no further problems with the ABS.
One last thing, I believe the Teves system is better bled the traditional way using slow pushes on the pedal taking 3 seconds to reach the floor, then hold for 3 secs then release taking 3 secs etc. again this worked for me much better than using pressure or vacuum systems.
Hope this helps as in the UK we running out of valve blocks from scrap cars!!
Thanks to Djinaustin for giving me the confidence to believe in myself!!
Cheers
Dave
Senior Member
Joined: Feb 2015
Posts: 377
Likes: 91
From: Uk
If you own an E Class circa 2002-2007 wait until the SBC brake pump fails and gives you a warning light, costing somewhere near �2000 to repair.......
Veteran Member
Joined: Feb 2013
Posts: 17,809
Likes: 3,945
Hi to all you ABS sufferers out there! I've just been through the whole scenario of sending fluid the wrong way, jamming one of the solenoid valves in the valve block etc...... Djinaustin had it dead right and I can mirror all his thoughts and ideas. I can however offer 2 more tips which may help.
1. Another hobby of mine is repairing clocks for which I use an Ultra sonic cleaning tank. You can get one for �40-�50 on ebay. Each solenoid valve was put on a tray with holes in to allow free flow of the brake fluid and filled to a level just below the coil. I hope this helped to clean out the interior of the valve better than just syringing. I syringed the valves as well to make sure. Rewiring the coils and getting rid of that stupid foil thing is an absolute must.Aerosol brake cleaner did a good job removing the crud from the filter screens.
2. At the ABS pump end everyone is told to remove the securing clip and pull out the low pressure line from the pump. This is bound to cause air to get into the pump. If there is nothing wrong with rear brakes or the pump then there is a quicker method. Don't remove the pipe at that union but remove the flexible line from the rigid line 6" further back. As you split them keep the rigid line upright and then cover or plug the pipe. When you want to reconnect just top up the rigid line if necessary and introduce the flexible line while fluid is coming through. No air should enter the system at all so no need to bleed the pump line or rear brakes. It worked for me beautifully and so far no further problems with the ABS.
One last thing, I believe the Teves system is better bled the traditional way using slow pushes on the pedal taking 3 seconds to reach the floor, then hold for 3 secs then release taking 3 secs etc. again this worked for me much better than using pressure or vacuum systems.
Hope this helps as in the UK we running out of valve blocks from scrap cars!!
Thanks to Djinaustin for giving me the confidence to believe in myself!!
Cheers
Dave
1. Another hobby of mine is repairing clocks for which I use an Ultra sonic cleaning tank. You can get one for �40-�50 on ebay. Each solenoid valve was put on a tray with holes in to allow free flow of the brake fluid and filled to a level just below the coil. I hope this helped to clean out the interior of the valve better than just syringing. I syringed the valves as well to make sure. Rewiring the coils and getting rid of that stupid foil thing is an absolute must.Aerosol brake cleaner did a good job removing the crud from the filter screens.
2. At the ABS pump end everyone is told to remove the securing clip and pull out the low pressure line from the pump. This is bound to cause air to get into the pump. If there is nothing wrong with rear brakes or the pump then there is a quicker method. Don't remove the pipe at that union but remove the flexible line from the rigid line 6" further back. As you split them keep the rigid line upright and then cover or plug the pipe. When you want to reconnect just top up the rigid line if necessary and introduce the flexible line while fluid is coming through. No air should enter the system at all so no need to bleed the pump line or rear brakes. It worked for me beautifully and so far no further problems with the ABS.
One last thing, I believe the Teves system is better bled the traditional way using slow pushes on the pedal taking 3 seconds to reach the floor, then hold for 3 secs then release taking 3 secs etc. again this worked for me much better than using pressure or vacuum systems.
Hope this helps as in the UK we running out of valve blocks from scrap cars!!
Thanks to Djinaustin for giving me the confidence to believe in myself!!
Cheers
Dave
How long did it take you to pull the pedal box out of the Car and did you have to buy any new parts, like Gaskets etc before you put it back together.
Also what sort of wire did you use to replace the ribbon, single or multi strand?
Junior Member
Joined: Mar 2015
Posts: 15
Likes: 11
From: Somerset, UK
Hi orangeblossom
the pedal box came out in a matter of minutes. 4 bolts on the bulkhead plate and a gentle lift making sure no damage was done to the brake switch. Obviously before this I had already disconnected the hoses, brake pipes and removed the reservoir. For better access I also removed the angled cross brace with the wiring loom on it. The valve block came off very easily and the 4 seals were carefully checked then put to one side. Deep breath and then gently prised up a solenoid valve. I used approx. 18 gauge multi strand wire and ,of course, made my own wiring diagram even though David's was correct. All 6 solenoids showed the correct resistance reading after rewiring. I prised out the mesh screens using a fine watchmaker's screwdriver and cleaned in brake cleaner. All the valves were fairly thick with a clear gel like muck which was removed. No new parts were used as all the seals were in good condition. I also took a couple of pics with my phone to make sure the valves went back in the same orientation before wiring. When I first took the valve block apart I tested the valves with a 12V supply and the offending one didn't 'click' quite in the same snappy way that the other 5 did. They all sounded the same when i tested again after completion. These little things help with confidence to carry on I find!!
Best of luck
Dave
Veteran Member
Joined: Feb 2013
Posts: 17,809
Likes: 3,945
Hi orangeblossom
the pedal box came out in a matter of minutes. 4 bolts on the bulkhead plate and a gentle lift making sure no damage was done to the brake switch. Obviously before this I had already disconnected the hoses, brake pipes and removed the reservoir. For better access I also removed the angled cross brace with the wiring loom on it. The valve block came off very easily and the 4 seals were carefully checked then put to one side. Deep breath and then gently prised up a solenoid valve. I used approx. 18 gauge multi strand wire and ,of course, made my own wiring diagram even though David's was correct. All 6 solenoids showed the correct resistance reading after rewiring. I prised out the mesh screens using a fine watchmaker's screwdriver and cleaned in brake cleaner. All the valves were fairly thick with a clear gel like muck which was removed. No new parts were used as all the seals were in good condition. I also took a couple of pics with my phone to make sure the valves went back in the same orientation before wiring. When I first took the valve block apart I tested the valves with a 12V supply and the offending one didn't 'click' quite in the same snappy way that the other 5 did. They all sounded the same when i tested again after completion. These little things help with confidence to carry on I find!!
Best of luck
Dave
the pedal box came out in a matter of minutes. 4 bolts on the bulkhead plate and a gentle lift making sure no damage was done to the brake switch. Obviously before this I had already disconnected the hoses, brake pipes and removed the reservoir. For better access I also removed the angled cross brace with the wiring loom on it. The valve block came off very easily and the 4 seals were carefully checked then put to one side. Deep breath and then gently prised up a solenoid valve. I used approx. 18 gauge multi strand wire and ,of course, made my own wiring diagram even though David's was correct. All 6 solenoids showed the correct resistance reading after rewiring. I prised out the mesh screens using a fine watchmaker's screwdriver and cleaned in brake cleaner. All the valves were fairly thick with a clear gel like muck which was removed. No new parts were used as all the seals were in good condition. I also took a couple of pics with my phone to make sure the valves went back in the same orientation before wiring. When I first took the valve block apart I tested the valves with a 12V supply and the offending one didn't 'click' quite in the same snappy way that the other 5 did. They all sounded the same when i tested again after completion. These little things help with confidence to carry on I find!!
Best of luck
Dave
That's Amazing!
Thank you for your reply, as I have a 1990 'Cream Puff' XJS V12 in Artic Blue, one owner from New, which has been laid up in my Garage for the past 12 years!
And I well remember the time I messed it up.
The Previous owner only did a couple of thousand miles a year and then it just sat in his Garage doing nothing.
This particular XJS had been the 'apple of my eye' for quite sometime except he didn't want to sell her, until I made him an offer he couldn't refuse.
By doing the same as you see them do in the movies, where I bought a real leather Briefcase and then I filled it up, with what was then and still is now an eye watering sum of money, all in �20 pound notes!
Then after asking if I could just look at his Car, I opened the Briefcase on his Kitchen table, I'm not sure who was shaking more, She didn't even have an MOT.
My only Condition was She would start and I could run her up and down his driveway, at which point after what must have been the shortest test drive in history, we shook hands and did the deal. OMG!
Then just like in the movies, I let him keep the Case.
After which She Failed the MOT! as She had to have to have New Front Calipers, which I put on myself.
Where thinking that the XJS was just the same as any other Car, I levered back the Brake Pads to get the old Calipers off, without undoing the bleed nipples beforehand 'Big Mistake!'
For although She past the MOT with the New Calipers fitted, there were times when She would suddenly take a very violent dive to the right.
So sudden and unexpected under Braking, that in the Wet, She would have spun 360!
Nobody but nodody had any idea at all what the problem might be and that included me sending out emails to those who specialize in doing Brakes.
There was only one option I could see and that was a New Master Cylinder, although as you know this comes bolted, to the Actuator so I reckoned it would be better to buy the whole thing.
My guestimate price wise was in the region of �150-�200 Max so imagine the 'shock horror' of being told they were �2,000! But only IF! I was able to find one, as they are as scarce as 'Rocking Horse Teeth'
So seeing that I didn't know then a bit more than I know now, I covered her up in the Garage, where She is still sitting to this very day!
Until I came across that post by DJ Austin which then made me realise by pushing the Brake Pads back, without any undoing of the 'Bleed Nipples' first, had inadvertantly sent a load of contaminated Brake Fluid, the wrong way up the System, which then Screwed everything up!
After reading his post I wanted to try and fix it but wasn't quite sure if I was up to the job and didn't want to pull it apart, only to find that I was unable to do so and have another Jagosaurus laying dead on the front lawn!
But your Post have given me Confidence to now give it a go, as I thought that I may have to try and find some hard to get parts, like Gaskets and 'O' rings etc.
Though since you seem to have done it without, just by cleaning the Valves and doing a rewire, I am going to try and do the same myself and will be posting loads of Pics to try and help anyone else as a Step by Step Guide.
If there is anything in what you did that needs a bit more explaining that would be great.
Did you manage to do the removal of the pedal box from outside the Car or did you have to remove any panels from underneath the Dashboard to get at the Brake Switch etc.
And did the Wiring loom on the Angle bracket get in the way at all, even after unbolting or did She just pull out without any problems?
One more question, is what you are calling the Valve Block the bit with all the Brake Pipes coming out or is it the Panel on the side of the Actuator assembly?
Any pics of what you did would also be a great help.
Once again many thanks for your reply.
OB
Last edited by orangeblossom; Apr 6, 2015 at 07:37 PM.
Junior Member
Joined: Mar 2015
Posts: 15
Likes: 11
From: Somerset, UK
Hi Orangeblossom
Yes, have a go! Nothing to lose. Take a deep breath and get stuck in. I found my car on eBay quite close to where I live, so I went and had a look. It had just been shipped back from Greece where it had been on show in a bar for 7 years! The previous owner bought the bar and drove from England to Greece. The collapse of the economy in Greece closed the bar and his friend ( A Porsche restoration garage owner) bought it and she came back on a lorry. He sorted it out (Hmmmmmm!) and I fell in love with her. I've been doing a fair bit of sorting out myself, including freeing off the sticking cylinders in the front callipers. Like everyone else without opening the bleed nipples and clamping the pipes. Although it had done the suicide dive once or twice before and I thought that this was just rusty discs or something.
To remove the pedal box I didn't need to go inside the car at all. When you lift the assembly out from under the bonnet just do it slowly and carefully being mindful that the brake pedal has to come past the switch assembly. Really very easy. Hardest job was emptying the reservoir before removal. Finally decided to split the line just before the pump where as I have said before you can pivot the rigid part upright from where it enters the pump. Thus keeping air out of the system. Cover or bung up the pipe. A suitable empty coffee jar collected the fluid. On removal of the reservoir a lot more fluid can be caught after removal of the bottom pipe from the reservoir. Undo the three unions from the valve block to the 2 front brakes and the rear brake feed. Unplug the 2 electrical connectors on the master cylinder assembly and away she comes. Takes longer to write this in reality! Reservoir held on by 1 small cap bolt accessible from the engine side and rock off the reservoir from the 2 rubber seal plugs. Renew these if they look dodgy. It is possible to remove the valve block complete from the master cylinder unit while it is still in situ if you prefer. There is room to undo the 3 cap bolts holding it on to the master cylinder unit. The only danger is losing one or all of the square 'O' ring seals. (Difficult to find replacements) Reassembly may also be tricky without displacing one of these. I plumped for the do or die method and had a good look at everything on a bench in controlled conditions. Removal of each solenoidal valve was a bit like levering teeth out. careful use of 2 screwdrivers just popped them up. Remember to check them for resistance and also note which ones are inlet and outlet. The electrical socket is held by 2 screws but first apply 12v to pin 7 (common) and pins 1-6 in turn and listen and feel their reaction. Nice firm click is what you want to hear. If any sound 'wooly' then these are the suspect ones. Try and use a desoldering sucker if possible when removing the wiring strips and use as little heat as possible. refer back to David's diagrams and photos, they are excellent. I managed to prise out the filter screens, 3 in base and 3 in valves without too much damage with a couple of fine watchmakers screwdrivers. I repair clocks so have many and various of these. I used a plastic syringe with a fine nozzle full of clean brake fluid to flush out the valves as best as I could then used the U/Sonic cleaning tank with them all semi submersed for about 30 mins. Reassembled, wired, tested and refitted to car. Phew!
Connect the pump line back together while fluid is flowing and no air should enter the pump side of things. I have tried all ways to bleed the brakes but the old fashioned way of slow push, hold and slow release works beautifully. Just takes a little time and patience.
Feel free to ask for any further clarification and good luck.
Let me know how you get on
Dave
Veteran Member
Joined: Feb 2013
Posts: 17,809
Likes: 3,945
Hi Dave
Those detailed instructions of yours, leave me in no doubt that I can do this, or at least give me the confidence I need to give it a go.
I had a mate who also had the same problem with his Car and he reckoned he'd found a way of putting it right, which was to race across a Car Park and slam the anchors on.
Needless to say this quick fix was useless as within a few days, the same problem came back to haunt him all over again, so glad I never tried it with my Car.
What makes this so scary, is that you can drive around for days and everything will be fine, until one day you hit the brakes and suddenly find the Car is heading for the line of traffic next to you.
Where suddenly and without warning, it does its best to spin the Car or throw you off the road.
It never seemed to do so when you were braking gently but much more when you needed to stop quickly, which turned an otherwise very safe Car into a potential death trap.
We phoned and emailed everyone who we thought maybe able to help but no one seemed to know the cause of the problem, let alone how to go about putting it right.
So this mate of mine decided to sell an otherwise very nice Car because of that fault and ended up getting scrap value for a Non runner.
It felt like a miracle when DJinaustin turned up but this Car has stayed on the 'back burner' while I got my grey Car back on the road, although in truth I was in denial, as to whether I was up to doing the job.
Then you go and turn up on the Scene, which to my mind was a real game changer, as now I cannot wait to get stuck in, the only problem being that my Grey Car needs an MOT and my other Car needs a new Rad.
So even if I only spend an hour a day on this, I am going to find the time from somewhere and I'll probably need to fit a set of new Calipers over again and Four new tyres to go with them.
Plus all the other assorted bits and bobs, and as I may have said before I will also do a set of Photos, which will hopefully help someone else on this Forum but first there is my MOT to sort out.
Many Thanks Again Dave
All the Best
O.B.
Junior Member
Joined: Mar 2015
Posts: 15
Likes: 11
From: Somerset, UK
Hi OB
I strongly advise though, if you haven't already, purchasing a full workshop manual. The one I got cost about �50 but worth every penny. Chapter 13 of the supplement describes how the system works and from page 70 there are all the instructions for removal, refilling, depressurising and bleeding. An absolute MUST read as you can do serious damage to the master cylinder if you don,t follow these procedures. It is all very simple really but vital. On eBay for sale by VW-DIY the repair operation manual is �54.50.
Have fun
Dave
Veteran Member
Joined: Feb 2013
Posts: 17,809
Likes: 3,945
Hi OB
I strongly advise though, if you haven't already, purchasing a full workshop manual. The one I got cost about �50 but worth every penny. Chapter 13 of the supplement describes how the system works and from page 70 there are all the instructions for removal, refilling, depressurising and bleeding. An absolute MUST read as you can do serious damage to the master cylinder if you don,t follow these procedures. It is all very simple really but vital. On eBay for sale by VW-DIY the repair operation manual is �54.50.
Have fun
Dave
I strongly advise though, if you haven't already, purchasing a full workshop manual. The one I got cost about �50 but worth every penny. Chapter 13 of the supplement describes how the system works and from page 70 there are all the instructions for removal, refilling, depressurising and bleeding. An absolute MUST read as you can do serious damage to the master cylinder if you don,t follow these procedures. It is all very simple really but vital. On eBay for sale by VW-DIY the repair operation manual is �54.50.
Have fun
Dave
Thanks, I check it out.
OB
Veteran Member
Joined: Feb 2013
Posts: 17,809
Likes: 3,945
Hi Dave
I just got the Car out the Garage, after a 12 year layup! She started first time, so I have started a new thread to cover the repair.
'Look what I found in the garage'
Taking that Pedal box out looks a bit of a 'nightmare' with nuts and bolts that look like they don't want to come undone.
And in the event that I do get it out, I have no idea what I'm going to find when I take the side cover off.
In some ways it looks like 6 bolts and in other ways looks like 4 as the side cover may or may not slide over the other 2.
The Plastic reservoir 'thingy' looks a bit of a headspin to take off.
Is it held on by just one bolt that is on the side just over the top of the plug and needs a number 4 Allen key to undo it?
Junior Member
Joined: Mar 2015
Posts: 15
Likes: 11
From: Somerset, UK
Hi OB
I found that the 4 nuts holding the pedal box assembly in place came off relatively easily. There is a foam gasket between the bulkhead and the mounting plate which I removed and discarded. I used a bead of silicon on reassembly. Yes the only bolt holding the reservoir is that cap bolt. Once removed the reservoir is held by the two spigots entering the master cylinder through the seals. A firm rocking motion and upward pull will then remove the reservoir. Do this before removing the pedal box to give you access and better site of what's what. Lots of old towels to catch the fluid!! The valve block is held on by 3 nuts. The top 2 and the middle one. The lower 2 just hold the cover together. If you try and remove this valve block without the master cylinder then watch out for the 4 square section 'O'rings. IMHO better to remove the whole unit and then start stripping it down. Don't do anything until you have released any pressure in the accumulator by depressing the brake pedal about 20 times until it goes very hard. Ignition off, of course!!
Dave
Veteran Member
Joined: Feb 2013
Posts: 17,809
Likes: 3,945
Hi OB
I found that the 4 nuts holding the pedal box assembly in place came off relatively easily. There is a foam gasket between the bulkhead and the mounting plate which I removed and discarded. I used a bead of silicon on reassembly. Yes the only bolt holding the reservoir is that cap bolt. Once removed the reservoir is held by the two spigots entering the master cylinder through the seals. A firm rocking motion and upward pull will then remove the reservoir. Do this before removing the pedal box to give you access and better site of what's what. Lots of old towels to catch the fluid!! The valve block is held on by 3 nuts. The top 2 and the middle one. The lower 2 just hold the cover together. If you try and remove this valve block without the master cylinder then watch out for the 4 square section 'O'rings. IMHO better to remove the whole unit and then start stripping it down. Don't do anything until you have released any pressure in the accumulator by depressing the brake pedal about 20 times until it goes very hard. Ignition off, of course!!
Dave
I found that the 4 nuts holding the pedal box assembly in place came off relatively easily. There is a foam gasket between the bulkhead and the mounting plate which I removed and discarded. I used a bead of silicon on reassembly. Yes the only bolt holding the reservoir is that cap bolt. Once removed the reservoir is held by the two spigots entering the master cylinder through the seals. A firm rocking motion and upward pull will then remove the reservoir. Do this before removing the pedal box to give you access and better site of what's what. Lots of old towels to catch the fluid!! The valve block is held on by 3 nuts. The top 2 and the middle one. The lower 2 just hold the cover together. If you try and remove this valve block without the master cylinder then watch out for the 4 square section 'O'rings. IMHO better to remove the whole unit and then start stripping it down. Don't do anything until you have released any pressure in the accumulator by depressing the brake pedal about 20 times until it goes very hard. Ignition off, of course!!
Dave
Thanks for that, I was thinking of emptying the reservoir by undoing one of the 'Bleed Nipples' on one of the Calipers and pumping the Fluid out that way.
In any case its going to be a full bleed out, as the fluid is at least 12 years old and I don't want any stuff in there, that might be contaminated.
And I'm going to take the whole lot out, in one piece as you suggested, assuming I can get those nuts undone.

Veteran Member


Joined: Apr 2014
Posts: 4,607
Likes: 3,549
From: Kent, UK
OB,
Just a suggestion; Use a tube and syphon / syringe or suck out as much from the top of the reservoir rather than pumping the crap through the brake system. Even if you're doing a subsequent flush, you don't want to send any more crap through the actuator, valve block, lines, flexis and calipers than you have to. You've already pushed some crap up one way, so don't try and push any more back the other way!
As Dave has mentioned, there'll still be fluid (and muck) trapped in the reservoir, so suck out what you can from the top, remove it, (plenty of rags!) and clean the rest out.
Cheers
Paul
Veteran Member
Joined: Feb 2013
Posts: 17,809
Likes: 3,945
OB,
Just a suggestion; Use a tube and syphon / syringe or suck out as much from the top of the reservoir rather than pumping the crap through the brake system. Even if you're doing a subsequent flush, you don't want to send any more crap through the actuator, valve block, lines, flexis and calipers than you have to. You've already pushed some crap up one way, so don't try and push any more back the other way!
As Dave has mentioned, there'll still be fluid (and muck) trapped in the reservoir, so suck out what you can from the top, remove it, (plenty of rags!) and clean the rest out.
Cheers
Paul
Just a suggestion; Use a tube and syphon / syringe or suck out as much from the top of the reservoir rather than pumping the crap through the brake system. Even if you're doing a subsequent flush, you don't want to send any more crap through the actuator, valve block, lines, flexis and calipers than you have to. You've already pushed some crap up one way, so don't try and push any more back the other way!
As Dave has mentioned, there'll still be fluid (and muck) trapped in the reservoir, so suck out what you can from the top, remove it, (plenty of rags!) and clean the rest out.
Cheers
Paul
I will use the Suction Pump out of a bottle of Shower Gel.
After I've washed it out and made sure that its dry.
Veteran Member
Joined: Feb 2013
Posts: 17,809
Likes: 3,945
Work on removing the ABS Actuator is now well under way but now I've hit the buffers!
What's the best way to remove this bolt?
Its right underneath the Bonnet/Hood Catch and since I have done loads of stuff today, thought that now would be a good time to ask for some advice.
I could probably get a spanner on it but wonder if it would be best to remove the bonnet catch first?
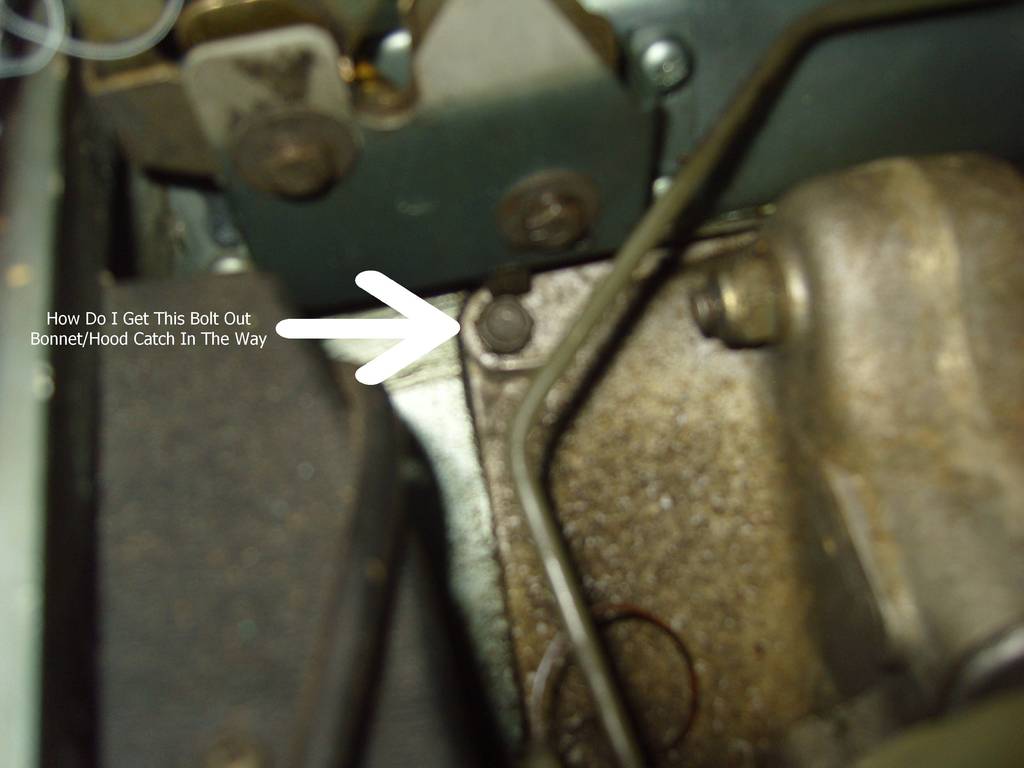
What's the best way to remove this bolt?
Its right underneath the Bonnet/Hood Catch and since I have done loads of stuff today, thought that now would be a good time to ask for some advice.
I could probably get a spanner on it but wonder if it would be best to remove the bonnet catch first?
