
Caliper Removal XJS V12 What's The Best Way?

Thread Starter
|
Veteran Member
Joined: Feb 2013
Posts: 17,809
Likes: 3,945
Its been a long time since I've done one of these.
What is the Best Way to remove the Calipers?
I'm thinking the Caliper holding bolts are going to be an absolute 'pig' to undo.
So is it a case of a Spanner and a Big Hammer?
Or should I instead take the Caliper to pieces by undoing the 2 Concealed Allen Key bolts?
My main concern is not breaking anything on the Car.
Veteran Member
Joined: Feb 2011
Posts: 9,733
Likes: 2,203
From: on-the-edge
You were warned in the other thread to never disassemble the caliper. So, that's not likely the way to go.
On the other hand, if they are ATE style brakes, then there are two hex headed pins at the extreme ends of the calipers. Upon removal of these pins, the caliper almost falls off. They are normally under some plastic plugs.
You might be staring at the bolts for the caliper mounts themselves which attach to the spindle. These only need removal for rotor replacement.

Veteran Member


Joined: Jan 2012
Posts: 14,618
Likes: 10,821
From: France
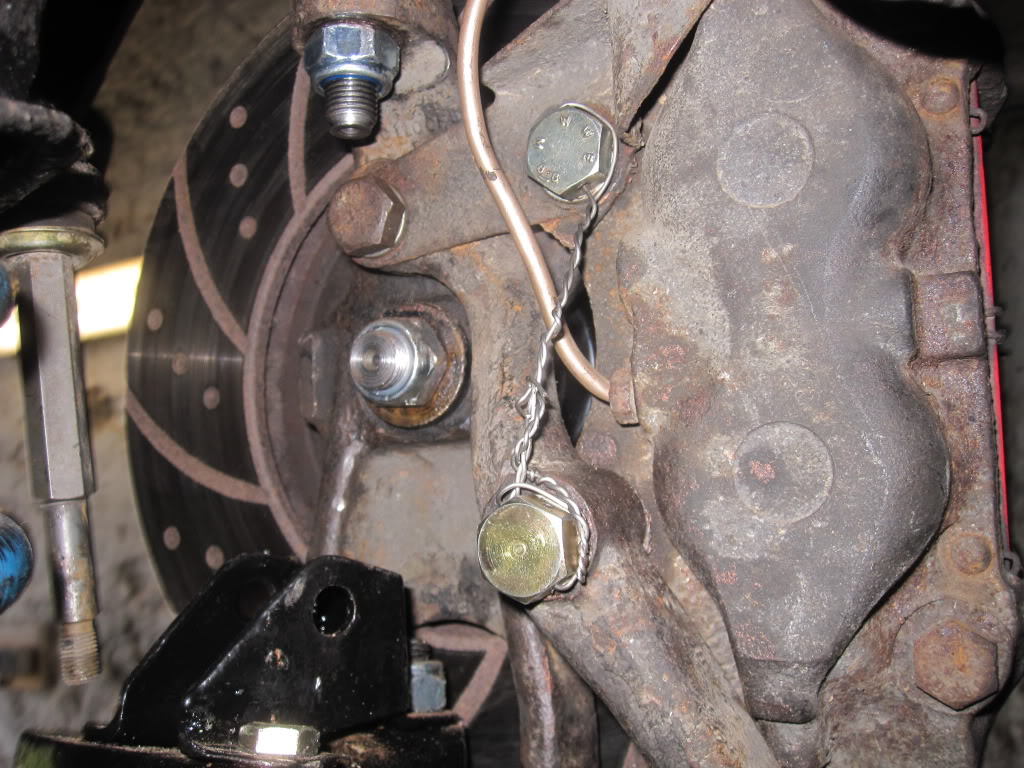
Assuming we are talking about front brakes, here is a photo:
proceed as follows:
Loosen road wheel nuts;
Jack up entire front of car and support it on stands VERY securely;
Remove wheels;
Turn the hub you are working on the full lock so you can see the caliper bolts from the rear of the wheelarch;
Undo the lockwire on the two bolts that hold the caliper;
Undo the bolts using a 1/2 inch drive single hex socket and a LONG breaker bar, save any shims that drop out of the bottom bolt hole;
If one or both of these bolts are difficult/will not undo, drench in WD40 type stuff for a few days, respraying fequently, and try again. If it still will not move post again for the watchmaker's fix!
Remove caliper and install new one using new bolts if the old ones are iffy, if they come out Ok it is normally Ok to reuse them.
Look at the photo, the bottom bolt goes through the steering arm into the caliper. When you have refitted the caliper, tighten the TOP bolt up reasonably tight and then using a feeler gauge measure the gap on the BOTTOM hole BETWEEN the arm and the caliper;
Install shims into this gap of the correct thickness then bolt up both bolts tight and lockwire them;
Remove the flexible hose and change it for a new one;
Repeat for the other side.
Then jack up the rear and change the single rear flexible and bleed the brakes starting at the back, using the special procedure to do so with ABS brakes that someone will explain.
As PJTS said, buy the recon calipers, discs if needed, flexibles and pads from David Manners. Forget the clever stuff, OEM stuff will be fine unless you are track-daying! If you really want to spend money then EBC sloteed dimpled discs and Redstuff pads, but this is only needed if you are going to regularly exceed 100mph and cain the brakes.
Greg
Last edited by Greg in France; May 17, 2014 at 01:41 PM.
Thread Starter
|
Veteran Member
Joined: Feb 2013
Posts: 17,809
Likes: 3,945
Assuming we are talking about front brakes, here is a photo:
proceed as follows:
Loosen road wheel nuts;
Jack up entire front of car and support it on stands VERY securely;
Remove wheels;
Turn the hub you are working on the full lock so you can see the caliper bolts from the rear of the wheelarch;
Undo the lockwire on the two bolts that hold the caliper;
Undo the bolts using a 1/2 inch drive single hex socket and a LONG breaker bar, save any shims that drop out of the bottom bolt hole;
If one or both of these bolts are difficult/will not undo, drench in WD40 type stuff for a few days, respraying fequently, and try again. If it still will not move post again for the watchmaker's fix!
Remove caliper and install new one using new bolts if the old ones are iffy, if they come out Ok it is normally Ok to reuse them.
Look at the photo, the bottom bolt goes through the steering arm into the caliper. When you have refitted the caliper, tighten the TOP bolt up reasonably tight and then using a feeler gauge measure the gap on the BOTTOM hole BETWEEN the arm and the caliper;
Install shims into this gap of the correct thickness then bolt up both bolts tight and lockwire them;
Remove the flexible hose and change it for a new one;
Repeat for the other side.
Then jack up the rear and change the single rear flexible and bleed the brakes starting at the back, using the special procedure to do so with ABS brakes that someone will explain.
As PJTS said, buy the recon calipers, discs if needed, flexibles and pads from David Manners. Forget the clever stuff, OEM stuff will be fine unless you are track-daying! If you really want to spend money then EBC sloteed dimpled discs and Redstuff pads, but this is only needed if you are going to regularly exceed 100mph and cain the brakes.
Greg
Thread Starter
|
Veteran Member
Joined: Feb 2013
Posts: 17,809
Likes: 3,945
You were warned in the other thread to never disassemble the caliper. So, that's not likely the way to go.
On the other hand, if they are ATE style brakes, then there are two hex headed pins at the extreme ends of the calipers. Upon removal of these pins, the caliper almost falls off. They are normally under some plastic plugs.
You might be staring at the bolts for the caliper mounts themselves which attach to the spindle. These only need removal for rotor replacement.
On the other hand, if they are ATE style brakes, then there are two hex headed pins at the extreme ends of the calipers. Upon removal of these pins, the caliper almost falls off. They are normally under some plastic plugs.
You might be staring at the bolts for the caliper mounts themselves which attach to the spindle. These only need removal for rotor replacement.
Veteran Member
Joined: Feb 2011
Posts: 9,733
Likes: 2,203
From: on-the-edge
Probably the type Greg showed you.
The ATE might now have shown up until at least the X300 ... stab in the dark on my part when I heard "allen head".
Now that's cleared up by Greg ... really curious about the watchmakers' solution
The ATE might now have shown up until at least the X300 ... stab in the dark on my part when I heard "allen head".
Now that's cleared up by Greg ... really curious about the watchmakers' solution
Thread Starter
|
Veteran Member
Joined: Feb 2013
Posts: 17,809
Likes: 3,945
I'm thinking that the 'Watchmakers' Solution, might involve the use of a 'Blinking Great Hammer!'
Trending Topics
Veteran Member
Joined: Jan 2012
Posts: 14,618
Likes: 10,821
From: France
In response to popular demand...
During my rebuild the LH front caliper was a real pain, in spite of having been off a mere 10 years previously. The problem was the bottom bolt in the pic, it would turn, but had corroded itself into the steering arm, which thus prevented the bolt being turned more than a few degrees, even with the other steering arm/hub bolt (the unwired one) undone. All the usual heat hammer etc etc did nothing as there was no way to get any more than a few degrees of movement on bolt or arm.
Therefore I rang Grublogger and ordered up an arm. Then armed (geddit?) with my trusty 115mm angle grinder, I cut the arm below and above the bottom bolt. Then I was able to wind out the bolt together with the still corroded on bit of the arm.
I might add for those still reading, this was as nothing to what I had to do to replace the 25 year old bottom wishbone bushes. The real problem with these was, once I had lowered the subframe etc etc, is that when trying to sledge hammer out the fulcrum pin, the bushes dampen the blow sufficiently to not get any real shock loading into the pin/bush outer steel in the wishbone.
In the end, I bought about 12 hacksaw blades for my trusty Black and Decker Scorpion electric saw. There is JUST enough room between the inner sides of the wishbone eyes and the subframe to cut through the bush end and then the pin. Takes ages, uses loads of blades as the OEM steel pin is very hard. Wishbone drops off with bush in it which is then burned out using the propane torch. This leaves the pin in the subframe of course... But this banged out with the lump hammer relatively easily,as any corrosion in the subframe tube is only on about about the first 3/8 inch into the tube.
I mean, occasionally you do have to explain to an XJS exactly who is Boss!
Greg
During my rebuild the LH front caliper was a real pain, in spite of having been off a mere 10 years previously. The problem was the bottom bolt in the pic, it would turn, but had corroded itself into the steering arm, which thus prevented the bolt being turned more than a few degrees, even with the other steering arm/hub bolt (the unwired one) undone. All the usual heat hammer etc etc did nothing as there was no way to get any more than a few degrees of movement on bolt or arm.
Therefore I rang Grublogger and ordered up an arm. Then armed (geddit?) with my trusty 115mm angle grinder, I cut the arm below and above the bottom bolt. Then I was able to wind out the bolt together with the still corroded on bit of the arm.
I might add for those still reading, this was as nothing to what I had to do to replace the 25 year old bottom wishbone bushes. The real problem with these was, once I had lowered the subframe etc etc, is that when trying to sledge hammer out the fulcrum pin, the bushes dampen the blow sufficiently to not get any real shock loading into the pin/bush outer steel in the wishbone.

In the end, I bought about 12 hacksaw blades for my trusty Black and Decker Scorpion electric saw. There is JUST enough room between the inner sides of the wishbone eyes and the subframe to cut through the bush end and then the pin. Takes ages, uses loads of blades as the OEM steel pin is very hard. Wishbone drops off with bush in it which is then burned out using the propane torch. This leaves the pin in the subframe of course... But this banged out with the lump hammer relatively easily,as any corrosion in the subframe tube is only on about about the first 3/8 inch into the tube.
I mean, occasionally you do have to explain to an XJS exactly who is Boss!
Greg
Thread Starter
|
Veteran Member
Joined: Feb 2013
Posts: 17,809
Likes: 3,945
In response to popular demand...
During my rebuild the LH front caliper was a real pain, in spite of having been off a mere 10 years previously. The problem was the bottom bolt in the pic, it would turn, but had corroded itself into the steering arm, which thus prevented the bolt being turned more than a few degrees, even with the other steering arm/hub bolt (the unwired one) undone. All the usual heat hammer etc etc did nothing as there was no way to get any more than a few degrees of movement on bolt or arm.
Therefore I rang Grublogger and ordered up an arm. Then armed (geddit?) with my trusty 115mm angle grinder, I cut the arm below and above the bottom bolt. Then I was able to wind out the bolt together with the still corroded on bit of the arm.
I might add for those still reading, this was as nothing to what I had to do to replace the 25 year old bottom wishbone bushes. The real problem with these was, once I had lowered the subframe etc etc, is that when trying to sledge hammer out the fulcrum pin, the bushes dampen the blow sufficiently to not get any real shock loading into the pin/bush outer steel in the wishbone.
In the end, I bought about 12 hacksaw blades for my trusty Black and Decker Scorpion electric saw. There is JUST enough room between the inner sides of the wishbone eyes and the subframe to cut through the bush end and then the pin. Takes ages, uses loads of blades as the OEM steel pin is very hard. Wishbone drops off with bush in it which is then burned out using the propane torch. This leaves the pin in the subframe of course... But this banged out with the lump hammer relatively easily,as any corrosion in the subframe tube is only on about about the first 3/8 inch into the tube.
I mean, occasionally you do have to explain to an XJS exactly who is Boss!
Greg
During my rebuild the LH front caliper was a real pain, in spite of having been off a mere 10 years previously. The problem was the bottom bolt in the pic, it would turn, but had corroded itself into the steering arm, which thus prevented the bolt being turned more than a few degrees, even with the other steering arm/hub bolt (the unwired one) undone. All the usual heat hammer etc etc did nothing as there was no way to get any more than a few degrees of movement on bolt or arm.
Therefore I rang Grublogger and ordered up an arm. Then armed (geddit?) with my trusty 115mm angle grinder, I cut the arm below and above the bottom bolt. Then I was able to wind out the bolt together with the still corroded on bit of the arm.
I might add for those still reading, this was as nothing to what I had to do to replace the 25 year old bottom wishbone bushes. The real problem with these was, once I had lowered the subframe etc etc, is that when trying to sledge hammer out the fulcrum pin, the bushes dampen the blow sufficiently to not get any real shock loading into the pin/bush outer steel in the wishbone.
In the end, I bought about 12 hacksaw blades for my trusty Black and Decker Scorpion electric saw. There is JUST enough room between the inner sides of the wishbone eyes and the subframe to cut through the bush end and then the pin. Takes ages, uses loads of blades as the OEM steel pin is very hard. Wishbone drops off with bush in it which is then burned out using the propane torch. This leaves the pin in the subframe of course... But this banged out with the lump hammer relatively easily,as any corrosion in the subframe tube is only on about about the first 3/8 inch into the tube.
I mean, occasionally you do have to explain to an XJS exactly who is Boss!
Greg
Maybe I need more leverage? So I will try welding a spanner to the end of a 20ft Scaffolding Pole! Not so lol at this moment in time!
Thread Starter
|
Veteran Member
Joined: Feb 2013
Posts: 17,809
Likes: 3,945
Also if you get the time, soak the Bolts in 'The Mixture' 50/50 Acetone and Tranny Fluid@Greg.

Veteran Member
Joined: Jun 2013
Posts: 2,124
Likes: 1,386
From: Australia
Hub/ bearing work can be done without removing caliper, the disc should be separated from the hub and the disc can be left in place and the hub removed.

Veteran Member
Joined: Jul 2012
Posts: 6,796
Likes: 2,403
From: Walnut Creek, California
Rough and ready stuff, not the fiddly variety !!!
I would have two suggestions to add to the excellent treatise afforded by Greg.
1. Oxy acetylene torch. Lots more BTU's than the propane one. If mere heat fails, cut the stuff off nd replace with good used. Although a careful burn might get the stubbotn bolt and not hurt the forgings.
2. If there is enough room for an impact wrench, the combination or torgue and lots of it and impact works often.
In my prior project involving ancient Ford Parts, these techniques worked on some really brutal places. As the transverse spring perches in the Vandium steel beam front axle.
Carl


Senior Member
Joined: Nov 2015
Posts: 374
Likes: 107
From: Kamloops BC
I like to soak the bolts and threads with a penetrating fluid then I hit them with the air chisel with a rounded point to free them up a bit. I do this a couple times before loosening them. Usually works without braking bolt. Also use an air impact if possible, the hammering effect lessens the chance of twisting the bolt in half like a breaker bar would
Last edited by BC XJS; Sep 13, 2016 at 09:56 AM.

Senior Member
Joined: Mar 2016
Posts: 318
Likes: 141
From: Hampshire, UK
Think I'll bookmark this thread for when I drop the subframe!
Why did Jag decide that the caliper mounting needed shimming- aren't they straight machined surfaces ? I've never heard anything like that on any other car.
Why did Jag decide that the caliper mounting needed shimming- aren't they straight machined surfaces ? I've never heard anything like that on any other car.
Veteran Member
Joined: Jan 2012
Posts: 14,618
Likes: 10,821
From: France
Just a quick point. Following all the grief I had, I did a bit of searching and bought a tin of this stuff:
https://www.silmid.com/products/moly...500gm-tin.aspx
Absolute MAGIC on bolt shafts, spark plug threads etc etc. Forget copperslip use this stuff. A bit pricey mind, but really worth it.
Greg
https://www.silmid.com/products/moly...500gm-tin.aspx
Absolute MAGIC on bolt shafts, spark plug threads etc etc. Forget copperslip use this stuff. A bit pricey mind, but really worth it.
Greg

Junior Member
Joined: Sep 2016
Posts: 19
Likes: 1
From: hamilton, on
changed the passenger side bearings tonight, all bolts came of by hand, no issues whatsoever.
I keep hearing from people how much of a nightmare these cars are to work on, but i'm impressed at how well engineered they are and how well it goes. Will hopefully get to the drivers side bearings next week, and ill be pulling everything apart and making sure it is all good bit by bit.
I keep hearing from people how much of a nightmare these cars are to work on, but i'm impressed at how well engineered they are and how well it goes. Will hopefully get to the drivers side bearings next week, and ill be pulling everything apart and making sure it is all good bit by bit.