
Cherry Blossom - Restoration 1990 XJS V12

Thread Starter
|
Veteran Member
Joined: Feb 2013
Posts: 17,809
Likes: 3,945
Terrific job on the cross panel OB. Congratulations. I am glad it is all coming together. The belts will not take too long, just soak all the adjusters with some mixture for a day or two before. The car lokks great and the cross member underneath the rad is amazing.
Greg
Greg
Thanks, I've just got to put some hammer paint on the Fan Shroud and Clean and Paint the Top up Tank for the Rad, then renew all the belts and hoses, put in a new main Radiator.
Connect up the wires and pipes on top of the Rad Top Closing Panel (Thanks for the photos of how to do that by the way)
Then Try and find the ignition Key!!!
I'm going to leave the Spoiler off until I get her running, just in case the Oil Cooler has corroded and developed a leak.
If I threw it altogether, I could probably do it in a couple of days but I'm going to take a bit more time, so when I've got it done I'll know its right.
How do I know if She has Mirelli ignition? Its probably staring me in the face but I don't know where to look.
Thread Starter
|
Veteran Member
Joined: Feb 2013
Posts: 17,809
Likes: 3,945
Bit by bit, step by step... I know how you feel when something looks great in the end or better than thought. As I removed my Jags waterbottle I was expecting to find a rust hole and loads of rot... Not a bit! Luckily my Jag hab been leaking oil from day one as it seems, as the engine bay has not rust anywhere. Wiped with a cloth: brand new paint beneath 
Keep the good work up!
Keep the good work up!
Thanks for the encouragement!
I'm actually getting quite nervously excited, every little thing I do, is a big step closer to success.
There is a temptation to rush this, which I am managing to resist as its so close now I can taste it.
I was also thinking, of spraying inside the engine bay with clear Waxoil, what do you think?

Veteran Member


Joined: Jan 2012
Posts: 14,607
Likes: 10,802
From: France
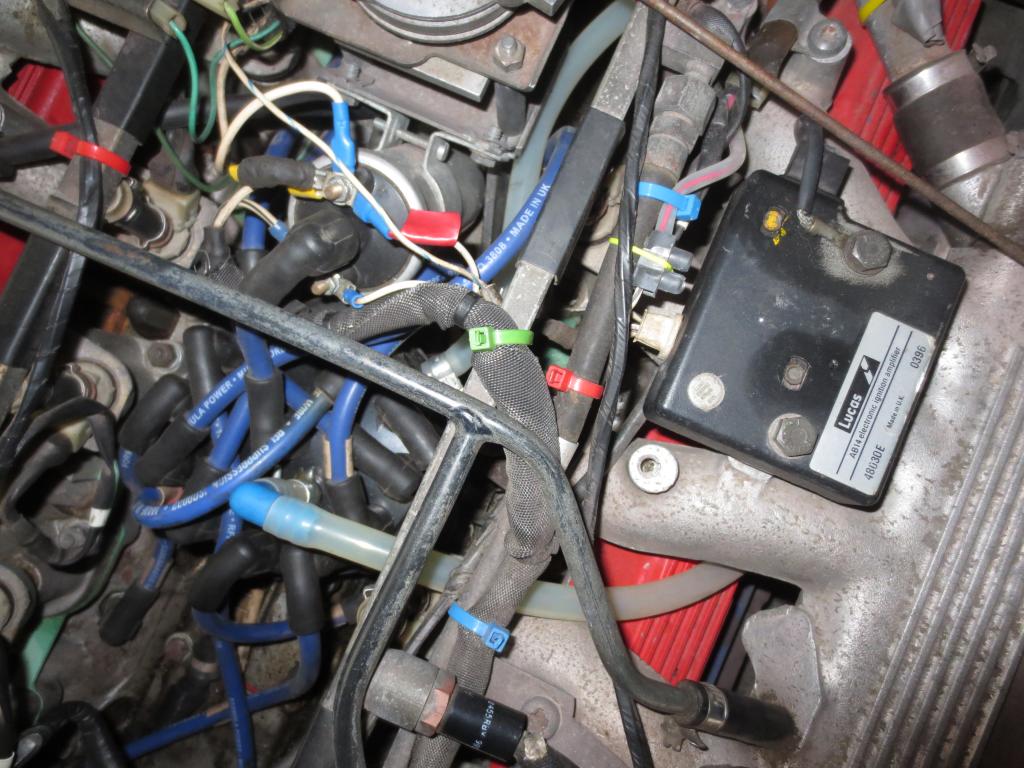
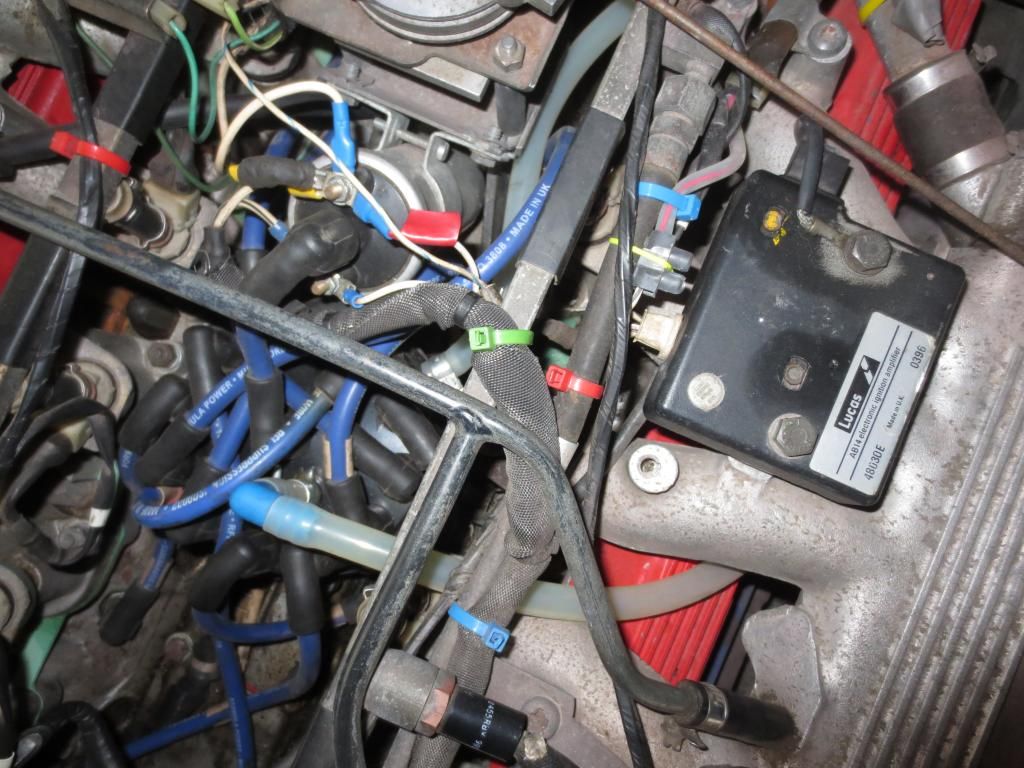
If you have one huge distributor cap with 12 HT leads in a single circle coming out of it, and a black box about the size of a large cigarette packet on the top cabin end of the B bank intake manifold, you have a Lucas ignition car. If not, and the dizzy cap has two sets of six coming out at different levels, it is a Marelli.
FWIW, I say do not waxoil the inside of the engine bay. This is not a bad rust area, and all the dust sticks to the wax and soon the engine bay looks shabby.
Greg
FWIW, I say do not waxoil the inside of the engine bay. This is not a bad rust area, and all the dust sticks to the wax and soon the engine bay looks shabby.
Greg
Veteran Member
Joined: May 2014
Posts: 5,906
Likes: 2,183
From: Bremen, Germany
If you have one huge distributor cap with 12 HT leads in a single circle coming out of it, and a black box about the size of a large cigarette packet on the top cabin end of the B bank intake manifold, you have a Lucas ignition car. If not, and the dizzy cap has two sets of six coming out at different levels, it is a Marelli.
FWIW, I say do not waxoil the inside of the engine bay. This is not a bad rust area, and all the dust sticks to the wax and soon the engine bay looks shabby.
Greg
FWIW, I say do not waxoil the inside of the engine bay. This is not a bad rust area, and all the dust sticks to the wax and soon the engine bay looks shabby.
Greg
I also agree on the wax. Just was and wipe clean. Maybe use an antistatic polish if needed...
Thread Starter
|
Veteran Member
Joined: Feb 2013
Posts: 17,809
Likes: 3,945
If you have one huge distributor cap with 12 HT leads in a single circle coming out of it, and a black box about the size of a large cigarette packet on the top cabin end of the B bank intake manifold, you have a Lucas ignition car. If not, and the dizzy cap has two sets of six coming out at different levels, it is a Marelli.
FWIW, I say do not waxoil the inside of the engine bay. This is not a bad rust area, and all the dust sticks to the wax and soon the engine bay looks shabby.
Greg
FWIW, I say do not waxoil the inside of the engine bay. This is not a bad rust area, and all the dust sticks to the wax and soon the engine bay looks shabby.
Greg
I will have another look at the Distributor, now I know what to look for.
Also I agree about the Waxoil, as I was really in two minds about which way to go.
The Engine Compartment is Rust Free, and should stay that way as long as I keep it well Polished.
If I coat it with Waxoil, then dirt and dust is going to stick, as you say.
Though I think I will put some Waxoil on the Radiator Beam and also pump it full of Waxoil as well.
Thread Starter
|
Veteran Member
Joined: Feb 2013
Posts: 17,809
Likes: 3,945
You and Greg are right, I will just keep the engine bay clean and polished.
Veteran Member
Joined: Jan 2012
Posts: 14,607
Likes: 10,802
From: France
If you have a air-fed wax sprayer thingy with a long probe, (or buy an bilt hamber 750mil areosol can with a long probe) it is a very good idea to spray inside the bottom chassis leg each side. This is the bit of chassis that runs along the bottom inside of the wing, backwards from the cross member. There are holes in it all ready.
Greg
Thread Starter
|
Veteran Member
Joined: Feb 2013
Posts: 17,809
Likes: 3,945
Protecting the beam under the rad is essential. As you say, waxoil inside and out. Also waxoil the insides of those under bumper corner pieces and the panel that joins them.
If you have a air-fed wax sprayer thingy with a long probe, (or buy an bilt hamber 750mil areosol can with a long probe) it is a very good idea to spray inside the bottom chassis leg each side. This is the bit of chassis that runs along the bottom inside of the wing, backwards from the cross member. There are holes in it all ready.
Greg
Thanks, that's a great idea!
I've got one of those compressed air gadgets, with a long probe, so I will spray Waxoil inside the chassis legs and do the same with the 'grey one'
Veteran Member
Joined: Jan 2012
Posts: 14,607
Likes: 10,802
From: France
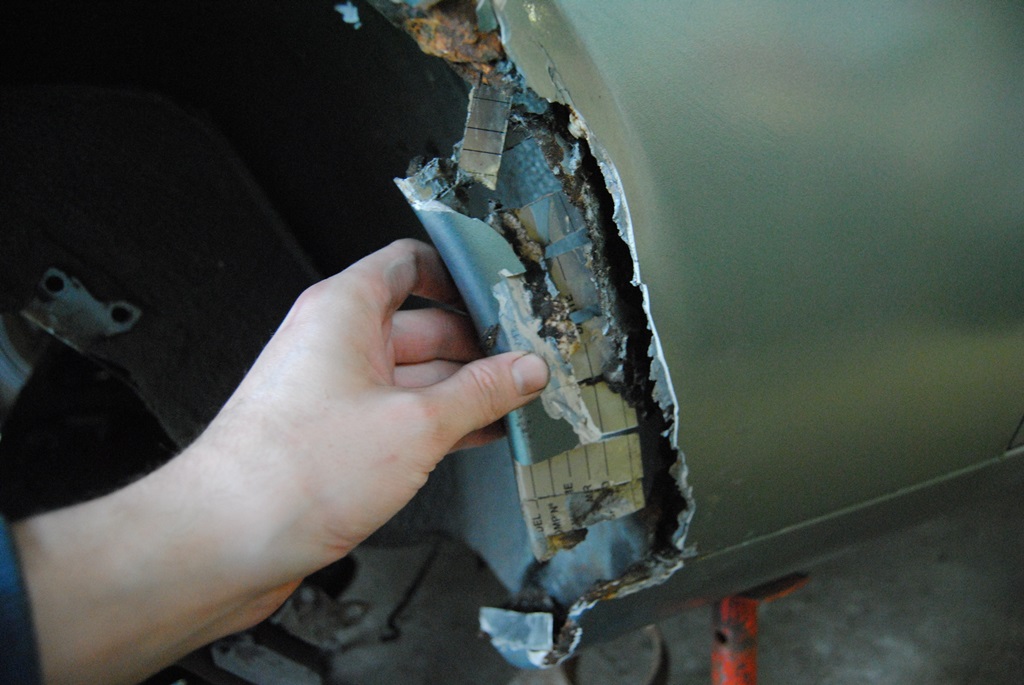
Ideal! And here is a photo of a Lucas ignition:
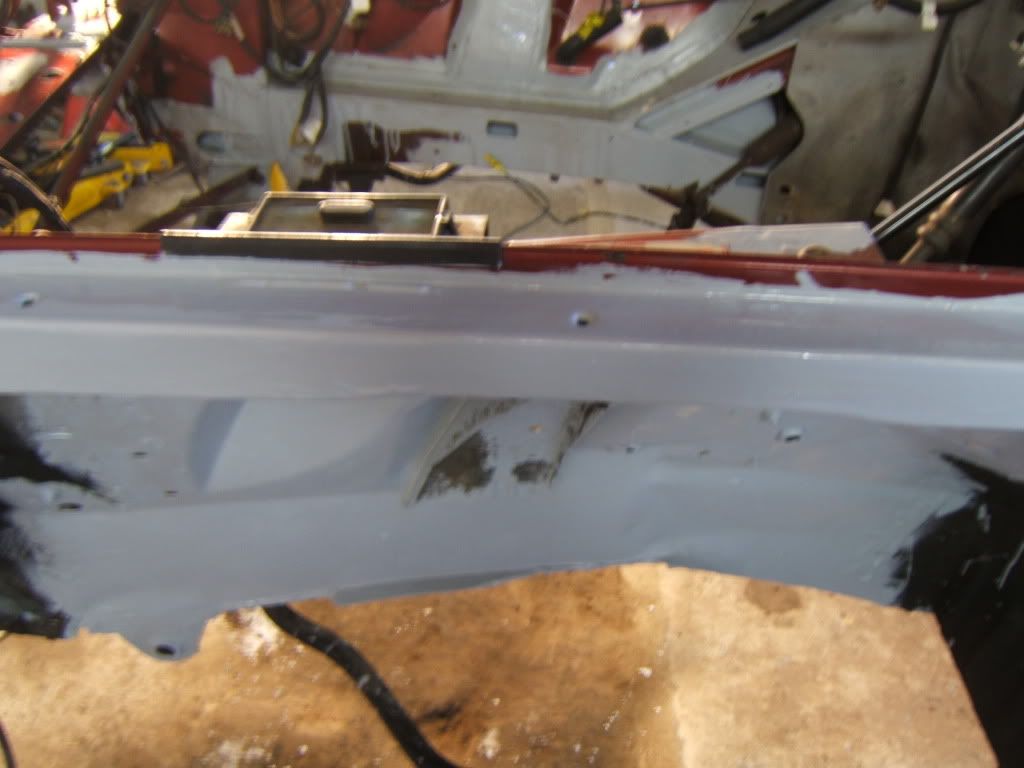
Also, if you have the time, slather on the wax/chassis black stuff on the wheelarch where the shock absorber strengthener is, water gets behind it and rusts out the wing underneath it. You can just see it in this photo

Greg

Also, if you have the time, slather on the wax/chassis black stuff on the wheelarch where the shock absorber strengthener is, water gets behind it and rusts out the wing underneath it. You can just see it in this photo

Greg
Thread Starter
|
Veteran Member
Joined: Feb 2013
Posts: 17,809
Likes: 3,945
Ideal! And here is a photo of a Lucas ignition:
Also, if you have the time, slather on the wax/chassis black stuff on the wheelarch where the shock absorber strengthener is, water gets behind it and rusts out the wing underneath it. You can just see it in this photo
Greg
Also, if you have the time, slather on the wax/chassis black stuff on the wheelarch where the shock absorber strengthener is, water gets behind it and rusts out the wing underneath it. You can just see it in this photo
Greg
Thanks, Great idea!
When I squirt Waxoil into the Chassis Leg, does it just stop at the 'Bulkhead' or also go into the Sills.
Or do you have to Waxoil the 'Sills' as a separate item.
Also looks like I have 'Marelli' ignition on this Car and hope that this would be the system of choice.

Veteran Member
Joined: Apr 2014
Posts: 4,587
Likes: 3,533
From: Kent, UK
OB,
You'll need to rustproof the sill sections separately.
Also remember that on convertibles, the sills were strengthened by putting a big tube that fills almost the whole sill cavity. So to do the job properly, go in from the rear wheelarch and spray the length inside the tube. Then also drill a few holes around the end of the tube ((you can easily see from the pressings in the closing panel in the rear wheelarch where the tube is located) and spray the full length of the sill section. You'll need quite a long extension pipe to spray the full length but it's the only practical way to do it on a convertible, because of how the tube fills the void.
Good luck
Paul
Veteran Member
Joined: May 2014
Posts: 5,906
Likes: 2,183
From: Bremen, Germany
@ OB
I wouldn't sod around with waxoil in the engine bay, because of this:
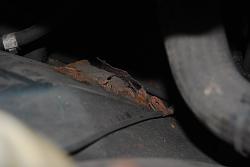

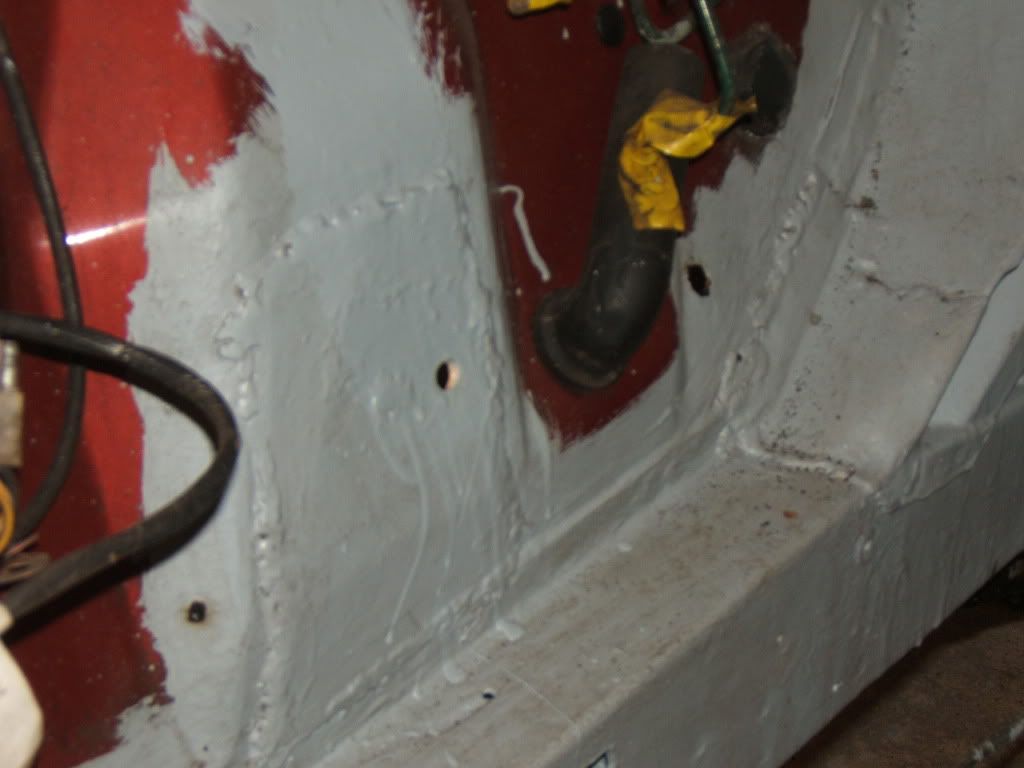
These areas are behind those, mentioned by Greg. Pictured aren't my XJ-S' areas but those of a 1990 model I bought (partly dismounted) only for the rims
I was shocked by the rust in those areas and instantly checked on mine - luckily totally rot free... At least in those areas
If you use any "binding" fluid, materials which catch on the waxoil stuff, can draw water resulting in rust before you expect it.
I wouldn't sod around with waxoil in the engine bay, because of this:

These areas are behind those, mentioned by Greg. Pictured aren't my XJ-S' areas but those of a 1990 model I bought (partly dismounted) only for the rims
I was shocked by the rust in those areas and instantly checked on mine - luckily totally rot free... At least in those areas
If you use any "binding" fluid, materials which catch on the waxoil stuff, can draw water resulting in rust before you expect it.
Veteran Member
Joined: Jan 2012
Posts: 14,607
Likes: 10,802
From: France
@ OB
These areas are behind those, mentioned by Greg. Pictured aren't my XJ-S' areas but those of a 1990 model I bought (partly dismounted) only for the rims
I was shocked by the rust in those areas and instantly checked on mine - luckily totally rot free... At least in those areas
These areas are behind those, mentioned by Greg. Pictured aren't my XJ-S' areas but those of a 1990 model I bought (partly dismounted) only for the rims
I was shocked by the rust in those areas and instantly checked on mine - luckily totally rot free... At least in those areas

There is absolutely fantastic stuff called Aqua Steel that you paint onto bare steel to protect it. If you ever do any welding Daim or OB, it is incredibly effective against rust. The grey paint you see in my photo is zinc chromate-type paint over Aqua Steel over the welded metal.
Greg
Last edited by Greg in France; Aug 16, 2014 at 02:22 PM.
Veteran Member
Joined: May 2014
Posts: 5,906
Likes: 2,183
From: Bremen, Germany
Thanks for the tip Greg! I'll remember that stuff!
Those rust areas I pictured really shocked me as I saw them. My first thing to do was to rush over to the garage my XJ-S was stored in and to check them. From inside the engine bay and inside the wheel wells. Those areas (on my XJ-S) had been well preserved. The owner had flooded all openings etc. regularly with wax or so... Just some small patches spread over the entire body (I'd say about 5 patches with a total area of about a �5 note).
But those pictures stayed in my mind... Weren't the only rust spots you couldn't see! I worked on the rear getting the axle off (I decided to sell it a few weeks ago) and hit my head on the body after the arch broke off...:
That really did hurt! Luckily it isn't my good car!
Thread Starter
|
Veteran Member
Joined: Feb 2013
Posts: 17,809
Likes: 3,945
OB,
You'll need to rustproof the sill sections separately.
Also remember that on convertibles, the sills were strengthened by putting a big tube that fills almost the whole sill cavity. So to do the job properly, go in from the rear wheelarch and spray the length inside the tube. Then also drill a few holes around the end of the tube ((you can easily see from the pressings in the closing panel in the rear wheelarch where the tube is located) and spray the full length of the sill section. You'll need quite a long extension pipe to spray the full length but it's the only practical way to do it on a convertible, because of how the tube fills the void.
Good luck
Paul
You'll need to rustproof the sill sections separately.
Also remember that on convertibles, the sills were strengthened by putting a big tube that fills almost the whole sill cavity. So to do the job properly, go in from the rear wheelarch and spray the length inside the tube. Then also drill a few holes around the end of the tube ((you can easily see from the pressings in the closing panel in the rear wheelarch where the tube is located) and spray the full length of the sill section. You'll need quite a long extension pipe to spray the full length but it's the only practical way to do it on a convertible, because of how the tube fills the void.
Good luck
Paul
Good to hear from you, I never knew any of that!
But when I was 'Black Waxing' the Rear Wheel Arch on my 'Grey' XJS, I seem to remember seeing the outline of a Tube.
I've got one of those 'Schutz' guns with the plastic tube (6ins) and the Wax Jets out of the side of the nozzle rather than the end.
So I recon I can rig it up with a longer tube.
That was a really great piece of advice, Thanks Paul
Thread Starter
|
Veteran Member
Joined: Feb 2013
Posts: 17,809
Likes: 3,945
@ OB
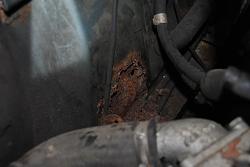
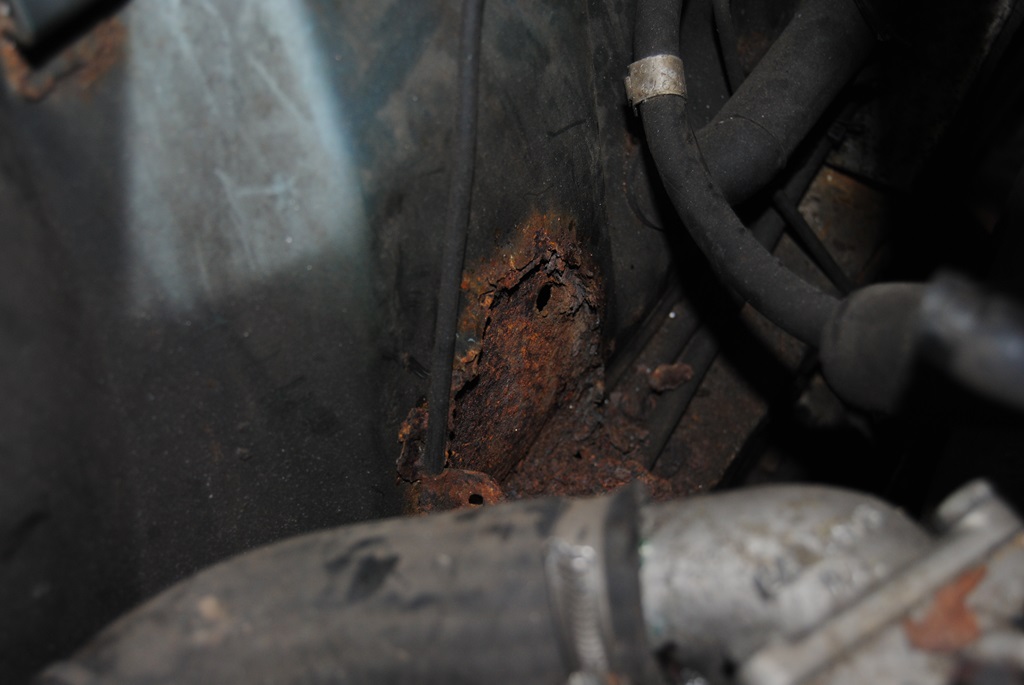
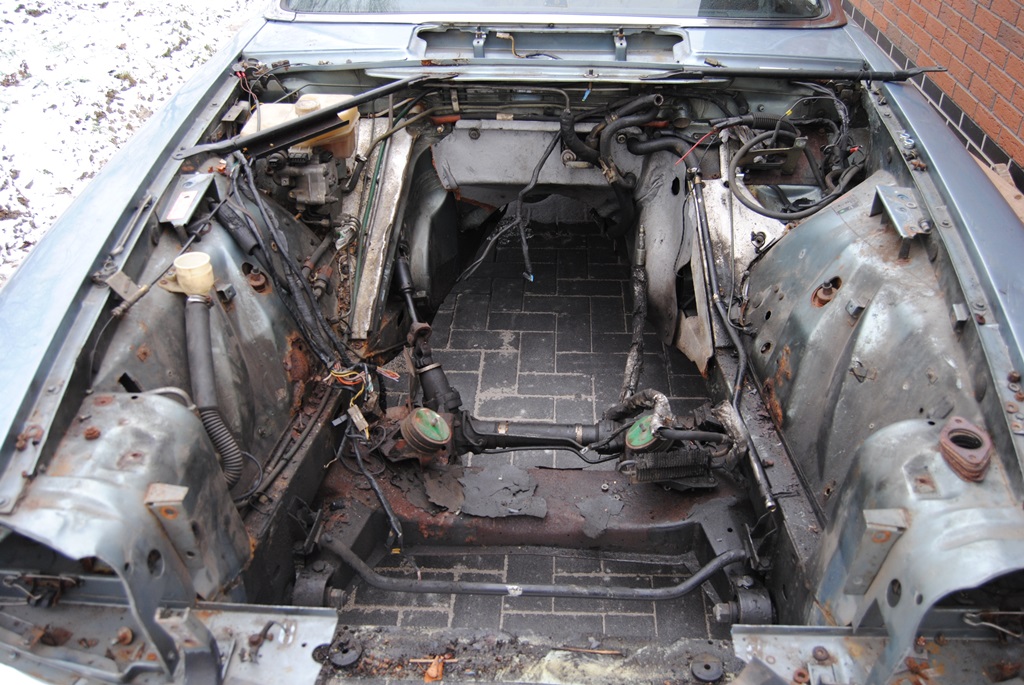
I wouldn't sod around with waxoil in the engine bay, because of this:
Attachment 93277
Attachment 93278
Attachment 93279
These areas are behind those, mentioned by Greg. Pictured aren't my XJ-S' areas but those of a 1990 model I bought (partly dismounted) only for the rims
I was shocked by the rust in those areas and instantly checked on mine - luckily totally rot free... At least in those areas
If you use any "binding" fluid, materials which catch on the waxoil stuff, can draw water resulting in rust before you expect it.
That is 'Frightening!' So thanks for posting those pics.
I will give her a thorough check over, as soon as the Weather improves.
Thread Starter
|
Veteran Member
Joined: Feb 2013
Posts: 17,809
Likes: 3,945
Thanks for the tip Greg! I'll remember that stuff!
Those rust areas I pictured really shocked me as I saw them. My first thing to do was to rush over to the garage my XJ-S was stored in and to check them. From inside the engine bay and inside the wheel wells. Those areas (on my XJ-S) had been well preserved. The owner had flooded all openings etc. regularly with wax or so... Just some small patches spread over the entire body (I'd say about 5 patches with a total area of about a �5 note).
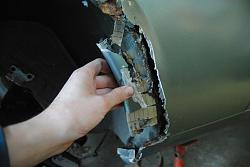
But those pictures stayed in my mind... Weren't the only rust spots you couldn't see! I worked on the rear getting the axle off (I decided to sell it a few weeks ago) and hit my head on the body after the arch broke off...:
Attachment 93280
That really did hurt! Luckily it isn't my good car!
Those rust areas I pictured really shocked me as I saw them. My first thing to do was to rush over to the garage my XJ-S was stored in and to check them. From inside the engine bay and inside the wheel wells. Those areas (on my XJ-S) had been well preserved. The owner had flooded all openings etc. regularly with wax or so... Just some small patches spread over the entire body (I'd say about 5 patches with a total area of about a �5 note).
But those pictures stayed in my mind... Weren't the only rust spots you couldn't see! I worked on the rear getting the axle off (I decided to sell it a few weeks ago) and hit my head on the body after the arch broke off...:
Attachment 93280
That really did hurt! Luckily it isn't my good car!
Inside Wheel Arches!
That's another area, that I need to check.
Thread Starter
|
Veteran Member
Joined: Feb 2013
Posts: 17,809
Likes: 3,945
Great point Daim. Those rust patches are a known XJS weak point, and they are almost invisible, engine in the car. OB, in Daim's shot, these are the places I was referring to in my post earlier. Water gets behind the shock absorber strengthener in the wheelarch and rots through the wing that is behind it,as shwon in Daim's photos. If you look carefully at my shot at the opposite side, you will see the patches where I have welded this area of the wing in the engine bay side. Close up here:
There is absolutely fantastic stuff called Aqua Steel that you paint onto bare steel to protect it. If you ever do any welding Daim or OB, it is incredibly effective against rust. The grey paint you see in my photo is zinc chromate-type paint over Aqua Steel over the welded metal.
Greg
There is absolutely fantastic stuff called Aqua Steel that you paint onto bare steel to protect it. If you ever do any welding Daim or OB, it is incredibly effective against rust. The grey paint you see in my photo is zinc chromate-type paint over Aqua Steel over the welded metal.
Greg
Many Thanks (Telepathy Again!)
I was just about to ask you, what that 'grey' stuff was, so I will check it out.
Preventing the Car from rusting away, is a whole new ball game in its own right.
Thread Starter
|
Veteran Member
Joined: Feb 2013
Posts: 17,809
Likes: 3,945
As regards the restoration, 'The Jaguar God's' have not been on my side.
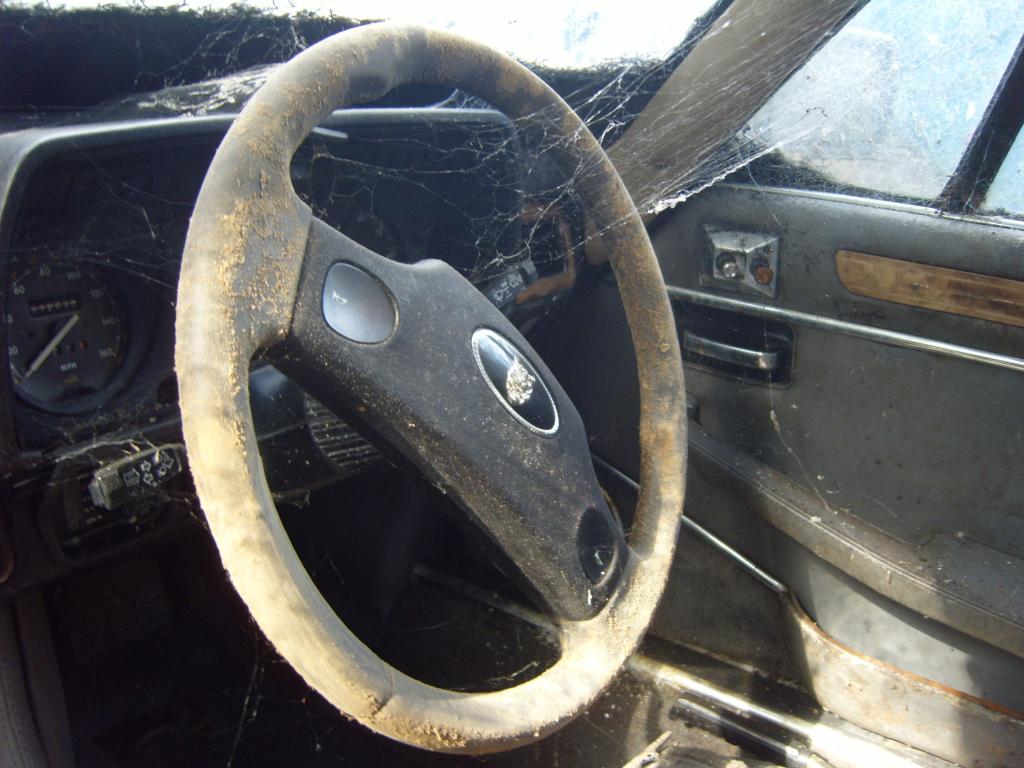
Its been too wet and windy to put the bonnet up, so while looking for other stuff I could do, I was considering buying a Wooden Steering Wheel to go on the Car.
Although I know which one I want and also where to buy it, I had a quick look at the price of the Standard Sports Wheel and couldn't believe how much some suppliers were asking!
At which point I remembered, that I still had one inside my Scrap Jag, which I now want to swap for the Standard (skinny) wheel on one of my other XJS's
Its all covered in mould and cobwebs and looks worth about 5p so I want to see how well (or not) it would clean up.
So my questions are, how do I take the Wheel off? without damaging it.
How do I get the Centre Cap off and what will I find underneath?
Will it just be a nut or something that requires a Special Tool.
Once I've undone whatever it is, how do I get it off the Steering Column?
Would I need a puller of some kind, as I'm guessing it won't be that easy to get it off.


Veteran Member

Joined: Nov 2010
Posts: 2,168
Likes: 417
From: Houston, TX
&#%$ damn that is a fright. Once the restoration is complete, you'll have to post a before and after with the steering wheel at that same angle and all.
Wow. Dare I ask for more interior shots?
YES.
[edit]
Now wait, hold on... you have the original with the radiator adventures, then you bought another which you'll be restoring... nice burgundy color. But you have a 3rd which is strictly a donor car? I can't keep up with all the Jags in your sig!
Wow. Dare I ask for more interior shots?
YES.
[edit]
Now wait, hold on... you have the original with the radiator adventures, then you bought another which you'll be restoring... nice burgundy color. But you have a 3rd which is strictly a donor car? I can't keep up with all the Jags in your sig!
Last edited by Flint Ironstag; Aug 22, 2014 at 08:48 PM.