
FI Harness update


Thread Starter
|
Senior Member

Joined: Jun 2009
Posts: 143
Likes: 26
From: So. California
It's built and installed!
Building a new harness isn't difficult, just a little tedious, but, worthwhile and satisfying. It looks daunting, but take notes and pictures and you can't really screw it up.
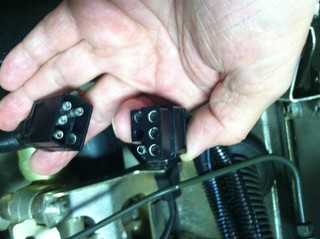
I bought all the parts from Del City and I am very pleased with the service I received from them. I highly recommend them. I routed the harness from the rear as has been suggested. Made things a little neater looking. For a connector I used a 5 way trailer light connector from NAPA, about $6. The connector is sturdy, weather tight, and about 2" long x 1" wide x 3/4" thick. Very compact and made of hard rubber, it also comes in a 6 way of the same size. Just by coincidence the wire colors matched the colors I used on the harness. Go figure! $130 total.
While I was at it I removed the fuel rail and injectors. I sent the injectors to Jaguar Fuel Injector Service and had them tested, cleaned and serviced as needed. Service was excellent and a week and a half turn around California to Florida. I highly recommend them also. $305.50 total
I also replaced all of the fuel lines under the hood, changed the air filters and changed the oil and filter.
I turned the key yesterday afternoon and voila, it fired up and runs smooth. All things considered it was an enjoyable and rewarding project.
I especially enjoyed building the harness. How many Jag projects can be done sitting comfortably at the kitchen counter with a cocktail, or wine or beer if you prefer, within reach!! Damn, I may go into business.
Now I have to address a trans fluid leak that appeared just before I put the car in the garage for the FI redo. The leak appears to be between the trans and engine area. I didn't notice anything obvious and really couldn't tell whether it's migrating or just dripping straight down. Bummer, no more bar stool, back to the concrete floor!!
Building a new harness isn't difficult, just a little tedious, but, worthwhile and satisfying. It looks daunting, but take notes and pictures and you can't really screw it up.
I bought all the parts from Del City and I am very pleased with the service I received from them. I highly recommend them. I routed the harness from the rear as has been suggested. Made things a little neater looking. For a connector I used a 5 way trailer light connector from NAPA, about $6. The connector is sturdy, weather tight, and about 2" long x 1" wide x 3/4" thick. Very compact and made of hard rubber, it also comes in a 6 way of the same size. Just by coincidence the wire colors matched the colors I used on the harness. Go figure! $130 total.
While I was at it I removed the fuel rail and injectors. I sent the injectors to Jaguar Fuel Injector Service and had them tested, cleaned and serviced as needed. Service was excellent and a week and a half turn around California to Florida. I highly recommend them also. $305.50 total
I also replaced all of the fuel lines under the hood, changed the air filters and changed the oil and filter.
I turned the key yesterday afternoon and voila, it fired up and runs smooth. All things considered it was an enjoyable and rewarding project.
I especially enjoyed building the harness. How many Jag projects can be done sitting comfortably at the kitchen counter with a cocktail, or wine or beer if you prefer, within reach!! Damn, I may go into business.
Now I have to address a trans fluid leak that appeared just before I put the car in the garage for the FI redo. The leak appears to be between the trans and engine area. I didn't notice anything obvious and really couldn't tell whether it's migrating or just dripping straight down. Bummer, no more bar stool, back to the concrete floor!!
Senior Member
Joined: Apr 2013
Posts: 230
Likes: 66
From: Greenville, SC
Can you post some pictures of your harness and a parts list from Del City? I am just about to do this in the next few weeks. I looked up the Del City website, how did you get your wire in less than 100ft rolls?
Thanks!
-Scott
Thanks!
-Scott
Last edited by 86jag; Jul 19, 2014 at 07:42 PM.
Veteran Member
Joined: Dec 2013
Posts: 1,078
Likes: 398
From: Greer SC
I built my new Marelli harness myself, from the Marelli ECU out. I did mine on the car. The harness that was on the car had a great amount of extra wire, and duplicate wiring that served no purpose at all. A little time, a little wine, and as you say, it turned out great. A very rewarding project.
Thread Starter
|
Senior Member
Joined: Jun 2009
Posts: 143
Likes: 26
From: So. California
Scott,
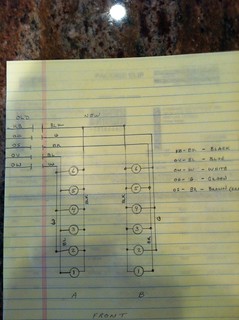
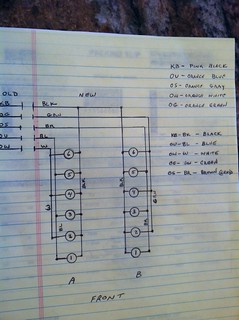
I can't send a pic of the harness as it is already installed. The original harness is like supercharged said, it has way more wire than necessary and is overly complicated. I ended up using 6 wires and 5 colors and putting it all in 3/8" loom.
My Del City parts list consisted of:
16 injector solenoid connectors #73522 $1.31 ea. ( i always buy a spare or two)
100' of hi temp split loom #774 $18.92 I'm not sure the high temp is necessary, this is 100' minimum, you can get split loom at Fryes, O'Reillys etc.
100' each of 16ga. GXL cross link wire at $11.78 a spool. 100' is minimum order.
Blue 4116103
Yellow 4116106
Green 4116104
Black 4116105
Red 4116101
White 4116102
Brown 4116107
I ordered all 7 colors just because that's how many they had and it doesn't hurt to have extra wire around.
I also used the 5 way trailer light plug from NAPA, very compact, sturdy and weather proof.
I don't know how to post pics but if you pm me I can text a pic of the scheme I drew up for the new harness.
Terry
Veteran Member
Joined: Dec 2013
Posts: 1,078
Likes: 398
From: Greer SC
The Marelli harness had several circuits doubled back to points that could have stopped far earlier. My car is a late 89, which only had coax going to the engine speed sensors. I opted for the later style, where coax went to the amps too. My harness is FAR smaller, less complicated. I just used the wiring diagram, started one circuit at a time, to its point of destination, and kept at it. At first, its overwhelming, but once you do a few wires, even having to unsolder, resolder a new way due to something you figured out along the way, it gets less and less daunting. I used a cheap soldering iron, and lots of patience. Had never done it before, and it worked out great.
Veteran Member
Joined: Dec 2013
Posts: 1,078
Likes: 398
From: Greer SC
It hasn't been mentioned yet, but I bought heat shrink from my local Pep Boys in a kit of several various sizes, and a cheap heat gun. I had to undo a couple of my connections, would up buying another kit because I ran out/low on two of the sizes, but it really does look great if I say so myself. I could take pics if you wanted them, but I doubt very seriously you could tell anything from the pics unless you had very good shots of a original harness bay to compare it to.
Senior Member
Joined: Apr 2013
Posts: 230
Likes: 66
From: Greenville, SC
Trending Topics
Senior Member
Joined: Apr 2013
Posts: 230
Likes: 66
From: Greenville, SC
I have found this website Jaguar Wiring Harnesses By Macharness
You can see how many more wires are in this harness. I would recommend rebuilding the FI harness and then soldering them into the rest of the harness. Assuming the rest of the harness is in good shape.

Thread
Thread Starter
Forum
Replies
Last Post
Currently Active Users Viewing This Thread: 1 (0 members and 1 guests)