
Replacing cam covers gaskets


Veteran Member
Joined: Jul 2010
Posts: 2,459
Likes: 695
From: Key West, FL
Personally I wouldn't recommend removing the bonnet. The inconvenience matches or outweighs the benefit and then you have to worry abut the delicate hood.
also PERSONALLY I would tack the gaskets on with seal and that is it. I am not criticizing or saying anyone is wrong but I personally would not slather the outside in sealer like greg did. But I can see where this makes some feel like they have extra insurance and confidence against it leaking again.If you do I'd at least go with some black RTV. I guess greg has some wild colors going on in his engine anyhow though. (seriously,no offense greg). Btw what exactly is that blue stuff greg? I've seen your pics dozens of times and wonder what it is. It seems to react to being touched or wetted almost like velour or a chalkboard? Is it like silicone paint?
I would put a healthy bead on the half moon seals though.
Greg, DO NOT build shims. Find the thickness you need and purchase that one and throw away the old one.
You can shim the buckets with the head off but you should be comfortable and plenty understanding of timing and sure the lobe facing completely away when measuring, you don't want to measure any of the ramp.
Here is some info for the job:
VALVE CLEARANCES
Inlet and Exhaust 0.012-0.014in
EXCESSIVE CLEARANCE - EXAMPLE
Size of existing shim 0.100
Plus the actual clearance noted 0.019
= 0.119
Less the specified valve clearance 0.013
Equals required shim size 0.106
INSUFFICIENT CLEARANCE - EXAMPLE
Size of existing shim 0.107
Plus the actual clearance noted 0.010
= 0.117
Less the specified valve clearance 0.013
Equals required shim size 0.104
TORQUE
Bearing caps to carrier 71-13.5 Nm
Camshaft sprocket to camshaft 23-27 Nm
Camshaft cover 11 Nm
EGR valve to throttle housing 9.5-12 Nm
Elbow to inlet manifold 12.2 Nm Hose clips 2.5 Nm
Inlet manifold to cylinder head (nuts) 23-27 Nm
Inlet manifold to cylinder head (bolts) 23-27 Nm
Silencer to compressor union 34 Nm
Last edited by sidescrollin; Mar 12, 2014 at 12:25 PM.


Veteran Member


Joined: Jan 2012
Posts: 14,607
Likes: 10,802
From: France
SS
Thanks for the very useful info, really a big help. I am gradually getting the bits together, and then, as is my wont, I will wait until my Karma says "Start". This engine rebuild project has been somewhat further pushed into the distance by my aircon compressor going wrong, this vital funds for an engine stand have been realocated...
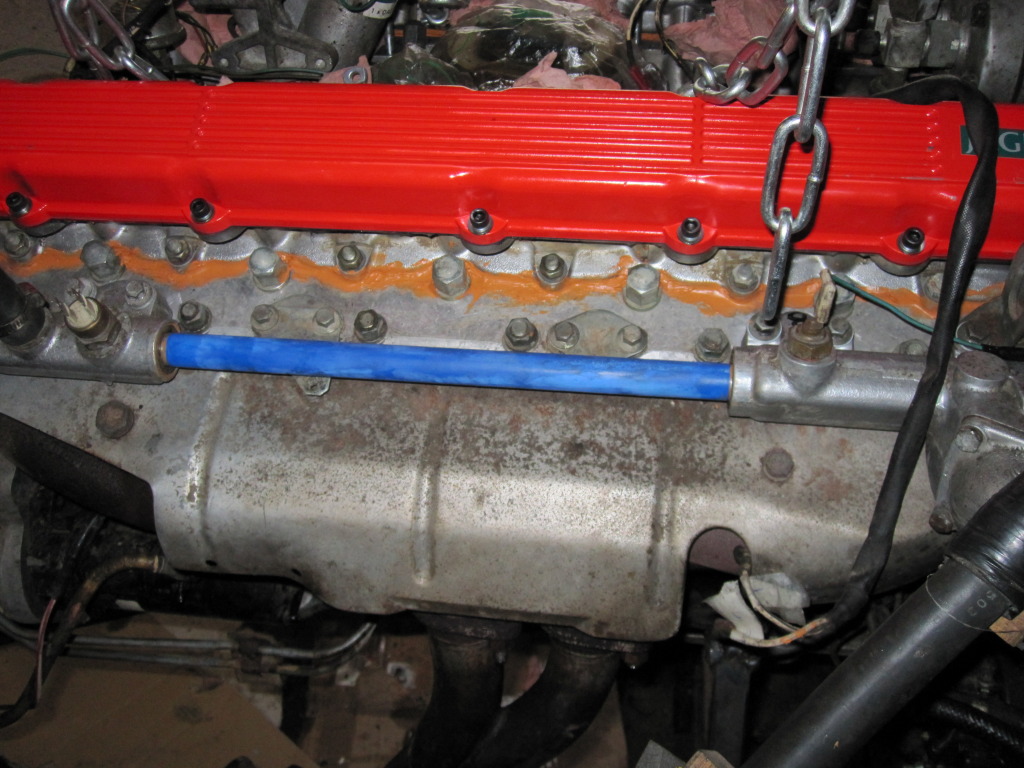
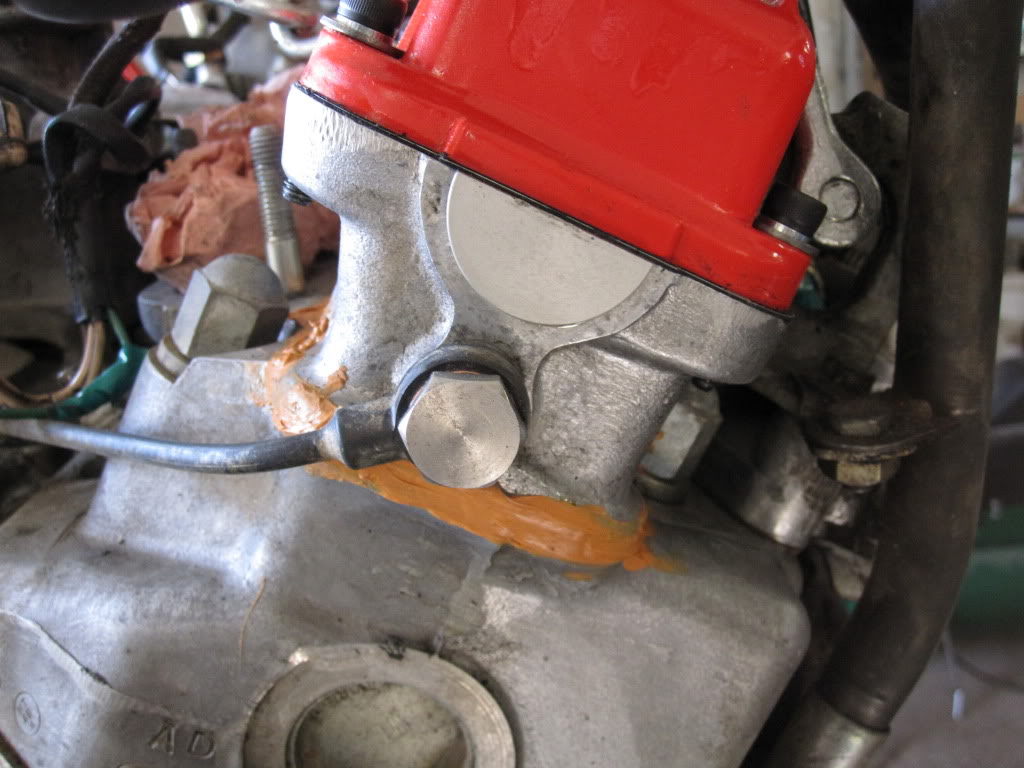
The orange "slather" (love it, no offence at all) you refer to in my pics is not the cam cover gasket seal. They are standard gasketsand are just under the red blinged up cams covers! The orange stuff is bodge to seal up the gravity leaks from the join between the tappet block and the actual head casting. This is an unsealed ungasketed joint from the factory and starts to leak eventually, dropping oil down onto the exhaust manifolds.
Remarkably, this works perfectly as an oil leak stopper and the engine is bone dry of oilleaks from this join. When I do the heads I will seal this join with some special Loctite sealer for the purpose and it will look normal again.
The blue paint is on the pipe between the water manifolds. It is high temp engine paint. To keep costs down I R&R'd these pipes rather than buy new ones or get stainless ones made. This type of paint does not go off properly until heateed up a bit. Same idea on the cross pipe.
Thanks again for the info on setup of the valves.
Thanks for the very useful info, really a big help. I am gradually getting the bits together, and then, as is my wont, I will wait until my Karma says "Start". This engine rebuild project has been somewhat further pushed into the distance by my aircon compressor going wrong, this vital funds for an engine stand have been realocated...
The orange "slather" (love it, no offence at all) you refer to in my pics is not the cam cover gasket seal. They are standard gasketsand are just under the red blinged up cams covers! The orange stuff is bodge to seal up the gravity leaks from the join between the tappet block and the actual head casting. This is an unsealed ungasketed joint from the factory and starts to leak eventually, dropping oil down onto the exhaust manifolds.
Remarkably, this works perfectly as an oil leak stopper and the engine is bone dry of oilleaks from this join. When I do the heads I will seal this join with some special Loctite sealer for the purpose and it will look normal again.
The blue paint is on the pipe between the water manifolds. It is high temp engine paint. To keep costs down I R&R'd these pipes rather than buy new ones or get stainless ones made. This type of paint does not go off properly until heateed up a bit. Same idea on the cross pipe.
Thanks again for the info on setup of the valves.
Veteran Member
Joined: Jul 2010
Posts: 2,459
Likes: 695
From: Key West, FL
Oh so they were a bit nasty looking so you just painted them instead of blasting them or totally replacing them, I gotcha.
I can't believe that area doesn't have a gasket..i figured it had a paper one at least
I can't believe that area doesn't have a gasket..i figured it had a paper one at least
Veteran Member
Joined: Jan 2012
Posts: 14,607
Likes: 10,802
From: France
AS to the tappet block join, extraordinary, isn't it?
Veteran Member

Joined: Sep 2016
Posts: 4,277
Likes: 1,314
From: New York New York
I did this about 2 years ago. Engine out is easiest, but it is quite doable engine in, but do remove the bonnet (hood). There are about 24 nuts securing the inlet manifolds to the heads. Then undo the fuel feed and return from the regulators, unplug injection loom (and undo the clips holding it to the bottom of the V) and other small pieces such as temp sender wires, kickdown wires, dizzy vent tubes etc etc. Remove air filters and covers, leaving just the bit attached to the throttles, remove any vac tubes etc. Then the entire lot, injectors and all, lifts off vertically, which is when you need a friend to help, one each side. Here is a photo of them going back in after the refurb:
Immediately place bungs, or ***** of kitchen paper into the now open intake holes in the heads! You can now have the joyous task of cleaning up the V.
The oil will be leaking from three sources almost certainly. The cam covers, the half moon seals AND the join between the 'tappet block' and the head casting itself (the tappet block is the bit on top of the actual head casting that holds the camshaft and valve gear). There are two ways to fix this: remove the valve train entirely and seal (as described in the Great Palm's Book); or, after a thorough cleaning and roughing up a bit with sandpaper round the join, bodging high temp silicone round the join. I, of course, did the latter, and it works brilliantly:
The list of things to do once the intakes are off is pretty extensive, but IMO they all need to be done if you want a reliable car:

Immediately place bungs, or ***** of kitchen paper into the now open intake holes in the heads! You can now have the joyous task of cleaning up the V.
The oil will be leaking from three sources almost certainly. The cam covers, the half moon seals AND the join between the 'tappet block' and the head casting itself (the tappet block is the bit on top of the actual head casting that holds the camshaft and valve gear). There are two ways to fix this: remove the valve train entirely and seal (as described in the Great Palm's Book); or, after a thorough cleaning and roughing up a bit with sandpaper round the join, bodging high temp silicone round the join. I, of course, did the latter, and it works brilliantly:

The list of things to do once the intakes are off is pretty extensive, but IMO they all need to be done if you want a reliable car:
- cam cover gaskets and half moon seals (the seals will be hard-ish to get at engine in, as they are at the firewall end of the heads, but again quite doable with patience, here are some lovely aluminium ones I fitted, made by Ron Kelnhofer in the USA:
- renew water rail seals (see the blue pipe in the first photo, each end is sealed by a top hat seal into the water manifolds)
- renew all the injection hoses from the rail to the manifolds
- renew the flexible fuel feed lines from where they exit the firewall up to the regulators
- renew the small vac tubes
- check the advance/retard capsule on the dizzy (if you have a Lucas ignition car). If it has not been renewed recently it will be toasted almost surely
- new manifold/head gaskets
- new injector loom (stll available from Jaguar, or make your own). This is VERY important, as a short from toasted insulation holds the injectors open permanently and fills up the sump with fuel, and the car will not run
- check AAV, remove and ensure the plunger moves freely
- renew dizzy vent hoses (if you have a Lucas ignition car)
- while you have better access, it is a good idea to renew the water cross-rail hoses

Thank you all so much!

Thread
Thread Starter
Forum
Replies
Last Post
KarimPA
New Member Area - Intro a MUST
8
Sep 3, 2015 07:32 PM
FS[Western US]: XJS Wiper Motor Upgrade- 76-88 - Electrolux Style
XJsc-guy
PRIVATE For Sale / Trade or Buy Classifieds
0
Sep 2, 2015 11:43 AM
Currently Active Users Viewing This Thread: 1 (0 members and 1 guests)