
Reupholstering my seats!


Thread Starter
|
Senior Member
Joined: Jan 2013
Posts: 129
Likes: 25
From: Norfolk, VA
My wife is letting me buy a kit to reupholster my front seats for my birthday. Happy days! I have been reading the forum entries for advice and I have come across some good information. I see that people have had good success with Autoberry, but they don't have my trim (SDC - Coffee) at the moment, and Im itching to get started. Has anybody had any luck with any other manufacturers? Also, has anybody used the leatherette, instead of the leather? Luck? And lastly, does anybody have any directions for how to do this? I am going to try to do it myself, and I don't think any of the kits come with directions. I imagine that they are assuming the work is going to be done by a qualified leather upholsterer.
Thanks a bunch in advance!
Thanks a bunch in advance!
Senior Member
Joined: Apr 2013
Posts: 230
Likes: 66
From: Greenville, SC
I know there is another guy that sells on ebay (username DiamondMall) that is very similarly priced to AutoBerry. New Jaguar XJS Coupe or Convertible Leather Seat Covers Replacement 1889 1996 | eBay
I received a sample from him and it looked very good. I am either going to go with him or AutoBerry when I get around to reupholstering my seats. I was planning I having a professional install the bottom portions as there are 4 pieces and looked pretty complex on my '90 seats. I was also going to install new foam while I was at it. I believe your later seats are much simpler. I would google a basic "how to" and let us know.
The only thing I don't like about vinyl seats is they don't breath. So you end up with a wet back and butt after a summer drive. If it was me I would spring on the extra bucks for the real leather.
Good luck and let us know what you decide to do.

Veteran Member


Joined: Jan 2012
Posts: 14,618
Likes: 10,821
From: France
Has anybody had any luck with any other manufacturers? Also, has anybody used the leatherette, instead of the leather? Luck? And lastly, does anybody have any directions for how to do this? I am going to try to do it myself, and I don't think any of the kits come with directions. Thanks a bunch in advance!
Greg
Thread Starter
|
Senior Member
Joined: Jan 2013
Posts: 129
Likes: 25
From: Norfolk, VA
Just talked to diamond mall. He has my trim color. I placed my order today. I will let you know how they look when I get them. I will also probably be harassing the forum with questions as I dive into the project. I will be trying to get it done in a weekend. I hope I'm not overly optimistic.
Senior Member
Joined: May 2012
Posts: 132
Likes: 7
From: Houston
Had mine done professionally for $500. Worth every penny as there are so many motors and wires that I didn't want to mess up. I'm sure you can do them yourself ,just take it slow. You need to have the seats out, and still wired to the car, so that you can remove the rails as on mine it wasn't possible to set them so that you can access all four.
Good luck and if there's any way I can help just ask
Good luck and if there's any way I can help just ask
Veteran Member
Joined: Oct 2008
Posts: 1,930
Likes: 537
From: San Jose, CA, USA
Good advice
I used DiamondMalls covers on my XJS. The build quality was amazing. I skimped and got the leatherette..... I should have got the leather :-(
Even with my fully functioning A/C, my back gets damp in the sun.
I did the seats myself...... it was very difficult, but now I have done it once, I would be confident to do it again. It took me a whole weekend to do both seats.
Let us know how you get on...... pictures before and after would be great :-)
Senior Member
Joined: Apr 2013
Posts: 230
Likes: 66
From: Greenville, SC
Good advice
I used DiamondMalls covers on my XJS. The build quality was amazing. I skimped and got the leatherette..... I should have got the leather :-(
Even with my fully functioning A/C, my back gets damp in the sun.
I did the seats myself...... it was very difficult, but now I have done it once, I would be confident to do it again. It took me a whole weekend to do both seats.
Let us know how you get on...... pictures before and after would be great :-)
I used DiamondMalls covers on my XJS. The build quality was amazing. I skimped and got the leatherette..... I should have got the leather :-(
Even with my fully functioning A/C, my back gets damp in the sun.
I did the seats myself...... it was very difficult, but now I have done it once, I would be confident to do it again. It took me a whole weekend to do both seats.
Let us know how you get on...... pictures before and after would be great :-)
Thanks!!
Trending Topics
Veteran Member
Joined: Oct 2008
Posts: 1,930
Likes: 537
From: San Jose, CA, USA
@86jag
I really wish I'd taken some pictures while I was doing it but I was not certain everything I did was the right way to do it.
On my 92 car, once the seats were out of the car it was easy to take them completely apart so the base and the back were separated. Then it was pretty straight forward to remove the original leather. Just go slow and take a lot of notes about which bit goes where.
I botched a few things, like I removed a lot of these weird little metal fasteners that were used to pull in the seems on the cushions. They were extremely fiddly to take off so for reassembly I just used tie grips. Not professional, but no one would know.
I also used quite a bit of that sticky backed velcro stuff on the base part to get the cover to stay put.
Once I had them on I was pretty disappointed because there were a lot of creases everywhere. I moped around for a day or so then did some reading online and went and bought a heat gun and applied heat very, very gently to the creases. This made a huge difference. Next thing I did was leave the car in the sun for a few days and that tightened the material up too. Now it looks pretty perfect, even if I say so myself. I'm just mad at myself for skimping on the vinyl instead of leather.
Thread Starter
|
Senior Member
Joined: Jan 2013
Posts: 129
Likes: 25
From: Norfolk, VA
OK. So I got the vinyl replacements from diamondmall on ebay. It took about two weeks to get them and cost a little under $400. They are fantastic quality. It took me about 16hrs all said and done to get them installed. I didn't need any glue or velcro, just patience and beer. My hands hurt for two days after. They are a little wrinkly, but I think if I leave them in the sun this week, they will shrink up and flatten out. I think they look great, and much better than what was in before.
These are the replacements before I put them in

This is a 'before' pic of my driver's side. My wife had patched the bottom cover about 3 months ago, since it had a large tear.

'Before' pic of my passenger side. Condition not that bad, just honest and pushing 20years old.

After installation. The picture doesn't do justice, since the sun was playing tricks on the camera, but the color is absolutely perfect. An exact match to my original SDC Coffee trim.
I was taking pics to do a step by step, to give back some knowledge to this forum, since I have taken so much. But I quickly realized that this job is not one that you can write a tutorial for. So much of it is paying attention when removing the originals, so that you see how to fit the new ones. Like I said, the new ones were fantastic quality and almost exact reproductions of the originals, so if you take your time and reinstall the same way you uninstalled, they will fit perfectly. I did end up cutting the electricals that run between the bottom cushion and the top cushion. There was no easy way to unplug, and the seat was to unwieldy connected. I just resoldered the connections when I was finished. I also took the opportunity to replace the worn air tube for the lumbar support, which was brittle and non-functioning. Now my back is happy. Anyway, if anybody has any questions while trying to do this themselves, drop a line and I will share my process knowledge.
These are the replacements before I put them in
This is a 'before' pic of my driver's side. My wife had patched the bottom cover about 3 months ago, since it had a large tear.
'Before' pic of my passenger side. Condition not that bad, just honest and pushing 20years old.
After installation. The picture doesn't do justice, since the sun was playing tricks on the camera, but the color is absolutely perfect. An exact match to my original SDC Coffee trim.
I was taking pics to do a step by step, to give back some knowledge to this forum, since I have taken so much. But I quickly realized that this job is not one that you can write a tutorial for. So much of it is paying attention when removing the originals, so that you see how to fit the new ones. Like I said, the new ones were fantastic quality and almost exact reproductions of the originals, so if you take your time and reinstall the same way you uninstalled, they will fit perfectly. I did end up cutting the electricals that run between the bottom cushion and the top cushion. There was no easy way to unplug, and the seat was to unwieldy connected. I just resoldered the connections when I was finished. I also took the opportunity to replace the worn air tube for the lumbar support, which was brittle and non-functioning. Now my back is happy. Anyway, if anybody has any questions while trying to do this themselves, drop a line and I will share my process knowledge.
Last edited by Stillill; May 21, 2013 at 01:20 PM.
Thread Starter
|
Senior Member
Joined: Jan 2013
Posts: 129
Likes: 25
From: Norfolk, VA
Also would like to add... Sarc's advice about using plastic ties instead of the hog wire ties was a lifesaver. Much easier, and saves blood and skin from your knuckles. Forgot to thank him properly...
Veteran Member
Joined: Oct 2008
Posts: 1,930
Likes: 537
From: San Jose, CA, USA
Awesome, glad you got them done. Also a nice added benefit to get your lumbar working while you were in there.
I am seriously considering doing mine again in leather..... Sigh, there's always something on an XJS "to-do" list :_)
I am seriously considering doing mine again in leather..... Sigh, there's always something on an XJS "to-do" list :_)
Senior Member
Joined: Apr 2013
Posts: 230
Likes: 66
From: Greenville, SC
Stillill, anyway you can reupload your pictures? Looks like the location for the pictures is your gmail account, which I believe you are the only one with access to... I hope.
Thanks, and I am glad everything went smoothly.
Thanks, and I am glad everything went smoothly.
Veteran Member
Joined: Oct 2008
Posts: 1,930
Likes: 537
From: San Jose, CA, USA
@David
The pics are great, thanks. Your crease situation looks about the same as mine. Take another picture for us in a few weeks...... I guarantee no creases then if the car has had some time in the sun.
Now that you've had them in for a bit, do you notice a difference compared to the leather ? I "feel" my vinyl makes me hotter, but maybe it's just psychological. Would be interested to get your feedback. I am still half tempted to do mine again in leather......
Last edited by Sarc; May 22, 2013 at 11:13 AM.
Thread Starter
|
Senior Member
Joined: Jan 2013
Posts: 129
Likes: 25
From: Norfolk, VA
I think my back may be a bit stickier, but not a huge difference. One thing I did notice when taking off the originals was how little of the seat was actual leather. Original 95 XJS, down the middle of the seat was leather, all of the rest was vinyl.
Veteran Member
Joined: Oct 2008
Posts: 1,930
Likes: 537
From: San Jose, CA, USA
Yep, and it's the middle of my back that gets sticky :-)
They knew where to put the leather for comfort and where they could scrimp on it.
I have a feeling the diamondmall leather covers may actually be all leather on all panels....... it would be a good point to confirm before paying almost 2x the price for sure
They knew where to put the leather for comfort and where they could scrimp on it.
I have a feeling the diamondmall leather covers may actually be all leather on all panels....... it would be a good point to confirm before paying almost 2x the price for sure

Thread Starter
|
Senior Member
Joined: Jan 2013
Posts: 129
Likes: 25
From: Norfolk, VA
You had to buy the set (both seats) every place I looked. sorry. But, diamond mall does custom jobs. You may want to drop him a line (get his email from his ebay store) and see what kind of price he will give you for just the one. good luck.
Veteran Member

Joined: May 2010
Posts: 5,355
Likes: 1,753
From: Arlington, VA
I'm surprised you did not need to replace any of the foam in the seat?
I would loved to have seen a picture of what the seat looks like without any skin on it. My left side cushion is getting further and further away from the actual seat.
You can't see from looking at it, but you can feel it.
I would loved to have seen a picture of what the seat looks like without any skin on it. My left side cushion is getting further and further away from the actual seat.
You can't see from looking at it, but you can feel it.
Thread Starter
|
Senior Member
Joined: Jan 2013
Posts: 129
Likes: 25
From: Norfolk, VA
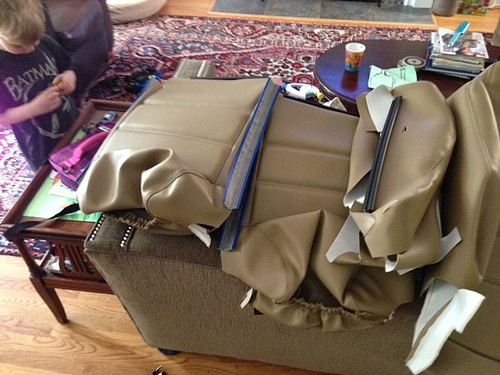
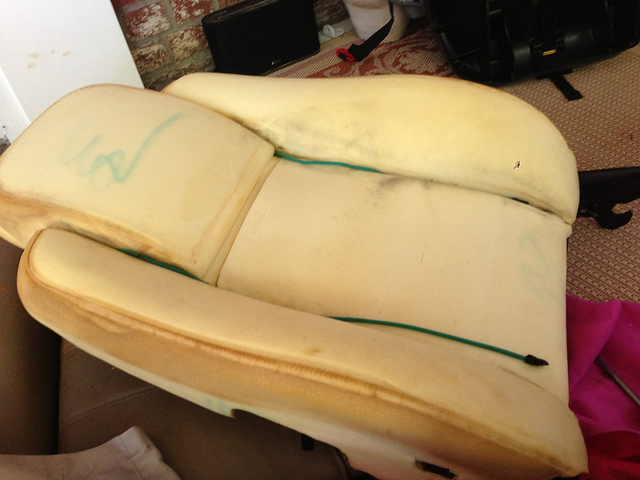
Ask and ye shall receive! I don't have a pic of the bottom after I removed the leather, but here is the top:
And here is the bottom before removing the leather:

The bottom is three separate pieces of foam. I know what you are talking about. The left side tends to meander to the door as time goes on. Luckily, the new upholstery seems to bind it back together to the center, so I think it may solve your issue. Good luck.
And here is the bottom before removing the leather:
The bottom is three separate pieces of foam. I know what you are talking about. The left side tends to meander to the door as time goes on. Luckily, the new upholstery seems to bind it back together to the center, so I think it may solve your issue. Good luck.