
Setting Timing after Complete Rebuild


Thread Starter
|
Junior Member
Joined: Jul 2013
Posts: 3
Likes: 2
From: NC
Hi folks.
I have looked everywhere, but have failed to find information on how to set the 5.3 V12 timing following a complete rebuild. Every description I've come across addresses the removal and replacement of either the chain, the tensioner, the heads, etc., but never the entire system.
I've also noticed that everyone says not to remove the timing chain guides as their location if critical to the safe operation of the chain.
Well, my motor has been completely disassembled and cleaned in preparation for the rebuild. the short block is reassembled and now It's time to install the timing chain, guides, tensioner, and front cover.
Can someone please point me in the direction of a step by step on how to set everything back up correctly from scratch. I understand I'll likely need the timing chain guide plate to properly locate the guides, but need to know how to align the crank, camshafts, chain, jack shaft, etc. properly.
Thanks for the help!
Matt


Joined: Feb 2010
Posts: 28,867
Likes: 11,296
From: Adelaide Stralia
Oh boy, it was 20 odd years ago when I did mine, and this is from memory.
The chain guides really need the Jaguar front plate special tool to set them 100%. It is basically a copy of the timing cover, with pins protruding on the engine side, and holes drilled at strategic places to allow sockets to tighten the guide bolts. Fit the guides with bolts left loose. Mount that special plate and the protruding pins WILL sit ON the chain face of the respective guides. Once the guides are positioned correctly, the bolts of the various guides can be tightened to spec. The plate is removed and the rest of the engine assembled.
This is possible without that plate, but you need the chain in place to position the guides, and with the chain in place the bolts are not accessable with any ease or confidence, but it is doable. Your sense of humour will be tested.
I had that plate. Took all of 15 minutes to set the guides up.
As for the rest.
Crankshaft at TDC piston 1A. The pistons etc are all installed.
Cylinder heads go on, and torgued to spec.
Cam blocks intalled and sealed on the underside.
Oil pump is installed and locked into place.
Chain sprocket and key fitted to crank snout.
Camshafts installed, including the sprockets. Camshafts located in place with the locating plate/s (you will 2 of these) fitted to the slot in the front journal flange.
Jackshaft installed and locked down.
Thread the chain thru, but DO NOT rotate the crankshaft or camshafts. Fit the chain joiner and clip the correct way round, heel of clip faces direction of rotation.
Jackshaft timing is subjective. I never bothered, it is only a shaft with a drive gear for the distributor, and that distributor shaft has 360deg rotational adjustment.
Fit the chain tensioner. DO NOT trigger it yet, all hell will break loose if you do.
Rotate that engine TWO rotations, until you are back where you started from. You will need a wire probe down 1A plug hole to "feel" TDC on the 2nd rotation.
Check the chain etc is sitting OK, and then apply HEAPS of Pre-Lube to anything that touches anything else.
Fit the timing cover, taking care that the tensioner pivot pin locates in the timing cover hole.
DO NOT RELEASE THAT TENSIONER JUST YET.
Now the camshafts.
They may well be 100% spot on. Mine were not, just a knats eye out.
STUFF SOME RAGS IN THE OPENING BELOW THE SPROCKETS. DROP SOMETHING DOWN HERE NOW AND YOU WILL START ALL OVER.
Remove the spring circlip inside the sprocket.
This will allow that sprocket to move towards the engine, only a small amount, and the serated teeth will disengage, and you can rotate the camshaft to its proper place using that timing plate you have 2 of, slide the sprocket back ON the serated plate, refit that circlip. Now do the other camshaft.
REMOVE THOSE RAGS.
Release that timing chain tensioner ratchet. It will not "spring" far due to the new chain.
Rotate that engine again, TWO more rotations and check the settings once more. They should NOT move if you have taken your time and been careful.
NEVER EVER ROTATE THIS ENGINE BACKWARDS, YOUR WALLET WILL EMPTY IF YOU DO.
When you do that rotation above it for final setting, have the front pulley installed and the timing plate attached to the sump. STOP at 10deg BTDC on #1A Comp stroke. THATS IT. If you are careless and go past that 10deg, go around again 2 more rotations. You need to be on the COMPRESSION stroke. ONE rotation will have the ignition timing 180deg out.
Fit the distributor so the rotor button points at the #1 cast into the distributor cap. That is #1A spark plug lead position.
Done. SIMPLE.
Last edited by Grant Francis; Jun 30, 2016 at 08:13 AM.

Veteran Member


Joined: Jun 2013
Posts: 2,132
Likes: 1,389
From: Australia
Hi folks.
I have looked everywhere, but have failed to find information on how to set the 5.3 V12 timing following a complete rebuild. Every description I've come across addresses the removal and replacement of either the chain, the tensioner, the heads, etc., but never the entire system.
I've also noticed that everyone says not to remove the timing chain guides as their location if critical to the safe operation of the chain.
Well, my motor has been completely disassembled and cleaned in preparation for the rebuild. the short block is reassembled and now It's time to install the timing chain, guides, tensioner, and front cover.
Can someone please point me in the direction of a step by step on how to set everything back up correctly from scratch. I understand I'll likely need the timing chain guide plate to properly locate the guides, but need to know how to align the crank, camshafts, chain, jack shaft, etc. properly.
Thanks for the help!
Matt
I have looked everywhere, but have failed to find information on how to set the 5.3 V12 timing following a complete rebuild. Every description I've come across addresses the removal and replacement of either the chain, the tensioner, the heads, etc., but never the entire system.
I've also noticed that everyone says not to remove the timing chain guides as their location if critical to the safe operation of the chain.
Well, my motor has been completely disassembled and cleaned in preparation for the rebuild. the short block is reassembled and now It's time to install the timing chain, guides, tensioner, and front cover.
Can someone please point me in the direction of a step by step on how to set everything back up correctly from scratch. I understand I'll likely need the timing chain guide plate to properly locate the guides, but need to know how to align the crank, camshafts, chain, jack shaft, etc. properly.
Thanks for the help!
Matt
Thread Starter
|
Junior Member
Joined: Jul 2013
Posts: 3
Likes: 2
From: NC
Oh boy, it was 20 odd years ago when I did mine, and this is from memory.
The chain guides really need the Jaguar front plate special tool to set them 100%. It is basically a copy of the timing cover, with pins protruding on the engine side, and holes drilled at strategic places to allow sockets to tighten the guide bolts. Fit the guides with bolts left loose. Mount that special plate and the protruding pins WILL sit ON the chain face of the respective guides. Once the guides are positioned correctly, the bolts of the various guides can be tightened to spec. The plate is removed and the rest of the engine assembled.
This is possible without that plate, but you need the chain in place to position the guides, and with the chain in place the bolts are not accessable with any ease or confidence, but it is doable. Your sense of humour will be tested.
I had that plate. Took all of 15 minutes to set the guides up.
As for the rest.
Crankshaft at TDC piston 1A. The pistons etc are all installed.
Cylinder heads go on, and torgued to spec.
Cam blocks intalled and sealed on the underside.
Oil pump is installed and locked into place.
Chain sprocket and key fitted to crank snout.
Camshafts installed, including the sprockets. Camshafts located in place with the locating plate/s (you will 2 of these) fitted to the slot in the front journal flange.
Jackshaft installed and locked down.
Thread the chain thru, but DO NOT rotate the crankshaft or camshafts. Fit the chain joiner and clip the correct way round, heel of clip faces direction of rotation.
Jackshaft timing is subjective. I never bothered, it is only a shaft with a drive gear for the distributor, and that distributor shaft has 360deg rotational adjustment.
Fit the chain tensioner. DO NOT trigger it yet, all hell will break loose if you do.
Rotate that engine TWO rotations, until you are back where you started from. You will need a wire probe down 1A plug hole to "feel" TDC on the 2nd rotation.
Check the chain etc is sitting OK, and then apply HEAPS of Pre-Lube to anything that touches anything else.
Fit the timing cover, taking care that the tensioner pivot pin locates in the timing cover hole.
DO NOT RELEASE THAT TENSIONER JUST YET.
Now the camshafts.
They may well be 100% spot on. Mine were not, just a knats eye out.
STUFF SOME RAGS IN THE OPENING BELOW THE SPROCKETS. DROP SOMETHING DOWN HERE NOW AND YOU WILL START ALL OVER.
Remove the spring circlip inside the sprocket.
This will allow that sprocket to move towards the engine, only a small amount, and the serated teeth will disengage, and you can rotate the camshaft to its proper place using that timing plate you have 2 of, slide the sprocket back ON the serated plate, refit that circlip. Now do the other camshaft.
REMOVE THOSE RAGS.
Release that timing chain tensioner ratchet. It will not "spring" far due to the new chain.
Rotate that engine again, TWO more rotations and check the settings once more. They should NOT move if you have taken your time and been careful.
NEVER EVER ROTATE THIS ENGINE BACKWARDS, YOUR WALLET WILL EMPTY IF YOU DO.
When you do that rotation above it for final setting, have the front pulley installed and the timing plate attached to the sump. STOP at 10deg BTDC on #1A Comp stroke. THATS IT. If you are careless and go past that 10deg, go around again 2 more rotations. You need to be on the COMPRESSION stroke. ONE rotation will have the ignition timing 180deg out.
Fit the distributor so the rotor button points at the #1 cast into the distributor cap. That is #1A spark plug lead position.
Done. SIMPLE.
The chain guides really need the Jaguar front plate special tool to set them 100%. It is basically a copy of the timing cover, with pins protruding on the engine side, and holes drilled at strategic places to allow sockets to tighten the guide bolts. Fit the guides with bolts left loose. Mount that special plate and the protruding pins WILL sit ON the chain face of the respective guides. Once the guides are positioned correctly, the bolts of the various guides can be tightened to spec. The plate is removed and the rest of the engine assembled.
This is possible without that plate, but you need the chain in place to position the guides, and with the chain in place the bolts are not accessable with any ease or confidence, but it is doable. Your sense of humour will be tested.
I had that plate. Took all of 15 minutes to set the guides up.
As for the rest.
Crankshaft at TDC piston 1A. The pistons etc are all installed.
Cylinder heads go on, and torgued to spec.
Cam blocks intalled and sealed on the underside.
Oil pump is installed and locked into place.
Chain sprocket and key fitted to crank snout.
Camshafts installed, including the sprockets. Camshafts located in place with the locating plate/s (you will 2 of these) fitted to the slot in the front journal flange.
Jackshaft installed and locked down.
Thread the chain thru, but DO NOT rotate the crankshaft or camshafts. Fit the chain joiner and clip the correct way round, heel of clip faces direction of rotation.
Jackshaft timing is subjective. I never bothered, it is only a shaft with a drive gear for the distributor, and that distributor shaft has 360deg rotational adjustment.
Fit the chain tensioner. DO NOT trigger it yet, all hell will break loose if you do.
Rotate that engine TWO rotations, until you are back where you started from. You will need a wire probe down 1A plug hole to "feel" TDC on the 2nd rotation.
Check the chain etc is sitting OK, and then apply HEAPS of Pre-Lube to anything that touches anything else.
Fit the timing cover, taking care that the tensioner pivot pin locates in the timing cover hole.
DO NOT RELEASE THAT TENSIONER JUST YET.
Now the camshafts.
They may well be 100% spot on. Mine were not, just a knats eye out.
STUFF SOME RAGS IN THE OPENING BELOW THE SPROCKETS. DROP SOMETHING DOWN HERE NOW AND YOU WILL START ALL OVER.
Remove the spring circlip inside the sprocket.
This will allow that sprocket to move towards the engine, only a small amount, and the serated teeth will disengage, and you can rotate the camshaft to its proper place using that timing plate you have 2 of, slide the sprocket back ON the serated plate, refit that circlip. Now do the other camshaft.
REMOVE THOSE RAGS.
Release that timing chain tensioner ratchet. It will not "spring" far due to the new chain.
Rotate that engine again, TWO more rotations and check the settings once more. They should NOT move if you have taken your time and been careful.
NEVER EVER ROTATE THIS ENGINE BACKWARDS, YOUR WALLET WILL EMPTY IF YOU DO.
When you do that rotation above it for final setting, have the front pulley installed and the timing plate attached to the sump. STOP at 10deg BTDC on #1A Comp stroke. THATS IT. If you are careless and go past that 10deg, go around again 2 more rotations. You need to be on the COMPRESSION stroke. ONE rotation will have the ignition timing 180deg out.
Fit the distributor so the rotor button points at the #1 cast into the distributor cap. That is #1A spark plug lead position.
Done. SIMPLE.
Wow! That's quite a memory! Thanks for the great description!
Two questions:
- You stated "Fit the chain joiner and clip the correct way round, heel of clip faces direction of rotation." I'm not clear on exactly what this means. are you suggesting unlinking the chain for installation and then reattaching the link (chain joiner) once installed
- You mentioned never rotating the engine backwards... I'm curious, what is the issue with rotating backwards?
Matt
Veteran Member
Joined: Jun 2013
Posts: 2,132
Likes: 1,389
From: Australia
Wow! That's quite a memory! Thanks for the great description!
Two questions:
Matt
Two questions:
- You stated "Fit the chain joiner and clip the correct way round, heel of clip faces direction of rotation." I'm not clear on exactly what this means. are you suggesting unlinking the chain for installation and then reattaching the link (chain joiner) once installed
- You mentioned never rotating the engine backwards... I'm curious, what is the issue with rotating backwards?
Matt
This will cause extra load on the tensioner but will also result in slack elsewhere in the chain and a change in timing between cams and crank.
Joined: Feb 2010
Posts: 28,867
Likes: 11,296
From: Adelaide Stralia
OK.
Most replacement chains are not a continous chain, as the original "Diamond Brand" chain was.
If you aquire a continous chain, then use it as is. It is more fiddly to fit, and takes way longer. Once you get your chain, and if it is a continous chain, let me know I will go thru the fitment of that chain, and it is fiddly.
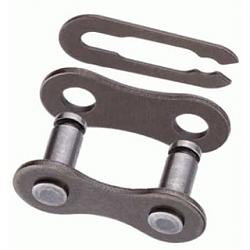
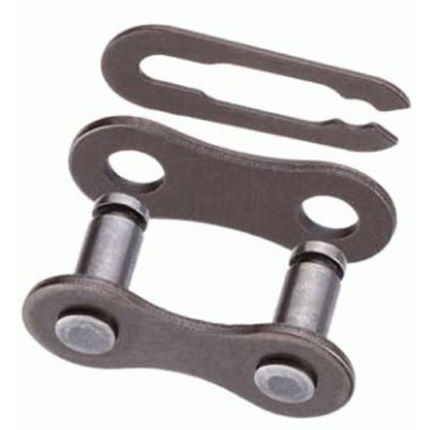
The joiner link supplied with a replacement chain has a clip like a hair clip, open on one end and closed on the other. ALWAYS fit that clip with the "heel", CLOSED END, facing the direction of rotation. If it is fitted with the open end facing rotation, there is "talk" that the rotation of the chain can "flip" that clip off, thus causing the chain to seperate and all hell break loose, and basically ruin your day. I have NEVER seen one seperate, and I have dismantled many engines with that clip fitted wrong.
As Baxtor has said, rotating the engine backwards CAN, not WILL, cause excessive load on the top edge of the plastic tensioner, and snap it at the pivot pin area. The amount of chain "slack" that this creates is also just not needed when setting things up. This is a habit I learnt in 1965 when I Apprenticed in the Engine Reconditioning sector, and it has stuck. Gear drive engines are not so critical, but Jags dont have that system.
Memory again???, that V12 chain is about 1.2metres long, so slack anywhere will reek havoc.
Here is a snap of a chain joiner, NOT a V12 joiner, just a random snap I found on Google. The "Clip" I mention is clearly seen.
Most replacement chains are not a continous chain, as the original "Diamond Brand" chain was.
If you aquire a continous chain, then use it as is. It is more fiddly to fit, and takes way longer. Once you get your chain, and if it is a continous chain, let me know I will go thru the fitment of that chain, and it is fiddly.
The joiner link supplied with a replacement chain has a clip like a hair clip, open on one end and closed on the other. ALWAYS fit that clip with the "heel", CLOSED END, facing the direction of rotation. If it is fitted with the open end facing rotation, there is "talk" that the rotation of the chain can "flip" that clip off, thus causing the chain to seperate and all hell break loose, and basically ruin your day. I have NEVER seen one seperate, and I have dismantled many engines with that clip fitted wrong.
As Baxtor has said, rotating the engine backwards CAN, not WILL, cause excessive load on the top edge of the plastic tensioner, and snap it at the pivot pin area. The amount of chain "slack" that this creates is also just not needed when setting things up. This is a habit I learnt in 1965 when I Apprenticed in the Engine Reconditioning sector, and it has stuck. Gear drive engines are not so critical, but Jags dont have that system.
Memory again???, that V12 chain is about 1.2metres long, so slack anywhere will reek havoc.
Here is a snap of a chain joiner, NOT a V12 joiner, just a random snap I found on Google. The "Clip" I mention is clearly seen.
Last edited by Grant Francis; Jul 1, 2016 at 03:56 AM.
Trending Topics
Thread Starter
|
Junior Member
Joined: Jul 2013
Posts: 3
Likes: 2
From: NC
OK.
Most replacement chains are not a continous chain, as the original "Diamond Brand" chain was.
If you aquire a continous chain, then use it as is. It is more fiddly to fit, and takes way longer. Once you get your chain, and if it is a continous chain, let me know I will go thru the fitment of that chain, and it is fiddly.
The joiner link supplied with a replacement chain has a clip like a hair clip, open on one end and closed on the other. ALWAYS fit that clip with the "heel", CLOSED END, facing the direction of rotation. If it is fitted with the open end facing rotation, there is "talk" that the rotation of the chain can "flip" that clip off, thus causing the chain to seperate and all hell break loose, and basically ruin your day. I have NEVER seen one seperate, and I have dismantled many engines with that clip fitted wrong.
As Baxtor has said, rotating the engine backwards CAN, not WILL, cause excessive load on the top edge of the plastic tensioner, and snap it at the pivot pin area. The amount of chain "slack" that this creates is also just not needed when setting things up. This is a habit I learnt in 1965 when I Apprenticed in the Engine Reconditioning sector, and it has stuck. Gear drive engines are not so critical, but Jags dont have that system.
Memory again???, that V12 chain is about 1.2metres long, so slack anywhere will reek havoc.
Here is a snap of a chain joiner, NOT a V12 joiner, just a random snap I found on Google. The "Clip" I mention is clearly seen.
Attachment 132555
Understood. Thanks! Hopefully I'll get to it next weekend.
Matt

Veteran Member
Joined: Jul 2012
Posts: 6,796
Likes: 2,403
From: Walnut Creek, California
Wow. that process in any non OHC engine is a snap compared to that.
Exactly what I envisaged as the clip. Takes me back to bicycle and motorcycle chains. Different sizes for different sized chains.
Might even have one in my odds and ends.
Son called a bit ago to, one, check one me, and two to talk about
working on his boat. Carb and cooling issues. Old Chris Craft cabin cruiser. Much modified SBC. Cool the engine and cool the exhaust.
Separate using river water. but not direct, via exchangers.
Made his own water pump on one of his CNC's. Drives off the Cam snout??? No belt issues.
Carl
Carl