XJS ( X27 ) 1975 - 1996 3.6 4.0 5.3 6.0

TWR Bumper installation - Saga

Thread Tools
 
Search this Thread
 
Old Oct 4, 2013 | 03:47 AM
  #1  
warrjon's Avatar
Thread Starter
|
Veteran Member
Joined: May 2010
Posts: 4,638
Likes: 2,583
From: Vic Australia
Default TWR Bumper installation - Saga

I decided that a set of TWR bumpers were in order when my baby was finished. But being in Australia these are few and far between, so when I came across a company selling new ones from an ex Jaguar Australia mold I thought ok lets go ahead.

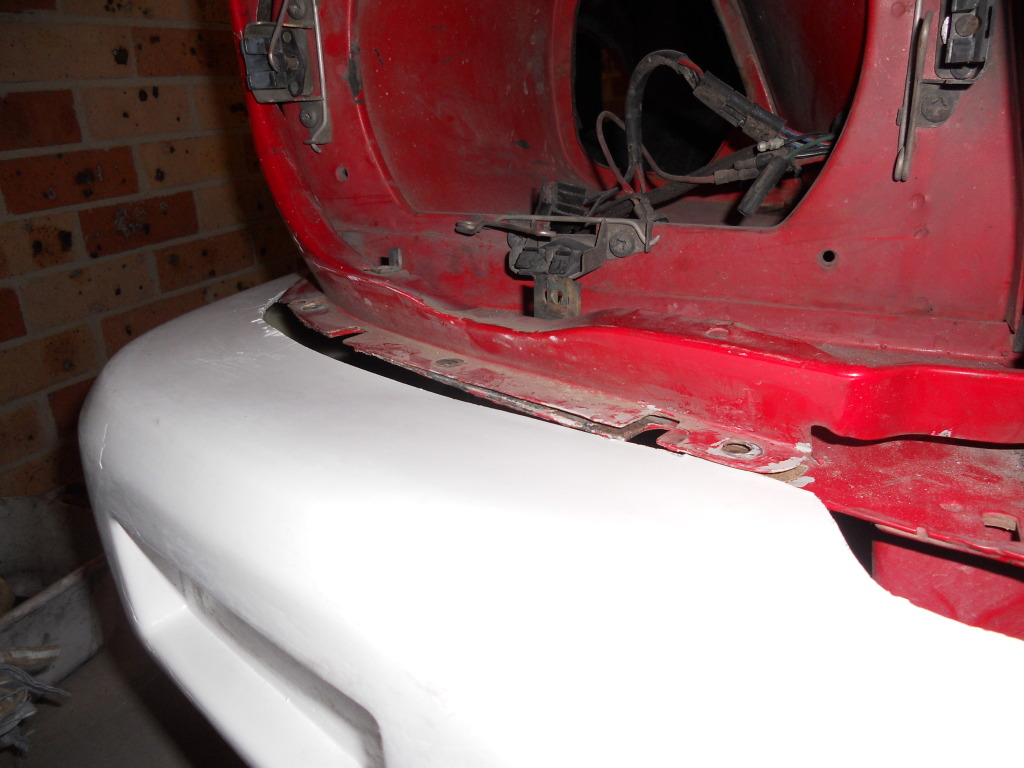
Little did I know what I got myself in for, the mold was obviously completely stuffed as the bars went nowhere near even fitting on the car. Now I had 2 options take them back and ask for my money back and keep looking or fix them. Unfortunately I decided to fix them.

Not even close to fitting, and the rear was worse. I didn't take a pic of the rear unfortunately.


It just would not go on.


New top made for the bar


Fiberglassed in place
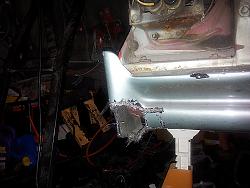
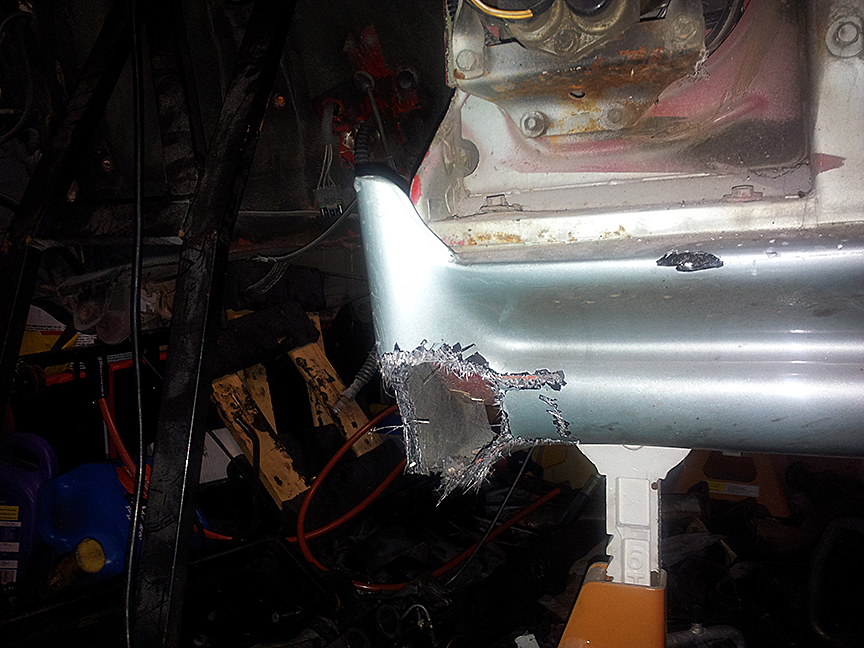


Custom mounts made


Mounts made from aluminum. Notice the aluminum stay between the guard and the inner engine wall, this provides strength, as I have removed all of the lower metal panels, saving 15kg.


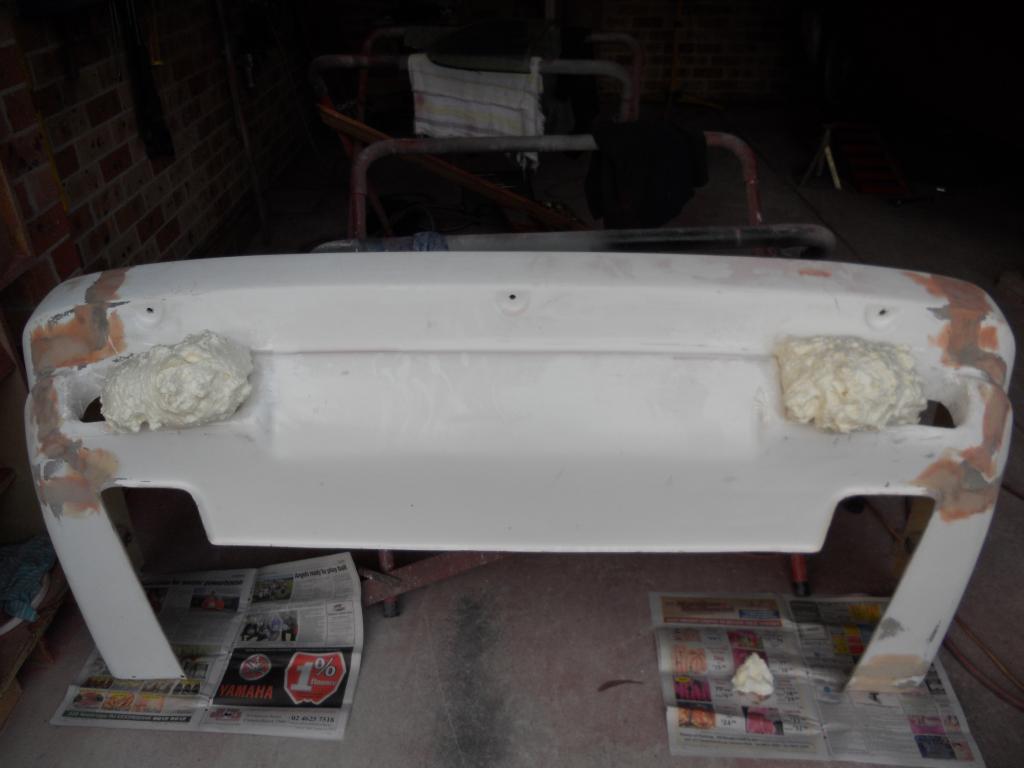
New fiberglass bumper trim made (the white one)


Trim fixed to the front bumper this was filled and sanded for a smooth finish.


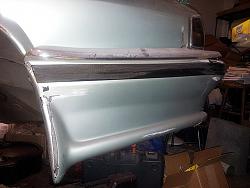
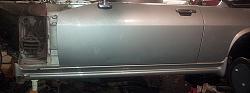
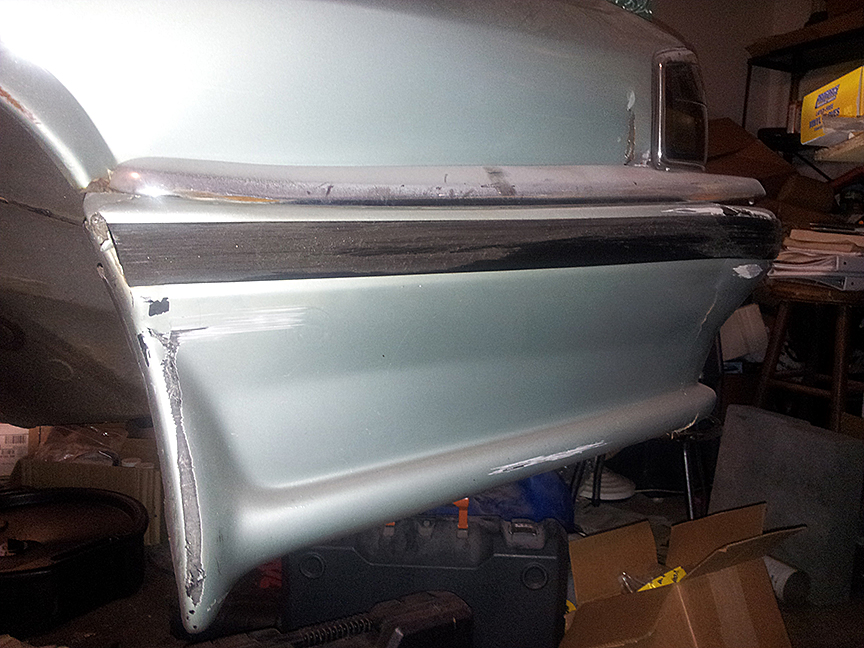
Front bumper finally finished and on the car. 18 months later.

 
Attached Thumbnails TWR Bumper installation - Saga-dscn0066.jpg   TWR Bumper installation - Saga-dscn0065.jpg   TWR Bumper installation - Saga-dscn0127_zpsf0838cd7.jpg   TWR Bumper installation - Saga-dscn0135.jpg   TWR Bumper installation - Saga-dscn0142.jpg  

TWR Bumper installation - Saga-dscn0139.jpg   TWR Bumper installation - Saga-dscn0565_zpsc560ca26.jpg   TWR Bumper installation - Saga-dscn0567_zpsc6cf8844.jpg   TWR Bumper installation - Saga-dscn0574_zpsb1d871c9.jpg  
Reply
Old Oct 4, 2013 | 03:55 AM
  #2  
warrjon's Avatar
Thread Starter
|
Veteran Member
Joined: May 2010
Posts: 4,638
Likes: 2,583
From: Vic Australia
Default

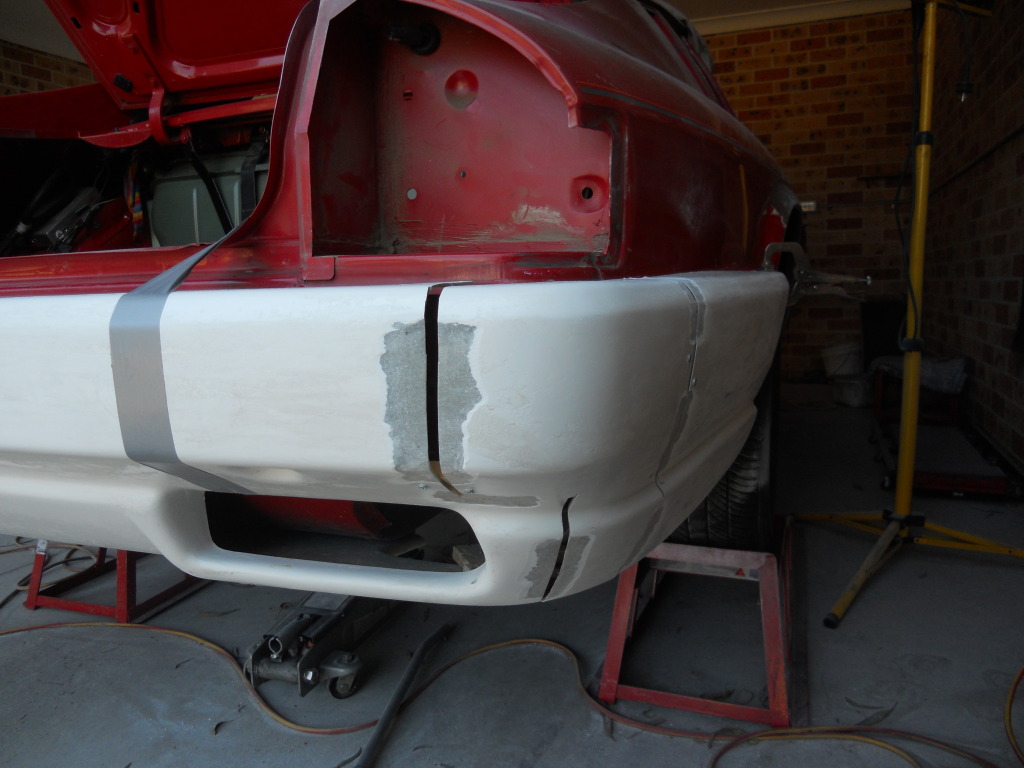
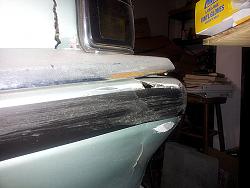
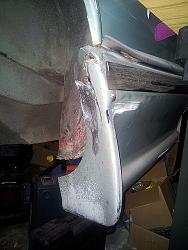
The rear bumper was far worse than the front. I had to cut into about 7 pieces and re-assemble it on the car.

I Didn't like the rear fog light holes next to the exhaust tips so I decided to remodel the bar using expanding foam to shape new exhaust outlets, then fiberglass over that and remove the foam once the glass was cured.


Attached Thumbnails TWR Bumper installation - Saga-dscn0108.jpg   TWR Bumper installation - Saga-dscn0105.jpg   TWR Bumper installation - Saga-dscn0114_zps5e56da45.jpg   TWR Bumper installation - Saga-dscn0168.jpg   TWR Bumper installation - Saga-dscn0571_zps338b1b9e.jpg  

TWR Bumper installation - Saga-dscn0572_zps61421e28.jpg   TWR Bumper installation - Saga-dscn0584_zps8064dd6b.jpg  
Reply
Old Oct 4, 2013 | 07:43 AM
  #3  
JagZilla's Avatar
Senior Member
Joined: Sep 2012
Posts: 835
Likes: 298
From: Mississippi
Default

Looks great Warren. You do good work.
My '89 donor car came with what was left of a Lister body kit. The look of that was just too squared off, and chuncky for my taste, but, I quite like the look of your individually tailored TWR kit.
 
Reply
Old Oct 4, 2013 | 04:06 PM
  #4  
warrjon's Avatar
Thread Starter
|
Veteran Member
Joined: May 2010
Posts: 4,638
Likes: 2,583
From: Vic Australia
Default

Its not difficult to modify fiberglass, just time consuming. I also made the bit that returns around the wheel arch removable on the rear bar so it goes on and off without scratching the paint.
 
Reply
Old Oct 4, 2013 | 05:53 PM
  #5  
amcdonal86's Avatar
Veteran Member
Joined: May 2010
Posts: 6,290
Likes: 485
From: Arlington, VA USA
Default

Looks awesome. Is it supposed to resemble the TWR Racing XJS?
 
Reply
Old Oct 5, 2013 | 04:51 AM
  #6  
baxtor's Avatar
Veteran Member
10 Year Member
Liked
Loved
Community Favorite
Joined: Jun 2013
Posts: 2,121
Likes: 1,380
From: Australia
Default

I've had an eye on your blog for a while Warren, good to see some serious progress.
I suspect somebody has simply tidied up the inside surfaces of a front and rear and then used them as moulds. The size difference looks about right
I have an 89 XJR-S on rotisserie at the moment but thankfully all the fibreglass components fit like a glove, just a couple of curb scuffs to fix up.
 
Reply
Old Oct 5, 2013 | 05:45 AM
  #7  
warrjon's Avatar
Thread Starter
|
Veteran Member
Joined: May 2010
Posts: 4,638
Likes: 2,583
From: Vic Australia
Default

The size difference was not that bad, I cut them with an angle grinder so gaps are due to cuts. The problem was the bar was twisted and some of the gaps are not even.
 
Reply
Old Oct 5, 2013 | 03:18 PM
  #8  
calvindoesntknow's Avatar
Senior Member
Joined: Dec 2011
Posts: 882
Likes: 65
From: new york
Default

jagzilla, do you still havr that lister kit?
 
Reply
Old Oct 5, 2013 | 08:05 PM
  #9  
JagZilla's Avatar
Senior Member
Joined: Sep 2012
Posts: 835
Likes: 298
From: Mississippi
Default

Originally Posted by calvindoesntknow
jagzilla, do you still havr that lister kit?
Calvin,

Like I said, it's just what's left of a Lister kit. The previous owner wrecked the car, which destroyed the front. The rest is in pretty bad shape. The only piece that was not damaged is the side skirt on the passenger side.

Driver side of rear skirt
TWR Bumper installation - Saga-20131005_180543.jpg

Close up of corner of rear skirt
TWR Bumper installation - Saga-20131005_180559.jpg

Portion of rear skirt inside the wheel well
TWR Bumper installation - Saga-20131005_175912.jpg

Driver side skirt
TWR Bumper installation - Saga-20131005_180318.jpg

Close up of leading edge of driver side skirt
TWR Bumper installation - Saga-20131005_175952.jpg

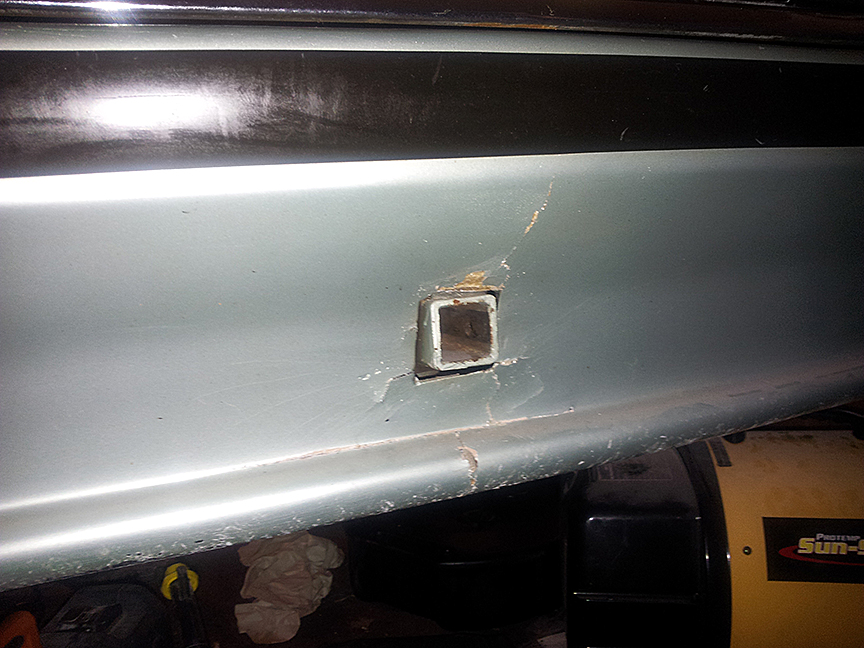
Cracks emitting from the square hole cut in the rear skirt, which accomodates the tow bar receiver.
TWR Bumper installation - Saga-20131005_175816.jpg
 

Last edited by JagZilla; Oct 6, 2013 at 08:34 AM.
Reply
Old Oct 5, 2013 | 11:45 PM
  #10  
warrjon's Avatar
Thread Starter
|
Veteran Member
Joined: May 2010
Posts: 4,638
Likes: 2,583
From: Vic Australia
Default

Scott that is all easily fixed.

The piece missing on the side skirt can be filled with expanding foam shaped and glassed over.

Mending broken bits you grin a wide V in both sides clamp the 2 bits together (I used scrap plywood) and then glass them back together. Another trick is to take a small mold of a part of the bar and then use this to reform another part.

I do agree the TWR kit looks good, and TWR did a lot of wind tunnel testing with it to reduce drag and improve airflow to the cooling system.
 
Reply
Old Oct 6, 2013 | 06:22 AM
  #11  
philhef's Avatar
Veteran Member
Joined: Feb 2011
Posts: 2,916
Likes: 547
From: North Carolina
Default

WOW! Makes me wish I had kept my XJS! Always wanted those bumpers.
 
Reply
Old Oct 6, 2013 | 10:07 AM
  #12  
calvindoesntknow's Avatar
Senior Member
Joined: Dec 2011
Posts: 882
Likes: 65
From: new york
Default

I was always a fan of the lister kit, if you're willing to part with it, just name your price!
 
Reply
Old Oct 6, 2013 | 02:54 PM
  #13  
JagZilla's Avatar
Senior Member
Joined: Sep 2012
Posts: 835
Likes: 298
From: Mississippi
Default

Originally Posted by warrjon
Scott that is all easily fixed.
Thanks for the repair advice Warren but, I doubt I'll fix it, because, I don't really like the look of the Lister kit. I'll be going with a retro look for JagZilla anyways, by eliminating the black rubber on the stock bumpers, and using the chrome bumper blades as the basis for all-metal bumpers, similar to those on the E-Type.
 

Last edited by JagZilla; Oct 9, 2013 at 10:11 AM.
Reply
Old May 25, 2022 | 11:06 AM
  #14  
Renfroeinc's Avatar
Junior Member
Joined: May 2022
Posts: 3
Likes: 0
Default

I know this thread is old but can anyone tell me what rubber is used for the side skirts and rear bumper?
 
Reply
Old May 26, 2022 | 02:21 AM
  #15  
baxtor's Avatar
Veteran Member
10 Year Member
Liked
Loved
Community Favorite
Joined: Jun 2013
Posts: 2,121
Likes: 1,380
From: Australia
Default

Originally Posted by Renfroeinc
I know this thread is old but can anyone tell me what rubber is used for the side skirts and rear bumper?
Basically a slight variation of a "U" section rubber strip on side skirt and more of a true "U" on the rear bumper, at least on my XJRS which l am confident is original fitment.
 
Reply
Old May 26, 2022 | 07:44 AM
  #16  
Renfroeinc's Avatar
Junior Member
Joined: May 2022
Posts: 3
Likes: 0
Default

Originally Posted by baxtor
Basically a slight variation of a "U" section rubber strip on side skirt and more of a true "U" on the rear bumper, at least on my XJRS which l am confident is original fitment.
Do you have any pics?
 
Reply
Old May 27, 2022 | 08:55 PM
  #17  
baxtor's Avatar
Veteran Member
10 Year Member
Liked
Loved
Community Favorite
Joined: Jun 2013
Posts: 2,121
Likes: 1,380
From: Australia
Default

Originally Posted by Renfroeinc
Do you have any pics?
Best l can do at the moment is pic of rear bumper U rubber. This has a section width of about 12mm for reference. The side skirt extrusion is very similar to the other image but not exact. Not possible at the moment to photograph actual installation.


Reply
Old May 27, 2022 | 09:17 PM
  #18  
Renfroeinc's Avatar
Junior Member
Joined: May 2022
Posts: 3
Likes: 0
Default

Any idea where that can be found?
 
Reply
Old May 27, 2022 | 11:47 PM
  #19  
baxtor's Avatar
Veteran Member
10 Year Member
Liked
Loved
Community Favorite
Joined: Jun 2013
Posts: 2,121
Likes: 1,380
From: Australia
Default

Originally Posted by Renfroeinc
Any idea where that can be found?
Not sure where you are but l imagine if you google "rubber extrusions" it will lead you to supplier in your location. The "U" moulding is very common, not so the other but sure you will find something.
 
Reply
Related Topics
Thread
Thread Starter
Forum
Replies
Last Post
H20boy
XJ ( X351 )
72
Dec 24, 2024 03:23 PM
danke
XF and XFR ( X250 )
8
Sep 24, 2015 02:41 PM
Sublyminal
PRIVATE For Sale / Trade or Buy Classifieds
0
Sep 15, 2015 06:32 PM
Marque
XJ XJ6 / XJ8 / XJR ( X350 & X358 )
1
Sep 14, 2015 11:17 AM
prettydaim
XJ6 & XJ12 Series I, II & III
2
Sep 4, 2015 09:13 AM

Currently Active Users Viewing This Thread: 1 (0 members and 1 guests)


All times are GMT -5. The time now is 04:50 PM.