OK, so...
I've got my 2010 XKR in at the dealer and I had an idle knocking that sounded like a collapsed lifter (from back in my day of working in the bays)....
dealer says no, but... there's a problem with the supercharger. At first they were going to replace it (I've got a pretty good warranty) but now they're just going to "replace all the bearings." They've assured me that if this doesn't work the company will pay to put in a new supercharger.
Should I be worried? I'm planning on taking a long trip next week...
Do you have a sound clip of this damaged supercharger before the rebuild? can you post a youtube clip of a similar sound if not? Thanks
Somehow, I managed to skip reading this post until today, but back a couple of months ago, the "bag of marbles" sound were the exact words I used to describe what I heard coming out of my engine bay when I took it to my mechanic. I suspected at the time that something was wrong in the supercharger, and I asked him to take a look. When he discovered and replaced a wobbling water pump, I felt that most of the sound had disappeared, but now I'm going to have to go out, open the hood, and really listen to see if all the sound is gone. Thanks a lot!
They, uhm... somehow damaged the "coolant pipe connector" when either removing or installing the thing.
Which is how I know that part is only available from England. Took another 10 days to finish the repair.
I can see why now.
I'm doing the job myself today, now.
I've got the supercharger out, on the bench and rebuilt ready to re-fit in a few minutes once I've had a coffee.
The pipe connector goes on where the coolant pipe connects near the front of the supercharger, it's a small metal collar with two o-rings that gets sandwiched into the pipe ends when you push them together.
Things is, if you don't know it you find yourself trying to pull the supercharger up out of the engine bay and it can't get passed the pipe connector, you have to remove it then there's room. I actually didn't spot it until my lad pointed it out to me, the snout is actually shaped to 'just' clear the coolant pipe, IF the collar connector is not in there. Easy to damage it if you just yank the S/C up and out.
Is suspected the issue was the isolator, the old one was still in one piece, but one end of the wound spring had started wearing away at the plastic housing allowing almost a quarter turn of slack movement on the pulley and for the spring end to be banging against the armature of the pulley.
The newer spring in the kit has a metal insert where the end of the spring sits to prevent the plastic wearing away again.
Also checked S/C oil, looked good as new and the actual blades of the s/c are super smooth in operation so re-assembled and ready to start back under the bonnet now to put it all back together.
All done. Car back together and running with no knocking/banging, just the sewing machine noise that the tappity tappets seem to make on these engines at tickover.
Only fly in the ointment is one of the coolant connectors that plugs into the front of the engine from the coolant tank snapped so I can either try and bodge it or just order up a new coolant pipe. I guess I'll be waiting for a new pipe.
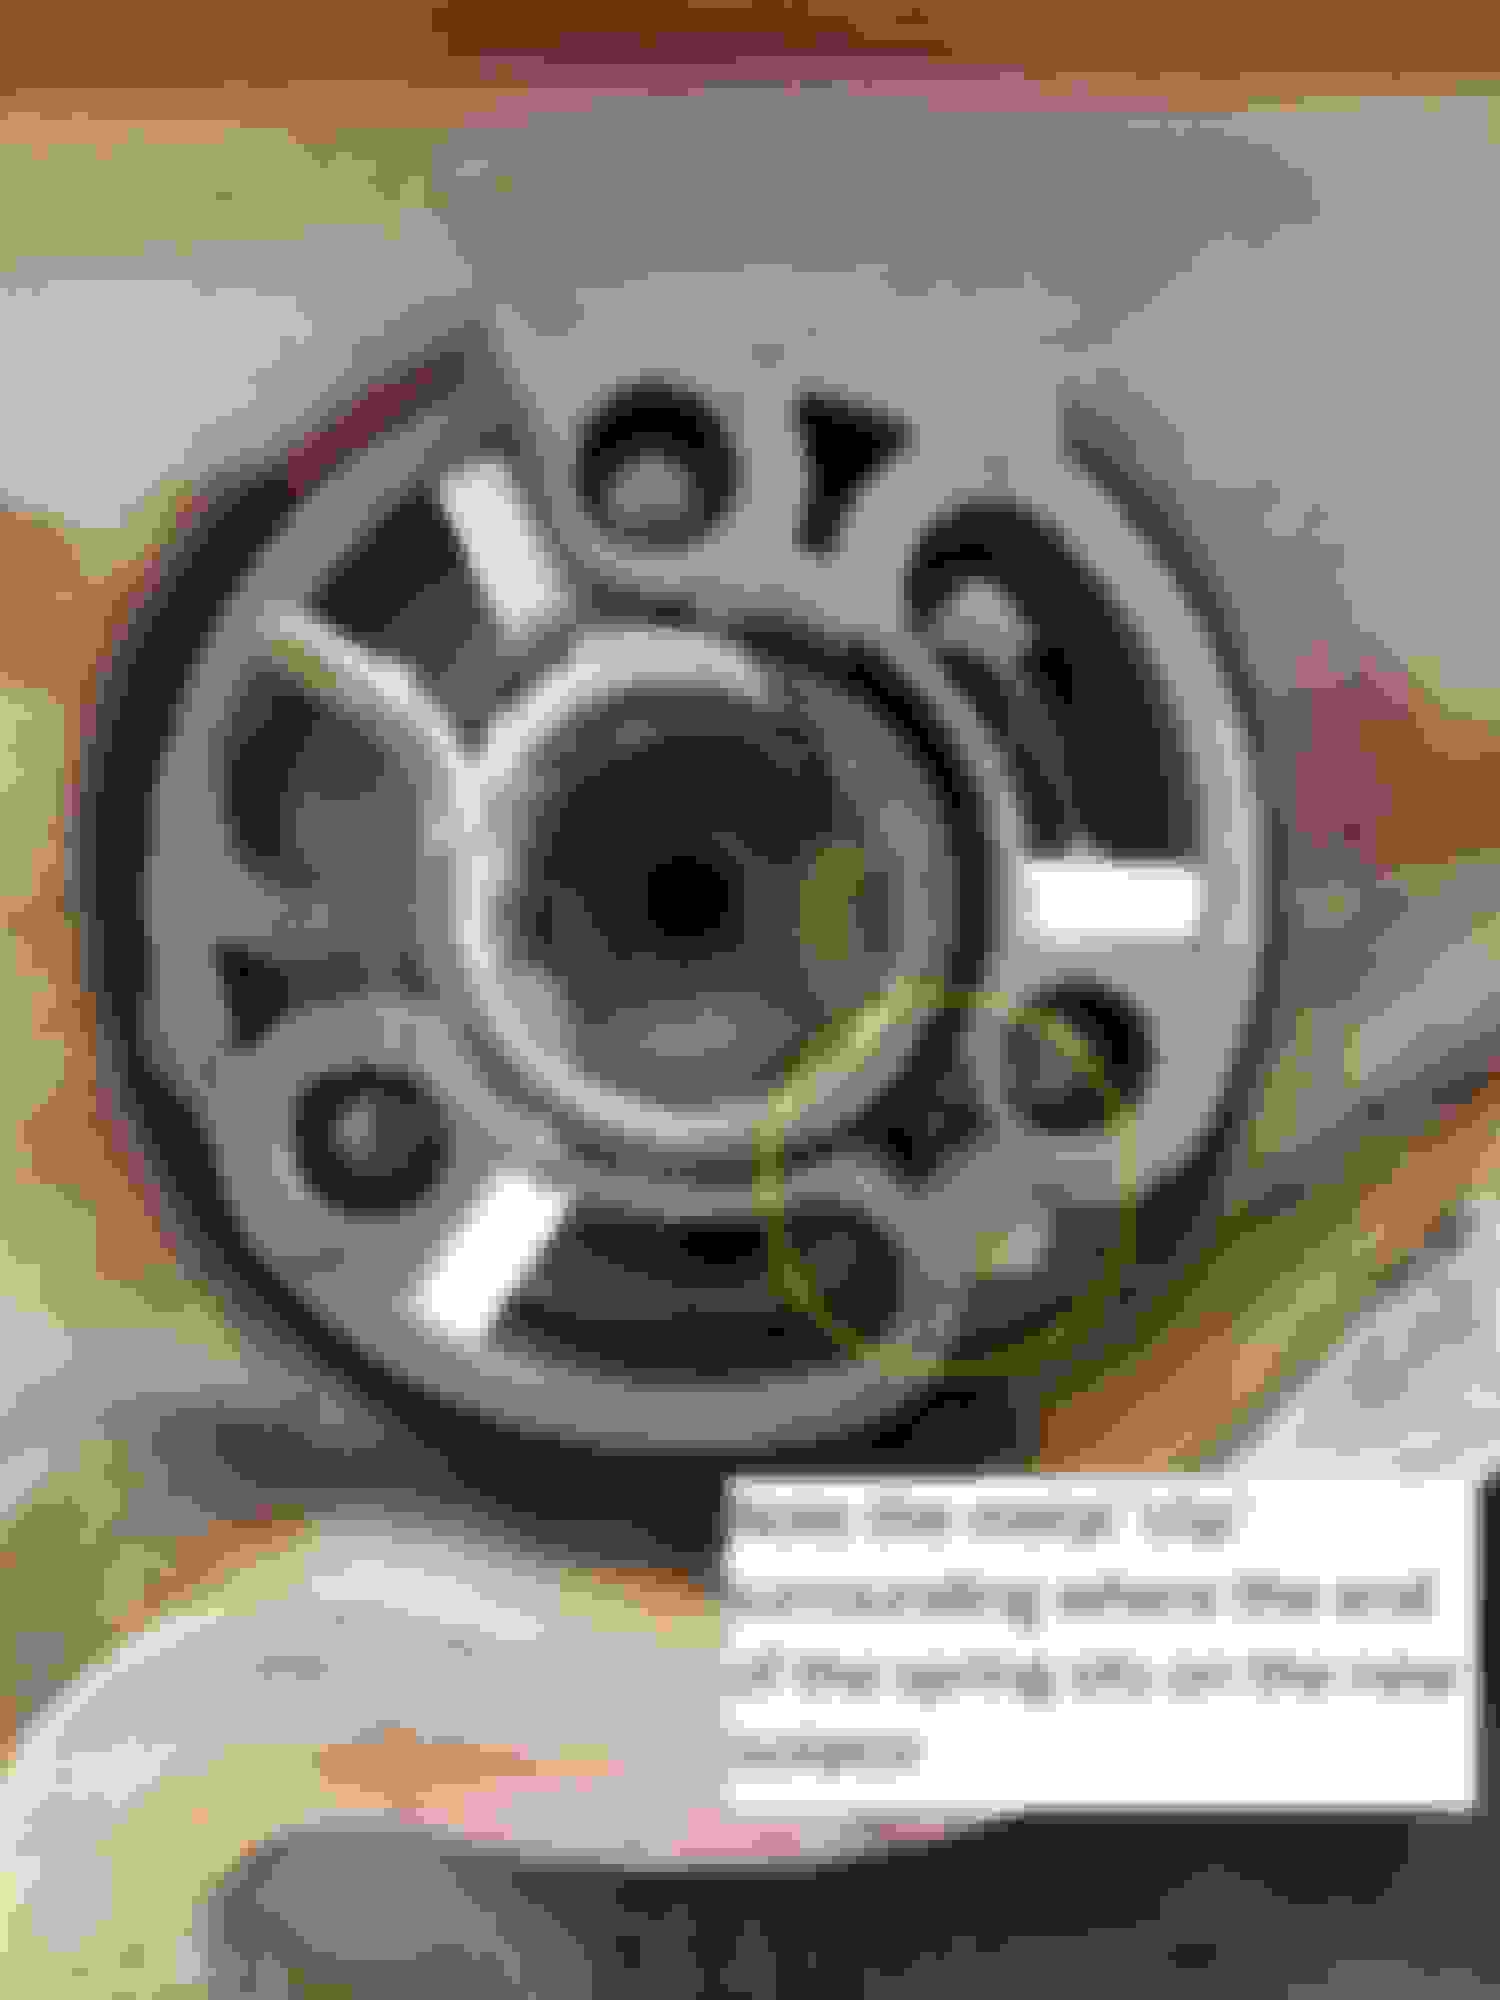
Below are some pictures of the new and old isolator showing why it makes that horrible knocking noise.
This is the new isolator, with a slightly revised body and a new metal insert that is not in the old one.
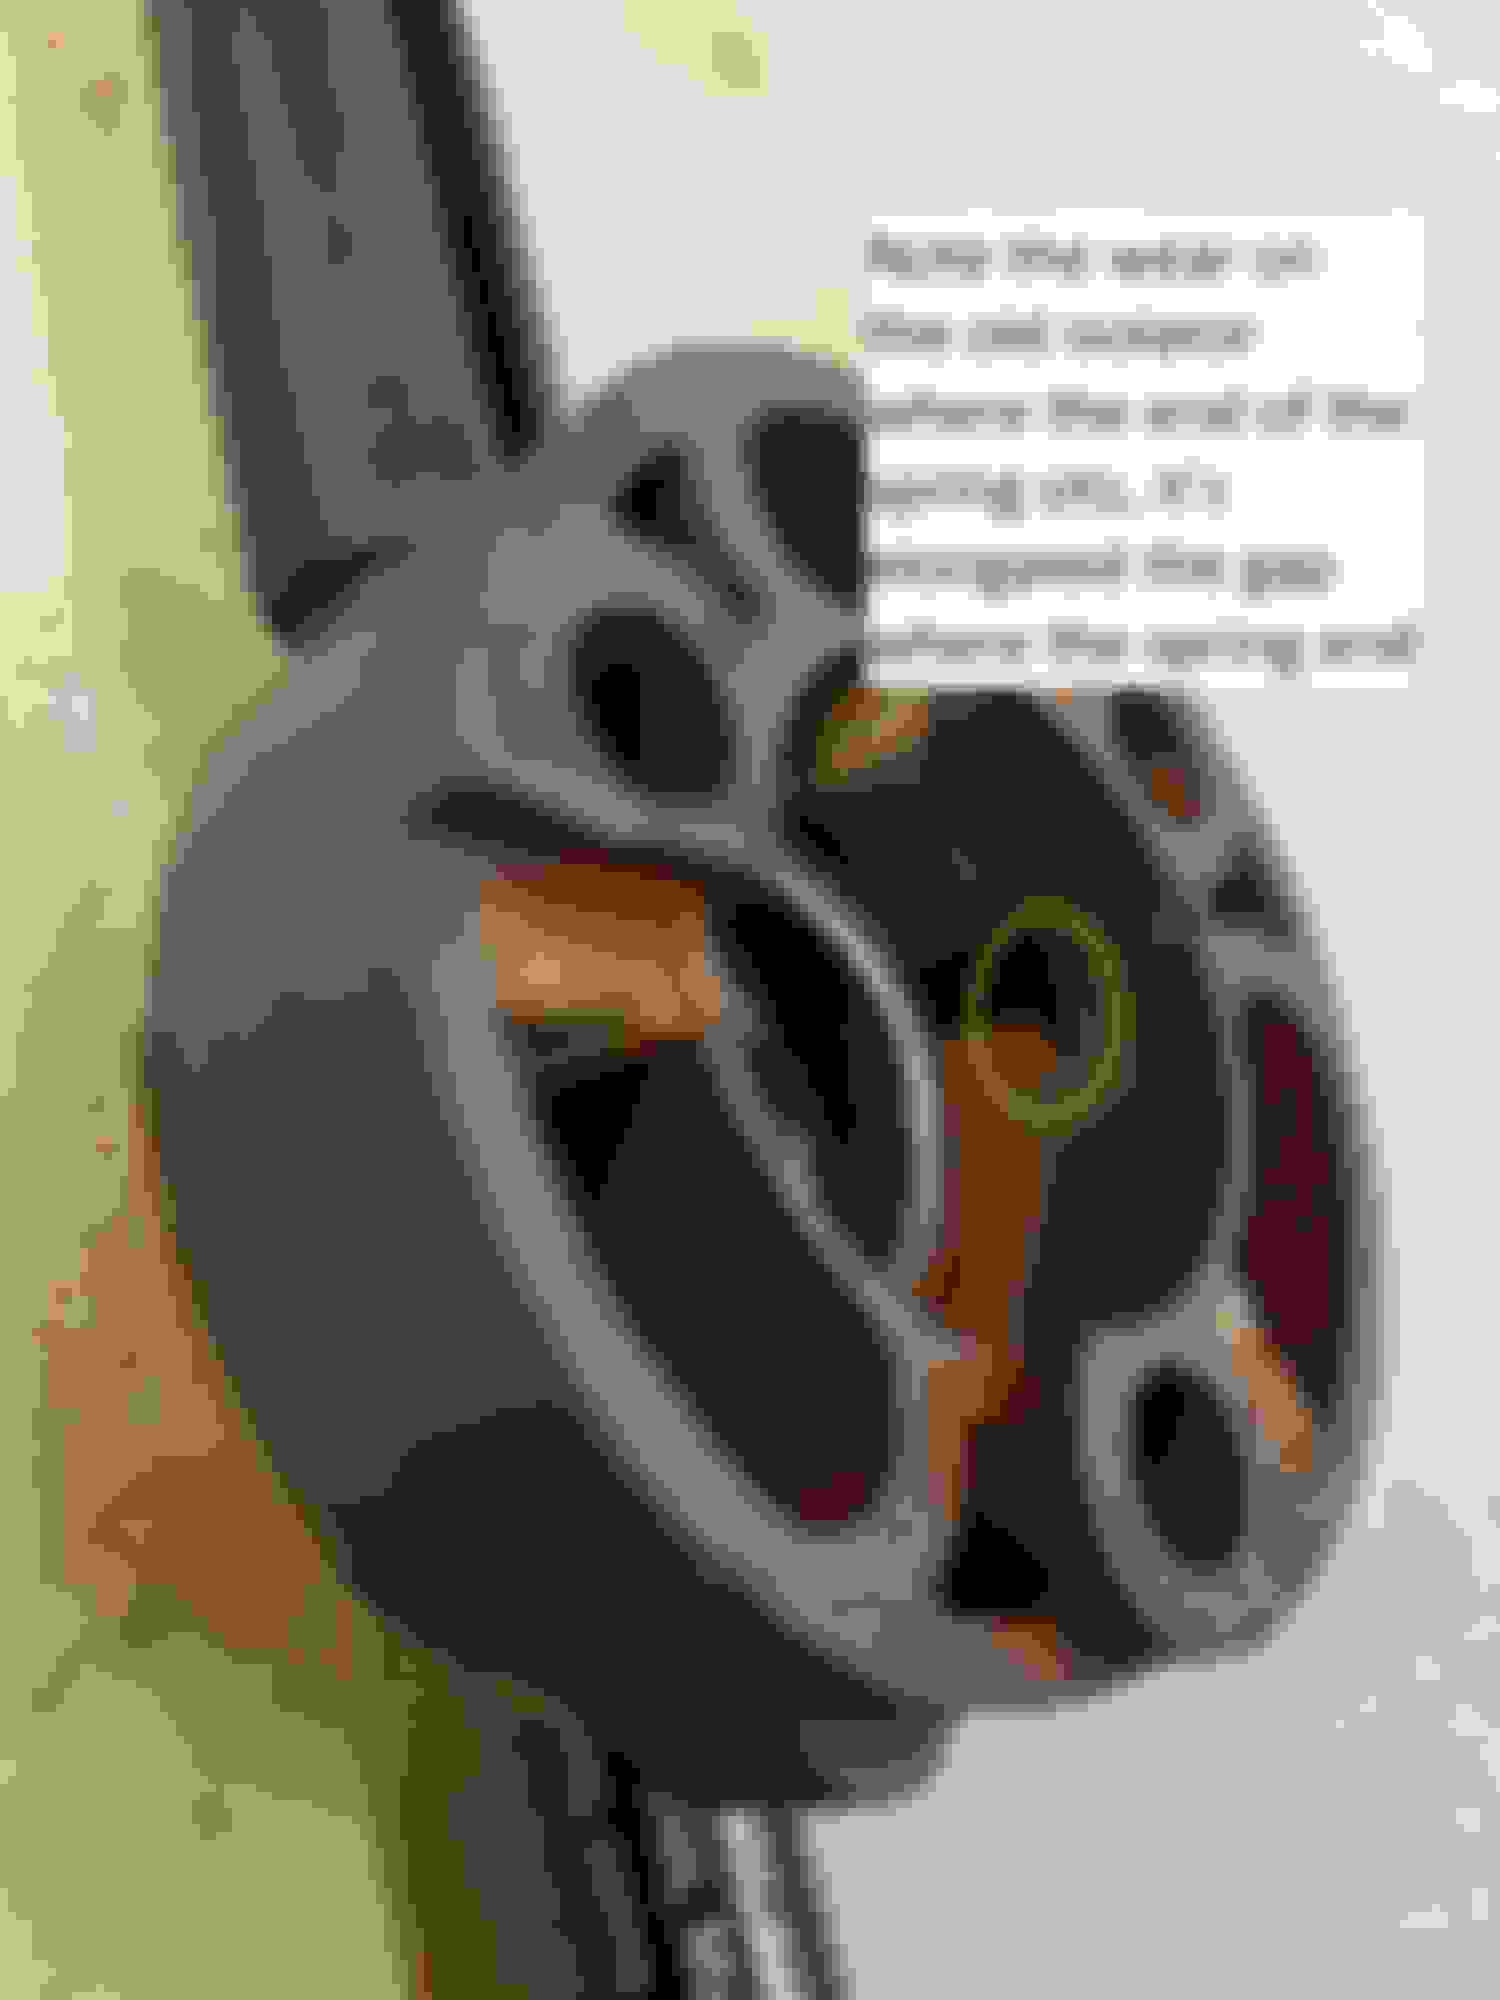
This is the old isolator with the spring inserted showing where the spring was sitting, it show why the pulley was able to flap around a good 20-30 degrees with out even touching the S/C drive shaft. Compare that big gap to what's on the new isolator, this is where the pin for the drive sits and there is a lot more movement allowed here. But how....?
The problem is shown above, the other end of the spring has worn the plastic body of the original isolator and a hole has been made into which the spring end sits. This is allowing the other end of the spring to sit out of position and slack. It also seems to mean that the spring is not sitting where it should be and this end of the spring was showing signs of having been hitting against the centre arm of the pulley and leaving the big gouges/marks that are seen in the OP of this thread.
Not that this is a repair I'll actually undertake (nor should I ever need to anymore, hopefully), but it's helpful to see the problem. Makes perfect sense.
And Lothar: nope, sad to say neglected to record it. I CAN say I didn't have the bag of rocks thing that others report-- what I reported was knocking after engine shut-off that to me sounded exactly like post-ignition from an older engine that was hot and was maybe running low-octane gas. That knockknockknock for about two seconds until it finally wheezed and stopped. THIS is what let them to the supercharger. You can see it as a "reported customer issue" on my invoice, here: https://www.jaguarforums.com/forum/x...nvoice-181671/
Hi Guys,
A most interesting thread I have read right through as I seem to have the same problem. I purchased my XKR 2010 a month ago with the rattle which I was told was normal. It has 57,500 miles on her and the engine rattles like a bag of old marbles when on tick over too.
I have had a good listen with a stethoscope and think the noise is coming from the centre of the supercharger. When revved, the rattle stops when the the ancillary parts are under load whilst revving up, then the rattle returns when the engine is revving down.
I am pretty certain I ned to change the supercharger parts using the spring isolator kit C2D38554.
I have some questions:
1:
Can I change the parts without removing the supercharger?
2:
Where can I find a guide showing me how to do it?
I think it is within my capability but would like to double check before dismantling the supercharger on my drive and getting stuck!
3:
Is this an Eaton supercharger and what model is it?
Also,
I see the bulletin also advises purchasing the left and right gaskets.
4:
Will I need to change the spring and bearings too?
5:
As this seems to be a manufacturing fault, will Jaguar carry out the repair under their warranty scheme (for ever hopeful).
Hi Neville, Sounds like you have it sussed, the symptoms you describe are spot on. Answers below:
I am pretty certain I need to change the supercharger parts using the spring isolator kit C2D38554. - Actually, if you could find the coupler on it's own that's all you actually need to replace, I couldn't so ended up paying �400 for the full kit. I think someone in the states is selling an aftermarket green coupler for the 5.0 s/c. However, I actually checked mine when I was working on it and I'm sure the 4.0 couplers I had laying around after doing the same job on my old 4.0 XKR would do the job as well. But... I wanted the proper spring loaded OEM coupler so ended up buying the full kit anyways.
1:Can I change the parts without removing the supercharger? - No.
2:Where can I find a guide showing me how to do it? - I found a description of the process in a workshop guide for the XFR5.0 S/C that I downloaded from online.
I think it is within my capability but would like to double check before dismantling the supercharger on my drive and getting stuck! - It's actually very straightforward, certainly a far simpler job than on the 4.0 S/C I had done previously.
3:Is this an Eaton supercharger and what model is it? It is, the model number I can't recall just now, have a google specifically and you will find it although it's not really a vital piece of info unless you're going to try and contact Eaton for the coupler on it's own.
Also,I see the bulletin also advises purchasing the left and right gaskets. - I replaced mine as it was recommended, but with hind sight I needn't have, but for a few extra pounds it wasn't worth not changing them.
4:Will I need to change the spring and bearings too? No. The kit contains a complete brand new snout... although it should be noted the snout that I took off was still perfectly smooth, it's the coupler that's worn, not the snout itself.
5:As this seems to be a manufacturing fault, will Jaguar carry out the repair under their warranty scheme (for ever hopeful). - Dream on , the TSB specifically states it as wear and tear.
As to doing the job, when you find the XFR workshop manual you'll see there are some little peg 'guides' mentioned that are used to hold the gaskets in place as you lower the s/c body back on to the top of the engine. I made myself some of these using some suitable bolts and sawing off the top and smoothing off the rough edges. Worked a treat.
Also, the only thing to be careful of is when you lift the S/C, make sure you have removed the coolant pipe coupler that sits just to the side of the snout. If you don't the snout will snag on it and if you're ham-fisted it'll damage the coupler. My lad that was helping me spotted it just before I was about to get a bit 'frustrated' with why the s/c wouldn't some out cleanly! LOL
On mine the coolant overflow/return connector that plugs into the front top of the engine was brittle and snapped when I pulled the connector out. If you can avoid breaking it it'll save you �30 for a new pipe.
I also noted whilst doing mine that one of the coolant pipes down to the thermostat didn't re-seal well so I had to replace that, and the t-piece air input pipe was cracked where it clipped to the throttle housing so I replaced that as well.
The S/C job itself though is actually really easy, takes just a few hours and is mainly nothing more than unbolting and re-fitting the big lump on the top of the engine!
Oh, and make sure you get the correct kit, there are two, one with vacuum control, one with electric control. The TSB tells you which to get for your car, if the S/C on yours has the little bellows canister on the base of the snout you need the vacuum activated kit, the earlier version.
Thank you piersman for your very informative reply. I am still searching for a workshop manual, once found I will get on with the job.
Whilst listening with a stethoscope which was not very successful I moved onto using a long screwdriver stuck into my ear. There was an amazingly loud clicking from the fuel pipes that run across the snout - I assume this is from the injectors but it had me worried for a moment.
Its a shame that I can't just change the coupler by taking the top off the supercharger but I assume that the snout will have to come off to release the coupler. I have my XKR up for sale so I intend buying one of these Jaguar Range Rover Eaton M112 M90 Supercharger Upgrade Drive Coupler Coupling | eBay
which will be a nice cheap option. If I was keeping the car I would probably fit a new snout.
My XKR 150 has the black and speed options. I bought her on a bit of a whim as I thought she looked amazing but upon reflection, I wish I had purchased a more attractive colour with silver wheels. I actually much prefer my 1999X100 convertible which looks much prettier. http://s1159.photobucket.com/user/st...tml?sort=3&o=0
Thanks again.
I am pretty sure you don't have to remove the super charger to replace the snout. The tech's would lift the front of the unit up a little & install the new snout.
Yesterday using a breaker bar I released the pressure of the supercharger belt allowing me to turn the supercharger pulley which had a lot of slack before feeling the rotors turn. About 20 degrees at a guess.
Once the green isolator arrives from America, I will attempt to fit it, or book the car in to my local Indie.
I have read the workshop manual which explains what needs to be done but need more confidence to start the job. Also need to obtain the locating bolts for the gaskets and two new gaskets.
I am not sure if I need to drain down the coolers or not.
Thanks again for all the help given.
Just had the supercharger coupler/snout replaced on my '11 XKR - paid for by my aftermarket warranty company, $1300.00. I'm pretty sure the knocking sound is gone. What throws me is there seems to be another sort of knocking sound that appears to be coming from under the car, maybe related to the exhaust? It fades away after a few minutes. Has anyone else had experience with this sound.
In preparation for the arrival of the green coupler winging its way from USA, I have ordered some inlet gaskets. �20 on Ebay in USA or �6 odd each from my local Jaguar parts department!
Jaguar are unable to supply Supercharger Installation Guide Pins. These are only available for dealers!!!!! I'll have to find some bolts and cut the heads off as mentioned by Piersman. CatScratchForever: I found this in the XKR sales brochure:
The charge cooling effect of the direct-injection fuel system have allowed the compression ratio of the supercharged engine to increase from 9.1;1 to 9.5:1 further optimising fuel economy. During the engine warm-up phase, the combustion system employs multiple injection mode strategies to deliver 50% more heat for fast catalyst warm-up and emissions reduction.
If you put a long screwdriver handle in your ear and the other end on the fuel pipe that runs across the top of the supercharger, you (well I) can hear a loud ticking noise I think is from the injectors, so perhaps it is the injectors that make more noise on warm up. I haven't checked as yet but it seems logical. Worth experimenting.
Thanks for your suggestion. I'll give that a try. I'm thinking it might be something else as it does it even when warm, say, after stopping to fill with fuel and then restarting. Almost a deeper knocking on a piece of steal sound. And if sitting in the car with the driver door open, if you lean out and put your head down towards the rocker it sounds like it's coming from under the vehicle. I'll probably get it back to the dealer and have them start it and raise it to see if something is loose, or if it's just a normal sound related to the exhaust. maybe this noise was already there with the supercharger knock. Someone suggested perhaps a loose piece in either a catalytic converter or the small resonators pulsing at startup.
Wondering if there are any local 5L XKR owners in the Tampa area that might be able to meet up for a quick listen to compare. Perhaps this is normal and I'm just chasing my tail...
Hi Neville, quick picture of the pins I made up below, as you can see I took a standard bolt (m8/m10 I think) and sawed off the head and smoothed the cut edges down. Glad I didn't bother trying to find these online now!
And the coupler you have bought... the advert didn't say it was for the 5.0L. (I think). IIRC when I was looking at getting one sent over the advert I saw specifically stated it was for the 5.0L and was slightly thicker than for previous engines. I just checked the ones I had left over from my old 4.0, they are both 16mm thick. Is yours any thicker than this?
ETA: This link is for a coupler specifically being sold for the 5.0L engines, it's the same seller as you used so might be worth checking the difference with the seller before starting the job! http://www.ebay.co.uk/itm/Oil-Filled...AAAOSwpJJZc5AX
Oh and someone above said the job can be done without removing the s/c from the engine... not possible to do as you can't get to all the bolts attaching the snout to the S/C with it in the car. I'm not going to state this as absolute truth mind, but I can remember having a quick look at doing just this when I was dismantling mine and I'm sure there was 1 or 2 snout bolts that were too deep/obscured to get to with the S/C in position.
Hi Neville, quick picture of the pins I made up below, as you can see I took a standard bolt (m8/m10 I think) and sawed off the head and smoothed the cut edges down. Glad I didn't bother trying to find these online now!
And the coupler you have bought... the advert didn't say it was for the 5.0L. (I think). IIRC when I was looking at getting one sent over the advert I saw specifically stated it was for the 5.0L and was slightly thicker than for previous engines. I just checked the ones I had left over from my old 4.0, they are both 16mm thick. Is yours any thicker than this?
Oh and someone above said the job can be done without removing the s/c from the engine... not possible to do as you can't get to all the bolts attaching the snout to the S/C with it in the car. I'm not going to state this as absolute truth mind, but I can remember having a quick look at doing just this when I was dismantling mine and I'm sure there was 1 or 2 snout bolts that were too deep/obscured to get to with the S/C in position.
Thanks for that. I was going to use some wooden dowels as I noted that Jaguar suggest bolts like yours or unthreaded ones too on their information sheet.
Just building up the courage and waiting for the rain to stop.
If the green coupler is wrong I will get a Jag upgrade part and hang the expense.
I finally finished the job and fired her up to hear a quieter engine. Still not as silky smooth as I would expect a V8 to be but I think a lot of the noise is from the injectors and the exhaust which is designed to be noisy. Next time I have the opportunity I will listen to a younger model with fewer miles - mine has covered 57,500 now.
It was a longer and harder job than I thought, but aren't they all?
There is no way that the snout can be removed with the supercharger still in the car. It was a right pain to remove as it was stuck on with gasket glue and one of the side chambers had to be removed to allow one of the snout fixing bolts to come out.
I followed the advise in the workshop manual and, like Piersman, cut some guide bolts to keep the new gasket in position when lowering the supercharger into place, but as it has to go in at an angle with the nose up to clear a way at the rear, the guide bolts made it more difficult to locate so I took the s/c out again, removed the guides and she slipped in much easier. I just kept the gaskets in place with a nudge with my finger through the inlet ports. There are two locating pins in the centre of the s/c that are a very tight fit making removal a bit scary due to the forces required to remove the pins from the head cover thingy that's in-between the heads.
It must have taken me about 10 hours to get the supercharger on my bench and about six hours all in all to change the torsion isolater and get the car running again. Would have been quicker if I had air tools and the correct tools and if I hadn't dropped my 3/8 to 1/2" square drive adaptor out of the belt tensioner into the under tray which I couldn't retrieve until the end when the engine was running so I could drive the car up my ramps!!!
�16.42 for 2 inlet gaskets and about �22 for the green isolator upgrade part plus about �14 import duty and the job is done.
I had a lot of help and support from Piersman during the operation with a few PMs back and forth which were a great help - big thank you to Piersman. There is not much other help out there on the forums, partly, I guess, due to the 5 litre XKRs still topping the �25K mark, and folk with that money send the car to the workshop, whereas there is a lot of info about removing the 4.2 and 4 litre s/c.
Here are a few photos I took. You can see the shaft has been worn by the spring and the inside of the isolator has worn allowing the spring to move around. There was about 20deg of freeplay. Its not as worn as Piersmans but enough to be really noisey. http://s1159.photobucket.com/user/st...?sort=3&page=1
A little video here.


 , the TSB specifically states it as wear and tear.


