
The great stereo upgrade.


Thread Starter
|
Senior Member
Joined: Nov 2011
Posts: 100
Likes: 7
From: Rossendale
My 2007 XK has the very basic stereo. No subwoofer, nothing. Sounds v v poor.
So, on many threads I've been asking for help, and Bart, especially, has proven v helpful. Also Gn4Hir.
Anyways - it is now all installed - so, here we go - what I did, what pitfalls to watch out for and how to do stuff!
First up:
The new kit
Going into the car I have a 2x100W (rms) power amplifier that is fed by either line in or speaker level inputs. This is a FLI450 unit.
This is powering a Ground Zero Titanium speaker package - 6.5" speakers with tweeters and a cross over included.
This all cost (including new cabling and a few bags of screws which I needed anyways) �168.
The tools you will need (or that I used)
Torx screwdriver set. Specifically T20 and T25 (I think) torx screws.
A drill and selection of wood bits.
10mm spanner.
12mm spanner.
Wire snippers.
Soldering iron.
Heatshring (or electrical tape).
Some 3/4" thick plywood for the new speaker mounts, along with a jig saw.
Some more 3/4" thick ply (or similar, or essentially whatever you have hanging around) for the amplifier mount.
A jig saw (or a coping saw) to make the speaker mounting rings.
Some spade connectors if you wish to avoid breaking into and soldering onto the accessory connector in the boot.
How to do various stuff.
1. How to remove the front door panel.
Wind the window down.
Remove the tweeter mounting plastic thingy. This is just clipped in and pulls out.
Undo the bolt on the end of the door. It is behind a cover that just pulls out - it is clipped in.

Do not undo these bolts. They are nothing to do with removing the front door panel.

Remove two bolts from the underside of the armrest/door pull closing handle thingy.
The door is now just held on with clips. Starting from the bottom pull it away from the door. Everything pulls away. I previously wrote that you then need to lift the panel up off the door. This is not the case - just pull away from the clips.

Refit is the reverse of removal.
Note
Unplugging the electronics cable from the door will mean that you lose your seat memory settings.
2. Removing the rear seats.
The rear seats are *easy* once you know how.
The lower part of the seat (i.e. the bit that you sit your *** on) just lifts up at the front and then slides out.
You can see the yellow clippy things at the front.

Once you've remove both seats, you'll be able to see a torx bolt on each side - undo these and the back of the seat just lifts up and out. Total time for removal - less than 40seconds.
Mr Hobbes likes the rear seat.

Mounting the amp
Others had said "behind the rear seat". Makes sense to me.
On removing the rear seat I noticed two unused bolts in my car - I will use these to mount the amp!
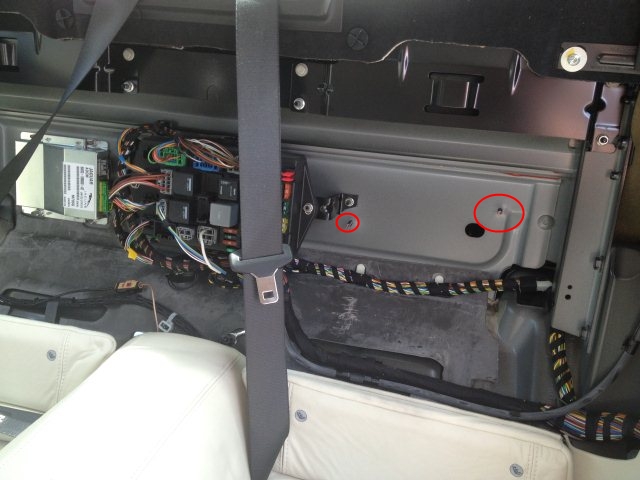
(note, this picture was taken *before* I realised that you should remove the lower part of the seat before struggling and cussing and hurting yourself to get the bolts out for the upper part).
So, with a bit of sawing and cussing I fashioned a mounting plate out of wood.

From here it was easy to run a power lead to the battery and there is a very convenient earth point nearby.

I then struggled for a while to find a switched live - Bart helped me out.
In the boot, under the cover at the left hand side of the car is a molex with nothing connected to it.
The Red/White wire is switched live.


Ok, step 1 done.
Now to run the wires to the front of the car.
This was trivial - until I got to the front of the car - access to the door wiring loom is behind a fusebox on one side and a computer ECU type thing on the other.
After *mucho* cussing and scraping of knuckles (this was seriously, by a long frikking way the hardest part of the job) I had removed the fuse box and the ECU thingy. Good job I have tiny hands. Tiny scuffed hands now. With broken nails.
There is a rubberised sticky pad protecting access to the door bay. I cut through that with a swiss army knife - and then repaired it later with gaffa/duct tape.
As I was using the speaker level input on my amp (see later for more on this) I found the wires to the original speakers and soldered them to the input wires. The OEM tweeter is powered from these with an inline capacitor as a cheap crossover. You can just ignore all that wiring - or leave it in place - it won't be connected to anything.
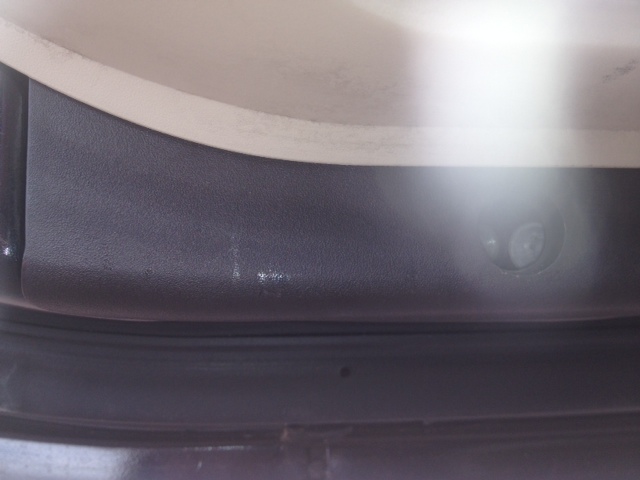
I made a speaker mounting ring by drawing around the OEM 5.25" speaker and cutting it out.
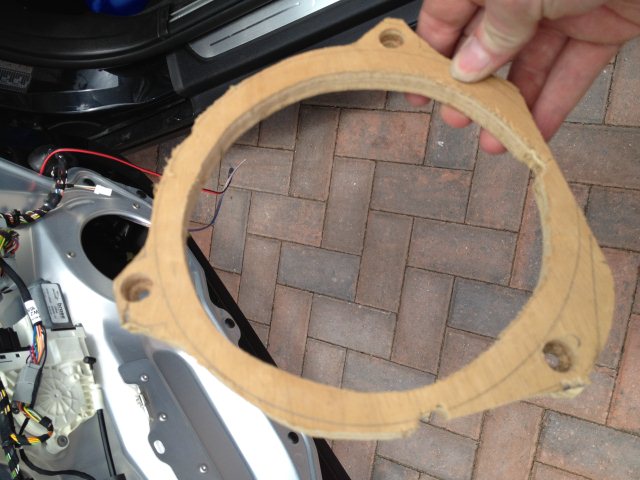

This is about 3/4" thick. It fitted fine and all went back together nicely.
The new tweaters where a smidge bigger than the old ones - so out with the trusty swiss army knife and I just trimmed the plastic till fitted. Luckily the new tweeters have an overhang bit - to hide my cack handed craftwork.

And here is the door all put back together.

Problems and issues
Nothing in life is straight forwards.
I disconnected the battery when I was removing the ECU and fusebox (didn't want to break anything!!). And I then promptly closed the boot. Locking it. Darn. Had to then remove the number plate to get at the key hole to open the boot.
When testing the install at first - please note that it will sound thin and dismal if your speakers are not mounted in the door frames. Don't panic!
On my install at least, at first I was suffering from a *HUGE* amount of RF interference when engine powered up. I checked the cabling - nope, the cabling wasn't an issue (I broke into my wiring and replaced it with shielded cable that I ran outside of the car - same issue). It wasn't the power - I used a different input source (my phone as an MP3 player) - the interference went away. It wasn't grounding issues - I ran cables from the grounds at the front to the ones at the back. No difference. I was started to get a bit at this point, so as a last resort I turned the gain on the amp *way* down and plugged the speaker level input leads into the line level inputs on the amp. Interference gone. Not sure what caused it, but it isn't there. The amp seems to cope just fine with it - I can turn it up to a level louder than I am happy with (i.e. louder than the on-stage level of my 80s hair metal band) and it isn't distorting.
Time taken
All in, this probably took me 9hrs. I reckon I could do the same again in maybe 3hrs. Most of the wasted time was spent investigating "how the f**k does this come apart" and such. And wandering around my garage looking for bits of old wood to use. As an example - the initial wiring to the speakers took me the better part of 2 hours. Today, fixing the RF problem, I replaced all that wiring and did a load of other investigations and built my 4yr old son a railway track for him to play with in 1hr.
Results
At first *I* wasn't that impressed. Or I didn't think I was. Until I faded the system to fully the rear. I hadn't changed the rear speakers don't forget. And my oh my did they sound dull and lifeless and, above all, quiet compared to the new system. I guess I wasn't that impressed because I expect things to sound good - which is why I started on all this. Right now the stereo sounds excellent. Real pounding sound.
It came home to me just how much louder the new system is when a phone call arrived.....nearly took my head off. That and the parking sensors - had to turn the volume *WAY* down on those.
Mrs Manic had a drive and a listen - she was very impressed with how it sounds. The new system is now both loud and clear - loud to the point where you are gonna hurt yourself if you don't turn it down. Whereas previously it was distorted just before it got to that "my this is a good volume" loud.
So, I'm happy.

Hope this is useful!
So, on many threads I've been asking for help, and Bart, especially, has proven v helpful. Also Gn4Hir.
Anyways - it is now all installed - so, here we go - what I did, what pitfalls to watch out for and how to do stuff!
First up:
The new kit
Going into the car I have a 2x100W (rms) power amplifier that is fed by either line in or speaker level inputs. This is a FLI450 unit.
This is powering a Ground Zero Titanium speaker package - 6.5" speakers with tweeters and a cross over included.
This all cost (including new cabling and a few bags of screws which I needed anyways) �168.
The tools you will need (or that I used)
Torx screwdriver set. Specifically T20 and T25 (I think) torx screws.
A drill and selection of wood bits.
10mm spanner.
12mm spanner.
Wire snippers.
Soldering iron.
Heatshring (or electrical tape).
Some 3/4" thick plywood for the new speaker mounts, along with a jig saw.
Some more 3/4" thick ply (or similar, or essentially whatever you have hanging around) for the amplifier mount.
A jig saw (or a coping saw) to make the speaker mounting rings.
Some spade connectors if you wish to avoid breaking into and soldering onto the accessory connector in the boot.
How to do various stuff.
1. How to remove the front door panel.
Wind the window down.
Remove the tweeter mounting plastic thingy. This is just clipped in and pulls out.
Undo the bolt on the end of the door. It is behind a cover that just pulls out - it is clipped in.
Do not undo these bolts. They are nothing to do with removing the front door panel.
Remove two bolts from the underside of the armrest/door pull closing handle thingy.
The door is now just held on with clips. Starting from the bottom pull it away from the door. Everything pulls away. I previously wrote that you then need to lift the panel up off the door. This is not the case - just pull away from the clips.
Refit is the reverse of removal.
Note
Unplugging the electronics cable from the door will mean that you lose your seat memory settings.
2. Removing the rear seats.
The rear seats are *easy* once you know how.
The lower part of the seat (i.e. the bit that you sit your *** on) just lifts up at the front and then slides out.
You can see the yellow clippy things at the front.
Once you've remove both seats, you'll be able to see a torx bolt on each side - undo these and the back of the seat just lifts up and out. Total time for removal - less than 40seconds.
Mr Hobbes likes the rear seat.
Mounting the amp
Others had said "behind the rear seat". Makes sense to me.
On removing the rear seat I noticed two unused bolts in my car - I will use these to mount the amp!
(note, this picture was taken *before* I realised that you should remove the lower part of the seat before struggling and cussing and hurting yourself to get the bolts out for the upper part).
So, with a bit of sawing and cussing I fashioned a mounting plate out of wood.
From here it was easy to run a power lead to the battery and there is a very convenient earth point nearby.
I then struggled for a while to find a switched live - Bart helped me out.
In the boot, under the cover at the left hand side of the car is a molex with nothing connected to it.
The Red/White wire is switched live.
Ok, step 1 done.
Now to run the wires to the front of the car.
This was trivial - until I got to the front of the car - access to the door wiring loom is behind a fusebox on one side and a computer ECU type thing on the other.
After *mucho* cussing and scraping of knuckles (this was seriously, by a long frikking way the hardest part of the job) I had removed the fuse box and the ECU thingy. Good job I have tiny hands. Tiny scuffed hands now. With broken nails.
There is a rubberised sticky pad protecting access to the door bay. I cut through that with a swiss army knife - and then repaired it later with gaffa/duct tape.
As I was using the speaker level input on my amp (see later for more on this) I found the wires to the original speakers and soldered them to the input wires. The OEM tweeter is powered from these with an inline capacitor as a cheap crossover. You can just ignore all that wiring - or leave it in place - it won't be connected to anything.
I made a speaker mounting ring by drawing around the OEM 5.25" speaker and cutting it out.
This is about 3/4" thick. It fitted fine and all went back together nicely.
The new tweaters where a smidge bigger than the old ones - so out with the trusty swiss army knife and I just trimmed the plastic till fitted. Luckily the new tweeters have an overhang bit - to hide my cack handed craftwork.
And here is the door all put back together.
Problems and issues
Nothing in life is straight forwards.
I disconnected the battery when I was removing the ECU and fusebox (didn't want to break anything!!). And I then promptly closed the boot. Locking it. Darn. Had to then remove the number plate to get at the key hole to open the boot.
When testing the install at first - please note that it will sound thin and dismal if your speakers are not mounted in the door frames. Don't panic!
On my install at least, at first I was suffering from a *HUGE* amount of RF interference when engine powered up. I checked the cabling - nope, the cabling wasn't an issue (I broke into my wiring and replaced it with shielded cable that I ran outside of the car - same issue). It wasn't the power - I used a different input source (my phone as an MP3 player) - the interference went away. It wasn't grounding issues - I ran cables from the grounds at the front to the ones at the back. No difference. I was started to get a bit
Time taken
All in, this probably took me 9hrs. I reckon I could do the same again in maybe 3hrs. Most of the wasted time was spent investigating "how the f**k does this come apart" and such. And wandering around my garage looking for bits of old wood to use. As an example - the initial wiring to the speakers took me the better part of 2 hours. Today, fixing the RF problem, I replaced all that wiring and did a load of other investigations and built my 4yr old son a railway track for him to play with in 1hr.
Results
At first *I* wasn't that impressed. Or I didn't think I was. Until I faded the system to fully the rear. I hadn't changed the rear speakers don't forget. And my oh my did they sound dull and lifeless and, above all, quiet compared to the new system. I guess I wasn't that impressed because I expect things to sound good - which is why I started on all this. Right now the stereo sounds excellent. Real pounding sound.
It came home to me just how much louder the new system is when a phone call arrived.....nearly took my head off. That and the parking sensors - had to turn the volume *WAY* down on those.
Mrs Manic had a drive and a listen - she was very impressed with how it sounds. The new system is now both loud and clear - loud to the point where you are gonna hurt yourself if you don't turn it down. Whereas previously it was distorted just before it got to that "my this is a good volume" loud.
So, I'm happy.
Hope this is useful!
Last edited by manicguitarist; Jun 2, 2012 at 05:24 PM.


Junior Member
Joined: Jan 2012
Posts: 17
Likes: 0
From: UK
Manic
I will review carefully as I wish to do something very similar.
My initial thought after looking at your excellent photos - is the switched feed of sufficient SWG thickness to feed a 450w amp? In the picture it looks quite a bit thinner than the blue cable you used, and did you put in an inline fuse to protect the existing wiring?
Also did you take a photo of the new 6.5" speakers screwed in place into the doors, or did you attach these to the door card as you had originally planned? If so how did you do that?
Thanks
Ed
Last edited by Rouseslane; Jun 3, 2012 at 01:39 AM.
Thread Starter
|
Senior Member
Joined: Nov 2011
Posts: 100
Likes: 7
From: Rossendale
Manic
I will review carefully as I wish to do something very similar.
My initial thought after looking at your excellent photos - is the switched feed of sufficient SWG thickness to feed a 450w amp? In the picture it looks quite a bit thinner than the blue cable you used, and did you put in an inline fuse to protect the existing wiring?
Also did you take a photo of the new 6.5" speakers screwed in place into the doors, or did you attach these to the door card as you had originally planned? If so how did you do that?
Thanks
Ed
I will review carefully as I wish to do something very similar.
My initial thought after looking at your excellent photos - is the switched feed of sufficient SWG thickness to feed a 450w amp? In the picture it looks quite a bit thinner than the blue cable you used, and did you put in an inline fuse to protect the existing wiring?
Also did you take a photo of the new 6.5" speakers screwed in place into the doors, or did you attach these to the door card as you had originally planned? If so how did you do that?
Thanks
Ed
I didn't take a photo of the speakers in place. The are screwed directly to the wooden mounting rings, and not the door card. I figured that this would sound better , also keeps it looking stock.
Junior Member
Joined: Jan 2012
Posts: 17
Likes: 0
From: UK
Thanks manic
That's great info.
One more question, if you made the new wooden speaker spacers by drawing round the stock 5 1/4" speakers,then how did you then screw your new 6 1/2" speakers into these? They would be too small ?
Once again, thanks for the info, I will be doing this job next month.
Cheers
Ed
That's great info.
One more question, if you made the new wooden speaker spacers by drawing round the stock 5 1/4" speakers,then how did you then screw your new 6 1/2" speakers into these? They would be too small ?
Once again, thanks for the info, I will be doing this job next month.
Cheers
Ed
Thread Starter
|
Senior Member
Joined: Nov 2011
Posts: 100
Likes: 7
From: Rossendale
Thanks manic
That's great info.
One more question, if you made the new wooden speaker spacers by drawing round the stock 5 1/4" speakers,then how did you then screw your new 6 1/2" speakers into these? They would be too small ?
Once again, thanks for the info, I will be doing this job next month.
Cheers
Ed
That's great info.
One more question, if you made the new wooden speaker spacers by drawing round the stock 5 1/4" speakers,then how did you then screw your new 6 1/2" speakers into these? They would be too small ?
Once again, thanks for the info, I will be doing this job next month.
Cheers
Ed
The old speaker mounts are huge - that is the outside of the mounting ring, with the holes for the bolts etc. The inner circle is where the new speaker goes - a template came with the speakers.
I sawed out the new template first, the dropped the old speakers and their mounts into the holes and then drew around those for the outside of the ring. Hope that makes sense, if not, please ask more!!
Junior Member
Joined: Jan 2012
Posts: 17
Likes: 0
From: UK
Thanks, so you ran a 4 core speaker cable from that amp to the new door speakers. 2 cores to connect to the original feed as the amp input, and 2 cores as the amp output?
The bit I am worried about is getting this 4 core wire through the door hinge rubber grommets, sounds like you too had a challenge here.
A really great upgrade though.
What's the bass like from the new front speakers ? do you wish you had put a small subwoofer tube in the boot? Nothing over the top, I don't want the boy racer sound, just a bit more bass than stock.
Trending Topics
Thread Starter
|
Senior Member
Joined: Nov 2011
Posts: 100
Likes: 7
From: Rossendale
Thanks, so you ran a 4 core speaker cable from that amp to the new door speakers. 2 cores to connect to the original feed as the amp input, and 2 cores as the amp output?
The bit I am worried about is getting this 4 core wire through the door hinge rubber grommets, sounds like you too had a challenge here.
A really great upgrade though.
What's the bass like from the new front speakers ? do you wish you had put a small subwoofer tube in the boot? Nothing over the top, I don't want the boy racer sound, just a bit more bass than stock.
The bit I am worried about is getting this 4 core wire through the door hinge rubber grommets, sounds like you too had a challenge here.
A really great upgrade though.
What's the bass like from the new front speakers ? do you wish you had put a small subwoofer tube in the boot? Nothing over the top, I don't want the boy racer sound, just a bit more bass than stock.
I actually ran 2 x 2 core cables. Plenty of room in rubber grommet- hard part was removing the fuse box and ecu.
Plenty of bass now for the kind of music I like.
Thread Starter
|
Senior Member
Joined: Nov 2011
Posts: 100
Likes: 7
From: Rossendale
Dunno. It wouldn't have cost much more to get a 4+1 channel amp and upgrade all the speakers and put a sub woofer in somewhere. Wouldn't have been much harder either - the rear speakers are very accessible compared to the front ones.

Senior Member
Joined: Dec 2011
Posts: 150
Likes: 39
From: Missouri
Well done, you've got a lot of guts pulling apart a car as nice as yours. I completely stripped out the interior of my last car to do a stereo upgrade etc., but I don't think I'd be able to take apart my XK.
Seems strange that you get interference from only one input source? I know on my install, I was getting some alternator noise (sounds like a ticking over the speakers that increases with engine RPM). It was happening because I spliced into the stock wiring harness under the driver's seat. I had just so happened to run the power cable from the battery (engine compartment) to the amp (in the trunk) and it came too close to the line level outputs from the headunit as they went from the console to under the seat. So... I'm not sure if that is what you might be dealing with, or even if you want to experiment with it, but certainly if a signal cable is close to your power cable and you're hearing a ticking-type interference, you're probably hearing the alternator.
I solved my problem the same way you addressed your issue though... turning down the gain on the amp until I couldn't hear any ticking with my ear pressed against the tweeter, so I figured I'd mention it.


Junior Member
Joined: Mar 2013
Posts: 1
Likes: 0
From: Paris( France)
Excuse me for my english, I am french ...You say :"I found the wires to the original speakers and soldered them to the input wires " My question is where did you fine them ? directly at the bottom of the speakers or is there an easier possibility ?
Thanks a lot for the pictures
Thanks a lot for the pictures
Thread Starter
|
Senior Member
Joined: Nov 2011
Posts: 100
Likes: 7
From: Rossendale
Excuse me for my english, I am french ...You say :"I found the wires to the original speakers and soldered them to the input wires " My question is where did you fine them ? directly at the bottom of the speakers or is there an easier possibility ?
Thanks a lot for the pictures
Thanks a lot for the pictures

Thread
Thread Starter
Forum
Replies
Last Post
adam699
XJ XJ6 / XJ8 / XJR ( X350 & X358 )
6
Sep 12, 2015 05:32 PM
Currently Active Users Viewing This Thread: 1 (0 members and 1 guests)