
How difficult is chrome mesh grill install?


Thread Starter
|
Junior Member
Joined: Dec 2010
Posts: 4
Likes: 0
From: PA
I want to install upper and lower chrome mesh grills on my 07 XK. Is this a difficult install or a simple bolt-on? Dealer wants about $550 to install them.

Junior Member
Joined: Dec 2007
Posts: 17
Likes: 2
I had a large tarp on the ground on which I set the cover. From here you'll easily see how the grilles go on.
A power drill with the right socket attachments is a must!!!!!!!!!!!!!
Last edited by hooutoo; Mar 10, 2011 at 04:54 AM.

Veteran Member
Joined: Aug 2010
Posts: 2,367
Likes: 601
From: California
Does anyone have pictures of a chromed mesh grille installed on an XK with a darker paint scheme? I think it would look fantastic on my XK with the brilliant Emerald Fire color but, some pictures would help me decide.
One of these days I will even accumulate enough posts here to actually see pictures... been here for years now!
thanks,
Albert
One of these days I will even accumulate enough posts here to actually see pictures... been here for years now!
thanks,
Albert
Member
Joined: Sep 2010
Posts: 54
Likes: 1
From: Northern CA
Well come on man, get posting. It's not that difficult!

Junior Member
Joined: Apr 2011
Posts: 14
Likes: 0
From: TX
Trending Topics

Senior Member
Joined: Mar 2011
Posts: 210
Likes: 9
From: Illinois
Does anyone have pictures of a chromed mesh grille installed on an XK with a darker paint scheme? I think it would look fantastic on my XK with the brilliant Emerald Fire color but, some pictures would help me decide.
One of these days I will even accumulate enough posts here to actually see pictures... been here for years now!
thanks,
Albert
One of these days I will even accumulate enough posts here to actually see pictures... been here for years now!
thanks,
Albert
Tom
Senior Member
Joined: Mar 2011
Posts: 210
Likes: 9
From: Illinois
Does anyone have pictures of a chromed mesh grille installed on an XK with a darker paint scheme? I think it would look fantastic on my XK with the brilliant Emerald Fire color but, some pictures would help me decide.
One of these days I will even accumulate enough posts here to actually see pictures... been here for years now!
thanks,
Albert
One of these days I will even accumulate enough posts here to actually see pictures... been here for years now!
thanks,
Albert
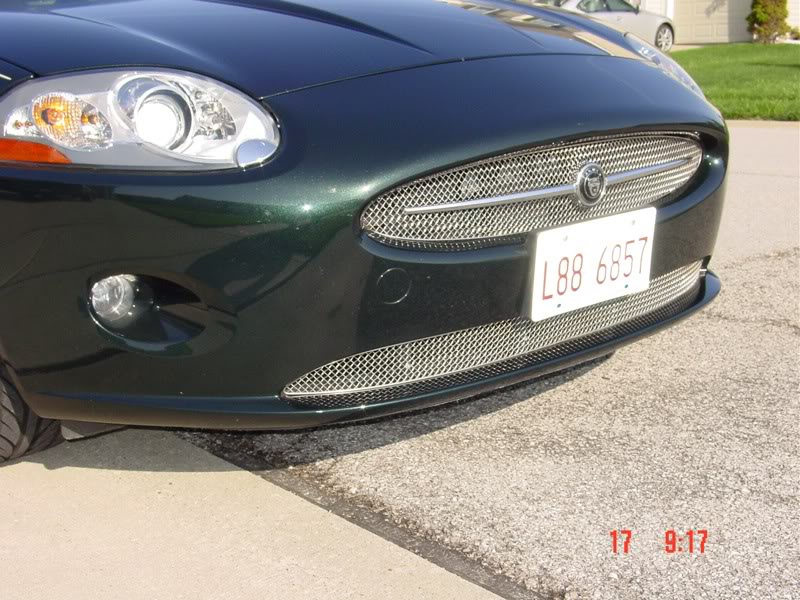
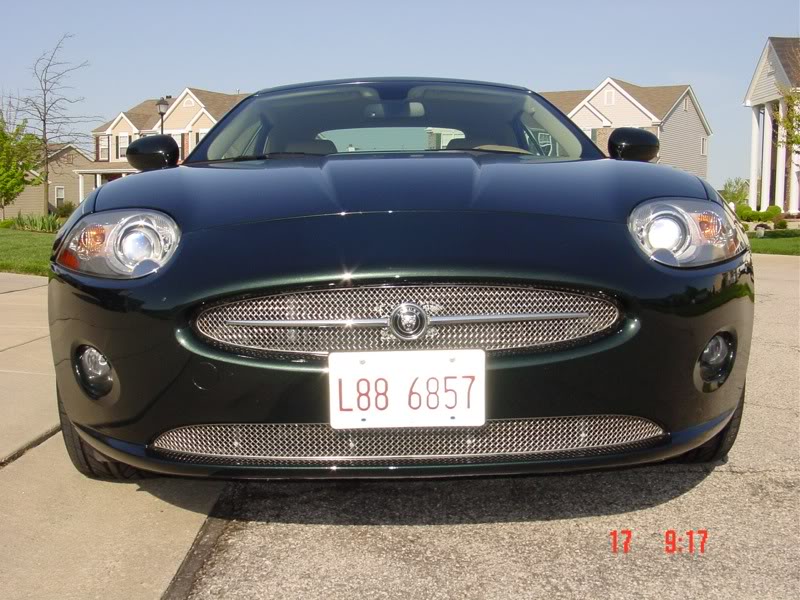
Hope this is what you were looking for, and forgive all the bugs rain is in the forecast and I opted not to ZAINO it today.
Tom
Veteran Member
Joined: Aug 2010
Posts: 2,367
Likes: 601
From: California
Tom
Thanks a million for taking the time and posting the pictures. Your car looks great with the grill. I assume it is the stainless and not chromed.
In the meantime I decided also to go ahead and get the stainless grill from MinaGallery for my '08 XK. It installed in minutes, right on top of the original grill with a few 4mm stainless screws. Those screws are nearly invisible from any viewing distance and I am super happy with the way the bright grille works on the Pearl British Racing Green (Emerald Fire) paint. At this point I only installed the upper grille, wishing to emphasize the upper intake.
I even went ahead and ordered from MinaGallery the chromed side vent covers that simply go on top of the factory ones with double sided tape. I was apprehensive about that kind of installation but, to my surprise, the Mina trim is beveled very nicely and looks totally stock and natural on the car. Again, it added an other jewel-like quality to the beautiful dark green color.
Thanks again for posting. Your car looks spectacular. Enjoy!!!
Albert

Junior Member
Joined: Jun 2011
Posts: 7
Likes: 0
From: Jersey
axr6 (Albert)...I just picked up my Mina Grille (stainless steel mesh). From what I've read and heard its simple to put on. I have the unfair disadvantage of being unskilled when it comes to anything involving tools. Can you tell me how you installed the upper and lower grille. Either here or to my email mr_thybulle@yahoo.com Would love to get it done right the first time. Thanks!
Veteran Member
Joined: Aug 2010
Posts: 2,367
Likes: 601
From: California
axr6 (Albert)...I just picked up my Mina Grille (stainless steel mesh). From what I've read and heard its simple to put on. I have the unfair disadvantage of being unskilled when it comes to anything involving tools. Can you tell me how you installed the upper and lower grille. Either here or to my email mr_thybulle@yahoo.com Would love to get it done right the first time. Thanks!
Thus, it is best to pre-drill the holes into the factory plastic mesh. Even then you will find it takes some effort to drive the screws all the way in. Make sure you use a fair amount of pressure on the screwdriver as I found that it had a tendency of wanting to spin-out of the Phillips head, rounding off the metal edges and make it impossible to turn anymore.
I used 8 screws to mount the upper grille, two on the far left-and-right and the rest divided top and bottom. You have to drill and screw into what ever solid plastic surface you see, mostly at the intersections of the grill plastic, not much because the factory grill is thin plastic. But, if you center your drill the best you can, it will be enough. Mine has now been mounted for a while, driven about 1500 miles and looks fine. The one thing I suggest is not to over-tighten the screws as they may distort the mesh and pull through it, instead of holding it down.
I did not purchase the lower grill but, the same pre-drill routine should apply. You actually have more solid mounting surfaces there for the screws. I would do that part first to get a feeling for the drill-screw process.
They sent a bunch of stainless screws with my grill, no reason to use them all. I'd say, 8 for the upper and 8 for the lower should be more than enough. Once you mount with those small 4 mm screws, they will not be obvious when looking at the car from even short distances.
Hope this helps,
Albert
Junior Member
Joined: Jun 2011
Posts: 7
Likes: 0
From: Jersey
Thanks Albert.....before I posted my original post I lined up the new grille with the factory, and couldnt for the life of me could see how this would work. I'm going to try it your way in the a.m . I was sent my grille with no instructions, so you can imagine my frustration.
Thanks again...I'll let you know how things go.
Randy
Thanks again...I'll let you know how things go.
Randy
Veteran Member
Joined: Aug 2010
Posts: 2,367
Likes: 601
From: California
You are very welcome.
Mine had no instructions either so, I immediately called the owner at Mina. I had a hard time to figure out exactly what surfaces I should screw into. Not much obvious surface for that. But, like I said, if you drill and screw into the junction points of the grill, it will hold fine.
I drilled the far left and far right screws at a bit of an angle (screws pointing to the outside fender directions) so I could find max surface area for the screws to grab into. Those two are the most important ones for making a nicely curved, solid fit.
Albert
Veteran Member
Joined: Aug 2010
Posts: 2,367
Likes: 601
From: California
Albert

Senior Member


Joined: Oct 2009
Posts: 422
Likes: 46
From: NJ, USA
All I can say is it was a piece of cake, took about 2 hours. I just installed them a couple of weeks ago. I used a floor jack and a couple of jack stands to get the car off the ground, then took the tires off the car. Next removed the front splash pan and from there it goes fast. Remove about six or so bolts from the fender linings in the front of the linings. You don't need to take them all out cause you just need to pull the front of the lining back to remove the 3 or 4 bolts (can't remember) that hold the bumper guard on the body. Then open the hood and take the 4 or 5 bolts out that hold it to the body on the top. You'll need to gently pry the 3 tabs next to these bolts loose from the body. These are used to sort of snap the top of the bumper cover to the body. The bumper cover was initially put on via a couple of guides that are on the front left and right corners on the body that fit into grooves on the bumper. Gently start to work the cover back away from the body until its loose. Don't try to go too fast here. Slowly will show you if you've missed any bolts and you dam sure don't want to chip any paint.
I had a large tarp on the ground on which I set the cover. From here you'll easily see how the grilles go on.
A power drill with the right socket attachments is a must!!!!!!!!!!!!!
I had a large tarp on the ground on which I set the cover. From here you'll easily see how the grilles go on.
A power drill with the right socket attachments is a must!!!!!!!!!!!!!

Senior Member
Joined: Oct 2012
Posts: 474
Likes: 99
From: Maui
I heard from Mina, if you have the Ford Taurus bar you have to destroy it to get it off being careful using large pliers etc. It's just plastic. Then the new grill comes with a new round button emblem. This allows it to sit flush up against the old grill.