When you click on links to various merchants on this site and make a purchase, this can result in this site earning a commission. Affiliate programs and affiliations include, but are not limited to, the eBay Partner Network.
How to fix the blower motor resistor module for $5
I am suffering through the typical a/c condensate draining into the passenger foot well on my 2010 XKR due to a blocked a/c duck bill even though my 2010 XKR has a late VIN after the duckbill issue was allegedly fixed. During this process, the water leaking onto the blower motor caused the blower system to fail so that when I turned the blower dial, no air came out of the vents even though the blower 'bars' were appearing on the infoscreen.
Since the choice is to go to the dealership and spend hundreds of $ to have the issue diagnosed and fixed or order a $170 resistor module online, I thought I'd take a go at fixing it myself for the princely sum of $4.50 plus about an hour of my time.
To fix the controller, you will need a short Phillips screwdriver, a flat blade screwdriver, a small electrical screwdriver or craft/box knife blade, a pair of interior clip pliers, needle nosed pliers/tweezers, an electrical meter, a soldering iron and solder, a de-soldering tool and a replacement thermal fuse available from Amazon.com using the link below:
When the blower motor fails (i.e., you turn the dial in the dashboard and the 'bars' on the blower appear on the infoscreen but there is no air coming out of the blower), then check the following:
Diagnosing the resistor/controller as the cause of the failure
1. First check is the orange 40 amp fuse located between the rear seats - check it visually and also with the continuity test on the electrical meter to make sure it hasn't failed.
2. If the 40 amp fuse is OK, then check that the blower motor is getting power.
3. Remove the black felt like trim panel from the upper part of the passenger side foot well. You may need to remove the plastic trim panel that covers the inside of the passenger door sill (where the carpet meets the rubber door seal) by gently prying it upwards from the front as well as removing the plastic vertical trim panel that covers the outside side of the passenger side foot well. This panel comes out by pulling it backwards towards the passenger seat.
4. To remove the black felt trim panel that covers the blower motor, there are three 1" long oblong plastic clips on the front edge where it meets the glove box. The clips compress length ways using the trim clip pliers and can be rotated down and out of their holes. They are quite temperamental to remove, even with a pair of trim pliers, so be patient.
5. With the clips removed, the felt pad panel should drop down into the footwell and can be removed.
6. The blower motor is mounted vertically and has a 2 wire connector attached to it - remove this connector and put the probes of the electrical meter into the plug on the harness (non motor) side of the wiring. Set the meter to read volts DC, switch on the ignition and switch the blower motor on using the rotary dial - if the meter reads between 10-12V DC, then the motor or the resistor/controller are at fault as there is power making it to the motor. Turn the ignition off before continuing.
7. I then removed the blower motor by undoing the three securing screws with the flat blade screwdriver (the screws are also hex head so you can use a socket if available).
8. When I dropped the blower motor, I noticed that the fan cage had seized from the water dropping onto the motor however I was able to easily rotate it by hand and free it up without too much pressure (I think this happened when I switched the a/c off when the problem occurred as the non-rotating blower allowed the blower shaft to seize slightly).
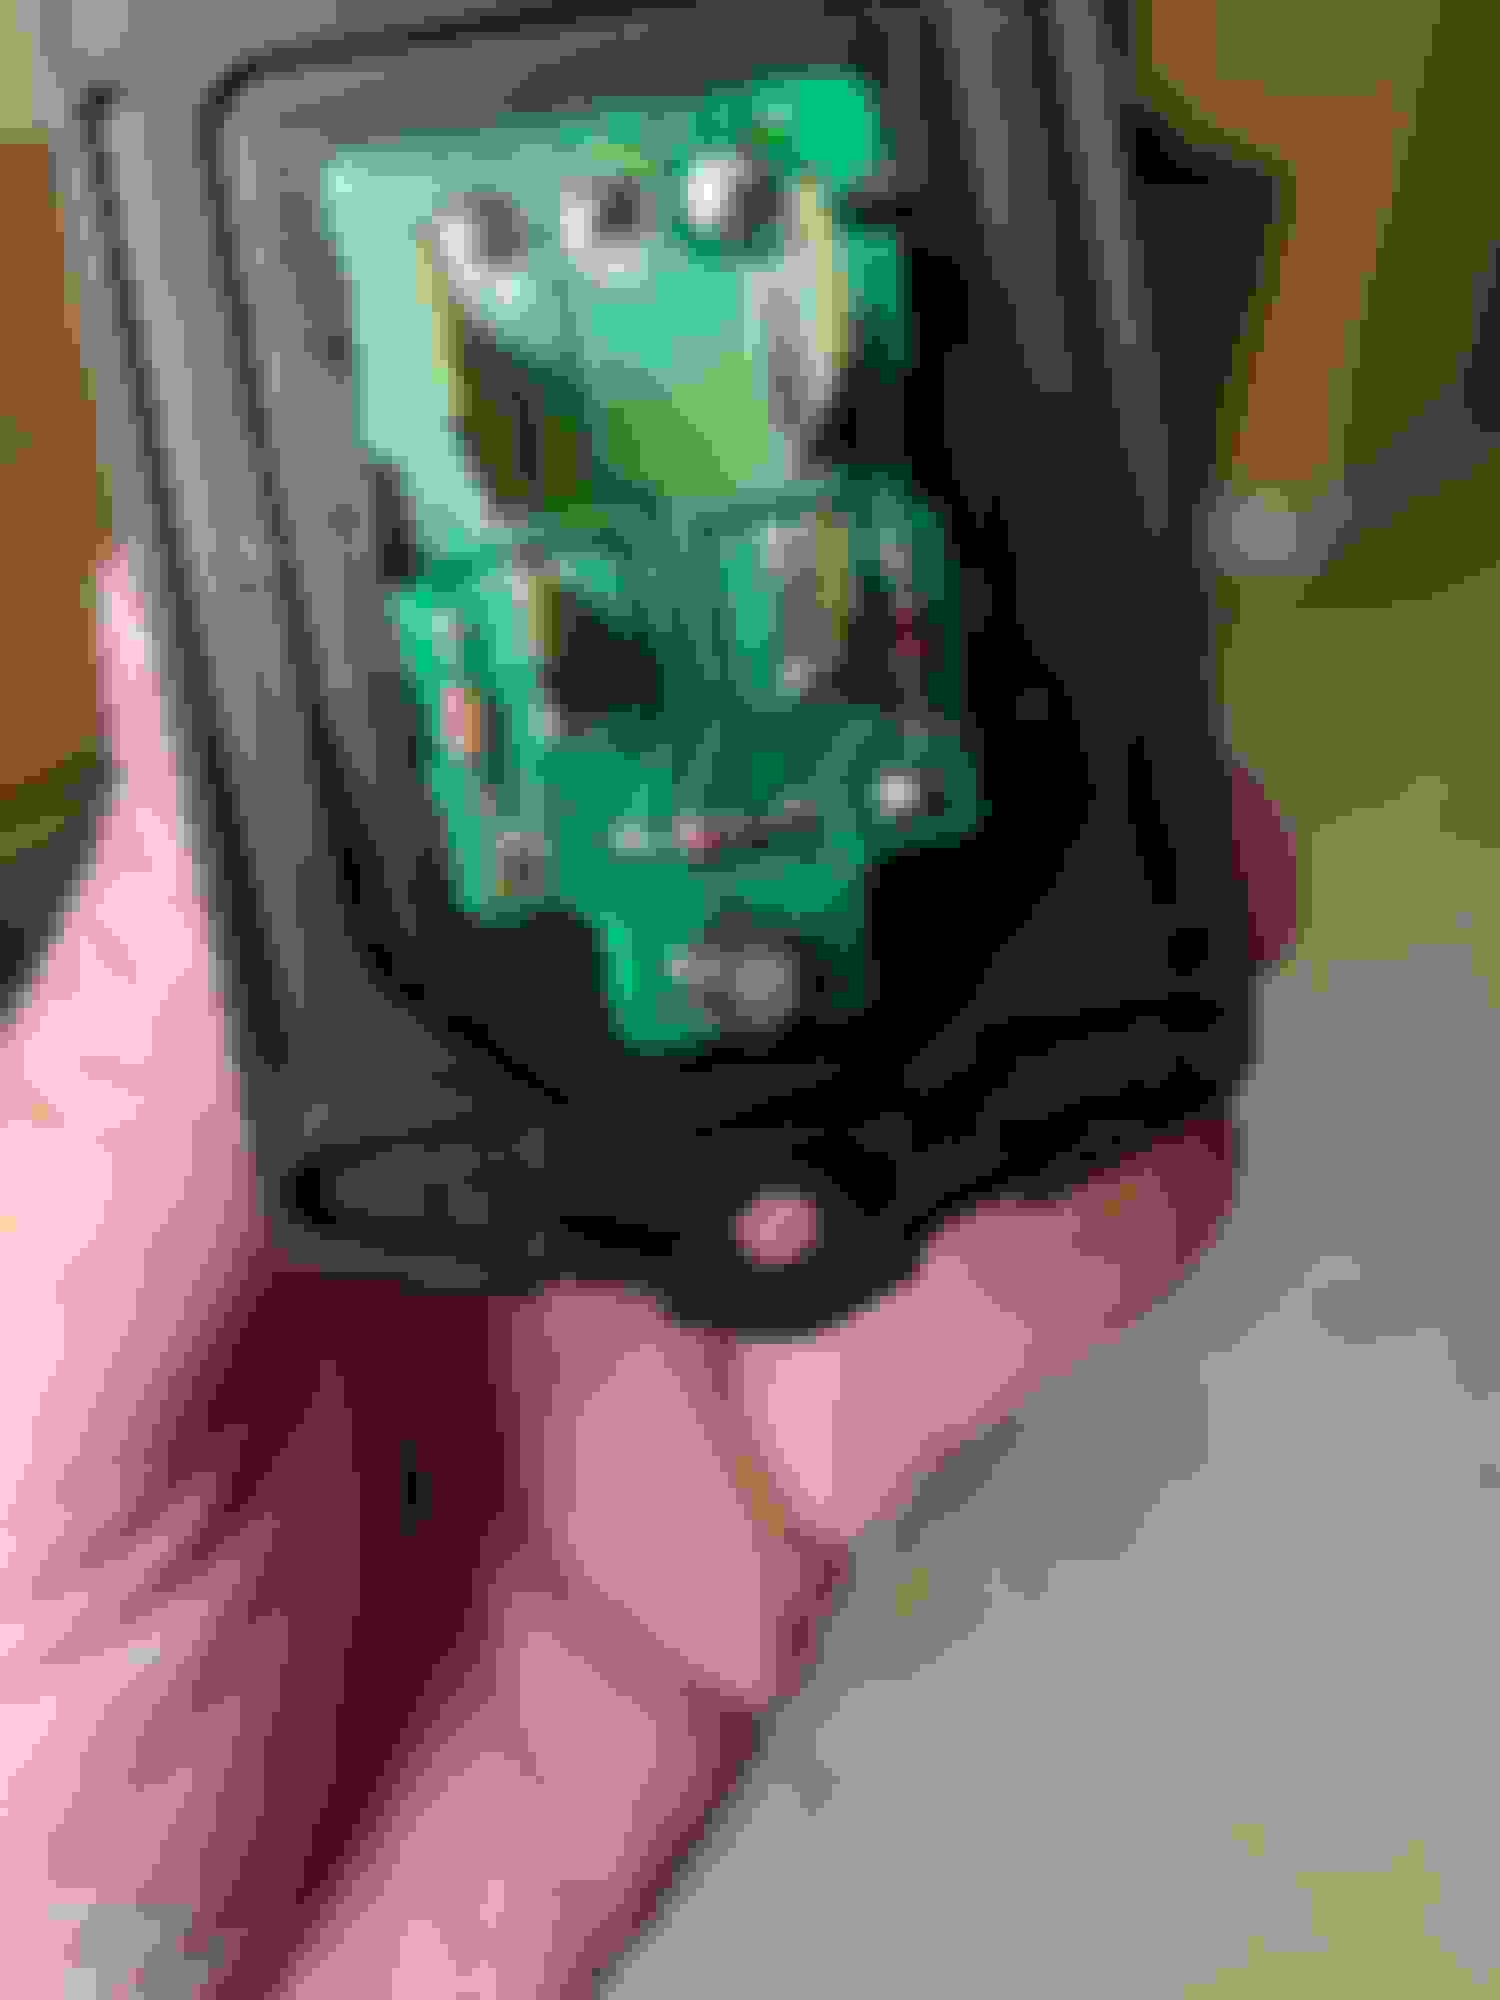
Removing and repairing the a/c blower resistor/controller So if the fuse is OK and the blower motor fan will rotate freely, the next stop is the blower resistor. This is located beside the blower motor and mounted slightly behind the small foot well bulb (on US left hand drive cars). It was a light grey color on my car, about 2 1/2" long and 1 1/2" high and held in by two Phillips screws.
1. Remove the two Phillips screws and remove the blower resistor module from the blower box. It has a metal heat sink on the underside.
2. Remove the wiring harness clip from the blower motor resistor module.
Repairing the blower motor resistor module
With the blower resistor out of the car, you will see that it looks like one of those 'non serviceable parts' that has to be replaced as a unit. To service it, do the following:
1. The upper light grey section that can be seen from inside the foot well has four plastic tabs that clip it to the lower section that holds the heat sink. Using a small electrical screwdriver, gently pry each of these outwards working one end and then the other, while gently applying some pressure with the craft knife blade in the seam beside the clip. It doesn't take much pressure to make them come apart.
2. Once apart, you will see a small electrical circuit board which has three soldered pins at one end and two soldered pins at the other end (which are the thermal fuse).
3. Using the electrical meter set to continuity test, test the two pins for continuity - if there is none, then the thermal fuse it blown.
4. De-solder all five pins that attach the circuit board using a soldering iron and desoldering tool.
5. With the pins desoldered, gently pry the board off the pins. If it resists, double check that each pin is desoldered properly. I actually had the soldering tip in the pins at each corner as I gently pried the circuit board upwards using a screwdriver. There are two vertical plastic retaining clips either side of the circuit board that need very light pressure to release the board.
6. With the board removed, you will see a small Phillips screw that holds a metal clip that holds the thermal fuse in place. Undo the screw and remove the retaining clip.
7. Remove the old thermal fuse - it has a white lithium grease like material around it, so I just scraped this off the old fuse and smeared it around the new one.
8. Bend the pins of the new fuse to match the spacing of the pins of the old fuse using a pair of needle nosed pliers or tweezers (or by hand as the wire is thin and pliable)
9. Screw the thermal fuse back in place with the retaining clip and Phillips screw
10. Place the circuit board gently back onto the pins making sure that they are locating in the corresponding holes in the circuit board. The pins on the thermal fuse will stick out by 1/2" or so but don't worry about that at this stage.
11. Re-solder all 5 pins with new solder
12. Trim the excess wire from the two thermal fuse pins down to the top of the hardened solder
13. Re-check the continuity of the thermal fuse pins with the electrical meter - it should give an audible tone to confirm the fuse is good.
14. Press the two halves of the resistor module back together making sure to line the connector blades up as two are larger than the other meaning the two halves can only fit back together one way.
Putting the controller back into the car Before screwing everything back together, double check that the resistor module is working:
1. Screw the blower motor back into the blower housing (if removed to check it was OK per the above test instructions)
2. Re-attach the wiring to the blower motor
3. Re-attach the wiring to the blower resistor module
4. Switch the ignition on
5. Switch the blower fan on with the rotary dial
If all has worked out properly, air should be coming out of the vents now.
Switch the ignition off, screw the blower motor resistor back in, reattach the trim panels.
And finally......
Finally, go grab a beer to celebrate fixing a $170 part with a $5 component!
While drinking said beer, ponder why the idiots in product engineering at Jaguar put a $170 resistor in place that blows before the 50 cent fuse that is in the same blower motor circuit!
Last edited by LosRubios; Jun 27, 2017 at 12:38 PM.
I am suffering through the typical a/c condensate draining into the passenger foot well on my 2010 XKR due to a blocked a/c duck bill even though my 2010 XKR has a late VIN after the duckbill issue was allegedly fixed. During this process, the water leaking onto the blower motor caused the blower system to fail so that when I turned the blower dial, no air came out of the vents even though the blower 'bars' were appearing on the infoscreen.
Since the choice is to go to the dealership and spend hundreds of $ to have the issue diagnosed and fixed or order a $170 resistor module online, I thought I'd take a go at fixing it myself for the princely sum of $4.50 plus about an hour of my time.
To fix the controller, you will need a short Phillips screwdriver, a flat blade screwdriver, a small electrical screwdriver or craft/box knife blade, a pair of interior clip pliers, needle nosed pliers/tweezers, an electrical meter, a soldering iron and solder, a de-soldering tool and a replacement thermal fuse available from Amazon.com using the link below:
When the blower motor fails (i.e., you turn the dial in the dashboard and the 'bars' on the blower appear on the infoscreen but there is no air coming out of the blower), then check the following:
Diagnosing the resistor/controller as the cause of the failure
1. First check is the orange 40 amp fuse located between the rear seats - check it visually and also with the continuity test on the electrical meter to make sure it hasn't failed.
2. If the 40 amp fuse is OK, then check that the blower motor is getting power.
3. Remove the black felt like trim panel from the upper part of the passenger side foot well. You may need to remove the plastic trim panel that covers the inside of the passenger door sill (where the carpet meets the rubber door seal) by gently prying it upwards from the front as well as removing the plastic vertical trim panel that covers the outside side of the passenger side foot well. This panel comes out by pulling it backwards towards the passenger seat.
4. To remove the black felt trim panel that covers the blower motor, there are three 1" long oblong plastic clips on the front edge where it meets the glove box. The clips compress length ways using the trim clip pliers and can be rotated down and out of their holes. They are quite temperamental to remove, even with a pair of trim pliers, so be patient.
5. With the clips removed, the felt pad panel should drop down into the footwell and can be removed.
6. The blower motor is mounted vertically and has a 2 wire connector attached to it - remove this connector and put the probes of the electrical meter into the plug on the harness (non motor) side of the wiring. Set the meter to read volts DC, switch on the ignition and switch the blower motor on using the rotary dial - if the meter reads between 10-12V DC, then the motor or the resistor/controller are at fault as there is power making it to the motor. Turn the ignition off before continuing.
7. I then removed the blower motor by undoing the three securing screws with the flat blade screwdriver (the screws are also hex head so you can use a socket if available).
8. When I dropped the blower motor, I noticed that the fan cage had seized from the water dropping onto the motor however I was able to easily rotate it by hand and free it up without too much pressure (I think this happened when I switched the a/c off when the problem occurred as the non-rotating blower allowed the blower shaft to seize slightly).
Removing and repairing the a/c blower resistor/controller So if the fuse is OK and the blower motor fan will rotate freely, the next stop is the blower resistor. This is located beside the blower motor and mounted slightly behind the small foot well bulb (on US left hand drive cars). It was a light grey color on my car, about 2 1/2" long and 1 1/2" high and held in by two Phillips screws.
1. Remove the two Phillips screws and remove the blower resistor module from the blower box. It has a metal heat sink on the underside.
2. Remove the wiring harness clip from the blower motor resistor module.
Repairing the blower motor resistor module
With the blower resistor out of the car, you will see that it looks like one of those 'non serviceable parts' that has to be replaced as a unit. To service it, do the following:
1. The upper light grey section that can be seen from inside the foot well has four plastic tabs that clip it to the lower section that holds the heat sink. Using a small electrical screwdriver, gently pry each of these outwards working one end and then the other, while gently applying some pressure with the craft knife blade in the seam beside the clip. It doesn't take much pressure to make them come apart.
2. Once apart, you will see a small electrical circuit board which has three soldered pins at one end and two soldered pins at the other end (which are the thermal fuse).
3. Using the electrical meter set to continuity test, test the two pins for continuity - if there is none, then the thermal fuse it blown.
4. De-solder all five pins that attach the circuit board using a soldering iron and desoldering tool.
5. With the pins desoldered, gently pry the board off the pins. If it resists, double check that each pin is desoldered properly. I actually had the soldering tip in the pins at each corner as I gently pried the circuit board upwards using a screwdriver. There are two vertical plastic retaining clips either side of the circuit board that need very light pressure to release the board.
6. With the board removed, you will see a small Phillips screw that holds a metal clip that holds the thermal fuse in place. Undo the screw and remove the retaining clip.
7. Remove the old thermal fuse - it has a white lithium grease like material around it, so I just scraped this off the old fuse and smeared it around the new one.
8. Bend the pins of the new fuse to match the spacing of the pins of the old fuse using a pair of needle nosed pliers or tweezers (or by hand as the wire is thin and pliable)
9. Screw the thermal fuse back in place with the retaining clip and Phillips screw
10. Place the circuit board gently back onto the pins making sure that they are locating in the corresponding holes in the circuit board. The pins on the thermal fuse will stick out by 1/2" or so but don't worry about that at this stage.
11. Re-solder all 5 pins with new solder
12. Trim the excess wire from the two thermal fuse pins down to the top of the hardened solder
13. Re-check the continuity of the thermal fuse pins with the electrical meter - it should give an audible tone to confirm the fuse is good.
14. Press the two halves of the resistor module back together making sure to line the connector blades up as two are larger than the other meaning the two halves can only fit back together one way.
Putting the controller back into the car Before screwing everything back together, double check that the resistor module is working:
1. Screw the blower motor back into the blower housing (if removed to check it was OK per the above test instructions)
2. Re-attach the wiring to the blower motor
3. Re-attach the wiring to the blower resistor module
4. Switch the ignition on
5. Switch the blower fan on with the rotary dial
If all has worked out properly, air should be coming out of the vents now.
Switch the ignition off, screw the blower motor resistor back in, reattach the trim panels.
And finally......
Finally, go grab a beer to celebrate fixing a $170 part with a $5 component!
While drinking said beer, ponder why the idiots in product engineering at Jaguar put a $170 resistor in place that blows before the 50 cent fuse that is in the same blower motor circuit!
Great post if you have the soldering skills,
if not here is a second option for cheap replacement.
Great write up, I had a plugged drain all summer and had water flowing into the passenger footwell on a daily basis.
I finally reached up and with my fingertip was able to get the drain unplugged, no more leak.
But, as happens, about 2 weeks ago my fan just didn't work one morning. So, I just performed this resister fix and although it seemed fairly simple, my fan still isn't working, what next?
First, I checked the orange 40 amp fuses between the back seats, I believe I had 4 of them. I wasn't sure which was for the fan/resister so I checked them all, all were good.
Second, I removed the 5 torx screws and dropped the glovebox.
There right in front of me on the left was the resister with 2 screws holding it in place and the connector intact.
Third, I removed the screws, disonnected the connector and pulled the old resister out. Easy Peasy.
I then connected my new resister (which is the generic land rover equivalent part).
I simply left it hanging and started the car. Still no fan
I could hear some clicking coming from the resister and the fins got very hot (which is why I assume they have fins!).
So, I reconnected the old resistor and restarted the car, this time the fins did NOT get hot, so I assume the resistor was bad.
But why does the fan still not work?
Open to suggestions on what to try next, will I need to pull out the main fan and motor assembly itself?
Thanks for the write up!
Below is the original resistor removed.
Below is the replacement resistor, connected and hanging
for the test. You can see just above it the square opening
into the ducting where it would be installed. Just to the
right you can see the main blower assembly.
So, I removed the 3 torx screws and dropped the motor. I turned it and indeed it was semi-stuck, then it loosened and now it freely spins.
Turn the car back on, still no blower....
If the blower motor spins with the ignition on under its own power, then the fuse is OK and the thermal fuse also sounds like it is still good.
Based on troubleshooting my own car earlier this year, the water drips onto the fan motor and causes the shaft that has the blower cage on it to lightly seize. Once this seizes, the blower motor trying to run then causes the thermal fuse in the resistor to fail.
It is possible that by not freeing up the fan shaft before you replaced the thermal fuse that you have compromised the new thermal fuse in some way although they seem to have a pretty simple work/don't work design when taken apart. I think you can check the thermal fuse using an electrical meter on a continuity test through the metal pins on the bottom of the fuse however I would need to pull my fuse out of the car and figure out which pins to test as I don't know which two to test for continuity through the thermal fuse off the top of my head.
I would recommend removing the blower motor and disassembling the blower cage from its shaft and dropping some light oil into the shaft to make sure it is rotating freely.
When it comes to diagnosing additional resistance or amp draw on the blower motor, there really isn't a "layman's'" explanation to doing this since it requires an electrical meter.
Well you might be right, I had to put everything back together to use the vehicle, and I noticed the new resistor didn't get warm the second time, even though the fan was freely spinning... maybe I burned it out again, ugh. I have a testing meter, just need to figure out how to test that resistor with it? Thanks for your thoughts!
Irony... My blower is running full tilt unless I turn the HVAC off. Checked the Thermal and it's reading open. Jumped it and still the same results. $8 module on order. Heck, if it works I may buy a spare at that price.
Fan isn't too annoying at full tilt but the noises from under dash are disquieting when it switching discharge ports by itself...
Additional Blower Motor Resistor Repair Information
The blower motor resistor module can fail in two different ways:
1) Its non-resetable thermal fuse can blow and go open circuit. This prevents the blower fan from running at all. LosRubios' post below is an excellent detailed article on how to replace the thermal fuse. The original thermal fuse trips at 114C. I replaced mine with one that trips at 145C (part number: EYP-2BN143, $0.86 CDN at digikey.ca). The thermal fuse is to protect the unit's MOSFET although I can not see the point in protecting the MOSFET when the thermal fuse going open circuit causes the whole unit to be scrap. The thermal fuse could actually be replaced by a piece of wire.
2) The MOSFET can go short circuit. This causes the blower fan to always run full blast unless the climate control is turned OFF. To me this is a better scenario than (1) above since either optionally OFF or FULL ON is better than not on at all. To check if the MOSFET is short circuit simply disconnect the Blower Motor Resistor Module and check the resistance between the two large contacts on its connector, if these two large contacts have no resistance between them then the MOSFET is short circuit and blown. The original MOSFET is a K2313 (now obsolete), I replaced mine with an IRLB3036PbF ($5.77 CDN at digikey.ca). LosRubios' post shows how to replace the thermal fuse. The MOSFET is held in place on the heat sink by the same screw that holds the thermal fuse's heat sink so it is pretty easy to replace at the same time; except that the IRLB3036PbF is physically smaller than the original K2313 and it is tricky to get its wire leeds over to the circuit board.
Attached is my reverse engineered circuit diagram of the Blower Motor 'Resistor' Module and associated wiring.
Quick question for you guys on this nicely informative thread;
Same as many, my condensate isn't draining. Drove the car for about a month with the fan getting wet...... #1 and I were on a cross country trip so no chance to get it fixed, not so much of a problem in the low humidity West but East Coast requires A/C; Once we got back the car had to sit for a while (freaking Bamabi in the SD Badlands) again without having the time to deal with this. Result; blower rusted and seised. Ordered a new one since the old one still won't work.
I'm getting 12v at the leads to the blower with the fan dial turned on, haven't checked if the voltage changes with volume.
?'s
Should it? If I'm getting 12v, does that indicate the Resistor is okay?
When the blower seizes, it will inevitably blow the thermal fuse in the Blower Motor Resistor unit. To test this, just unplug and remove the resistor unit (two phillips screws, located to the left side of the blower motor in the passenger side footwell).
Gently pry the two halves of the resistor apart with a couple of flat blade screwdrivers or a screwdriver and a craft knife blade to slide in between the two halves to keep them apart while you pry apart the other end.
Once apart, set your electrical meter to continuity test and test the two terminals circled in red in the attached picture. If there is no continuity, then the fuse is blown.
You can either replace the fuse or just buy a Land Rover LR031677 resistor from EBay for about $14 (less if you want it shipped directly from China and can wait a couple of weeks) and replace the whole unit.
I am getting 9,xV on low and 12V at full volume and 0 in the off position.
Took the fan motor apart and one of the brushes was not free to engage the commutator. The brush fell apart so I may have to replace the motor if I can't find a replacement brush.
Didn't get yet the chance or real need to change them as the motor works just fine after cleaning and lubrication
You can try replacing brushes before going to a new motor
New motor is not available from Jaguar anymore and the aftermarket replacement is poor fit. I bought one and left it the box just as arrived...