
Jaguar courtesy light modification


Thread Starter
|
Junior Member
Joined: Mar 2013
Posts: 13
Likes: 12
From: UK
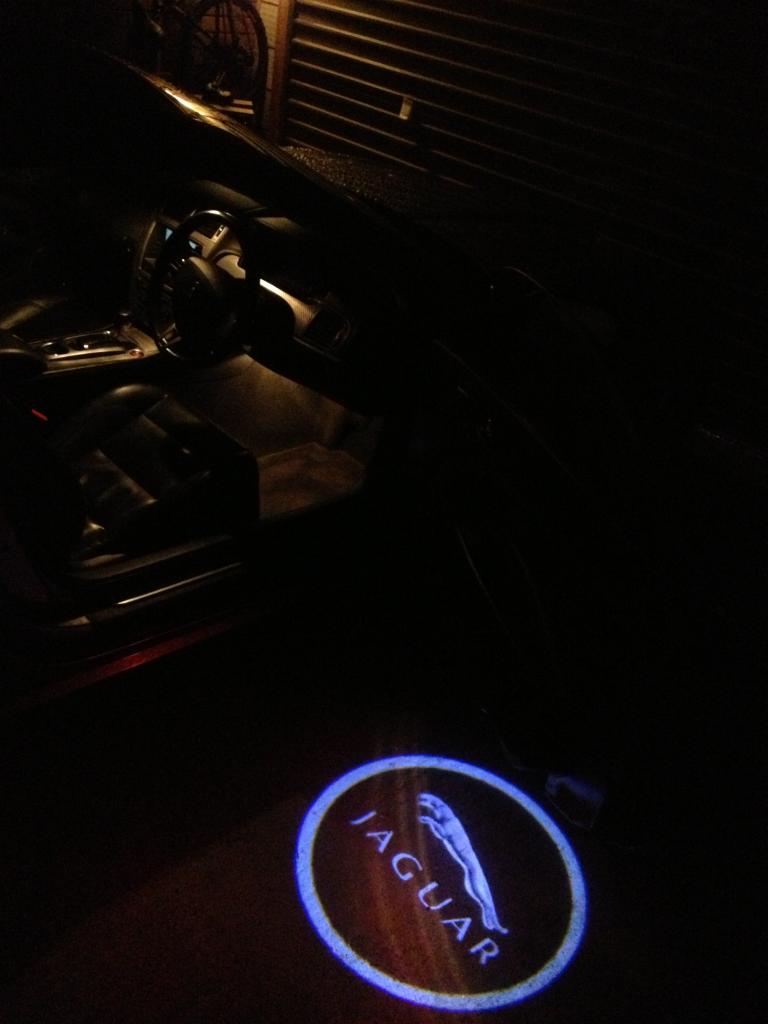
I saw the review on the New Range Rover and liked the courtesy light displaying the Range Rover on the ground as you opened the door. Well for only �15 off eBay, I got hold of some Jaguar specific lights. What do you all think? Personally, I'm very pleased with the results and managed to install them myself.


I think it adds a nice modern touch to my XKR.
All the best
gg
I think it adds a nice modern touch to my XKR.
All the best
gg

Veteran Member


Joined: Dec 2011
Posts: 3,453
Likes: 880
From: Pacific Northwest
I want.....
An earlier post showed them also available in two colors.... Would love to see that before I leap as well.
Vince
Question....Visible at all in daylight?
An earlier post showed them also available in two colors.... Would love to see that before I leap as well.
Vince
Question....Visible at all in daylight?
Last edited by CleverName; Mar 16, 2013 at 11:17 AM.
Thread Starter
|
Junior Member
Joined: Mar 2013
Posts: 13
Likes: 12
From: UK
Morning guys,
I found the install very simple to do. This is what I did. Now, I am not a trained electrician or a mechanic, so if you do follow what I've done, you do so at your own risk and I accept no responsibility whatsoever for any issues that arise, directly or indirectly.
1) open door!
2) I used a trim removal tool to gently pop open the courtesy light, which is attached with two plastic prongs - be careful not to snap them!
3) The light projected needs to be facing straight down so I took a piece of masking tape and placed it parallel across the underneath of the plastic door trim on the door hinge side near the existing hole for the courtesy light. I then placed another piece of masking tape next to it, again towards the courtesy light hole and this bit over laps the plastic trim, where it comes out at a diagonal - following? Needs pics? Pls ask!
4) on this second piece of masking tape, I measured 2cm away from the inside of the plastic door trim towards the edge of the door and this was my drill point.
5) knowing where the drill point is now, I ensured that all door wires etc were away from where the drill bit would enter the door card.
6) drill hole.
7) prior to placing unit in the hole I tested it with one of those square 9volt batteries from one of the kids toys. This allowed me to line it up so the image projected is aligned as desired.
8) once happy with alignment, I pushed the unit in. This is a tight fit!
9) because I didn't dare take the door cards off the car, I then had to screw the lock washers onto the unit by fitting them blind by screwing them in with a finger using the courtesy light as access.
10) To wire them up to the car, the units come with a black and red wire. For my car I slid them under the contacts for the courtesy light. Black to black and red to green/yellow. I did try soldering them but my soldering skills aren't good enough and I couldn't get the solder to stick, so by sliding them under the contacts and taping them over, seems to have worked just as well.
11) I then tucked up all the wires inside the cavity of the door, pushed the oem courtesy light back in and hey presto, one door done.
12) the install would be much less fiddle if you took the door card off, but I didn't dare!
If you need any more pictures, I'm happy to take some and post on here if that would help.
The image quality is great. Obviously, the closer to the ground, the smaller the image gets, but I think it's an ideal size where it is
Daylight? Not really visible
Gg
Last edited by gg8tcw; Mar 17, 2013 at 10:18 AM. Reason: typo
Senior Member
Joined: May 2012
Posts: 281
Likes: 59
From: New Mexico
Trending Topics


No. Its a pretty simple setup. The image gets larger with distance. At 36 inches away I'd imagine the circle/logo would be quite large, and may even lose some quality. I could measure the distance vs size if you were curious.
But that doesn't mean you have to use them as puddle lights. They'd be just as cool projected on the living room wall.
But that doesn't mean you have to use them as puddle lights. They'd be just as cool projected on the living room wall.
Last edited by Muddydog; Mar 23, 2013 at 02:36 AM.
Thread Starter
|
Junior Member
Joined: Mar 2013
Posts: 13
Likes: 12
From: UK

Veteran Member
Joined: Dec 2011
Posts: 3,453
Likes: 880
From: Pacific Northwest
No. Its a pretty simple setup. The image gets larger with distance. At 36 inches away I'd imagine the circle/logo would be quite large, and may even lose some quality. I could measure the distance vs size if you were curious.
But that doesn't mean you have to use them as puddle lights. They'd be just as cool projected on the living room wall.
But that doesn't mean you have to use them as puddle lights. They'd be just as cool projected on the living room wall.
Just letting the possibilities wander a bit...
Senior Member
Joined: Mar 2012
Posts: 203
Likes: 36
From: Tauranga New Zealand
Just ordered some myself. Can't wait for them to arrive. I am thinking about mounting them under the dash. To illuminate the foot wells when door is opened. THanks to original poster for getting the idea out there.
Thread Starter
|
Junior Member
Joined: Mar 2013
Posts: 13
Likes: 12
From: UK
Now, that's a great idea! If you do it, please post some pictures up on here!
Veteran Member
Joined: Dec 2012
Posts: 3,054
Likes: 978
From: Canada
Rscultho, Did you get these installed? I received mind yesterday. Where did you locate it? Along side of the courtesy light in the center? Any problem with clearance of courtesy light connector? The 2010 and 2011 models should have the same door panel design.
Veteran Member
Joined: Dec 2012
Posts: 3,054
Likes: 978
From: Canada
Anyone install these on a 2010+ XK/XKR? where did you install it? I'm thinking about behind the courtesy in the center where the courtesy light connector goes up. However, I'm not sure if there is enough clearance. The connector may interfere with the new light fixture when it is inserted in the drilled hole. Other areas of the door panel seem to have a double plastic bottom.