
MEGA Nav Upgrade details!...plus Integrated Gauges, XM radio and Real Time Traffic

Thread Starter
|
Veteran Member


Joined: Apr 2010
Posts: 7,657
Likes: 3,020
From: Arlington VA USA
My 2001 XKR is a joy, but I really wanted to add some permanent gauges, especially now that I was performing supercharger boost upgrades. Also, with a car of this age, keeping an eye on critical systems would help alert me of early signs of trouble. I was not keen on finding an entire new wood paneling set and removing the navigation screen to install gauges. Cheapening the interior with a bunch of aftermarket hardware was also not my cup of tea.
I like having integrated vehicle navigation better than relying on an aftermarket unit or a smartphone, but with non-upgradeable 10 year old maps, as many of you know, this already dated system has grown to be more of an annoyance than a help. The integrated approach has the advantage of a larger screen, and information at your fingertips whenever you are driving without inconveniences, distractions, dangling wires or repeated setup procedures.
I also am a long time XM satellite radio listener and have really grown fond of commercial and hassle free music of whatever genre I want on satellite radio. Having XM real time traffic in an urban area is another bonus. I had installed an inexpensive XM radio when I first purchased the car, but it turned out to be a poorly designed model that had chronic crashing issues.
This situation led me to the set of upgrades I am describing here. It was not particularly cheap, but it is solves all of these issues and more in a nicely integrated fashion. It really brings the car to another level. OK, I admit, these feature are just plain cool too J.
If you search around as I did, you might be able to obtain some of the items used and save a few bucks.
I have broken the installation discussion into four documents, to make it easier to mix and match features or add related upgrades such as a back-up cam or IPOD audio and video if you wish.
1)Adding two switchable video inputs to the existing navigation screen to an XK8/R (Note: This is required for the other upgrades)
2)Adding the Garmin GVN-53 upgradeable navigation, with option for XM radio with real time traffic and weather to an XK8/R
3)Adding HKS CAMP 2 Electronic OBDII Gauges to an XK8/R
4)Adding HKS CAMP 2 optional Oil Pressure (XK8/R) and Boost and Intercooler Water temperature sensors to an XKR
ENJOY !!
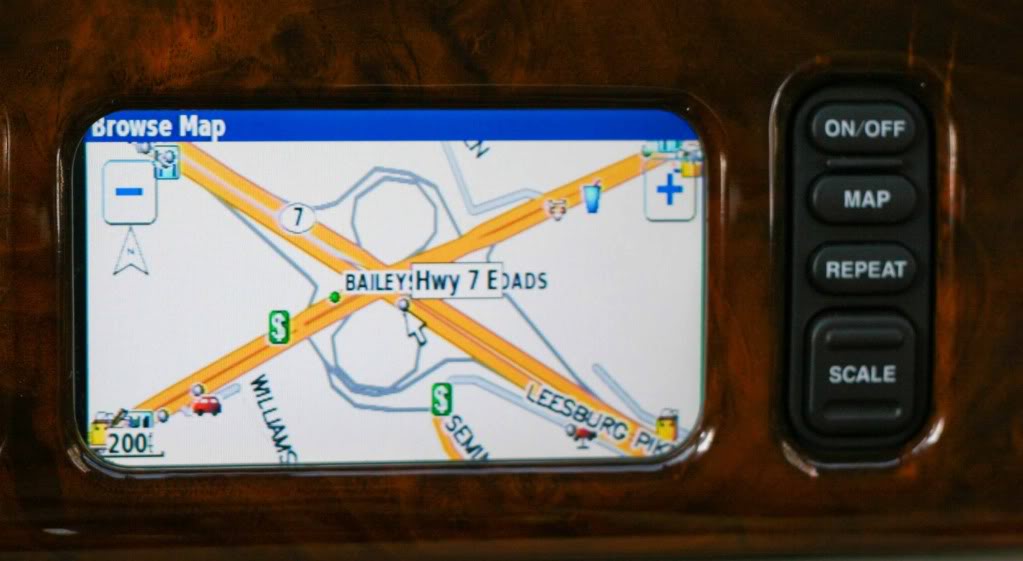
Here are some example screenshots:

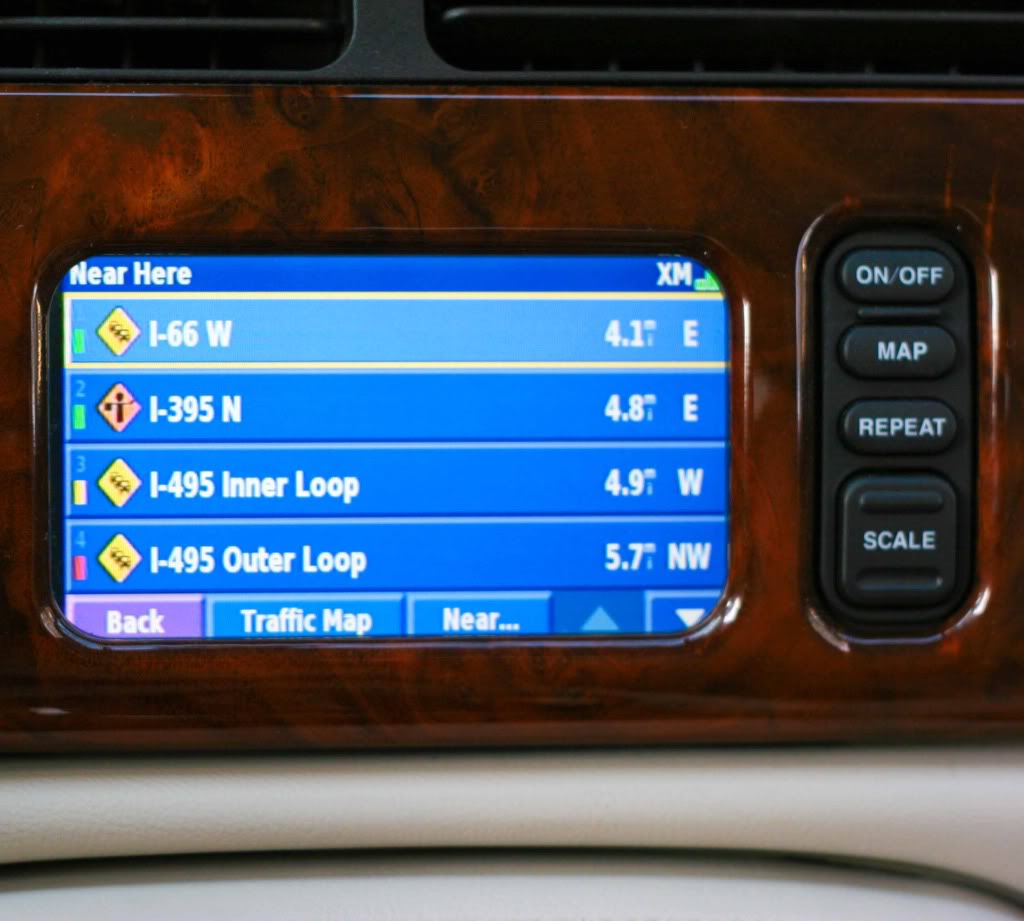
Traffic summary
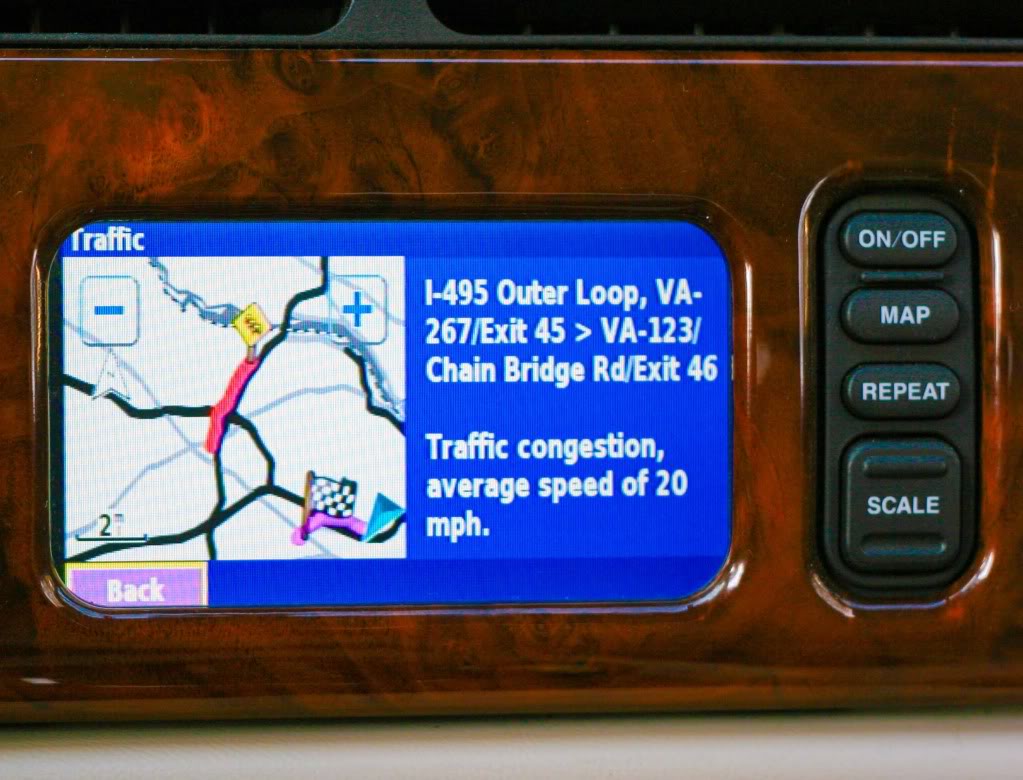
Traffic details
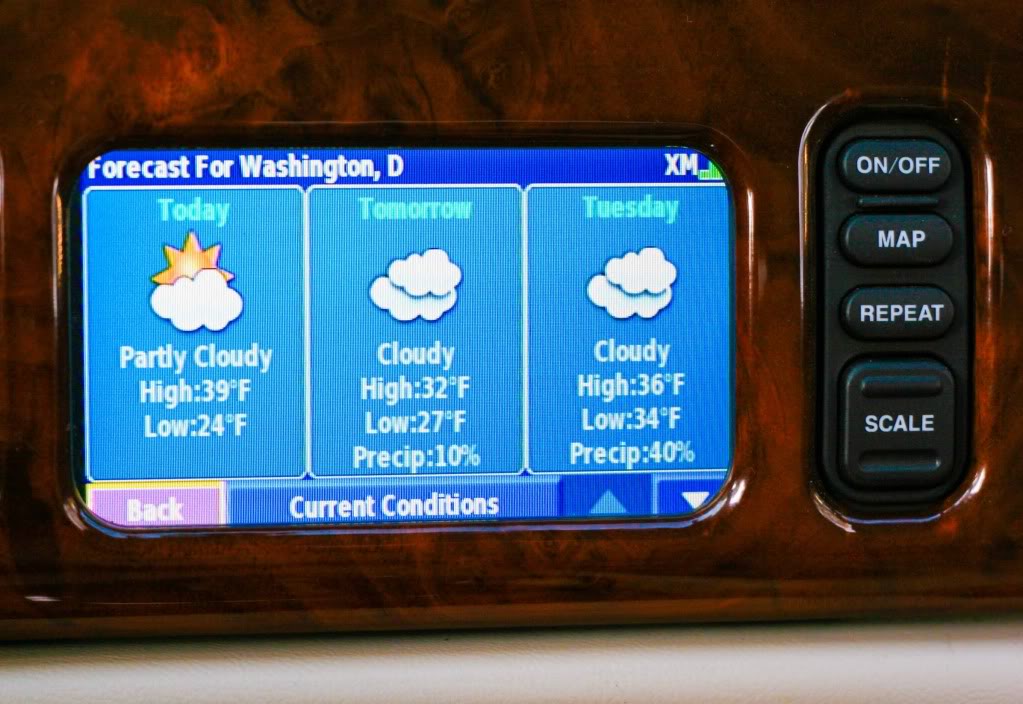
Weather
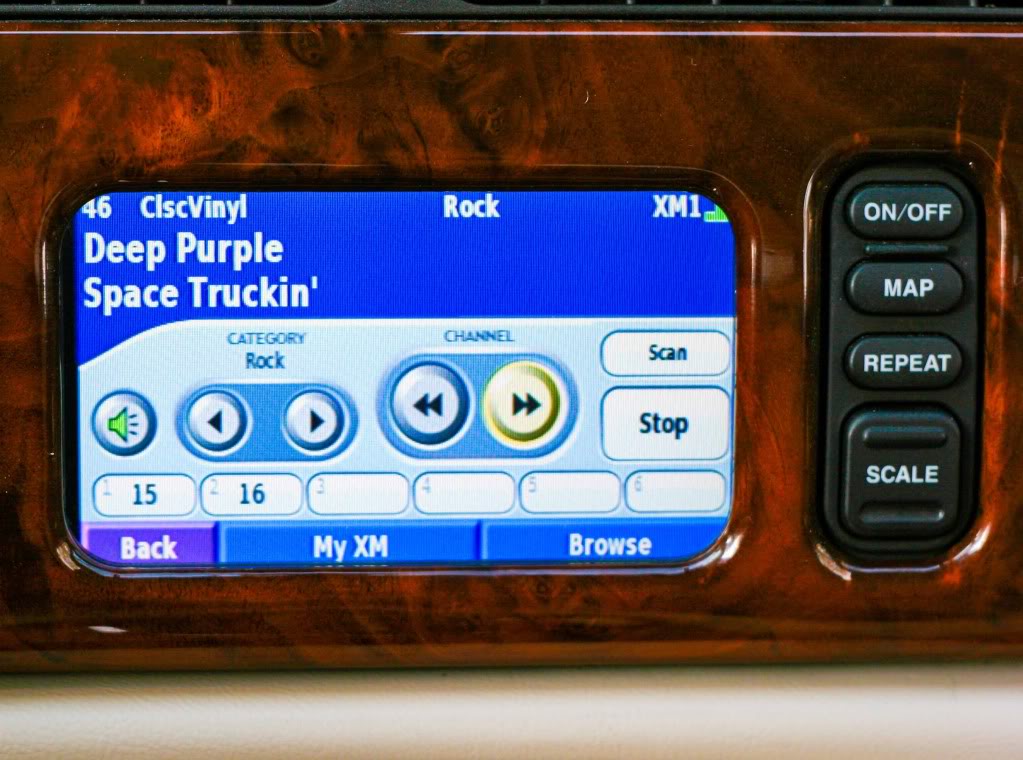
XM Satellite Radio
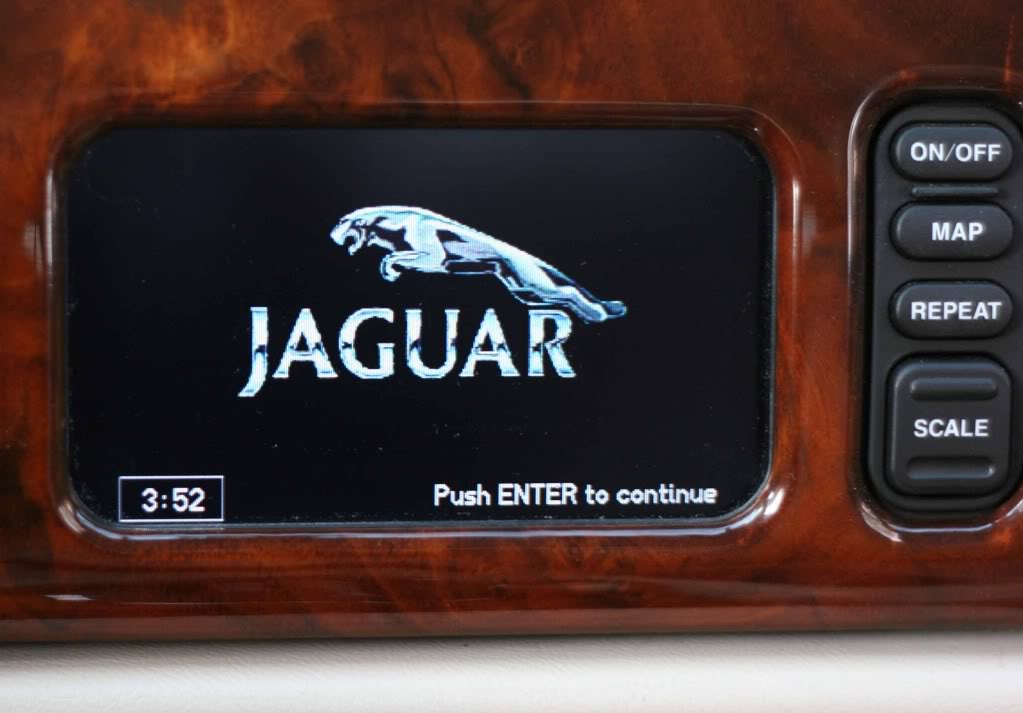
Still have the clock! (and leaper on the earlier models)
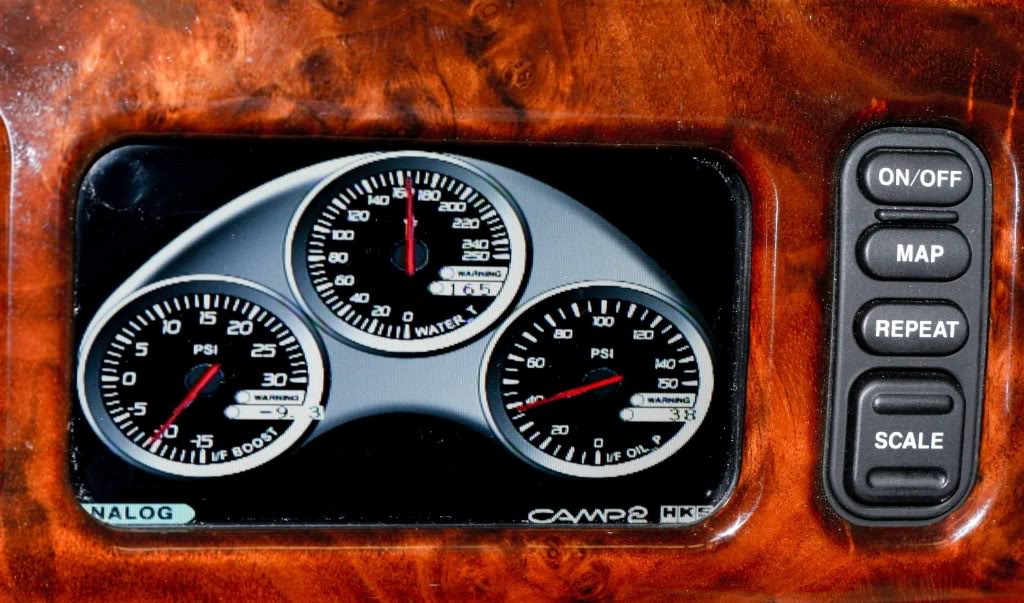
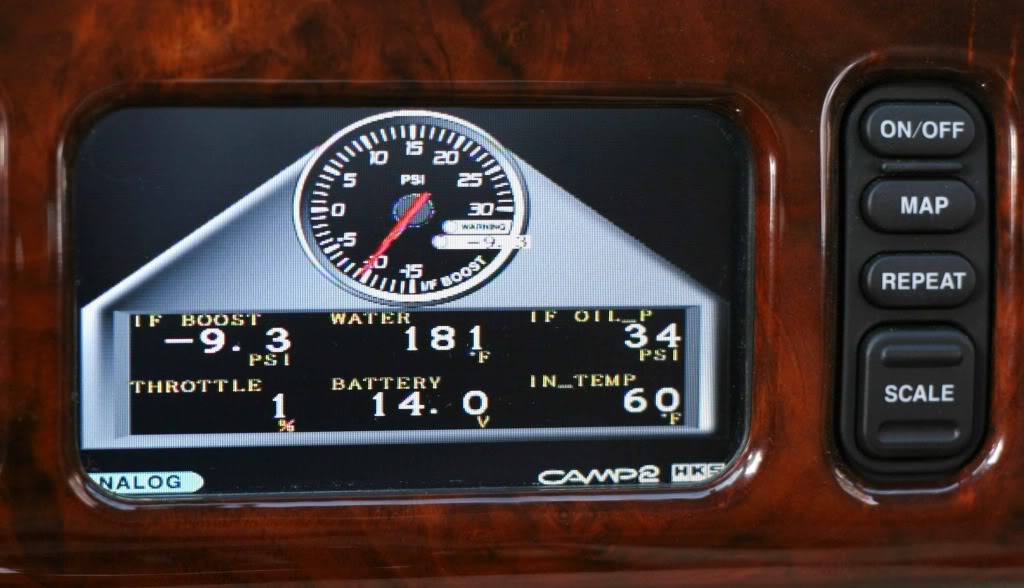
HKS CAMP 2 guages
CAUTIONARY NOTES:
1) The write-ups below are not full step by step procedures. Instead they provide suggestions and details on the parts of the installation process that are not necessarily obvious from the manufacturers instructions or that are specific to the Jaguar XK8/XKR. This has only been tested on a 2001 XKR with premium audio.
2) These installations require significant modification to your vehicle wiring. Do not undertake this yourself unless you are confident in what you are doing.
3) Never apply any signals (audio, video or control) to this aftermarket equipment without power and ground both reliably connected. Doing so may damage the equipment.
4) XM Satellite Radio is only available in parts of North America and is a subscription based service.
....
I like having integrated vehicle navigation better than relying on an aftermarket unit or a smartphone, but with non-upgradeable 10 year old maps, as many of you know, this already dated system has grown to be more of an annoyance than a help. The integrated approach has the advantage of a larger screen, and information at your fingertips whenever you are driving without inconveniences, distractions, dangling wires or repeated setup procedures.
I also am a long time XM satellite radio listener and have really grown fond of commercial and hassle free music of whatever genre I want on satellite radio. Having XM real time traffic in an urban area is another bonus. I had installed an inexpensive XM radio when I first purchased the car, but it turned out to be a poorly designed model that had chronic crashing issues.
This situation led me to the set of upgrades I am describing here. It was not particularly cheap, but it is solves all of these issues and more in a nicely integrated fashion. It really brings the car to another level. OK, I admit, these feature are just plain cool too J.
If you search around as I did, you might be able to obtain some of the items used and save a few bucks.
I have broken the installation discussion into four documents, to make it easier to mix and match features or add related upgrades such as a back-up cam or IPOD audio and video if you wish.
1)Adding two switchable video inputs to the existing navigation screen to an XK8/R (Note: This is required for the other upgrades)
2)Adding the Garmin GVN-53 upgradeable navigation, with option for XM radio with real time traffic and weather to an XK8/R
3)Adding HKS CAMP 2 Electronic OBDII Gauges to an XK8/R
4)Adding HKS CAMP 2 optional Oil Pressure (XK8/R) and Boost and Intercooler Water temperature sensors to an XKR
ENJOY !!
Here are some example screenshots:
Traffic summary
Traffic details
Weather
XM Satellite Radio
Still have the clock! (and leaper on the earlier models)
HKS CAMP 2 guages
CAUTIONARY NOTES:
1) The write-ups below are not full step by step procedures. Instead they provide suggestions and details on the parts of the installation process that are not necessarily obvious from the manufacturers instructions or that are specific to the Jaguar XK8/XKR. This has only been tested on a 2001 XKR with premium audio.
2) These installations require significant modification to your vehicle wiring. Do not undertake this yourself unless you are confident in what you are doing.
3) Never apply any signals (audio, video or control) to this aftermarket equipment without power and ground both reliably connected. Doing so may damage the equipment.
4) XM Satellite Radio is only available in parts of North America and is a subscription based service.
....
Last edited by WhiteXKR; Apr 12, 2011 at 05:39 AM. Reason: Added note to clarify that external video is required for the other upgrades / XM avail. in North America


Veteran member
Joined: Jan 2011
Posts: 1,638
Likes: 173
From: France (UK expat)
Wow, great project and excellent write-up. I started getting all excited and downloaded your PDFs, but on skimming through them I quickly realised it is too complicated an install for my limited talents. I think I will go down the 3-gauge cluster + separate satnav route. Thanks for sharing, though, and well done on an excellent upgrade.

Senior Member
Joined: Oct 2010
Posts: 271
Likes: 17
From: syracuse NY
Fantastic information! I will be looking into using in my 2004 STR if at all possible.
Thanks whitexkr
Thanks whitexkr
Trending Topics
Thread Starter
|
Veteran Member
Joined: Apr 2010
Posts: 7,657
Likes: 3,020
From: Arlington VA USA
FYI, before I installed my HKS CAMP 2, I plugged it's OBDII port into my 2003 S and it worked without any cable mods. I was using an external monitor at the time, but I believe the S-type uses RGBS video also.
Thread Starter
|
Veteran Member
Joined: Apr 2010
Posts: 7,657
Likes: 3,020
From: Arlington VA USA
True enough Sam.
Kenwood markets the KNA-G510 which is basically a customized Garmin GVN-53 that interfaces to their touch screen headunits via serial port. The GVN-53 has that serial port also. Is there a driver for that serial port already in the software for aftermarket touch screen overlays? Can the KNA-G510 work without the Kenwood headunit and with an aftermarket touchscreen? Interestring areas for further investigation.
In the meantime. the Garmin remote is fairly easy to use, and the HKS, once set up, I find does not need the remote much, if at all.
Last edited by WhiteXKR; Jan 31, 2011 at 12:21 PM.
Veteran member

Joined: Mar 2007
Posts: 11,344
Likes: 1,164
From: Oak Ridge, TN
Great work and impressive, detailed presentation documents! Others will appreciate your hard work when they look for a similar solution. I was never very good at reading electrical schematics in school, and still can't. 
Thread Starter
|
Veteran Member
Joined: Apr 2010
Posts: 7,657
Likes: 3,020
From: Arlington VA USA
Matt- Thank YOU for pioneering the use of the GVN-53 in the XK8, and for all your support debugging some of the issues.

Senior Member
Joined: Nov 2010
Posts: 289
Likes: 21
From: Phila
I love what you've done. Have you ever considered doing this upgrade for a fee for others who are less talented?https://www.jaguarforums.com/forum/i...icon_shrug.gif
Thread Starter
|
Veteran Member
Joined: Apr 2010
Posts: 7,657
Likes: 3,020
From: Arlington VA USA
I love what you've done. Have you ever considered doing this upgrade for a fee for others who are less talented?https://www.jaguarforums.com/forum/i...icon_shrug.gif
In a roundabout way, thats what I do for a living as an engineer.
For my Jaguar XK brethren, however, it is play
Outside of that, a competent auto custom shop should be able to do this...just bring my instructions...most of it is pretty straighforward, but there are a few tricky bits.
Veteran member
Joined: Mar 2007
Posts: 11,344
Likes: 1,164
From: Oak Ridge, TN
Modification request...as I don't have the OEM navigation still operating, even when I have a dark screen (no video 1 or video 2 input active) the screen is still somewhat 'illuminated'. Without the existing navigation connected with the deck, all the factory buttons don't work...and that's fine, but if only the On/Off button would actually still work, to power the screen. Could you think about out how to make that work on my installation, and give an instruction on what I might need to do...wiring-wise?
Thread Starter
|
Veteran Member
Joined: Apr 2010
Posts: 7,657
Likes: 3,020
From: Arlington VA USA
Modification request...as I don't have the OEM navigation still operating, even when I have a dark screen (no video 1 or video 2 input active) the screen is still somewhat 'illuminated'. Without the existing navigation connected with the deck, all the factory buttons don't work...and that's fine, but if only the On/Off button would actually still work, to power the screen. Could you think about out how to make that work on my installation, and give an instruction on what I might need to do...wiring-wise?
I would have to poke around some at the signals to see if there is a cleaner way.