
2000 XK8 Headlight assembly removal


I am a bit slow - I can't see how the headlight ***'y even comes out; I tried to pry up the two tabs you can see when raising the hood but it wouldn't budge. So I had the goofy blue bulbs replaced at significant expense, and now one light has water, maybe from the washer; can I disable the washer, and can someone tell me how to get the assembly out? What I read just says like "after you get it out..." Please!
r
r
Veteran Member


Joined: May 2010
Posts: 4,114
Likes: 1,274
From: North Carolina
You need to take out the wheel well liner, which is easy. Go to my Youtube channel. There's a video on how to remove the wheel well liner. After removing the liner you remove a bolt that's on the underside of the headlamp assembly. Then there are two bolts on top. Disconnect the plug on the back, and then disconnect the washer jet assembly. Then the headlamp will slide out.
By the way, there's a little cover on the front of the wheel well liner that you can remove to access the lower bolt. Trust me... it's much easier to just remove the entire wheel well liner. That little access cover doesn't give you room to work, and you'll be feeling around up there in the dark with all of the spiders and scorpions and stuff (you have scorpions in Illinois, right? ). Removing the liner takes 5 minutes and you'll save yourself 30 minutes and a bunch of busted knuckles.
By the way, there's a little cover on the front of the wheel well liner that you can remove to access the lower bolt. Trust me... it's much easier to just remove the entire wheel well liner. That little access cover doesn't give you room to work, and you'll be feeling around up there in the dark with all of the spiders and scorpions and stuff (you have scorpions in Illinois, right?
). Removing the liner takes 5 minutes and you'll save yourself 30 minutes and a bunch of busted knuckles.

Junior Member

Joined: Sep 2012
Posts: 14
Likes: 3
From: Arlington, Texas
I have two little light bulbs in my driver side headlamp assembly that are blown out. The headlight works fine but those two little decorative lights are out. Does anyone know how to replace those? 
Thanks
Tim
Thanks
Tim

Joined: Dec 2011
Posts: 120,439
Likes: 17,014
From: Durham, UK
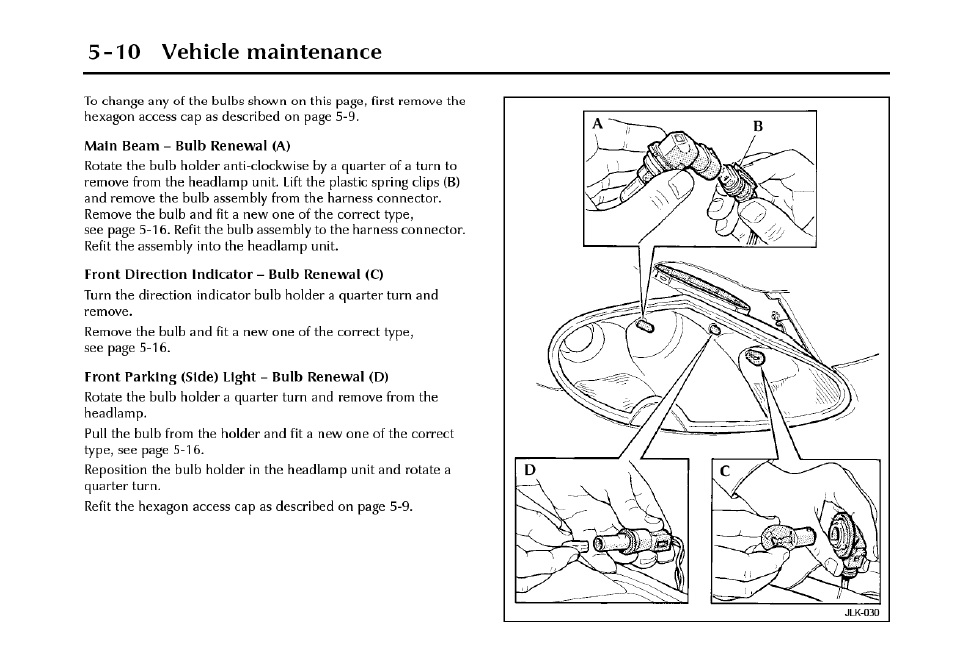
The Front Parking (Side) Lights.
1. remove the plastic hexagon cap on the top of the headlamp unit:

(click on the image to enlarge it)
2. rotate the bulb holder to release it:
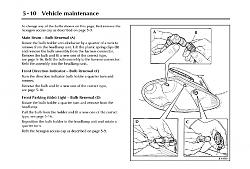
(click on the image to enlarge it)
For completeness, this is the dip beam bulb renewal procedure:
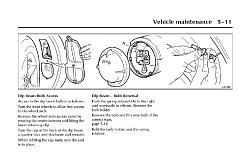
(click on the image to enlarge it)
Graham
1. remove the plastic hexagon cap on the top of the headlamp unit:

(click on the image to enlarge it)
2. rotate the bulb holder to release it:
(click on the image to enlarge it)
For completeness, this is the dip beam bulb renewal procedure:

(click on the image to enlarge it)
Graham

Hi Graham,
Not wanting to hijack this thread but I must ask, are these files available to download I have tried to load the JTIS folder but my PC skills didn't quite come up to scratch or is there a CD with them all on
Regards
Peter
Not wanting to hijack this thread but I must ask, are these files available to download I have tried to load the JTIS folder but my PC skills didn't quite come up to scratch or is there a CD with them all on
Regards
Peter

Veteran Member
Joined: May 2011
Posts: 1,230
Likes: 155
From: Waterford, MI
The following link from the top of this forum has many helpful documents.
https://www.jaguarforums.com/forum/x...ts-data-29800/
I believe the JTIS only goes through 2003 my but most of what you'll need can be found here.
WORKSHOP MANUALS - PDF Format (thanks to jonscot):
Third Edition - 2003
http://www.mediafire.com/view/0iiiuu...ed_in_2003.pdf
The 'Third edition' is also a fully navigable PDF for the 4.2 litre models.
Junior Member
Joined: Sep 2012
Posts: 14
Likes: 3
From: Arlington, Texas
Thanks for the diagrams! They were a big help...I was able to replace the parking lamp bulbs really easily.
Tim
Tim
Trending Topics
Joined: Dec 2011
Posts: 120,439
Likes: 17,014
From: Durham, UK
JTIS goes to 2004 for the XK8/XKR:
(click on the image to enlarge it)
I like JTIS because it's quick to navigate but it can be a pain to install and learn to use effectively. The PDF's are a good alternative for anyone only wanting a single model.
Graham

(click on the image to enlarge it)
I like JTIS because it's quick to navigate but it can be a pain to install and learn to use effectively. The PDF's are a good alternative for anyone only wanting a single model.
Graham

Senior Member
Joined: Oct 2012
Posts: 853
Likes: 192
From: Panama City, Florida
Just to add to the Rev's note, once you jack up the car and remove the wheel, just look around the wheel well liner and remove all the nuts and screws you can see holding it on. You'll have to wiggle it a bit here and there, but it will come out. Don't worry about breaking it, it won't break.
Now you can stick your head in the wheel well and look forward at the bottom of the HL Assy. Finding that bolt the Rev spoke of will be something of a magic stunt, but it is located about mid way and is hidden from view until you find it. Then seeing it will be alot easier. It's upside down and behind a couple of (I guess) metal braces--for lack of another name. Once you find it you'll need a ratchet-extension-and correct size socket. Try to remember where you found it, because you'll need to put it back--another magic trick.
Once you have completed that 'simple' task, you can uncoil yourself from the wheel well and go around to the front of the assembly. Dont worry about those clips you tried to open and look down to the right/left (depending on which assy your working on, and you'll see a 13mm nut holding the assy to the frame of the car. Note how the washers are arranged so you can put it back the way you loosen it---don't take the nut off, just loosen it enough so the assy will slip past it. Now look on the top where the assy slips under a frame member and you'll note another nut/screw with washer. This is holding the assy in the car from the top. Remove this nut.
Now, the assy is ready to come out. As you wiggle it about you'll get to a point where you can see the wiring coupling. Its close in there, but you will have the room to unplug it--once you find the coupling lock. Use a small screwdriver to hold the lock open just enough to slid the coupling off.
Now the assy will slid out, but, that little triangle mirrow at the bottom front is the headlight washer and once you get the assy out far enough, you can see that the washer system is just snapped into it's receiver on the bottom front of the HL assy. Unsnap it from the HL assy. It just pulls foward with mirrow attached. Just let it dangle until your ready to replace the HL assy.
That's it in more detail. Do your thing and then put everything back in reverse of the above.
Cheers and good luck.
Chuck
05/XK8 CF vert 1 of 200


Junior Member
Joined: Feb 2015
Posts: 1
Likes: 0
From: North Carolina
Just finished removing the complete LH headlight assembly, pursuant to all of the above advise. I ended up changing the HID ballast that I bought brand new - from ebay. (cost $300 - NEW). The ballast easily detaches from the assembly - with 8 torx screws. At first glance, the project looked like it was going to be complicated. As it turned out, it was relatively easy. You just have to take your time, and don't force the assembly out - use some finesse, and use a bright light - to see if the assembly is binding as you carefully remove it from it's hole. You don't have to take the whole fender liner splash guard out. Just take the front screws out, and duct tape the splash liner to the strut - to keep it out of the way. All of the light assembly hardware is as described in the above posts. The whole process of removing the assembly, replacing the HID ballast. and then replacing the assembly back, took me about (2) hours. Don't force any clips, or connectors. Take your time to figure out how they come loose. If your using to much force, then your doing something wrong. The dealership wanted to charge me over $1,600 to replace the whole assembly - as they will not just replace the ballast - which is all that was needed. So, if your HID bulb is good...just take it out and test it on the opposite side light...then it is probably just the ballast. Just saved my mom $1,300 - so you can too.
Junior Member
Joined: May 2015
Posts: 2
Likes: 0
From: KY
Just to add to the Rev's note, once you jack up the car and remove the wheel, just look around the wheel well liner and remove all the nuts and screws you can see holding it on. You'll have to wiggle it a bit here and there, but it will come out. Don't worry about breaking it, it won't break.
Thank you in advance
Veteran Member
Joined: May 2011
Posts: 1,230
Likes: 155
From: Waterford, MI
I think this is the fastener that's giving you trouble. #C2S9354- The screw goes in and expands the legs. You have to hold the body to back off the screw (I think it is a phillips)- then pop it out by the shoulder. Also torx screws.

Junior Member
Joined: May 2015
Posts: 5
Likes: 0
From: woodstock,ny
Removing the headlight assembly can be trying if you have not done it before .. I am going to replace the plastic fasteners with something better like self tapping sheet metal screws if i cna find ones that fit . So that there are 4 different types of fasteners like original..
Also the foward torque screw is almost impossible to remove on the light assembly itself...i have replaced it with a 8 mmhex head bolt that it much easier to install and remove if necessary ...
Also the foward torque screw is almost impossible to remove on the light assembly itself...i have replaced it with a 8 mmhex head bolt that it much easier to install and remove if necessary ...
Junior Member
Joined: May 2015
Posts: 5
Likes: 0
From: woodstock,ny
When i say the plastic fasteners i mean on the fender well liner..... Why they have 4 different types is beyond me..correction:: I now want to have just one type like simple sheet metal screws so i dont have to keep changing tools to remove the fender well liner..
Senior Member
Joined: Dec 2013
Posts: 551
Likes: 202
From: Granite Falls
If you do a search for headlight lens replacement, you will find me. A couple months ago I replaced the passenger side lens on my 1999 XK8, and did a very clear step by step photo shoot as I progressed through it. It's also in the how to section here on the forums.

Junior Member
Joined: Jun 2018
Posts: 2
Likes: 0
From: Michigan
how does this headlamp cover attach. (i took the car in for service and didnt notice it was missing, yeah stupid me, or it fell off but they havent in all these years). i thought it would push in place no luck if course. im missing something. i cant find online what it is. please help. thx. kind regards, liis

Junior Member
Joined: Jun 2018
Posts: 2
Likes: 0
From: Michigan
Hi Johnken.
thx for the reply. no, not the washer fill bottle under the hood. the head lamp washer cover is for the headlamp washer fluid jet located in the headlamp. the cover is on the outside of the car located on the lower outside of the headlamp. basically it is a glass cover. attached pics off the web. lol too lazy to go to the garage. (i didnt want to take off the cover that is attached in case something breaks on the intact one and i cant snap it back in place. but that one is pretty much secured in there) i am guessing what ever is suppose to hold it in place was broken when the missing one was removed that is why it wasnt put back and like i said i didnt notice it to make them responsible as they were.
thx for the reply. no, not the washer fill bottle under the hood. the head lamp washer cover is for the headlamp washer fluid jet located in the headlamp. the cover is on the outside of the car located on the lower outside of the headlamp. basically it is a glass cover. attached pics off the web. lol too lazy to go to the garage. (i didnt want to take off the cover that is attached in case something breaks on the intact one and i cant snap it back in place. but that one is pretty much secured in there) i am guessing what ever is suppose to hold it in place was broken when the missing one was removed that is why it wasnt put back and like i said i didnt notice it to make them responsible as they were.
