XK8 / XKR ( X100 ) 1996 - 2006
Sponsored by:
Sponsored by:

All black headlight project

Thread Tools
 
Search this Thread
 
  #41  
Old 11-20-2013, 05:48 AM
philhef's Avatar
Veteran Member
Join Date: Feb 2011
Location: North Carolina
Posts: 2,916
Received 513 Likes on 333 Posts
Default

Originally Posted by XKRacer
Looks good...... 1 recommendation, use chromatic bulbs for the indicator, it will make it look even better
The look like LED bulbs. May be ale to use a small sharpie and black out the white housing around the LED chips.
 
  #42  
Old 11-20-2013, 07:02 AM
philhef's Avatar
Veteran Member
Join Date: Feb 2011
Location: North Carolina
Posts: 2,916
Received 513 Likes on 333 Posts
Default

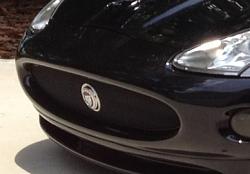
All black headlight project-image.jpg
Ignore the badge. You gotta have this grille. It really cleans up the nose! (So to speak!)
 
  #43  
Old 11-20-2013, 07:04 AM
philhef's Avatar
Veteran Member
Join Date: Feb 2011
Location: North Carolina
Posts: 2,916
Received 513 Likes on 333 Posts
Default

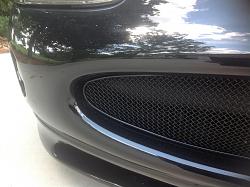
All black headlight project-image.jpg
Close up. After all you've done to the headlights, is would look awesome!! And if you can get to your headlights, you can pull the nose to install this!
 
  #44  
Old 11-20-2013, 08:32 AM
The Coupe's Avatar
Veteran Member
Join Date: Aug 2011
Location: South Carolina
Posts: 1,294
Received 369 Likes on 228 Posts
Default


.
 
Attached Thumbnails All black headlight project-hijack_zps43130b86.gif  
  #45  
Old 11-20-2013, 09:06 AM
killergsxr1's Avatar
Member
Thread Starter
Join Date: Aug 2013
Location: tucson AZ
Posts: 31
Likes: 0
Received 20 Likes on 9 Posts
Default

Phil your grill is badass but I like when the grill rounds outwards like mine.it keeps the round lines of the car and makes it all flow.. Stay tuned im in the prosess of making a lip for the rear decklid kinda like the new xkr has.its going to be a blend of xkr and aston lips but to match our xk curves
 
  #46  
Old 11-20-2013, 09:12 AM
philhef's Avatar
Veteran Member
Join Date: Feb 2011
Location: North Carolina
Posts: 2,916
Received 513 Likes on 333 Posts
Default

Originally Posted by killergsxr1
Phil your grill is badass but I like when the grill rounds outwards like mine.it keeps the round lines of the car and makes it all flow.. Stay tuned im in the prosess of making a lip for the rear decklid kinda like the new xkr has.its going to be a blend of xkr and aston lips but to match our xk curves
That sounds cool. I like the Aston rear spoiler.
How did you deal with the rubber gasket that's attached to the lens? btw
 
  #47  
Old 11-20-2013, 11:16 AM
killergsxr1's Avatar
Member
Thread Starter
Join Date: Aug 2013
Location: tucson AZ
Posts: 31
Likes: 0
Received 20 Likes on 9 Posts
Default

I found some new seals on ebay then used 100% pure silcon adhesive,it only took a very small amount and once it was cured I tried to seperate it and its strong as sh#t..ive used the same stuff on motorcycle lenses and those see speeds if 180 mph and havent failed
 
  #48  
Old 11-20-2013, 12:23 PM
philhef's Avatar
Veteran Member
Join Date: Feb 2011
Location: North Carolina
Posts: 2,916
Received 513 Likes on 333 Posts
Default

Finally got my lenses off! DAMN!!! That was WAY harder than my 88 XJS lenses. Did you use any solvent to clean off chrome? My right lens that had a bad water leak just wiped off most of the plastic but the other is really on there!!
I'm going to try my body color for mine. Enderle painted his blue inside to match his color. Always thought it was cool!
 
  #49  
Old 11-20-2013, 12:34 PM
killergsxr1's Avatar
Member
Thread Starter
Join Date: Aug 2013
Location: tucson AZ
Posts: 31
Likes: 0
Received 20 Likes on 9 Posts
Default

I used some xylene.very little.and some gray scotch bright..then lots of soap and water to clean the solvent off.then I scotch bright again dry then when I was satifyed.some panel wipe then let the etching primer do its job..i never got all the chrome off but I know I got all the bad stuff off...
 
  #50  
Old 11-20-2013, 08:40 PM
philhef's Avatar
Veteran Member
Join Date: Feb 2011
Location: North Carolina
Posts: 2,916
Received 513 Likes on 333 Posts
Default

I really hate you!!! I've spent all day messing with these lights, now they're primed and I'll paint tomorrow. Did you have any trouble with sealant squeezing inside? I've cleaned off all of the old from glass since some of it stuck to the housing.
And how do your turn signals work without the chrome behind?
 
  #51  
Old 11-21-2013, 09:55 AM
philhef's Avatar
Veteran Member
Join Date: Feb 2011
Location: North Carolina
Posts: 2,916
Received 513 Likes on 333 Posts
Default

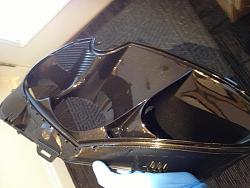
All black headlight project-image.jpg
On the way!! Hope they look as good as yours!!
 
The following users liked this post:
dannyS (11-23-2013)
  #52  
Old 11-21-2013, 10:00 AM
philhef's Avatar
Veteran Member
Join Date: Feb 2011
Location: North Carolina
Posts: 2,916
Received 513 Likes on 333 Posts
Default

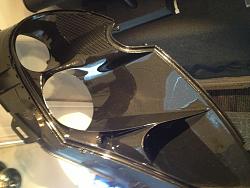
All black headlight project-image.jpg
Another shot. Still 50/50 on body color, yours look so good all black. But my color is really dark.
 
  #53  
Old 11-21-2013, 10:09 AM
killergsxr1's Avatar
Member
Thread Starter
Join Date: Aug 2013
Location: tucson AZ
Posts: 31
Likes: 0
Received 20 Likes on 9 Posts
Default

I left it chrome behind the turn signal lense..and I used very little sealant so it didnt go everywhere...
 
The following users liked this post:
White Bear (04-27-2014)
  #54  
Old 11-21-2013, 11:25 AM
philhef's Avatar
Veteran Member
Join Date: Feb 2011
Location: North Carolina
Posts: 2,916
Received 513 Likes on 333 Posts
Default

Originally Posted by killergsxr1
I left it chrome behind the turn signal lense..and I used very little sealant so it didnt go everywhere...
does the road rash on the glass bother you? Assuming yours are similar to mine? Seems to show up more on the black interior than the chrome. \
And of course my chrome is now painted behind signal. I may try to do something about that.
 
  #55  
Old 12-16-2013, 12:43 PM
Mr. Feathers's Avatar
Senior Member
Join Date: Jul 2013
Location: California, USA
Posts: 212
Received 29 Likes on 22 Posts
Default

It looks good on a dark colored car, but what about a light colored one? Any photos out there?
 
  #56  
Old 01-03-2014, 05:00 PM
Hare's Avatar
Senior Member
Join Date: Jan 2012
Location: Mattawa, Ontario,Canada
Posts: 160
Received 40 Likes on 25 Posts
Default

Going to do the HID mod but I have one question. Do I need a CANBUS Digital Error-cancelling kit ? A site for a Canadian HID dist says it is required but I have not read of it being needed on this site?
 
  #57  
Old 01-03-2014, 05:19 PM
XKRacer's Avatar
Veteran Member
Join Date: Oct 2010
Location: UK
Posts: 2,255
Received 576 Likes on 475 Posts
Default

Simple answer is No

When you have a bulb out you do not get an error message unlike the rears...... Always made perfect sense to me, why would you, you can tell you have a light out, I would accept a side light but if you can't tell you have a dip beam out you need an eye test
 
The following users liked this post:
Hare (01-03-2014)
  #58  
Old 01-03-2014, 05:21 PM
Hare's Avatar
Senior Member
Join Date: Jan 2012
Location: Mattawa, Ontario,Canada
Posts: 160
Received 40 Likes on 25 Posts
Default

but if you can't tell you have a dip beam out you need an eye test

LOl...thanks.
 
  #59  
Old 02-26-2014, 04:55 PM
dannyS's Avatar
Senior Member
Join Date: Apr 2012
Location: San Diego, CA
Posts: 217
Received 30 Likes on 22 Posts
Default

Originally Posted by XKRacer
What I did to separate the lens from the body was put it in the oven when the wife is out, at about 150C for roughly 30 minutes. I found doing it with a hot air gun was a bit hit and miss and I broke a lens, doing it in the oven you just take it out every few minutes and give it a little tug, eventually it pulls away quite easily.

To stick them back on is simple, you want some polyurethane sealant, commonly known in the trade as "bond n seal", a few trade names are Tiger Seal and Sikaflex. Don't go made with the sealant just a thin line in the track the glass sits into, what you don't want is the sealant squeezing out on the inside of the glass. leave it for 24 hrs, then go back and seal some more around the edge, I even used it to stick the rubber trim back on, clean off any excess with some spirit based liquid, panel wipe or brake cleaner works well...... Jobs a goodun!!

Hi gents, XKRacer.
I would like to improve the look of my headlights this spring, and after many failed approaches I decided to go the "oven" way . However, killergsxr1 (the black headlight mod thread founder) mentioned getting seals from eBay which he used in the process of putting the lenses together. I was unable to find compatible seals no matter where I look, and judging from your the above (XKRacers) "bond n seal" suggestion I may not need to worry about seals after all. Could somebody advise whether it is feasible to assemble the headlight without the seal?
Thank you in advance for your time and help.
 
  #60  
Old 02-27-2014, 06:39 AM
philhef's Avatar
Veteran Member
Join Date: Feb 2011
Location: North Carolina
Posts: 2,916
Received 513 Likes on 333 Posts
Default

Originally Posted by dannyS
Hi gents, XKRacer.
I would like to improve the look of my headlights this spring, and after many failed approaches I decided to go the "oven" way . However, killergsxr1 (the black headlight mod thread founder) mentioned getting seals from eBay which he used in the process of putting the lenses together. I was unable to find compatible seals no matter where I look, and judging from your the above (XKRacers) "bond n seal" suggestion I may not need to worry about seals after all. Could somebody advise whether it is feasible to assemble the headlight without the seal?
Thank you in advance for your time and help.
I think the seal your talking about is the rubber gasket on the outer edge of glass. There is no seal holding the glass to the plastic. It's a type of glazing. I used black silicone and taped them together for a couple days. I reused the rubber outer strip and used a gasket/trim glue from auto zone to put it back on.
 
The following users liked this post:
dannyS (02-27-2014)


Quick Reply: All black headlight project


All times are GMT -5. The time now is 03:35 PM.