When you click on links to various merchants on this site and make a purchase, this can result in this site earning a commission. Affiliate programs and affiliations include, but are not limited to, the eBay Partner Network.
"$80 in labor was worth me not having the frustrations and hours spent by others I have read about in this thread."
A Jag dealer did it for $80?!? That's amazing. $100 an hour is peanuts for those places. I'm assuming that didn't include doing the oil cooler and hoses. Absolutely, not having to do the job by oneself is worth $80. The only reason my car has a brake switch in it is my daughter's tiny hand was able to reach up and get the switch in position.
Oh no, that was the labor charge only for the switch, I think it was 1/3 hour. The oil cooler and other work done... well, I racked up over 3K on that one visit. That is why I had it done in conjunction with the other work, just rolled it in with the list of other things (annual service, replace brake fluid, etc).
After reading all the posts on this thread I headed over to my local indy shop and asked if they had a mechanic that was young, thin, and had hands like a 12 year old girl. The owner looked and me strangely but said: "why yes we do."
Oh no, that was the labor charge only for the switch, I think it was 1/3 hour. The oil cooler and other work done... well, I racked up over 3K on that one visit. That is why I had it done in conjunction with the other work, just rolled it in with the list of other things (annual service, replace brake fluid, etc).
Ah, that's more like the Jag dealer rates we know and love.
Had the switch replaced at my local indy shop. $112 labor and that included the MOT. (yearly inspection) Even the skinny fella had trouble getting the new one in.
This info was a great help. To help line the bolts and holes up for the brake switch I tied fishing line to the threaded bolts on the old unit then took the switch off, re tie the line onto the replacement and then refit the new unit, it made it a10min re installation using the line under tension to position the bolts.
Originally Posted by sgtofmarines1775
I recently replaced the brake light switch on my '98 XK8, and I thought I'd go ahead and document the process here for others. I am going to attempt to include several pictures. As this will be my first time doing so on this forum, I'll keep my fingers crossed.
Some of the steps/pictures included here may seem painfully obvious, but I subscribe to the theory that having too much information is vastly preferable to not having enough. So without further ado, here are my notes:
Supplies used:
New brake switch ($70+tax from dealer)
Socket wrench with 12" extension
8mm socket
Piece of scrap wood about 15" long
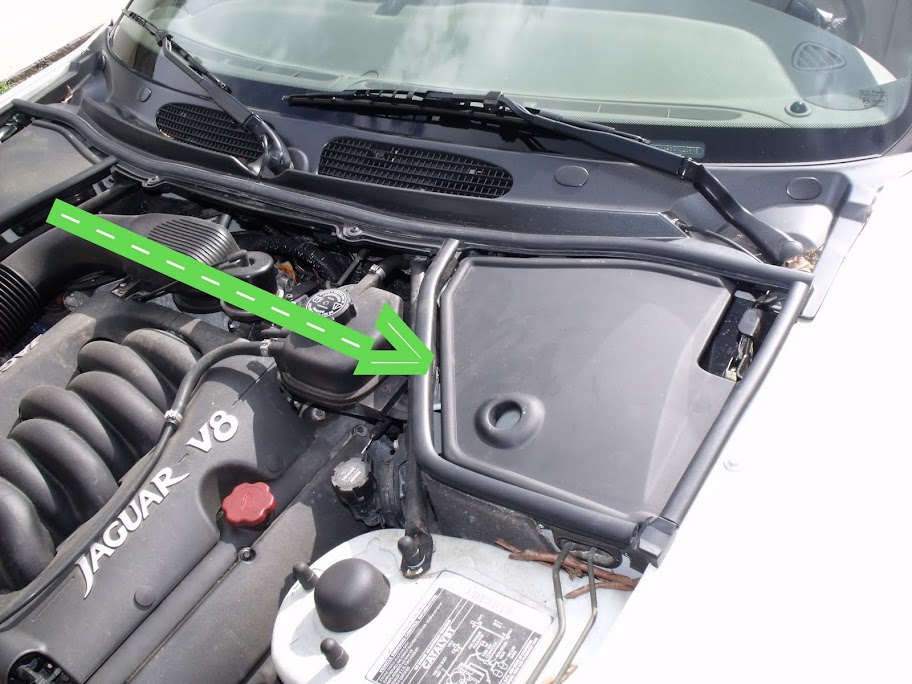
The nuts which mount the brake switch bracket to the vehicle's body are located under the hood/bonnet. After opening the hood, you need to remove the plastic cover identified by the green arrow below. Simply insert a finger or two into the hole presumably provided for this purpose and lift up and in towards the center of the car.
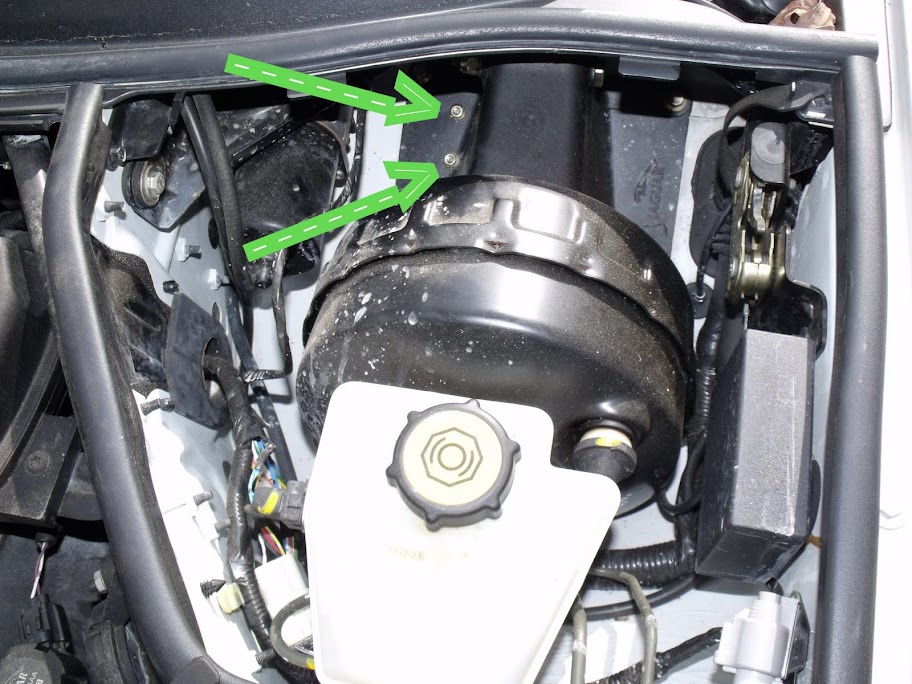
Next, remove the two 8mm nuts indicated in the picture below. You will need an extension if using a socket wrench. I used a 12" extension and had a few inches to spare.
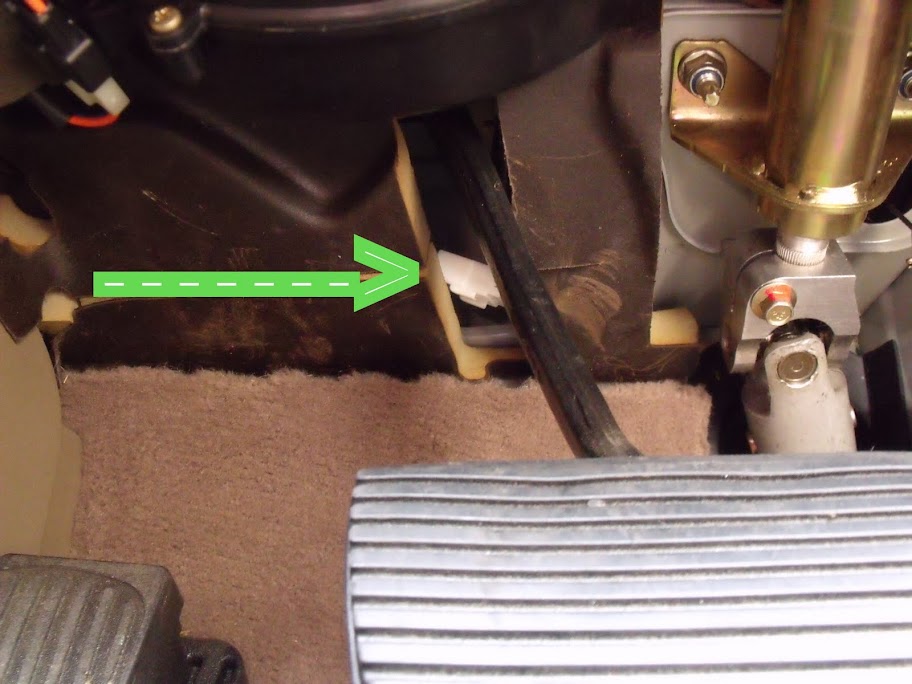
Now move to the vehicle's interior and unplug the switch's electrical connector, which is located behind the brake pedal. Mine was readily visible, but even if yours isn't, you should easily be able to find it by tracing the wire from the switch.
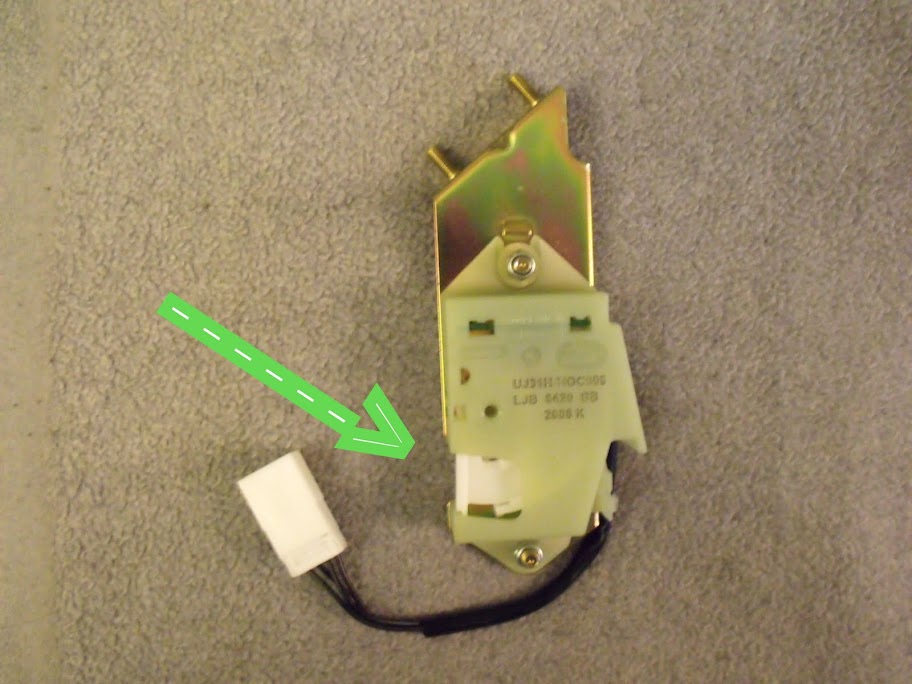
Remove the old switch and replace it with the new one. NOTE: The switch is designed to be engaged when the brake pedal is RELEASED. You will probably be working blind (I was unable to see the mouting holes no matter how I positioned myself), so if you do not orient the new switch properly, you will waste a lot of time trying in vain to mate the bracket's studs to the holes where they belong. There is a horizontal bar that protrudes from the brake pedal stem. This bar and the actual switch that is activated are shown in the two photos below.The side of the switch housing that allows the switch to make contact with the bar should face toward the front of the car.
If you are replacing the switch by yourself, you can wedge a piece of wood or something else under the switch to help hold it in place while you re-attach the nuts. Once the nuts are in place, re-connect the elctrical connector and test the switch. After the replacement, my brake lights stayed on even when the pedal was released. A gentle wiggle of the switch followed by a little additional tightening of the nuts solved the problem. Do not over-tighten the nuts. I don't have torque numbers for them, but maybe someone else here does.
I just removed my switch and tested it. This was due to my brake lights being stuck on. Prior to this my shifter lockout solenoid was intermittent and also seemed to correspond with other issues such as window operation, central locking, multiple warnings for doors, boot and bonnet being open. I was racking my brain trying to chase this down. I removed and tested door micro switches, hard restarts and so on.
It turns out that my switch was in good operational order electrically. I’m thinking the switch assembly was simply out of adjustment and making my life miserable.
"It turns out that my switch was in good operational order electrically. I’m thinking the switch assembly was simply out of adjustment and making my life miserable."
So, do the brake lights work properly now? How about all your other "symptoms"? Hate to say it, but you should have put a new switch in, anyway. The original is almost guaranteed to eventually fail. My fail was intermittent... until it wasn't. Good luck!
Almost every DIYer initially "tests" the switch assembly and thinks it is good, but the failures are intermittent and the timing between the two micro-switches opening and closing is important.
IMHO, the symptoms will persist until you replace the switch assembly.
Good luck.
"$80 in labor was worth me not having the frustrations and hours spent by others I have read about in this thread."
A Jag dealer did it for $80?!? That's amazing. $100 an hour is peanuts for those places. I'm assuming that didn't include doing the oil cooler and hoses. Absolutely, not having to do the job by oneself is worth $80. The only reason my car has a brake switch in it is my daughter's tiny hand was able to reach up and get the switch in position.
$80 is a steal. Cherry Hill Jaguar wants $420 plus tax and that's if you have the switch.
I am not sure why this is such a big deal. I believe the two bolt (nut) heads are 7 mm. Get two wrenches: one that is a ratching wrench and the other can be regular. I ordered a cheapie off eBay.
By just knelling at the door of the car I was able to change mine out in about 10 minutes. I did not even open the hood. One can search in this thread as I think I posted about it earlier.
My 1998 UK XK8 only used two of the pins. I opened it while waiting for the replacement to be delivered. Kind of kicked myself after I managed to fix it with a �1.50 microswitch from Maplin. Could have saved myself �60 on replacing the complete switch. Still, I know I have a quality component and not something that could be unreliable.
By the way, if you want an easy way to put the switch back on the car use you head. Literaly, that is, to hold the brake pedal down and looking up you should see one of the holes for locating the switch. Bet you get it back in first try.
I am getting cruise control cancelled and also rear bulb failure which can supposedly be traced back to the 2 micro switches in the brake switch. When you had the switch apart, was the micro switch the same as link below? Honeywell Micro Switch STR LVR SPDT 3A 125V ZD30S60C02-Z
hi, I am new to this forum, I have the same problem Engine Fault, I just wanted to ask after changing the switch, did it fix the problem
I swapped out both of the micro switches almost exactly 3yrs ago (04/01/2018 to be exact), and I've had not a single issue with them since. Wasn't a real fun job removing and installing, but definitely well worth the effort. I did a 20 hour round trip drive afew days after I did the switches, and my foot thanked me.
hi, I am new to this forum, I have the same problem Engine Fault, I just wanted to ask after changing the switch, did it fix the problem
The switch has two microswitches, one brings in the lights and one switches cruise control off. If they don't switch at the same time it throws a fault check rear lights cruise disabled.
Remove the switch from underneath the brake peddle. One 8mm nut, and remove it, and the top has a slot, so it should come out of You just slacker off the top nut. Need to undo the white connector and snip the tie wrap.
Unsolder the switches and replace.
The micro switch has three connectors, one is normally open, one is normally closed, and one is a common.
Just wire into circuit you don't have to worry about which is which. Then pop it back.
It will be all good and will clear your fault.
Others will tell you the code for the switch available in You country.
Hey Guys,
All the the good food talk is making me want to visit the south again. Just a heads, up if you do remove your seat to get better access be sure to disconnect the battery first.
It would be be a lot harder to replace the switch with two black eyes and a possible broken nose form the side air bag going off! in your face!
I just finished my install on the brake position switch. After 2 hours and nearly breaking my neck under the dash, I figured there had to be a better way!
So....I fed a loop of dental floss down into the mounting holes and tied the ends onto the threaded stud ends.
With my son inside guiding the sensor into place on the pedal arm and myself pulling on the strings we had it done in 30 seconds.
(facepalm)
I hope this can save you guys the trouble.
Never mind the dust here is what that looks like. And you can share the joy of my new coolant overflow tank!
Job done!
Dental floss on the stud ends - tie on inside the car. Gently pull the switch into place. My new coolant overflow tank.