
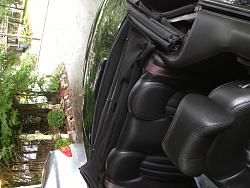
My new black headliner for 45.00.

Veteran Member
Joined: Feb 2011
Posts: 1,059
Likes: 134
From: Mtn View, CA
Thanks for the tips! Even though I paid close attention to everything you said in this thread, every bit helps. I'll be doing it outside, and I have hepa masks, though they don't really help with fumes, it does help with the particulate matter floating about.
I'm going to be spraying the pillars and the visors as well.
I would try to Rit-Dye all the grey plastics, but I'm fairly certain they probably wouldn't take.
I'm going to be spraying the pillars and the visors as well.
I would try to Rit-Dye all the grey plastics, but I'm fairly certain they probably wouldn't take.
Thread Starter
|
Veteran Member
Joined: Feb 2011
Posts: 2,916
Likes: 547
From: North Carolina
Thanks for the tips! Even though I paid close attention to everything you said in this thread, every bit helps. I'll be doing it outside, and I have hepa masks, though they don't really help with fumes, it does help with the particulate matter floating about.
I'm going to be spraying the pillars and the visors as well.
I would try to Rit-Dye all the grey plastics, but I'm fairly certain they probably wouldn't take.
I'm going to be spraying the pillars and the visors as well.
I would try to Rit-Dye all the grey plastics, but I'm fairly certain they probably wouldn't take.
Veteran Member
Joined: Feb 2011
Posts: 1,059
Likes: 134
From: Mtn View, CA
Any chance you can take some better pictures with a camera? I admit, I'm a bit concerned with actually doing it, cause once you do it, you can't really go back. I'd like to see a picture of what the top looks like completely down, how you say it looks crumpled or out of the ordinary if possible. I'm still gonna do it, but I'd like to see better pictures if possible. If not, no worries.
Thread Starter
|
Veteran Member
Joined: Feb 2011
Posts: 2,916
Likes: 547
From: North Carolina
Here's a pic down. It's raining here today so I'll add a few more when it stops.
The flash makes it look a bit mottled but its solid black. It looks like the more I use it it gets softer.
The flash makes it look a bit mottled but its solid black. It looks like the more I use it it gets softer.


Veteran Member


Joined: Apr 2010
Posts: 7,657
Likes: 3,020
From: Arlington VA USA
Attachment 51538
iPad flips pics. Sorry.
iPad flips pics. Sorry.
Consider trying the spray also on the faded seatbelts that almost every black XK8 has.
Thread Starter
|
Veteran Member
Joined: Feb 2011
Posts: 2,916
Likes: 547
From: North Carolina
Black on black on black on black on black! Lol
I think that's why I want the suede in the seats and door inserts. Needs texture. A friend has an amazing Porsche Boxster S with a black leather interior and red piping and stitching details in the seats. It's soooo hot! If I could figure out how to do something to give a touch of color to my interior, I would. I've actually thought about using the red as well since I've got the red badges and caliper covers.
All ideas swimming around in my head. I may make a mock up and stick to door just to get a feel before I make any real commitment. Doors I can do myself, seats, not so much!!
Any custom interior pics out there??
Also found a carbon fiber vinyl that looks interesting as well. Again, just thinking.
Last edited by philhef; Aug 19, 2013 at 08:26 PM.

Veteran Member
Joined: Feb 2011
Posts: 1,059
Likes: 134
From: Mtn View, CA
So far I only managed to do the pilliars and the front top piece. Haven't done the headliner yet. So far, 1.5 cans. I'll probably need a 5th can to finish the headliner, but we'll see. That should get done tomorrow.
Overall I'm pleased with the results of the paint on cloth, but on plastic it doesn't seem to bond so well. I've set some parts to cure overnight, hopefully the plastic bits that I've painted will be sufficient.
Overall I'm pleased with the results of the paint on cloth, but on plastic it doesn't seem to bond so well. I've set some parts to cure overnight, hopefully the plastic bits that I've painted will be sufficient.
Thread Starter
|
Veteran Member
Joined: Feb 2011
Posts: 2,916
Likes: 547
From: North Carolina
So far I only managed to do the pilliars and the front top piece. Haven't done the headliner yet. So far, 1.5 cans. I'll probably need a 5th can to finish the headliner, but we'll see. That should get done tomorrow.
Overall I'm pleased with the results of the paint on cloth, but on plastic it doesn't seem to bond so well. I've set some parts to cure overnight, hopefully the plastic bits that I've painted will be sufficient.
Overall I'm pleased with the results of the paint on cloth, but on plastic it doesn't seem to bond so well. I've set some parts to cure overnight, hopefully the plastic bits that I've painted will be sufficient.
I've really been using the convertible top and its really holding up well. I actually usually much more now that I'm embarrassed to leave the top cover off. And the fabric is stiffer so it doesn't flap in the wind.
I also just sprayed my old mats to use on long rainy spells and they even look brand new. This paint is the bomb.
Veteran Member
Joined: Feb 2011
Posts: 1,059
Likes: 134
From: Mtn View, CA
Yeah, on cloth, that paint works great. Getting it nice and even black all across wasn't an issue like I thought it might be... you do need to make sure and get proper coverage. And my foam cloth still feels nice and rebounds well. I'm absolutely certain the headliner will come out just fine as well!
Thread Starter
|
Veteran Member
Joined: Feb 2011
Posts: 2,916
Likes: 547
From: North Carolina
Yeah, on cloth, that paint works great. Getting it nice and even black all across wasn't an issue like I thought it might be... you do need to make sure and get proper coverage. And my foam cloth still feels nice and rebounds well. I'm absolutely certain the headliner will come out just fine as well!
Veteran Member
Joined: Jun 2012
Posts: 1,245
Likes: 339
From: Gainesville, VA
First: Mucho Thanks to Philhef for giving me the nudge to do this.
Changing the visors from gray to tan has taken a fair amount of paint - more than one can. After a few coats, I noticed that the surface of the visors was becoming very rough. Tufts of cloth were sticking up and hardening. From a tactile standpoint, it was unacceptable. You can see these bumps clearly in the pic.
BTW: the paint was wet when I took the first pic - the wrinkles on the label flattened completely when the pain dried. It looks a little strange because the color differs from the surrounding cloth, but I hate visor labels (except the "women should remove constricting clothing" of course - lol), so it doesn't bother me too much.
Remember to save enough paint for one last coat with the mirror flaps closed. There will be an unpainted line just along the previously rotated edge.
I tried various methods to smooth and soften the surface. What finally worked well was a very fine Scotch-Brite cloth. To be honest, the cloth was already worn a bit from occasional kitchen use; I can't say for sure that a new, unworn cloth would be as effective. I believe that scrubbing the surface smooth after every one or two coats throughout the process will definitely improve the project. It may also apply to other cloth-painting projects.
As Always: GOOD LUCK TO US ALL!
Last edited by scardini1; Sep 15, 2013 at 01:54 PM.
Thread Starter
|
Veteran Member
Joined: Feb 2011
Posts: 2,916
Likes: 547
From: North Carolina
First: Mucho Thanks to Philhef for giving me the nudge to do this.
Changing the visors from gray to tan has taken a fair amount of paint - more than one can. After a few coats, I noticed that the surface of the visors was becoming very rough. Tufts of cloth were sticking up and hardening. From a tactile standpoint, it was unacceptable. You can see these bumps clearly in the pic.
BTW: the paint was wet when I took the first pic - the wrinkles on the label flattened completely when the pain dried. It looks a little strange because the color differs from the surrounding cloth, but I hate visor labels (except the "women should remove constricting clothing" of course - lol), so it doesn't bother me too much.
Remember to save enough paint for one last coat with the mirror flaps closed. There will be an unpainted line just along the previously rotated edge.
I tried various methods to smooth and soften the surface. What finally worked well was a very fine Scotch-Brite cloth. To be honest, the cloth was already worn a bit from occasional kitchen use; I can't say for sure that a new, unworn cloth would be as effective. I believe that scrubbing the surface smooth after every one or two coats throughout the process will definitely improve the project. It may also apply to other cloth-painting projects.
As Always: GOOD LUCK TO US ALL!
Changing the visors from gray to tan has taken a fair amount of paint - more than one can. After a few coats, I noticed that the surface of the visors was becoming very rough. Tufts of cloth were sticking up and hardening. From a tactile standpoint, it was unacceptable. You can see these bumps clearly in the pic.
BTW: the paint was wet when I took the first pic - the wrinkles on the label flattened completely when the pain dried. It looks a little strange because the color differs from the surrounding cloth, but I hate visor labels (except the "women should remove constricting clothing" of course - lol), so it doesn't bother me too much.
Remember to save enough paint for one last coat with the mirror flaps closed. There will be an unpainted line just along the previously rotated edge.
I tried various methods to smooth and soften the surface. What finally worked well was a very fine Scotch-Brite cloth. To be honest, the cloth was already worn a bit from occasional kitchen use; I can't say for sure that a new, unworn cloth would be as effective. I believe that scrubbing the surface smooth after every one or two coats throughout the process will definitely improve the project. It may also apply to other cloth-painting projects.
As Always: GOOD LUCK TO US ALL!
I had a bit of the rough look but I didn't mind. It's much better than the really stained headliner I had!
And an update on wear. Since I've had the remote top, I use it every day. The finish has held up perfectly. Ad I don't have to use the top cover now. Looks great all black!
Thread Starter
|
Veteran Member
Joined: Feb 2011
Posts: 2,916
Likes: 547
From: North Carolina
How does the tan match? I know they look better in person too! I can't get a single photo of mine to look as good as in person!
Veteran Member
Joined: Feb 2011
Posts: 1,059
Likes: 134
From: Mtn View, CA
The airbag decals looked like that on mine when they were wet with paint... as soon as they dried, they dried nice and flat.
I still haven't done the headliner, but I'm all prepared... I dug through my storage locker and found my paint mask and I have a little more than 2 cans left and all the plastic sheeting I'll need. I was just waiting for the ambient temps to drop below 80 so I wouldn't melt inside....
I have the front pilliars, the top and all the plastic bits done already. Another XK owner saw me when I was at the auto parts store and he seemed pretty impressed. The black makes it look so much more modern and new.
I'm disappointed that the factory didn't realize they were doing the verts a disservice by doing grey interior. Black just makes the car look so much newer and much more expensive. I'll post pictures when I'm done.
Thread Starter
|
Veteran Member
Joined: Feb 2011
Posts: 2,916
Likes: 547
From: North Carolina
Mine too, actually look a bit like suede. I think the black may hide a lot of flaws. My bother's tan mustang looked more like these tan visors. It takes a lot to cover the lighter colors I guess.