
Pics of my Garmin GPS install

Thread Starter
|
Veteran Member


Joined: May 2010
Posts: 4,114
Likes: 1,274
From: North Carolina
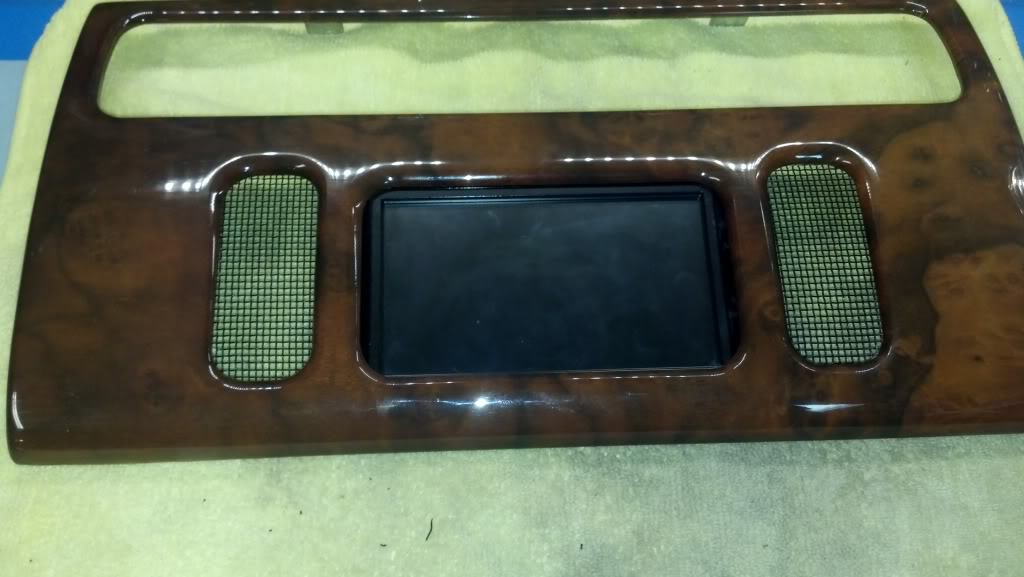
Over a year ago I removed the factory nav system and installed a Garmin 1490t, which is a 5 inch GPS. At the time I just had black pieces of cardboard covering the openings where the switches used to be. Since then I've done some tweaking to make it look better. I bought some black #10 mesh on eBay, made a form, and hammered the mesh into a convex shape to match the switch holes. I also painted the mesh flat black. The holes in the mesh allowed me to see back into the cavity behind the GPS, so I took some black fabric and glued it behind the mesh. The pics below make it look kinda crappy, but it's really just the lighting. In broad daylight the GPS and the mesh pieces look like they were installed at the factory. I took some black caulk and caulked around the edges of the GPS to hide the slight gap between the GPS and the wood trim. It's wired straight to switched power, so it automatically turns on and off with the car. In every way it feels and looks like a factory unit now, with one exception, the sound comes out of the little speaker in the back of the GPS. I can hear it fine, even with the top down, unless I have the tunes cranked up. Thanks to a tip from WhiteXKR I think I'll have that fixed soon. I'm going to open up the GPS unit, tap into the tiny speaker wires, and route them to the nav audio input on the amplifier. If it works the way I expect, whenever my Garmin lady starts to speak the amp will mute the music and play the Garmin lady's voice through the car speakers.
Anyway... I'm happy with it. It's soooo much better than the factory GPS and it's better than sticking a suction-cup GPS to the windshield.
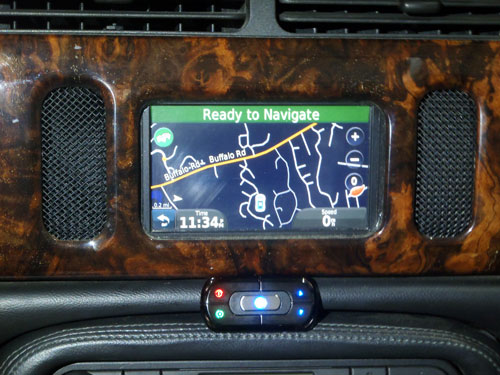
Also, the Garmin functions as a picture viewer, too. I found a few leaper pics in the internet and I downloaded them to the unit. Now, when I'm not using the GPS I can set it so it shows a leaper!

The little thing with the colored lights is my new Motorola T605 bluetooth unit. It allows me to talk on the phone hands-free, and play the music on my phone through the car speakers without having to plug the phone into anything.
Anyway... I'm happy with it. It's soooo much better than the factory GPS and it's better than sticking a suction-cup GPS to the windshield.
Also, the Garmin functions as a picture viewer, too. I found a few leaper pics in the internet and I downloaded them to the unit. Now, when I'm not using the GPS I can set it so it shows a leaper!
The little thing with the colored lights is my new Motorola T605 bluetooth unit. It allows me to talk on the phone hands-free, and play the music on my phone through the car speakers without having to plug the phone into anything.
Last edited by Reverend Sam; Sep 1, 2011 at 11:10 PM.
Thread Starter
|
Veteran Member
Joined: May 2010
Posts: 4,114
Likes: 1,274
From: North Carolina
It gets better! I just bought THIS:

It's a P.I.E 1VT. I got it from sonicelectronics.com It will allow me to trigger the mute wire on the radio head unit to silence the radio. I'm going to crack open the back of the Garmin and tap into the wires for that tiny little speaker. The PIE 1VT will mute the radio and then the Garmin lady's voice will play through the car speakers. This will be cool!
It's a P.I.E 1VT. I got it from sonicelectronics.com It will allow me to trigger the mute wire on the radio head unit to silence the radio. I'm going to crack open the back of the Garmin and tap into the wires for that tiny little speaker. The PIE 1VT will mute the radio and then the Garmin lady's voice will play through the car speakers. This will be cool!
Thread Starter
|
Veteran Member
Joined: May 2010
Posts: 4,114
Likes: 1,274
From: North Carolina
Well, I bought both. I was reading the instructions for the TR-7 and it said there was a 1 second delay between when the device was triggered and then the output activated. It wasn't until about ten minutes ago when I read your post in the "Garmin audio through stereo" thread that I learned about feature 12. I'm going to try the 1VT first. If it doesn't work then I'll try the TR-7. I'm hoping the 1VT will work because I'd like to use the TR-7 as the trigger to activate my fuel pump relay.
Veteran Member
Joined: Apr 2010
Posts: 7,657
Likes: 3,020
From: Arlington VA USA
Can'y find a spec sheet, but some product descriptions say it has a 2 second turn on delay: PIE 1VT Low Voltage Trigger :: Car Stereos and components :: Discount Car Stereo
Veteran Member
Joined: Mar 2007
Posts: 11,393
Likes: 649
From: Planetarium
Trending Topics
Veteran Member
Joined: Apr 2010
Posts: 7,657
Likes: 3,020
From: Arlington VA USA
Well, I bought both. I was reading the instructions for the TR-7 and it said there was a 1 second delay between when the device was triggered and then the output activated. It wasn't until about ten minutes ago when I read your post in the "Garmin audio through stereo" thread that I learned about feature 12. I'm going to try the 1VT first. If it doesn't work then I'll try the TR-7. I'm hoping the 1VT will work because I'd like to use the TR-7 as the trigger to activate my fuel pump relay.
Last edited by WhiteXKR; Sep 5, 2011 at 06:46 AM.


Junior Member
Joined: Apr 2012
Posts: 5
Likes: 0
From: Raleigh, NC
I am currently working on doing the same exact setup on my moms 2001 XKR. Didn't even look at this thread first, just thought up the idea, figured the garmin would fit quite nicely and i would give it a go since the factory Nav is so outdated. I looked at the other thre0ad you posted in as well. Right now I have everything wired up. Unfortunately i live about 5 hours away from my parents and since I don't have everything available to finish the job I am going to have to take the wood trim home with me and mount the GPS at home and then install it when I return to visit them later in the summer. Plus I will have to cut out some of the metal trim piece that runs along the bottom.
Thread Starter
|
Veteran Member
Joined: May 2010
Posts: 4,114
Likes: 1,274
From: North Carolina
Yep... I had to cut that metal, too. It's very tough. I ended up using this tool to do the job:
3" Variable Speed Air Cutter
Before buying that thing I was trying to use a hack saw, which just didn't work.
There are some other 5 inch GPS units which have the power connector in a different location. Those might be easier to install without cutting, but I liked the Garmin 1490t at the time. I saw another GPS at Best Buy the other day which had a wider aspect ratio, so it might actually fit the hole better, but I forget what brand it was.
I eventually ended up just using the red 3M double-sided tape to hold the GPS to the back of the wood piece. It worked great. That 3M stuff is incredibly strong and heat resistant. Originally I used Bondo to hold it in place, but the Bondo was overkill and completely unnecessary. Then, one day I needed to get to the GPS and I had to chip away all of the Bondo. The double-sided tape was definitely the way to go.
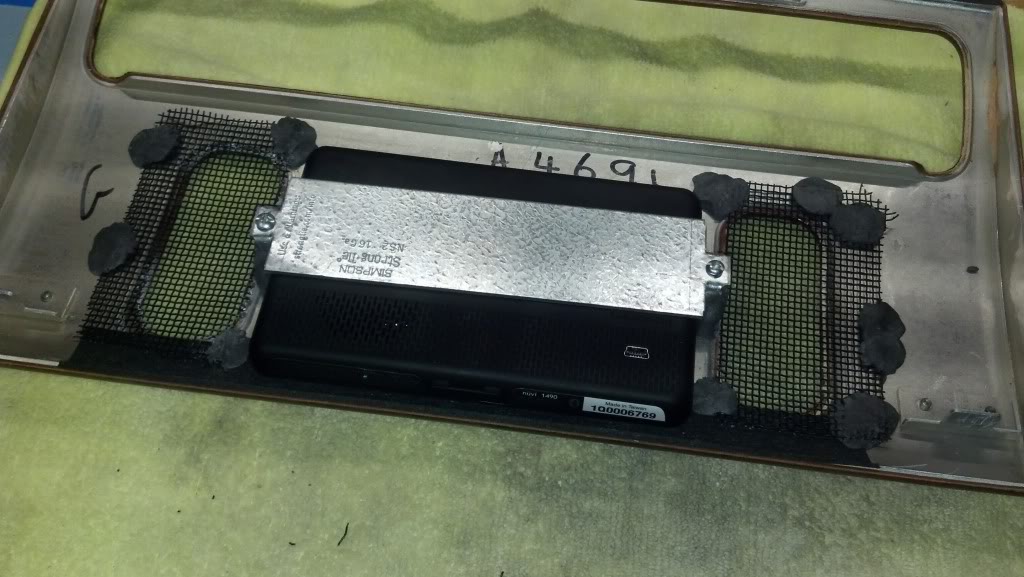
To help hold the unit in place a made a brace out of 1 inch angle aluminum. Here's a pic of the brace.

And here's a pic of it installed. I took two pieces of the double-sided tape about 1 inch square and layered them on top of each other, leaving the red plastic cover on the top piece of tape. I put the tape right in the middle of the piece of aluminum so that it pressed on the back of the GPS unit once it was installed. That way my finger pressure on the touch screen was transmitted through the unit to the aluminum brace. That prevented the repeated presses on the touch screen from weakening the tape holding the GPS in place.

You can't run the Garmin directly off of the 12vdc from the car. The little cigarette lighter plug has some electronics in it which converts the car's voltage to the correct voltage to run the GPS. I bought a cigarette lighter splitter from Radio Shack. The kind I bought has two flexible cords with a receptacle on each cord. I cut off the receptacles leaving as much cord as possible, then I tapped into the power on the connector back there in that cavity. I forget which wires I used, but I can look it up if you don't know which ones to tap into. You need to make sure you keep the positive and negative wires straight. The center pin on the cigarette light receptacle is positive and the sleeve around the outside is negative. If you wire it up backwards you'll fry the part of the GPS that plugs into the receptacle (ask me how I know).
So, after installing a cigarette lighter adapter in the cavity behind the GPS unit, I just plugged the Garmin power cord into the newly installed receptacle, taped it up with electrical tape so it wouldn't work its way loose, and then closed everything up. It works like a champ, and it is orders of magnitude superior to the factory nav system.
3" Variable Speed Air Cutter
Before buying that thing I was trying to use a hack saw, which just didn't work.
There are some other 5 inch GPS units which have the power connector in a different location. Those might be easier to install without cutting, but I liked the Garmin 1490t at the time. I saw another GPS at Best Buy the other day which had a wider aspect ratio, so it might actually fit the hole better, but I forget what brand it was.
I eventually ended up just using the red 3M double-sided tape to hold the GPS to the back of the wood piece. It worked great. That 3M stuff is incredibly strong and heat resistant. Originally I used Bondo to hold it in place, but the Bondo was overkill and completely unnecessary. Then, one day I needed to get to the GPS and I had to chip away all of the Bondo. The double-sided tape was definitely the way to go.
To help hold the unit in place a made a brace out of 1 inch angle aluminum. Here's a pic of the brace.
And here's a pic of it installed. I took two pieces of the double-sided tape about 1 inch square and layered them on top of each other, leaving the red plastic cover on the top piece of tape. I put the tape right in the middle of the piece of aluminum so that it pressed on the back of the GPS unit once it was installed. That way my finger pressure on the touch screen was transmitted through the unit to the aluminum brace. That prevented the repeated presses on the touch screen from weakening the tape holding the GPS in place.
You can't run the Garmin directly off of the 12vdc from the car. The little cigarette lighter plug has some electronics in it which converts the car's voltage to the correct voltage to run the GPS. I bought a cigarette lighter splitter from Radio Shack. The kind I bought has two flexible cords with a receptacle on each cord. I cut off the receptacles leaving as much cord as possible, then I tapped into the power on the connector back there in that cavity. I forget which wires I used, but I can look it up if you don't know which ones to tap into. You need to make sure you keep the positive and negative wires straight. The center pin on the cigarette light receptacle is positive and the sleeve around the outside is negative. If you wire it up backwards you'll fry the part of the GPS that plugs into the receptacle (ask me how I know).
So, after installing a cigarette lighter adapter in the cavity behind the GPS unit, I just plugged the Garmin power cord into the newly installed receptacle, taped it up with electrical tape so it wouldn't work its way loose, and then closed everything up. It works like a champ, and it is orders of magnitude superior to the factory nav system.
Junior Member
Joined: Apr 2012
Posts: 5
Likes: 0
From: Raleigh, NC
Well, I got it mounted using a metal piece from lowed that fit around the gps Perfectly and some steel reinforced jbweld. I will post pics later. Now I just need to figure out how to cover up the other holes. Also, I planned to use a dremal tool to cut the metal. Do you think that will do the job?
Thread Starter
|
Veteran Member
Joined: May 2010
Posts: 4,114
Likes: 1,274
From: North Carolina
I think the Dremel tool has zero chance of doing the job. Well... it might eventually work, but it would be about like using toothpaste and floss to cut through prison bars. That metal is very thick. You'd go through about a hundred bits before you finally got it done.
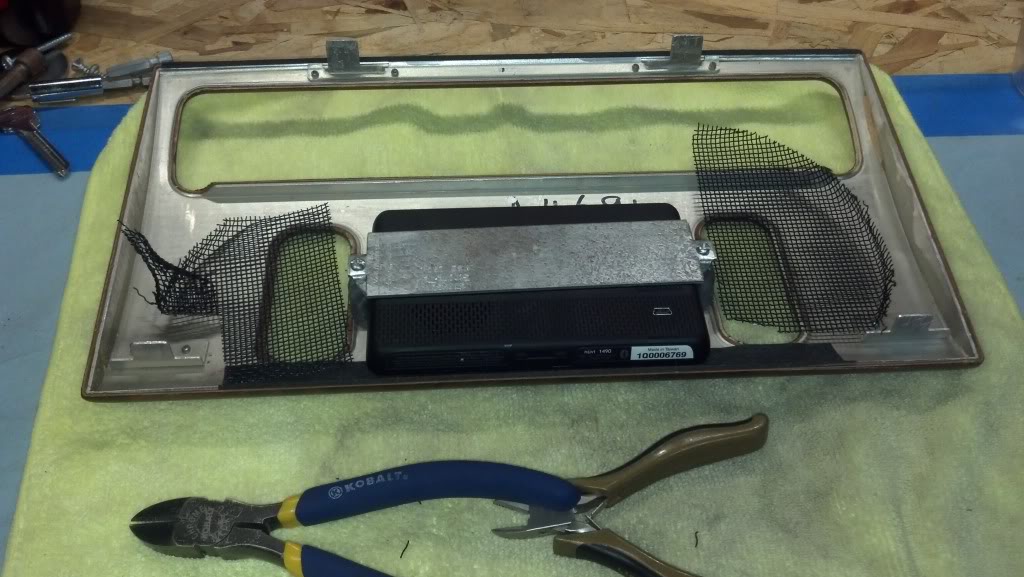
There's another thread on here somewhere in which another member shows how they filled in their holes. They used a speaker grill which they gently hammered into a hole they cut into a piece of plywood. I did something similar using stainless steel mesh. Prior to making the stainless steel mesh pieces, I just spray painted a couple of business cards flat black and taped them to the back side of the wood piece. It looked better than the empty holes, but the mesh was a definite improvement. The cards were just temporary.
There's another thread on here somewhere in which another member shows how they filled in their holes. They used a speaker grill which they gently hammered into a hole they cut into a piece of plywood. I did something similar using stainless steel mesh. Prior to making the stainless steel mesh pieces, I just spray painted a couple of business cards flat black and taped them to the back side of the wood piece. It looked better than the empty holes, but the mesh was a definite improvement. The cards were just temporary.
Junior Member
Joined: Apr 2012
Posts: 5
Likes: 0
From: Raleigh, NC
Nope, And i dont know how to edit on this forum. This should work.

Purchased a fairly old looking speaker grill from radioshack today for $3.13 They probably had it on the shelf since the late 80's, at least thats what it looked like. Right now I am almost finished, just have to get some black foam to put behind the speaker grills. Unfortunately the other problem i have run into is the gps screen does not was to work very well. I have to press very hard to get it to function and can be very temperamental. I bought off of ebay, go figure. However, i found a refurbished 1490lmt on walmart.com for $105 shipped.
Then the next hard part will be tackling that metal. Ugh.
Thread Starter
|
Veteran Member
Joined: May 2010
Posts: 4,114
Likes: 1,274
From: North Carolina
Another thing you can do is take some black RTV sealant and squeeze it in around the edges of the screen, especially on the left and right. That will fill in the gap and give it a more finished look. I used the tip of the tube to squeeze it into the gap and then I smoothed it with my finger. You can get RTV at Lowes in the adhesives section near the paint.
Thread Starter
|
Veteran Member
Joined: May 2010
Posts: 4,114
Likes: 1,274
From: North Carolina
Hey... I just thought of something. If there's anyone with an XK near Raleigh with a nav system in it and you'd like to dump the factory nav and install a Garmin or some other 5 inch GPS, send me a PM. You supply the GPS and pay me a very nominal fee for my time and we'll make a video of it. You'll also need a cigarette lighter splitter which you can get at Radio Shack for $10. If you get the Garmin on Craigslist you can probably have the complete setup for less than $200 installed.
Junior Member
Joined: Apr 2012
Posts: 5
Likes: 0
From: Raleigh, NC
Well after buying a used one on ebay and having problems with that I figured I would go for a new one and have the piece of mind of a warranty. Now I will just go and sell the old one back again on ebay.
Junior Member
Joined: Apr 2012
Posts: 5
Likes: 0
From: Raleigh, NC
Also, just saw your Youtube channel. Good stuff there. When I go back to visit them I am going to add the antenna elimination to the list of stuff to do. I have been wanting to do that for years.