When you click on links to various merchants on this site and make a purchase, this can result in this site earning a commission. Affiliate programs and affiliations include, but are not limited to, the eBay Partner Network.
Hey Guys, im brand new to the forum, this is my first post, and just bought my first XK ever last week. Its a 2002 XKR Coupe in BRG with 14K miles. i work for Ford as a Hybrid Powertrain Engineer and luckily i work for a Manager who used to design the XK8 and XJ8, so he has been a great source of advice
Anywho, here are the steps to install nearly ANY Reverse camera. I am installing the Garmin BC30/BC20 camera because they can be wirelessly used for the Garmin Navigation units (Which I swapped for the old Jag Navigation)
1. First off, remove the trunk lid carpeting retainer clips to expose the inside of the trunk lid.
2. Remove the 4 nuts that hold the chrome trunk trim piece and then remove the trim piece (which contains the license plate lights and trunk button)
3. open the license plate light bezel/cover and insert the camera wires through the opening and pull them through.
4. The new goal is to push the camera wires through the rubber grommet (the same one that the trunk button is going through) Since my camera wires are thick, then i cut a slit into the rubber grommet to help aid in passing the camera wires through it. After some persistence i got the camera wires through
5. Pull the wires through even more (from the back side) until the camera wire has a little bit of slack left. Reattach the 4 nuts to re-secure the chrome trim piece and then pull the camera wires even more to relieve the slack. Camera can be mounted at this time (NOTE: my camera bracket was attached to the license plate screw) With the camera mounted, reattach the license plate light bezel/cover. it might be a tight fit through the small gap on the light bezel/cover clip. but it should look like the 3rd picture.
6. Now feed the camera wires through the trunk lid to the right corner where the Hinge is located. i removed the rubber grommet which sends the wires to the hinge so that i could feed the wires through. Picture 2 should show the wires popping out of the hole where the rubber grommet was originally fixed.
(If you are using the Garmin BC30/BC20 unit, then you need to use the extension wires or the power wires from the wireless module. the camera will connect to the wireless unit inside the trunk lid while the wireless module power wires will be fished down to the trunk/cargo area. The picture below shows the camera connector joining the wireless module connector)
7. Now for the tricky part! We need the camera/power wires to be fished from the trunk lid and into the trunk/cargo area. If you have small wires, you can fish them through the same plastic tubing that the other wires are being fed through as shown in picture 1. it can then be received from the other end of the plastic tubing in the trunk area as shown in pictures 2 & 3. NOTE: my wire was too large to be fed through the plastic housing so i needed to fish it parallel to the plastic housing but still passing through each rubber grommet as shown in picture 4. Passing the wire through the rubber grommets was frustrating so i pulled them out and had to cut another slit in the grommet to pass the wires. but eventually i succeeded which gives you the 4th picture. i also ziptied my wire next to the plastic wire housing so it has less of a chance to snag or pinch with the trunk lid opens and closes.
8. Now that we have our wires passed through to the trunk/cargo area, we need to supply power from the reverse lights. I ran my wires behind the right carpeting wall next to (behind) the CD and Navigation units and got the wires to route just behind the right tail light. Now remove the right tail lamp cover (inside cover) and locate the wire connector which attaches to the tail light assembly. We want to connect to the 2nd and 3rd wires towards the center which should be a black and a yellow wire. (Black is Ground and Yellow is +12 Reverse lamp) i stripped a small amount and used gator clips onto the camera wires so i could test it out. Pictures 1 & 2. Once it tested correctly with my garmin unit and displayed the image, then i soldered the connections (Picture 3) and then used heat shrink to clean it up and protect the exposed areas.
9. Mount the wireless module (IF you have it) If you do not have a wireless unit then you will need to run the video feed wires to the center console. or if you are clever, cut and use the empty wires from the navigation unit because they go straight to the center console and then you can pick up the video feed quickly). Picture 1 shows me mounting the wireless module in the middle of the trunk lid (with 3M adhesive)...sorry its hard to see. Picture 2 shows me tucking the wires behind the carpet.
10. Reinstall the carpet retaining clips and then BAM!!! DONE! (Note: my camera was installed upside down in the bracket so i needed to flip it right-side-up) you may also need to calibrate the vehicle edge lines...but other than that you should be DONE!!!!!!!!!!
Clean install; nice post! Answers some questions I had about planning my own install (just waiting for some relief from the heat here in Lost Wages, NV).
you could pull the sensors out. but i personally wouldn't, the sensors are far apart and removing one would give dead zones when detecting in reverse. Im going to change the camera bracket and install it it reight under the chrome trim strip directly under the trunk button, it should look more slick and harder to notice
I'm in the middle of fitting a back-up camera system which plays through the OEM Satnav. I picked a camera position that I'd seen used in an S Type and that is in place of the trunk switch in the trunk plinth. The camera, a bullet style, is fitted through the boot lid, but up against the aperture left by removing the switch, as shown below. The aperture does not obscure the line of view of the camera.
Fortuitously, there is room in the space behind the plinth to allow the switch to be repositioned as shown below
Great instructions Reid! Everything was just as you described and everything worked, with no visible wires. The only problem is that I now get a persistent check rear lights message, even though all of my lights (and my camera) work fine. I have a 2001 XK-8. Does anyone have any ideas for what I can do to fix that?
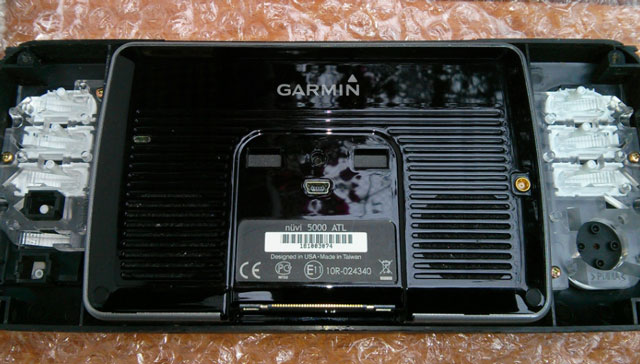
Does anyone know what Garmin unit he installed and how he installed it?
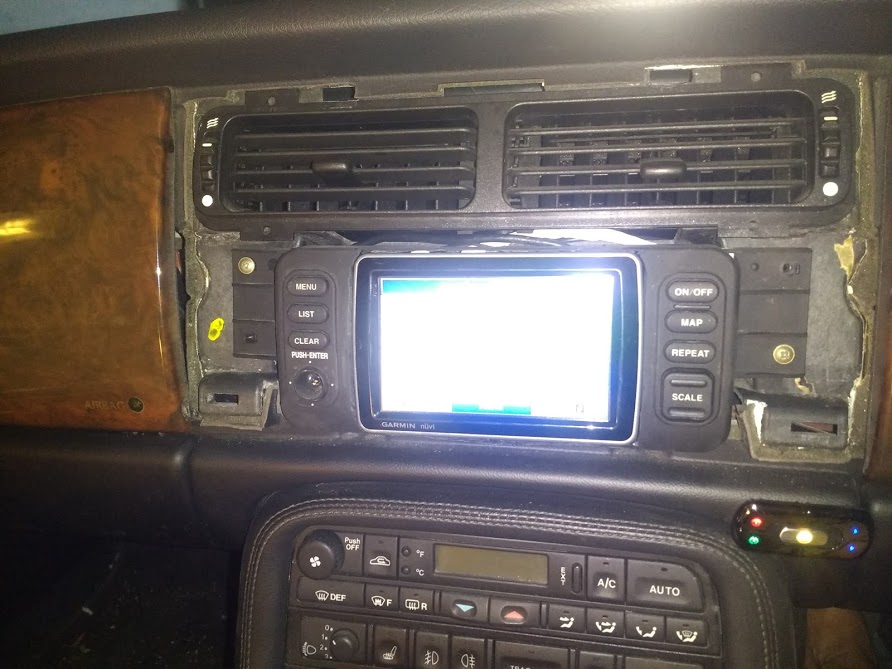
Pretty much any 5" Garmin sat nav will fit. When I did mine, I dismantled the original sat nav and kept the switches and bezel. I glued the Garmin into the original bezel:-
Which then mounts back in the dashboard using the original screws:-
I wired the buttons up to the backlight supply in the original sat nav connector and the finished result looks practically OEM:-
I would avoid the wireless Garmin cameras - expensive and poor picture quality and no real time saving on the install either. This is a cheap wired camera from ebay - far superior picture quality to the Garmin junk:-
This thread has more details, but search the forum for "sat nav upgrade" or "Garmin":-
You can also buy cameras that replace the rear number plate lights. They still they up the plate but its a much easier and cleaner install. I did this on my previous car and the power was supplied by the reversing lights. So you put the car into reverse and the camera automatically connected.
There are also ones you can replace your number plate with. For example on this UK site. Number plate cam
Just be careful with any camera that is installed on a plate cover. Some states have "Blue Laws" that allow any cops to pull over motorist with license plates that have any part of the plate "Unreadable within 100 ft.". Florida is one of those state. THe cops even have a forum where they discuss how they use this law to check out suspicious cars legally, or even cars they just want to check(the drivers?). As I stated earlier, a friend(68yr. old female at the time) was stopped on I-75, made to remove license plate surround my FHP officer on the side of the road while he stood and watched. Then allowed to proceed. All perfectly legal.
I had to change mine because the letters"ORI" were partially covered as the word 'Florida' arched over the top of the plate. Gotta love our public servants.