
Rear suspension clunk


Thread Starter
|
Senior Member
Joined: Oct 2009
Posts: 328
Likes: 38
From: Michigan
OK I am on to the next project on the XKR. Since I got it there has been a clunking noise from the passenger side rear of the car at every bump. It sounds like something in the suspension is very loose.
Here's what I know so far;
I don't see any really obviously worn bushings in the rear.
Nothing is loose in the trunk.
The previous owner said that he had it to the local Jaguar dealer, and had the shocks replaced about a year ago, and then had the rear brakes done about 6 months ago. When the brakes were done he was told that the top bushing of the rear passenger side shock was bad.
I don't have a whole lot of faith in this because I have found that most of everything else the previous owner told me is just plain not true. Also, from what I can tell, both of the rear shock mounting seems tight, and the shocks look a lot older than 1 year.
I had a friend come over and bounce the rear of the car up and down while I looked underneath for the clunk. We could make the noise happen by doing this. It looked to me like the large outer bushing for the rear crossmember / subframe thing was maybe loose. There seemed to be some movement there that corresponds to the clunk. This is the busing at the outer edge of the car, just forward of the rear wheel.
I got these bushings and decided to give it a shot at replacing them, however reading the JTIS has made me back off a bit. The special tools to press them out I might be able to get around, however the alignment procedure, and special adhesive to install the new bushings is making me thing this might be a good job for a dealer.
Has anyone replaced these bushings before? Any advice on them?
Any other common sources of the clunk I might try before having the dealer replace these?

Senior Member


Joined: Oct 2010
Posts: 661
Likes: 108
From: Deland Florida
I think you should DITY if at all possible....take lots of pictures...write it up and post it for us willing to have a crack at it ourselves.
My advantage ... I have a lift.... I wouldn't try it with out one.
My advantage ... I have a lift.... I wouldn't try it with out one.
Really does sound like a lower shock bush to me, very common, the best test I use is to hold the bottom of shock with your hand when someone gently bounces the car, if it is knocking you will feel it rathet than see it.
Thread Starter
|
Senior Member
Joined: Oct 2009
Posts: 328
Likes: 38
From: Michigan
I think you are right. I tried this again last night, and it does appear to be the lower shock bushing. If I twisted the shock and put some pressure on that lower bushing while it was bouncing, the clunking would quiet down a bit.
Thread Starter
|
Senior Member
Joined: Oct 2009
Posts: 328
Likes: 38
From: Michigan
I am going to pick up a new shock bushing today. Does anyone know if it is possible to change this out on the vehicle?
At first glance it LOOKS like if the lower shock bolt was removed and the control arm supported, the shock lower end would drop below the control arm enough to get access to the bushing. I have access to a small hand held press for changing U-joints (like a fancy C-clamp) that looks like it should work to press the bushing with.
That's my plan unless it just can't be done without removing the shock.
Veteran member

Joined: Mar 2007
Posts: 11,345
Likes: 1,165
From: Oak Ridge, TN
I can't see how you could do it on the car as the bolt faces front-rear.
I've swapped out the rear shock myself. In order to get the shock, you have to remove the entire spring/shock assembly, which can be done by dropping the lower control arm far enough without using coil spring compressors...but in order to do that, you'll have to unbolt and bend the snot out of the metal subframe cover...I think that's what it is. I found using the spring compressor, coupled with slightly bending the cover gets the arm low enough to slide out the coil spring and its attached upper 'hat' is more managable in the garage. Just be careful with putting it back in, there is a either a covered hose or wiring loom that sits at the edge of that hat, and if you're not cautious, it'll get hung up on the wrong side of that hat, and it'll mess with all sorts of geometry. Just pry that connector just below the hat off, the wiring/hose will be easier manipulated and prevent it from getting squished.
I've swapped out the rear shock myself. In order to get the shock, you have to remove the entire spring/shock assembly, which can be done by dropping the lower control arm far enough without using coil spring compressors...but in order to do that, you'll have to unbolt and bend the snot out of the metal subframe cover...I think that's what it is. I found using the spring compressor, coupled with slightly bending the cover gets the arm low enough to slide out the coil spring and its attached upper 'hat' is more managable in the garage. Just be careful with putting it back in, there is a either a covered hose or wiring loom that sits at the edge of that hat, and if you're not cautious, it'll get hung up on the wrong side of that hat, and it'll mess with all sorts of geometry. Just pry that connector just below the hat off, the wiring/hose will be easier manipulated and prevent it from getting squished.
Veteran member
Joined: Mar 2007
Posts: 11,345
Likes: 1,165
From: Oak Ridge, TN
Oh, I see what you are planning on doing there with keeping the arm up and the shock extended below it. I can't recall just how far that shock extends though, even with the spring compressors on it. If there isn't any, the coil will surely resist your intended manipulation of the arm upwards.
Trending Topics
I do them on the car all the time, it is a far cheaper way than removing the wishbone and shock assembly. But I have a special tool made up, with what you are suggesting you will struggle as they do require quite a bit of force to remove and fit back in, below is a drawing of what I use
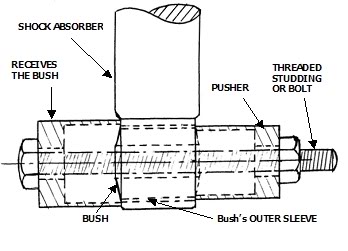
The studding is actually a couple of inches longer as I use the same tool to push the bush back in, you do get through the studding as it does strip after about half dozen removals and refits
The studding is actually a couple of inches longer as I use the same tool to push the bush back in, you do get through the studding as it does strip after about half dozen removals and refits
Senior Member
Joined: Jul 2009
Posts: 647
Likes: 60
From: Kentucky
Looks to me like you could use a pair of properly sized sockets. I would opt for impact sockets because of the thicker wall on the socket it self. The bushing should be lubed with keroil or penatrating fluid, KY, you know the stuff. I would size the pusher on the removal side as close to the shock shackle. This might mitigate the mushrooming of the bushing while pushing. You could also turn the socket around to where the square end is actually the pusher and put a washer on the other end. But be sure it won't get logded in the shackle. The reciever socket should be large enough accept, deep well. the old bushing. You can use the new bushing for the correct fit. I might suggest some anti-seize or white lithium on the new bushing prior to installation of the new part to help it go in easier.
Thread Starter
|
Senior Member
Joined: Oct 2009
Posts: 328
Likes: 38
From: Michigan
I do them on the car all the time, it is a far cheaper way than removing the wishbone and shock assembly. But I have a special tool made up, with what you are suggesting you will struggle as they do require quite a bit of force to remove and fit back in, below is a drawing of what I use

The studding is actually a couple of inches longer as I use the same tool to push the bush back in, you do get through the studding as it does strip after about half dozen removals and refits
The studding is actually a couple of inches longer as I use the same tool to push the bush back in, you do get through the studding as it does strip after about half dozen removals and refits
Thread Starter
|
Senior Member
Joined: Oct 2009
Posts: 328
Likes: 38
From: Michigan
Well, it can be done. I removed the lower shock bolt, and supported the spindle on a floor jack with the body resting on jack stands and got the bottom of the shock to drop below the control arm enough to make the above tool idea work, with no need for spring compressors.
The old bushing was a BEAR. I actually broke the 1/2" threaded rod at one point there was so much tension. After that I used a propane torch to heat the lower shock end a bit. That and some proper curse words seemed to do the trick.
The new joint pressed in quite easy in comparison.
In all it took just about 2 1/2 hours, and most of that was fighting with the homemade tools. I think that using some machined parts that fit the sizes of the bushing better would be much nicer, but I just used some sockets and cheap threaded rod. Only lost the skin from 3 knuckles...
I said and did some things that I am not proud of in the process, but the job got done. Tomorrow we'll see if that fixed the clunk.
Edit; The clunk is history!
Last edited by Andy94SC; Apr 26, 2011 at 11:13 AM.

Junior Member
Joined: Jul 2012
Posts: 3
Likes: 0
From: peterborough
My '01 XKR has 2 bad rear shock lower bushes. I got a quote for �900 from one place and �650 from another to replace both shocks. From the first they would replace the lower bushings for 335 which means removing both shocks. Seems a lot for 2 �20 bushings (a lot of work that is).
Does anyone know of a garage that could do this work in situ without removing the shocks. I live in Cambridgeshire UK. Thanks.
Does anyone know of a garage that could do this work in situ without removing the shocks. I live in Cambridgeshire UK. Thanks.

Thread
Thread Starter
Forum
Replies
Last Post
Mugatu
XJ XJ6 / XJ8 / XJR ( X350 & X358 )
22
Jun 23, 2020 01:50 PM
Currently Active Users Viewing This Thread: 1 (0 members and 1 guests)