Show me your Garmins


Thread Starter
|
Veteran Member


Joined: Jul 2013
Posts: 1,105
Likes: 328
From: Northern Virginia
I am about to undertake the Garmin NAV swap. I have chosen the Garmin Dezl 560 (older, discontinued model). It's a trucker model, but it has an extra loud speaker, and wired video input, while still being a 5" model. Ironically, this old model seems to be in demand so they are no cheaper than a current unit (argg!).
My plan is to extend the Garmin's speaker, and on/off button to the left panel. The right panel will have a magnetic phone mount and the Garmin's data USB extended. I will split the video from my backup camera and tpms between stereo headunit and this Garmin. Since my stereo does BT hands free and streaming (and the Garmin does not do MP3), I see no reason to tie it's speaker to the stereo.
I have an extra NAV unit I can butcher for mounting, but will be using a talented mobile electronics fabricator.
Cost no object, I think button relocation and a 2DIN unit is the best solution. However, that's pricey as I'd have to convert to 3 Guage and deal with panel matching that adds a bunch to cost.
If I were brave, I'd go for the dezl 770 (7" current unit) and route the NAV screen cutouts for seamless match. However, I'm taking the cheap path of least resistance that will look 90% as good.
Anyway, I'd love some inspiration while I wait for parts, so post what you've done!
Veteran Member


Joined: Oct 2010
Posts: 2,078
Likes: 1,034
From: Spain
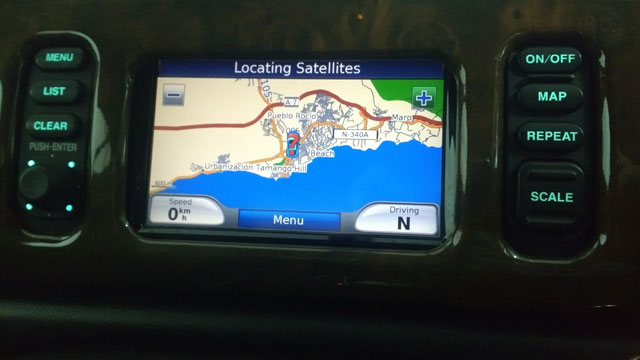
Here's mine. I kept the original buttons for a more OEM look - the on/off switch is the only one that does anything. I also connected the backlights for the buttons up, so they come on and dim with the rest of the dashboard.
In real life it looks OEM unless you look closely and realise the screen isn't an exact match for the opening - I do want to adjust it a bit better as it is currently slightly too high (due to the large metal bar running across the bottom of the dashboard).
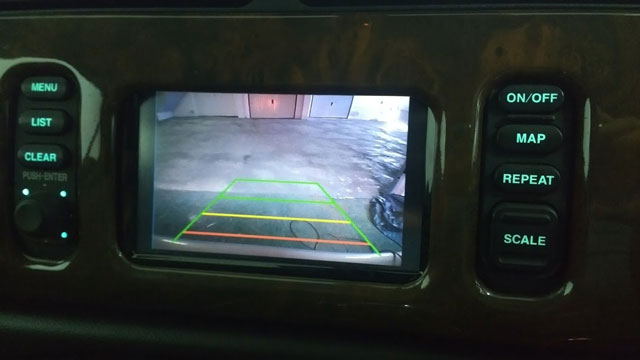
I also added a backup cam.
Plus of course a leaper on start up:-

Overall I am very pleased with the result - the OEM sat nav didn't even have a map for Spain, let alone an up to date one - and it was a cheap and relatively easy upgrade.
In real life it looks OEM unless you look closely and realise the screen isn't an exact match for the opening - I do want to adjust it a bit better as it is currently slightly too high (due to the large metal bar running across the bottom of the dashboard).
I also added a backup cam.
Plus of course a leaper on start up:-
Overall I am very pleased with the result - the OEM sat nav didn't even have a map for Spain, let alone an up to date one - and it was a cheap and relatively easy upgrade.
Last edited by dibbit; May 10, 2017 at 12:24 PM.
And can you describe what is required to maintain the dimming backlight on the other buttons? I really want to do that too!
Veteran Member
Joined: Oct 2010
Posts: 2,078
Likes: 1,034
From: Spain
The Garmin is a Nuvi 5000 bought for practically nothing on ebay as its an ancient model, but the right size and with a video input for the camera (hardwired). I did have to dremel various bits off the Garmin's casing to get it to fit - newer versions might well be an easier fit as they are thinner.
I bought a second hand Jaguar OEM sat nav unit on ebay and took it completely apart, rather than risking my original unit. I used the plastic mounting bezel, the two little pcbs with the switches on and the harness connectors.
I used the Jaguar wiring diagram to work out which pins on the OEM wiring harness do what and identified the switched 12v supply, ground and backlight. I wired the Garmin power supply to the salvaged connector and it just plugs straight into the original harness. I know others have mucked around in the glovebox to get a 12v supply, but I can't see the point as it is right there where the sat nav is.
The on/off switch controls a toggling relay I bought on ebay - I wired this in to the 12V supply to the Garmin (I know others have opened the Garmin's case and wired the switch in place of the Garmin on/off switch, but I thought my way was less risky).
Its quite easy to identify the connections for the backlights on the two switch pcbs and I just wired these to my salvaged connector.
The whole unit then just screws back in place of the original sat nav and plugs into the original harness. No need for any extra backboards or anything else if you use the original bezel/mounting plate.
If you know your way around a multimeter and a soldering iron its not hard to do.
Thread Starter
|
Veteran Member
Joined: Jul 2013
Posts: 1,105
Likes: 328
From: Northern Virginia
Dibbit,
If you don't mind I have a few questions about your Garmin.
When you startup, do you need to hit ok or agree before the camera can be used?
How did you change the splash screen to Jaguar?
I bought the dezl 560, which was the replacement for the 5000, but it seems I have to hit ok twice before the camera will engage.
That would be really annoying, so I'm debating whether to even install it.
Thanks!
Trending Topics
Veteran Member
Joined: Oct 2010
Posts: 2,078
Likes: 1,034
From: Spain
Yes, there is some sort of disclaimer screen you have to agree to at start up. The original sat nav was the same though.
To get the leaper, I found it on the internet and copied it to the Garmin using the USB cable - you can then choose the startup screen.
The backup camera is nice to have, but by no means essential - it was a small amount of work compared to putting the Garmin in, so IMO if you are going to replace the satnav, you may as well add the backup cam.

Veteran Member
Joined: Apr 2014
Posts: 5,457
Likes: 1,816
From: New Jersey USA
Sing it, mind I'd I ask a quick question about your Garmin? Years ago I got annoyed with the brand's suction cup mounted unitswhen they changed the software to display a RED warning when it detected I was over the speed limit. (I admit i kept thinking: are you trying go be my @$%$@in mother?) Anyway, just wondering if you see that on this model too.
Looks like a real nice install!
John
Looks like a real nice install!
John
Veteran Member
Joined: Oct 2010
Posts: 2,078
Likes: 1,034
From: Spain
Thanks.
As far as I can tell the sat nav doesn't know what the speed limits are and certainly doesn't warn me if I am going above them. It would be a handy feature though, as the speed limit signs around here aren't that good and they use a helicopter to catch you.
As far as I can tell the sat nav doesn't know what the speed limits are and certainly doesn't warn me if I am going above them. It would be a handy feature though, as the speed limit signs around here aren't that good and they use a helicopter to catch you.
Back in the day, my first computer came with a specification for the power supply which I had to design and build. Various expansion boards I did the circuit layout, etched the copper, drilled the board and soldered it up.
I think I can manage this. And, if not, I know some GREAT electronic techs that I've worked with.

Veteran Member
Joined: Oct 2010
Posts: 2,078
Likes: 1,034
From: Spain
In that case you won't have any difficulties doing this, as it is just basic soldering skills to get everything connected. Just take a deep breath as you dismantle the OEM sat nav.
This is what you find when you unscrew the OEM sat nav from the bezel.
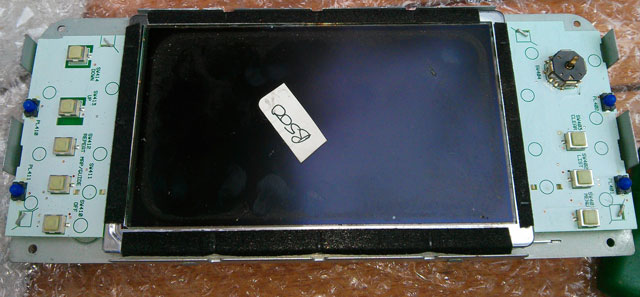
You can see the two switch PCBs on either side of the screen, held in place on the metal backing plate with twist tabs. I actually cut the metal backing plate on either side of the screen, so the switch PCBs could then be screwed back into the plastic bezel intact. If you take it apart you will see what I mean.
This is the Garmin fitting in the plastic bezel. You can also see the back of the buttons on either side.
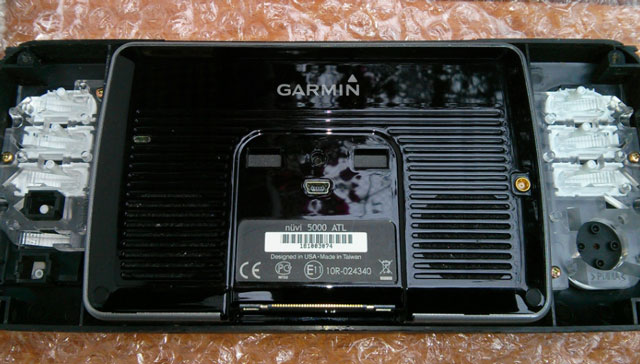
There was more cutting needed after this to get the power connector on the Garmin (you can see the pins at the bottom).
And this is the type of latching relay I used for the ON/OFF switch:-
DC 5V/12V/24V 1 Channel Latching Relay Module With Touch Bistable Switch MCU
Once the original sat nav unit is out of the car, you can do most of the work on your work bench/kitchen table, before plugging it all back in and enjoying an up to date touch screen sat nav.
This is what you find when you unscrew the OEM sat nav from the bezel.
You can see the two switch PCBs on either side of the screen, held in place on the metal backing plate with twist tabs. I actually cut the metal backing plate on either side of the screen, so the switch PCBs could then be screwed back into the plastic bezel intact. If you take it apart you will see what I mean.
This is the Garmin fitting in the plastic bezel. You can also see the back of the buttons on either side.
There was more cutting needed after this to get the power connector on the Garmin (you can see the pins at the bottom).
And this is the type of latching relay I used for the ON/OFF switch:-
DC 5V/12V/24V 1 Channel Latching Relay Module With Touch Bistable Switch MCU
Once the original sat nav unit is out of the car, you can do most of the work on your work bench/kitchen table, before plugging it all back in and enjoying an up to date touch screen sat nav.