
Temperature light loose connection


My second love (as my wife calls her) my 2001 XKR convertible must be feeling her age. The dash light for the temp gauge must be loose since every few days I have to wack the dash for it to go on.
Are the dashboard lights plug ins? What is the best way to remove the woodgrain dash to get to the lights?
Thanks
Gary
Are the dashboard lights plug ins? What is the best way to remove the woodgrain dash to get to the lights?
Thanks
Gary

Veteran Member


Joined: Jul 2013
Posts: 1,105
Likes: 328
From: Northern Virginia
The speedo console has a large connector that plugs it in under the wood.
There is a youtube video on how to remove the wood. I believe its covered in the stickies but you can search youtube pretty easy.
There is a youtube video on how to remove the wood. I believe its covered in the stickies but you can search youtube pretty easy.
Senior Member
Joined: Mar 2016
Posts: 859
Likes: 322
From: Auckland NZ/ Houston, TX
There will be 2 connectors on the back. Its most likely the bulb is going out, you'll need to take the Instrument pack out, then replace the bulb, or bulbs while you have it out.
Senior Member
Joined: Mar 2016
Posts: 859
Likes: 322
From: Auckland NZ/ Houston, TX
You'll need to make sure you put the steering column all the way out ( towards you ) and down. Disconnect the battery, you don't need to remove the steering wheel or air bag. You'll need to remove the scuttle panel/knee bolster at the bottom, 2 30 torx bolts at the bottom. Once this lower panel is out, then you can remove the screws for the wood trim around the instrument pack. Then you should be able to get the pack out. Flip it over and you just use some needle nose pliers to turn the base of the bulbs to get them out. Might be wise to just change them all instead just the one.
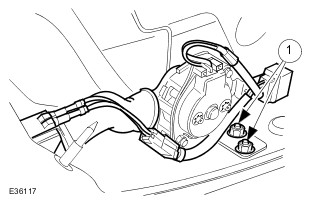
Remove battery cover and disconnect earth lead from terminal.
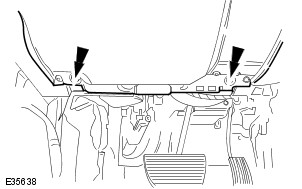
Slacken and remove the two screws securing the lower underscuttle to the fascia panel cross-member.
Withdraw the underscuttle upper fasteners from their locations in the fascia panel.
Position the underscuttle rearwards for access.

Disconnect harness multiplugs and reposition underscuttle.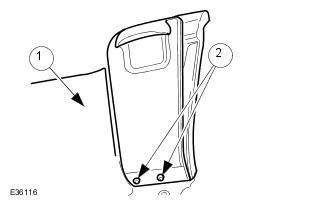
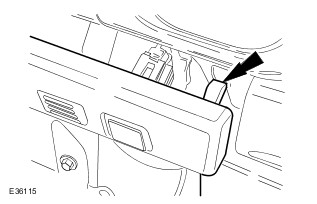
Remove stowage compartment lid.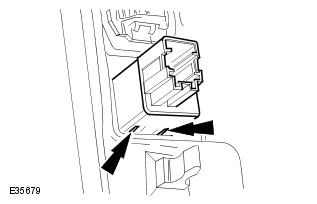
Release the valet switch securing tangs and remove the switch.
Remove air conditioning aspirator.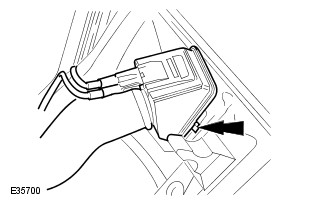
Release the aspirator vent securing tangs and remove the vent from the underscuttle.
Accessing through underscuttle aperture, disconnect gauge module harness connectors.
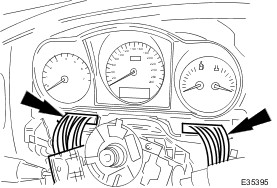
Using a thin plastic lever, remove major gauge module veneer panel.
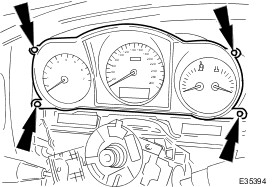
Remove gauge module screws and withdraw module from facia.
Remove battery cover and disconnect earth lead from terminal.
Slacken and remove the two screws securing the lower underscuttle to the fascia panel cross-member.
Withdraw the underscuttle upper fasteners from their locations in the fascia panel.
Position the underscuttle rearwards for access.
Disconnect harness multiplugs and reposition underscuttle.
-
- Disconnect air conditioning aspirator harness multiplug.
- Disconnect valet switch harness multiplug.
Remove stowage compartment lid.
-
- Position underscuttle for access.
- Slacken and remove two screws securing the stowage compartment lid to the underscuttle and remove the lid.
Release the valet switch securing tangs and remove the switch.
Remove air conditioning aspirator.
-
- Slacken and remove the two nuts securing the air conditioning aspirator mounting bracket to the vent and remove the aspirator.
Release the aspirator vent securing tangs and remove the vent from the underscuttle.
Accessing through underscuttle aperture, disconnect gauge module harness connectors.
Using a thin plastic lever, remove major gauge module veneer panel.
Remove gauge module screws and withdraw module from facia.

Senior Member
Joined: Mar 2016
Posts: 859
Likes: 322
From: Auckland NZ/ Houston, TX
No worries. I know how frustrating it can be taking things apart even when you have access to Topix, can only imagine what its like when you DONT have that access, so I try to help keep people sane when working on their own Jags. =)

