
XK8 Replacement Bushings


Senior Member
Joined: Jan 2011
Posts: 883
Likes: 173
From: Columbus, OH
Suspension feels little tighter and steering wheel is now in the dead center, when before it was a little to the side.
Also, it looks like bushings I took out of my car were almost new, or in perfect shape. I should probably eBay them

Last edited by Mish_Mish; Feb 26, 2011 at 08:41 PM.
Senior Member
Joined: Aug 2010
Posts: 533
Likes: 45
From: Bellevue, WA
Hopefully, I'm a few years away from this exercise, but I'm following it with interest. Every day I seem to find another reason to love this forum. When you look at the amount and quality of information flowing in this thread, it is incredible. Not to mention the willingness of all involved to share their experiences (for better or worse) so the next guy will have it a little easier. When my day comes to tear into the front end, I'll bet this thread will be a valuable resource. Thanks in advance.
Cheers,
Cheers,
Veteran member


Joined: Mar 2007
Posts: 11,345
Likes: 1,165
From: Oak Ridge, TN
subscribe to the regional section of the forum, and look for a meet that should be happening soon...and will be happy to properly introduce myself.

Member
Joined: May 2011
Posts: 53
Likes: 2
From: Connecticut
Just replaced one bushing with the help of my neighbors who are all good backyard mechanics. The front one on the lower control arm was cracked causing a lot of vibration. I'm going to do the other side tomorrow. The only hard part was getting the bushing out of the lower arm bar. I rented the tool to press the new bushing in, but it still required some hammering to get it fully seated. I went with the Jaguar oem rubber ones. I'll let you know how they feel once I test drive it.
Sorry I don't have a video camera or I would try to video the other side. Thanks to all who have posted to this thread. I would have never had the confidence to take this on otherwise.
Sorry I don't have a video camera or I would try to video the other side. Thanks to all who have posted to this thread. I would have never had the confidence to take this on otherwise.
Member
Joined: May 2011
Posts: 53
Likes: 2
From: Connecticut
I was able to take some photos as we repalced the second bushing. The car is smooth as silk now short of a little alignment issue. The bushings cost me $35 each and the whole job took about 4 hours....3 for the first side and 1 for the second. I hope these photos will shorten the learning curve for anyone who wants to give this a go.
The first two photos show the two parts that need to be removed to make room for removing the control arm.

There's that bracket that goes across the underside of the car
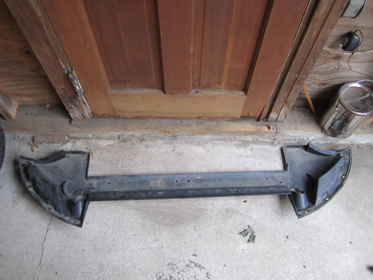
and the plastic piece that goes across the front of the car.
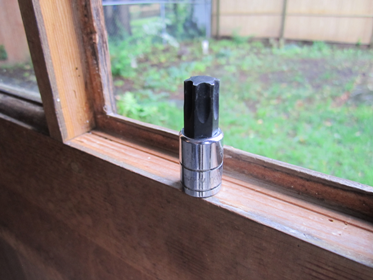
This is the star tool needed to remove the two bolts that connect the control arm to the chassis. It's a 3/8 inch drive star tool...part number 76-015.
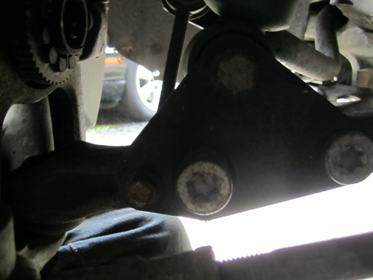
These are the two bolts before we disconnected them. We found that a good dose of WD 40 was essential to loosening those bolts. We also used a heavy duty ratchet.
This is the bushing as it is attached to the car. The left of the photo is toward the front of the car.
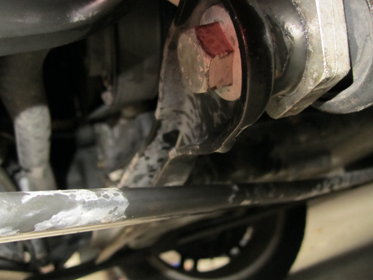
This is the bolt that goes through the bushing that has to come off. So, in all, there are only three bolts to remove once the tire is removed from the car.
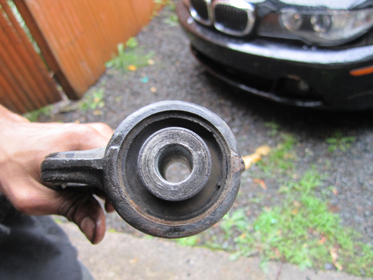
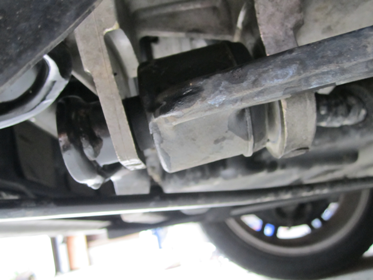
You can see how worn and dry the bushing is in the removed control arm.
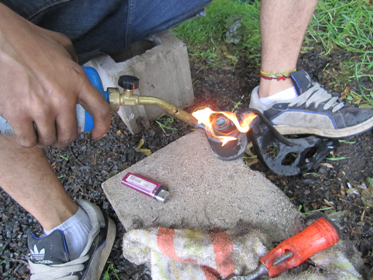
We actually had to burn the crap out of that bushing and pound it like crazy to remove it. There is a machine to do it but we did not have access to one.
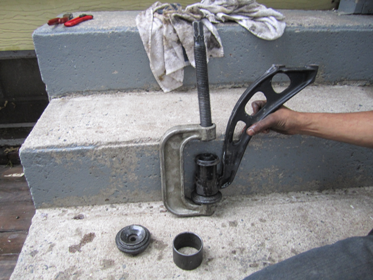
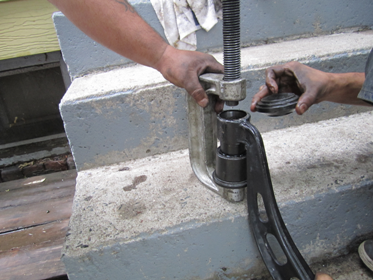
The last two photos show the C clamp tool we rented from Auto Zone to press the new bushing into the lower control arm. We learned, after struggling a lot with the first one, that a good dose of grease and some patience to hammer the bushing in part way before torking it in with the C clamp tool, made the job much easier. The issue we had was that the clamp wasn't big enough to accommodate the bushing, the control arm, and the top and bottom pieces of the clamp, so by getting the bushing partially inserted, we could fit the whole mess in the clamp and tork it down. We had to stop periodically and tap the edges of the bushing to keep it straight as it went into the opening in the lower control arm.
Once the new bushing was in the control arm, everything went back together very easily.
The first two photos show the two parts that need to be removed to make room for removing the control arm.
There's that bracket that goes across the underside of the car
and the plastic piece that goes across the front of the car.
This is the star tool needed to remove the two bolts that connect the control arm to the chassis. It's a 3/8 inch drive star tool...part number 76-015.
These are the two bolts before we disconnected them. We found that a good dose of WD 40 was essential to loosening those bolts. We also used a heavy duty ratchet.
This is the bushing as it is attached to the car. The left of the photo is toward the front of the car.
This is the bolt that goes through the bushing that has to come off. So, in all, there are only three bolts to remove once the tire is removed from the car.
You can see how worn and dry the bushing is in the removed control arm.
We actually had to burn the crap out of that bushing and pound it like crazy to remove it. There is a machine to do it but we did not have access to one.
The last two photos show the C clamp tool we rented from Auto Zone to press the new bushing into the lower control arm. We learned, after struggling a lot with the first one, that a good dose of grease and some patience to hammer the bushing in part way before torking it in with the C clamp tool, made the job much easier. The issue we had was that the clamp wasn't big enough to accommodate the bushing, the control arm, and the top and bottom pieces of the clamp, so by getting the bushing partially inserted, we could fit the whole mess in the clamp and tork it down. We had to stop periodically and tap the edges of the bushing to keep it straight as it went into the opening in the lower control arm.
Once the new bushing was in the control arm, everything went back together very easily.
Last edited by Badkitty; Jun 13, 2011 at 06:59 PM.

Thread
Thread Starter
Forum
Replies
Last Post
KarimPA
New Member Area - Intro a MUST
8
Sep 3, 2015 07:32 PM
Currently Active Users Viewing This Thread: 1 (0 members and 1 guests)