LOG IN
REGISTER
Forums
General Jaguar Forums
New Member Area - Intro a MUST
Jaguar Forums Feedback & Suggestion Center
General Tech Help
Jaguar Models ( Current )
XF (X260)
F-Type ( X152 )
XE ( X760 )
E-Pace
F-Pace (X761) / C-X17
I-Pace EV
Jaguar Models ( Modern )
XF and XFR ( X250 )
XJ ( X351 )
X-Type ( X400 )
S-Type / S type R Supercharged V8 ( X200 )
XJ XJ6 / XJ8 / XJR ( X350 & X358 )
XJ XJ8 / XJR ( X308 )
XJ XJ12 ( X305 )
XJ XJ6 / XJR6 ( X300 )
XK8 / XKR ( X100 )
XK / XKR ( X150 )
Jaguar Models ( Classics )
Mark V - X 420G
MKI / MKII S type 240 340 & Daimler
XK120 XK140 XK150
E type ( XK-E )
XJ6 & XJ12 Series I, II & III
XJS ( X27 )
XJ40 ( XJ81 )
XKSS
XJ220
Other Jaguars
Other Jaguar Models / Concepts / Replicas
Diesel variants
Diesel variants - All models
Non Jaguar vehicles
Non-Jaguar Vehicles
Brand Review
Jaguar Press release
Jaguar Customer Relationship Centre
Jaguar Engines & transmissions
Wheels / Tires, Suspension & handling
Interior
Exterior
Audio/Visual Electronics
Detailing / Car care
Motorsports
Jaguar Classifieds
Marketplace
PRIVATE For Sale / Trade or Buy Classifieds
VENDOR 'For Sale' Classifieds
Regional
US Northeast
US Central
US Southwest
US Western
US Northwest
US Midwest
US Mid Atlantic
US Lower Atlantic
US Southern Midwest
Canada
Mexico, South America
UK & Eire
Europe
Australia - Queensland
Australia - New South Wales / ACT
Australia - Victoria / Tasmania
Australia - Western
Australia - South / NT
New Zealand
Other Areas
Official Site Sponsors
VENDOR Threads
General Interest / History
Sights N Sounds
Photography
Forum announcement archives / Forum History
Jaguarforums Merchandise
Memorial Section
News
Marketplace
Vendor Directory
Become a Vendor
Member Marketplace
Vendor Marketplace
Site Store
New Posts
Tools
Car Payment Calculator
Tire Rim Calculator
Vin Decoder
Recalls
Technical Service Bulletins (TSBs)
Members List
Live Feed
Gallery
View Dark Mode
Please register or login to enable Dark Mode.
Log In
Register
Threads
Google
Threads
Posts
Advanced
Dark Mode
Please register or login to enable Dark Mode.
Log In
Forgot your Password?
By logging into your account, you agree to our
Terms of Use
and
Privacy Policy
, and to the use of cookies as described therein.
or
Login with Google
Login with Facebook
Recent
Commented
Albums
My Pictures
My Post Pictures
57loboy
June 26, 2023
146
0
Sort:
Most Recent
Default
Most Recent
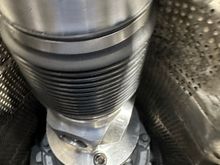
Larger diameter tube still clears driveshaft tunnel with no BFH modifications needed.
0
2026/04/10 17:37:26
57loboy
Good clearance all around at the rear as well.
0
2026/04/10 17:37:24
57loboy
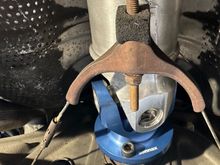
Sonax flange for the Jaguar rear diff, adapted from a different GM model. Needed only the pinion locator hole to be slightly enlarged.
0
2026/04/10 17:37:20
57loboy
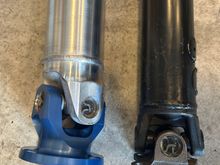
One of two pics that show what a properly made, $1,600 driveshaft looks like. Sonax flange to attach to the 6L80E output flange.
0
2026/04/10 17:37:16
57loboy
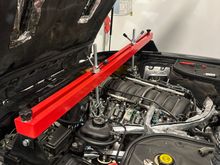
Support bar was perfect way to hold engine while swapping the mounts.
0
2026/04/10 17:31:37
57loboy
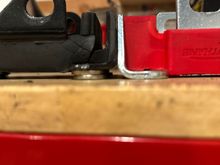
This shows how the poly mount eliminates the need for the stacked washers the JS kit specifies when the rubber mounts are used.
0
2026/04/10 17:31:34
57loboy
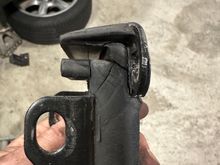
Second broken engine mount.
0
2026/04/10 17:31:31
57loboy
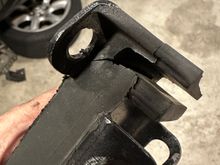
One broken engine mount...
0
2026/04/10 17:31:24
57loboy
Finished look is exactly what I wanted. Lots of ambient heat released when car is off.
0
2026/04/10 17:31:20
57loboy
0
2026/04/10 17:31:17
57loboy
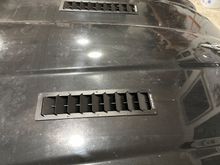
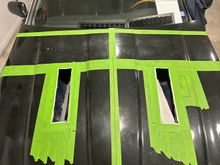
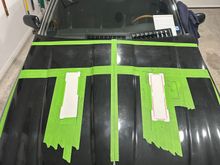
And then cut the holes, as you're committed at that point.
0
2026/04/10 17:31:12
57loboy
Measure 3, or even 33 times for proper alignment...
0
2026/04/10 17:31:08
57loboy
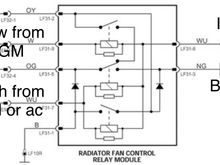
This is how the wiring was resolved using the existing Jaguar fan relay module.
0
2026/04/10 17:26:06
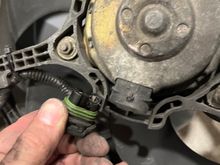
57loboy
Here's the toasted connector for the high speed fan. Looks like the clip broke off and the connector vibrated loose until it melted.
0
2026/04/10 17:26:04
57loboy
Original LF upper came out like it was new.
0
2025/04/07 09:49:27
57loboy
0
2025/04/07 09:49:18
57loboy
0
2025/04/07 09:49:13
57loboy
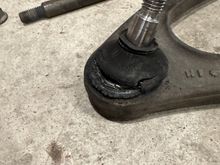
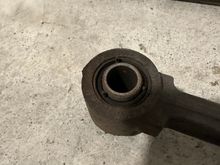
Gaiters were toast and open even before I separated the balljoint from the knuckle.
0
2025/04/07 09:49:07
57loboy
0
2025/04/07 09:49:03
57loboy
0
2025/04/07 09:48:58
57loboy
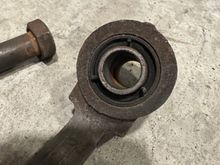
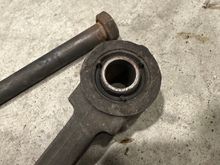
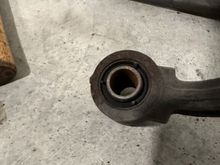
Bushings on both left and right looking like this. I was surprised they were this intact.
0
2025/04/07 09:48:55
57loboy
0
2025/04/07 09:48:52
57loboy
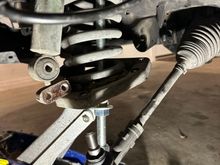
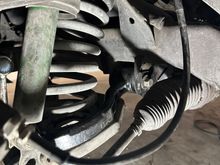
Here's a (so-so) pic of the tool in place within the spring, holding the front part of the lower control arm/plate in place. The jack was "there" but not actually doing anything.
0
2025/04/07 09:48:49
57loboy
Pic from with new arm in place...
0
2025/04/07 09:48:45
57loboy
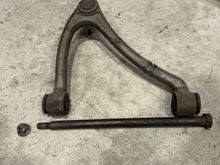
And everything all back together. Upper arms w/new bushings, ball joint, sway bar end links, out tie rods and complete lower control arm (rear section).
0
2025/04/07 09:48:42
57loboy
0
2025/04/07 09:48:12
57loboy
0
2025/04/07 09:48:07
57loboy
0
2025/04/07 09:48:03
57loboy
And a view of the collar wrapped with heat tape. Fingers crossed this slows the deterioration.
0
2025/04/07 09:21:29
57loboy
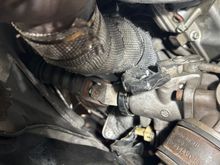
Here's where I added another layer of heat wrap, the clearance is really tight. You can see the hard line that I rewrapped too.
0
2025/04/07 09:21:18
57loboy
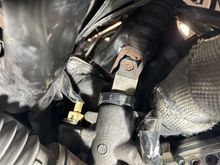
This is the collar that I noticed as getting heat damaged, and the visible side faces the downpipe when the steering wheel/gear is oriented for straight ahead travel.
0
2025/04/07 09:21:06
57loboy
0
2025/04/07 09:20:27
57loboy
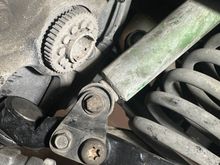
Pic of left side lower contol arm on a 2000 X308 at a local pull and pay yard this weekend. Shows bolt inserted from the rear, just ahead of the steering linkage.
0
2025/01/06 08:48:13
57loboy
Exactly 3,030 miles from swap starting point of 109,971...
0
2024/12/04 14:51:01
57loboy
0
2024/09/20 09:31:34
57loboy
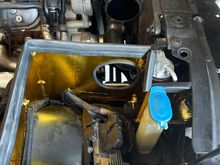
I'm pretty happy with the finished product. It closes things up nicely. Next step is to have to the tune adapted to accommodate the revised intake characteristics.
0
2024/08/18 14:47:42
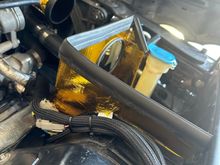
57loboy
After measuring 3x, I made one cut to allow the intake tube to pass into the closed off area. The piece along the wheelwell is screwed to the inner fender and also the wheel well, hidden under the wiring loom in this pic.
0
2024/08/18 14:47:38
57loboy
I made the longitudinal piece such that it slid between the crush tube and fender well, and extends under the radiator support out towards the back of the headlight. It ends right next to the headlight adjuster knob. It's riveted to the piece that curves on the wheel well.
0
2024/08/18 14:47:34
57loboy
I made templates from cardboard that followed the contour of the passenger fender well and up to the height of the existing bodyline/weatherstripping for a close seal to the hood insulation. I then transferred to sheet metal. (I forget what gauge I used, but I could cut it with my jigsaw and metal scissors).
0
2024/08/18 14:47:28
57loboy
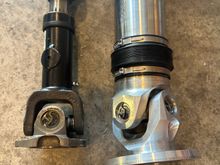
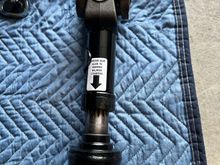
The new driveshaft has a MUCH bigger stub/slip joint.
0
2024/08/18 14:36:11
57loboy
First
Page
1 of 4
Last
Go To
Page
1
2
3
4
1 of 4
Go To
GO
Go to page
of 4
pages
1
2
3
4