Jaguar Forums - Jaguar Enthusiasts Forum
  • LOG IN
  • REGISTER
  • Forums
    • General Jaguar Forums
      • New Member Area - Intro a MUST
      • Jaguar Forums Feedback & Suggestion Center
      • General Tech Help
    • Jaguar Models ( Current )
      • XF (X260)
      • F-Type ( X152 )
      • XE ( X760 )
      • E-Pace
      • F-Pace (X761) / C-X17
      • I-Pace EV
    • Jaguar Models ( Modern )
      • XF and XFR ( X250 )
      • XJ ( X351 )
      • X-Type ( X400 )
      • S-Type / S type R Supercharged V8 ( X200 )
      • XJ XJ6 / XJ8 / XJR ( X350 & X358 )
      • XJ XJ8 / XJR ( X308 )
      • XJ XJ12 ( X305 )
      • XJ XJ6 / XJR6 ( X300 )
      • XK8 / XKR ( X100 )
      • XK / XKR ( X150 )
    • Jaguar Models ( Classics )
      • Mark V - X 420G
      • MKI / MKII S type 240 340 & Daimler
      • XK120 XK140 XK150
      • E type ( XK-E )
      • XJ6 & XJ12 Series I, II & III
      • XJS ( X27 )
      • XJ40 ( XJ81 )
      • XKSS
      • XJ220
    • Other Jaguars
      • Other Jaguar Models / Concepts / Replicas
    • Diesel variants
      • Diesel variants - All models
    • Non Jaguar vehicles
      • Non-Jaguar Vehicles
    • Brand Review
      • Jaguar Press release
      • Jaguar Customer Relationship Centre
      • Jaguar Engines & transmissions
      • Wheels / Tires, Suspension & handling
      • Interior
      • Exterior
      • Audio/Visual Electronics
      • Detailing / Car care
      • Motorsports
    • Jaguar Classifieds
      • Marketplace
      • PRIVATE For Sale / Trade or Buy Classifieds
      • VENDOR 'For Sale' Classifieds
    • Regional
      • US Northeast
      • US Central
      • US Southwest
      • US Western
      • US Northwest
      • US Midwest
      • US Mid Atlantic
      • US Lower Atlantic
      • US Southern Midwest
      • Canada
      • Mexico, South America
      • UK & Eire
      • Europe
      • Australia - Queensland
      • Australia - New South Wales / ACT
      • Australia - Victoria / Tasmania
      • Australia - Western
      • Australia - South / NT
      • New Zealand
      • Other Areas
    • Official Site Sponsors
      • VENDOR Threads
    • General Interest / History
      • Sights N Sounds
      • Photography
      • Forum announcement archives / Forum History
      • Jaguarforums Merchandise
      • Memorial Section
  • News
  • Marketplace
    • Vendor Directory
    • Become a Vendor
    • Member Marketplace
    • Vendor Marketplace
    • Site Store
  • New Posts
  • Tools
    • Car Payment Calculator
    • Tire Rim Calculator
    • Vin Decoder
    • Recalls
    • Technical Service Bulletins (TSBs)
    • Members List
    • Live Feed
  • Gallery
  • View Dark Mode
    • Please register or login to enable Dark Mode.
  • Log In
  • Register
Jaguar Forums - Jaguar Enthusiasts Forum
    • Threads
      • Advanced
Dark Mode

Please register or login to enable Dark Mode.

Log In

Forgot your Password?

By logging into your account, you agree to our Terms of Use and Privacy Policy, and to the use of cookies as described therein.
or
 
  • Recent
  • Commented
  • Albums
  • My Pictures

My Post Pictures

10 XF Premium
September 17, 2015
 142
 0
Sort:
Most Recent
  • Default
  • Most Recent
0 2015/09/18 19:50:45 10 XF Prem
0 2015/09/18 19:50:39 10 XF Prem
0 2015/09/18 19:50:32 10 XF Prem
0 2015/09/18 19:50:26 10 XF Prem
0 2015/09/18 19:50:20 10 XF Prem
0 2015/09/18 19:50:13 10 XF Prem
A better view of the inside of the dual layer of plastic card.
0 2015/09/18 19:37:55 10 XF Prem
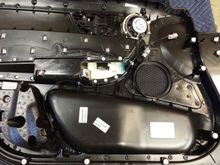
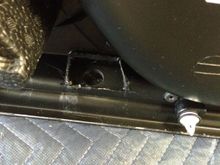
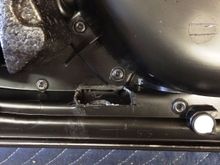
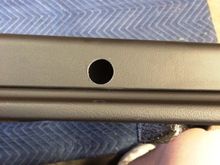
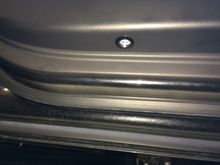
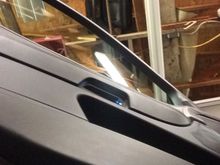
Here is the hole I cut. The card is dual layer in this area and once you use a hole saw the size needed in both the outer and inner layers, you use a Dremel tool with a small cutting wheel and expose the inside layer so you can fasten the locking nut down and then glue after you have angled the projection as you like it.
0 2015/09/18 19:37:46 10 XF Prem
Here is where I poked the new wires through the loops and rapped them around before soldering and re-insulating. Doing it this way keep the integrity of the factory wiring while providing positive connections and better yet, everything lays back down in the original wiring path.
0 2015/09/18 19:37:38 10 XF Prem
here is a close-up of the mirror wire harness. It is PIN #12 for ground and PIN #13 for +12 volts. This is where I carefully cut and exposed the conductors inside the wire and make a loop with a pick. This keeps the factory wiring intact and the same length so everything reinstalls properly.
0 2015/09/18 19:37:32 10 XF Prem
Here is the plugs I went with. They are from AMP but you can really get any small two-wire plugs. These have "solder" style pins/sockets as it is easier than buying the proper crimp tool for only a few ends. These are water tight and were about $8.00 a set.
0 2015/09/18 19:37:22 10 XF Prem
Here is the whole inner side of the card in one shot. Small amounts of hot melt glue to keep wires where they will not get smashed when re-installing the card.
0 2015/09/18 19:37:14 10 XF Prem
And this is the outside or under side of the card. Using the correct hole saw size is very important. Too big and you will hate life.
0 2015/09/18 19:37:08 10 XF Prem
Again, another picture that shows the projector.
0 2015/09/17 22:13:00 10 XF Prem
Here is the under side of the door card installed. Very clean.
0 2015/09/17 22:12:45 10 XF Prem
The finished product. It turns on with either the remote unlock button from the fob or by just pulling the handle to open the locked door (as long as your car has the full keyless system.
0 2015/09/17 22:12:42 10 XF Prem
And more glue spots.
0 2015/09/17 22:12:34 10 XF Prem
Again, more glue to keep wires tidy.
0 2015/09/17 22:12:16 10 XF Prem
Here is where I installed the projector light. Your light may be different. Notice I hot melt glued the light after installation to keep it from rotating after I made sure the display was angled as I wanted it to be. Also glued the cable to keep it tight to the card.
0 2015/09/17 22:12:03 10 XF Prem
I have wired a positive wire to the door wiring that is pin #13 and a negative wire to pin #12. This is to feed the Cree LED projector you have chosen to light your way.
0 2015/09/17 22:11:46 10 XF Prem
As the mirror plug sits in the door.
0 2015/09/17 22:11:33 10 XF Prem
Mirror plug. #12 is black and is ground. #13 is Blue w/black stripe and is power for puddle light
0 2015/09/17 22:11:21 10 XF Prem
 
First
Page
4 of 4
Last
Go To
Page
  • 1
  • 2
  • 3
  • 4
4 of 4
Go To GO
Go to page of 4 pages
  • 1
  • 2
  • 3
  • 4

Top
Jaguar Forums - Jaguar Enthusiasts Forum
  • Contact Us
  • FAQ
  • Archive
  • Advertising
  • Cookie Policy
  • Privacy Statement
  • Terms of Service
  • Your Privacy Choices
  • Manage Preferences

© 2026 MH Sub I, LLC dba Internet Brands

Follow Us        


When you click on links to various merchants on this site and make a purchase, this can result in this site earning a commission. Affiliate programs and affiliations include, but are not limited to, the eBay Partner Network.