Jaguar Forums - Jaguar Enthusiasts Forum
  • LOG IN
  • REGISTER
  • Forums
    • General Jaguar Forums
      • New Member Area - Intro a MUST
      • Jaguar Forums Feedback & Suggestion Center
      • General Tech Help
    • Jaguar Models ( Current )
      • XF (X260)
      • F-Type ( X152 )
      • XE ( X760 )
      • E-Pace
      • F-Pace (X761) / C-X17
      • I-Pace EV
    • Jaguar Models ( Modern )
      • XF and XFR ( X250 )
      • XJ ( X351 )
      • X-Type ( X400 )
      • S-Type / S type R Supercharged V8 ( X200 )
      • XJ XJ6 / XJ8 / XJR ( X350 & X358 )
      • XJ XJ8 / XJR ( X308 )
      • XJ XJ12 ( X305 )
      • XJ XJ6 / XJR6 ( X300 )
      • XK8 / XKR ( X100 )
      • XK / XKR ( X150 )
    • Jaguar Models ( Classics )
      • Mark V - X 420G
      • MKI / MKII S type 240 340 & Daimler
      • XK120 XK140 XK150
      • E type ( XK-E )
      • XJ6 & XJ12 Series I, II & III
      • XJS ( X27 )
      • XJ40 ( XJ81 )
      • XKSS
      • XJ220
    • Other Jaguars
      • Other Jaguar Models / Concepts / Replicas
    • Diesel variants
      • Diesel variants - All models
    • Non Jaguar vehicles
      • Non-Jaguar Vehicles
    • Brand Review
      • Jaguar Press release
      • Jaguar Customer Relationship Centre
      • Jaguar Engines & transmissions
      • Wheels / Tires, Suspension & handling
      • Interior
      • Exterior
      • Audio/Visual Electronics
      • Detailing / Car care
      • Motorsports
    • Jaguar Classifieds
      • Marketplace
      • PRIVATE For Sale / Trade or Buy Classifieds
      • VENDOR 'For Sale' Classifieds
    • Regional
      • US Northeast
      • US Central
      • US Southwest
      • US Western
      • US Northwest
      • US Midwest
      • US Mid Atlantic
      • US Lower Atlantic
      • US Southern Midwest
      • Canada
      • Mexico, South America
      • UK & Eire
      • Europe
      • Australia - Queensland
      • Australia - New South Wales / ACT
      • Australia - Victoria / Tasmania
      • Australia - Western
      • Australia - South / NT
      • New Zealand
      • Other Areas
    • Official Site Sponsors
      • VENDOR Threads
    • General Interest / History
      • Sights N Sounds
      • Photography
      • Forum announcement archives / Forum History
      • Jaguarforums Merchandise
      • Memorial Section
  • News
  • Marketplace
    • Vendor Directory
    • Become a Vendor
    • Member Marketplace
    • Vendor Marketplace
    • Site Store
  • New Posts
  • Tools
    • Car Payment Calculator
    • Tire Rim Calculator
    • Vin Decoder
    • Recalls
    • Technical Service Bulletins (TSBs)
    • Members List
    • Live Feed
  • Gallery
  • View Dark Mode
    • Please register or login to enable Dark Mode.
  • Log In
  • Register
Jaguar Forums - Jaguar Enthusiasts Forum
    • Threads
      • Advanced
Dark Mode

Please register or login to enable Dark Mode.

Log In

Forgot your Password?

By logging into your account, you agree to our Terms of Use and Privacy Policy, and to the use of cookies as described therein.
or
 
  • Recent
  • Commented
  • Albums
  • My Pictures

Peter_of_Australia's Photos

View Profile
Sort:
Commented
  • Most Recent
  • Most Comments
  • Albums
  • Photos
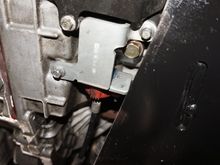
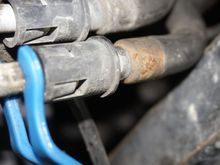
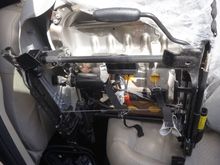
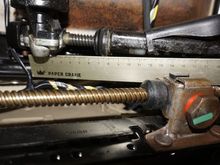
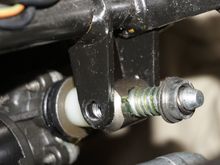
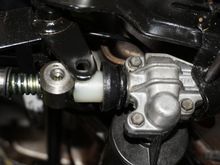
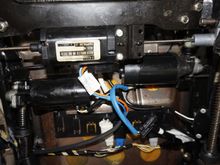
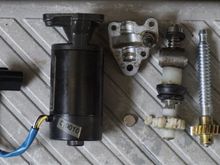
When I was done, I started the engine, let it run for a short while, went a few times thru all the gears with the foot firmly on the brake and the handbrake on, and then - with the engine running I opened again the ATF-level-check bolt, which is the big golden one on the right side in the picture. A small stream of ATF came out - I was happy with that. If more would hae come out, I would have left it open for a while longer, if nothing had come out, i would have filled in more ATF (with the engi
0 2023/04/12 06:14:02 Peter_of_A
Then I filled in more of the ATF.
0 2023/04/12 06:14:01 Peter_of_A
As my little helper had only a couple of minutes to help me, I had to contend with the old ATF coming out by the green hose. But the idea was, that it would come out of the clear hose so that I could see the colour-change better, AND the idea was to purge the ATF-chamber in the radiator that way as well: SO as you can see, the ATF comes out of the upper pipe, which I connected back to the radiator, and the clear waste-pipe goes to the lower connection point. I briefly started the engine again tw
0 2023/04/12 06:13:59 Peter_of_A
That's one of the pans. (Btw.: Before blowing: Opening the drain plug only (and starting up the engine twice for about 3 seconds each, and letting the old ATF drip out over night I got 4L out of the system..., "Blowing" gave me another 1.5L after letting it drip again over night).
0 2023/04/12 06:13:57 Peter_of_A
0 2023/04/12 06:13:55 Peter_of_A
SO here we go: The "blow" method: After disconnecting the drain plug: With both pipes disconnected and the lower pipe replaced with a "waste-pipe) leading into the waste-pan I blew with the air-compressor-gun full power into the upper opening on the radiator and out came the ATF, which was stuck in the radiator by the waste hose. Then I carefully blew into the 2 pipes going to the transmission and out came the old ATF by the drain plug opening and by those 2 pipes (2 pans required!)
0 2023/04/12 06:13:53 Peter_of_A
Note that it is necessary to insert the pipe-removal-tool fully and to twist it into a position, where it can "push" all 4 clips on the pipe-connector outwards.
0 2023/04/12 06:13:50 Peter_of_A
Thus I removed and spray-painted (black cold gal & clear coat) this as well...
0 2023/04/12 06:13:48 Peter_of_A
0 2023/04/12 06:13:16 Peter_of_A
0 2023/04/08 17:49:45 Peter_of_A
0 2023/04/08 17:49:42 Peter_of_A
and I'd use an inline fuse holder with a blade fuse, 10A.
0 2023/04/08 04:14:02 Peter_of_A
0 2023/04/06 19:47:20 Peter_of_A
I especially like the "special touch" of having a leaping Jaguar where a Mustang or a Ferrari have a horse...
0 2023/04/06 19:38:41 Peter_of_A
This shows the a.m. spare seat - mainly manual adjustment with only ONE height adjust motor, which very likely has a 16cm spindle.
0 2023/04/06 17:00:45 Peter_of_A
To avoid having to go thru the immense trouble of having to disconnect the seat belt I simply lifted the driver's seat carefully onto the rear seats with a solid support (little plastic bench underneath.
0 2023/04/06 16:57:45 Peter_of_A
0 2023/04/06 05:56:12 Peter_of_A
And after all this (seat back in position and the fixed motor worked fine), the other height adjust was playing up (the one, which is doing the lifting of the rear of the seat...). I am fairly sure that THIS spindle with sprocket is 14cm long (the other was 11cm).
0 2023/04/06 05:17:05 Peter_of_A
And a cable tie to hold all those cables together (needed to be cut before to get the motor off).
0 2023/04/06 05:17:04 Peter_of_A
Then the connector back on (size 7mm socket).
0 2023/04/06 05:17:02 Peter_of_A
That is another idea of how to fit that bolt (with a "bendy" extension).
0 2023/04/06 05:17:00 Peter_of_A
That is one idea of how to fit that bolt.
0 2023/04/06 05:16:58 Peter_of_A
And here it gets really difficult, because it is very hard to get the little inner bolt into position. Also. you need to adjust the metal bar above to be finally in the correct position over the threads.
0 2023/04/06 05:16:55 Peter_of_A
That's the pin being in position again.
0 2023/04/06 05:16:53 Peter_of_A
Thus, second assembly (for me): First hammer that pin back in.
0 2023/04/06 05:16:51 Peter_of_A
It had to go INSIDE! That little bit of unintended play made for a huge amount of rocking. Btw.: Don't try to drive with the motor removed: The seat will be an absolute rocking chair...
0 2023/04/06 05:16:49 Peter_of_A
THIS was WRONG! I left that washer OUTSIDE!
0 2023/04/06 05:16:47 Peter_of_A
...and this fully assembled... - so I thought.... I put it back into the seat, mounted the seat into the car, sat in it, and it was awfully rocking a bit forward and backward with the weight of my body. Obviously, something was wrong...:
0 2023/04/06 05:16:45 Peter_of_A
That's it part-assembled...
0 2023/04/06 05:16:43 Peter_of_A
Next that ring had to go over it as well. I used a massive pair of pliers, bringing first one end of the ring into position, then the middle.
0 2023/04/06 05:16:40 Peter_of_A
... and then I could carefully hammer it into position using a socket.
0 2023/04/06 05:16:38 Peter_of_A
Next I moved all the bits and pieces from the old spindle to the new. To do so I had been grinding off the other end of the spindle (opposite to the sprocket). Note that there is a ring inside the outermost part. After moving over all the bits & pieces, the outermost part did not want to go over the new spindle and I carefully drilled a little bit into it with a 9mm drill-bit, but not completely thru - I just removed a tiny bit of material, ...
0 2023/04/06 05:16:35 Peter_of_A
Thus I removed the motor on the right (as seen on picture above). Your see the broken (by design) plastic sprocket and the new part on it's right (...the RIGHT part is on the right...  ;). Also note that little plate between the motor and the broken plastic: Do not forget to put it back where it was, i.e. on top of the golden sprocket.
Thus I removed the motor on the right (as seen on picture above). Your see the broken (by design) plastic sprocket and the new part on it's right (...the RIGHT part is on the right... ;). Also note that little plate between the motor and the broken plastic: Do not forget to put it back where it was, i.e. on top of the golden sprocket.
0 2023/04/06 05:16:32 Peter_of_A
Here you see 3 motors: on top with thin spindles on both sides: Moving the seat forward and backwards. Below and on right: to move front part of the seat up/down. Below and left: to move rear part of seat up/down. My issue was the front part, which did not want to move down anymore.  Note that I am in Australia and this is a RHD driver's seat. Thus, your US driver's seat looks probably like a mirror image of this.
Here you see 3 motors: on top with thin spindles on both sides: Moving the seat forward and backwards. Below and on right: to move front part of the seat up/down. Below and left: to move rear part of seat up/down. My issue was the front part, which did not want to move down anymore. Note that I am in Australia and this is a RHD driver's seat. Thus, your US driver's seat looks probably like a mirror image of this.
0 2023/04/06 05:16:31 Peter_of_A
To be able to remove the motor, you need to hammer a pin out and remove 2 bolts (5mm hex key),..and: This will drive you nuts: Remove the connector from under the seat. Very tricky: I knew that system, as it is being used in the engine compartment on some Jags: Push a screwdriver thru under the connector to push that little latch away from the connector, so that you can pull the connector of it's "rail". You pull the connector towards the back of the seat...
0 2023/04/06 05:16:28 Peter_of_A
To fix this design failure (plastic sprockets) the aftermarket offers the real Mc Coy: Metal sprockets. You can either buy those sprockets only or buy it with the spindle. I bought it with spindle. I bought only the replacement part for the part, which was broken, and that was the 11cm long version.
0 2023/04/06 05:16:26 Peter_of_A
To move all the parts over I had to grind off the old spindle on the other end. Later I saw that I actually did not have to grind off as much - possibly - as there is a "ring" inside of the outer part. But does not matter, as that old spindle is scrap anyway. To get the outer part back onto the new part I had to drill very slowly and carefully first into that part with a size 9mm drill. I did not drill all the way thru. It need just a bit of an ID increase.
0 2023/04/04 16:21:17 Peter_of_A
That is the height adjust motor taken apart with the 11cm spindle - left: old / right: new. Those parts on the spindle need to be transferred. Don't loose or forget that little plate (shown between motor and old spindle. It sits on top of the sprocket (the golden thing on the new part.)
0 2023/04/04 16:21:15 Peter_of_A
0 2023/04/04 16:21:13 Peter_of_A
0 2023/03/27 14:52:46 Peter_of_A
First
Page
14 of 25
Last
Go To
Page
  • 1
  • ...
  • 12
  • 13
  • 14
  • 15
  • 16
  • ...
  • 25
14 of 25
Go To GO
Go to page of 25 pages
  • 1
  • ...
  • 12
  • 13
  • 14
  • 15
  • 16
  • ...
  • 25

Top
Jaguar Forums - Jaguar Enthusiasts Forum
  • Contact Us
  • FAQ
  • Archive
  • Advertising
  • Cookie Policy
  • Privacy Statement
  • Terms of Service
  • Your Privacy Choices
  • Manage Preferences

© 2026 MH Sub I, LLC dba Internet Brands

Follow Us        


When you click on links to various merchants on this site and make a purchase, this can result in this site earning a commission. Affiliate programs and affiliations include, but are not limited to, the eBay Partner Network.