Best way to route a wire from boot/trunk to centre cubby box under armrest ?
#1
 03-06-2009, 10:23 PM

I've been trying (and failing) to get MP3 connectivity into my '00 XJR (FM transmitter, FM modulator, Cassette adaptor, Alpine ALP/AI-NET AUX switcher), but after following the phone/bluetooth install thread on this forum I am going to go the "hack into your CDChanger" route (As mine is flaky anyway)
Assuming I don't blow myself up doing this, can I get a recommendation on the best way to run wires from the CDChanger in the boot/trunk to the cubby box under the centre armrest as thats where I'm going to put my MP3 player.
Thanks in advance
Assuming I don't blow myself up doing this, can I get a recommendation on the best way to run wires from the CDChanger in the boot/trunk to the cubby box under the centre armrest as thats where I'm going to put my MP3 player.
Thanks in advance
#2
03-07-2009, 08:37 AM

Member
Join Date: May 2008
Location: Omaha, Nebraska
Posts: 61
Likes: 0
Received 0 Likes
on
0 Posts
I just did an ipod install to mine last weekend. Removed the rear seat cushion and back rest, removed decklid, then pulled heel board on drivers rear seat. Ran wire from cd changer following wiring loom to the top left opening of the rear decklid framing, behind the seat insulation. Pulled out armrest storage compartment cubby. Routed the wires on top of the heelboard fuse panel to the center hump, then used a fish tape to pull the rca from the carpet to the underside of armrest storage. I ran black tape over most of the wire to keep it in place preventing shorting out or anything stupid. Works great, able to hide everything too. If you need more info on what to do for removal of anything just let me know, its still fresh in my memory!
#3
03-08-2009, 01:14 AM
Thanks stkxjrtech, I just completed the mission !
Actually I cheated a bit. I removed the rear fuse box covers to get to the rear seat cushion bolts only to find the bolts were pretty messed up so I was starting to dispair. They looked like torx bolts so I was resigning myself to a trip to the car store in the morning to get a torx driver set...... so with nothing else to do I took the fuel tank cover out of the boot/trunk to see if I could see the underside of the rear shelf.
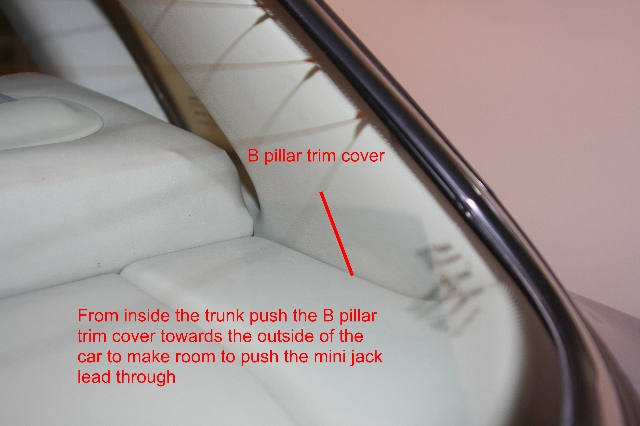
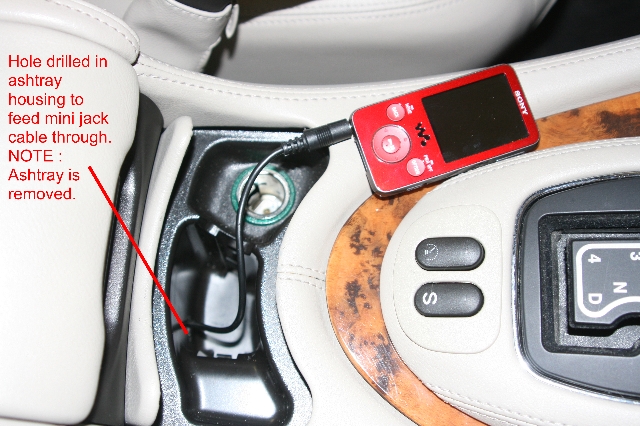
You can't see much of it, but I could get my hands all the way up to the right rear corner and push the bottom of the B pillar trim cover outwards so to create a little gap between the shelf and the B pillar cover. Now, we all know a 3.5mm mini jack is not very big so with a bit of fiddling I managed to poke it through so it came out onto the rear shelf. Then I pulled it towards the front of the car and it went neatly behind the rear seat. Then I routed it down the edge of the rear seat, and along inside the rear fuse boxes to the tunnel, then down under the mat to the side of the centre console, then up the inside under the cubby box which I'd removed (That was fiddly too). From start to finish this took me 15 minutes and I never took the rear seats out !! The cable is completely invisible the whole run. As I have a tiny Sony MP3 player that fits inside the ashtray I removed the ashtray completely and drilled a hole in the side of the ash tray holder and fed the wire through there (You wouldn't see this hole once the ashtray was put back in)
I'm so glad I found the link on the other thread about hacking into the CD changer. My CD Changer was actually still working most of the time (only skipped on bad potholes) so I wired another set of RCA leads off the original CD outputs and fed them out the back of the CD Changer and into the spare tyre/tire well. This is also where I connected the RCA to mini jack cable so if I want to go back to having the CDChanger working, I just swap the RCA plugs over and the CDChanger sound plays out of the stereo instead of the MP3 player.
I have seriously messed around with this for 2 months trying to get MP3 player connectivity and here the actual solution cost about 20 dollars all told for the RCA leads, plus some time and excitement pulling the trunk and CDChanger apart.
Fabulous!
Actually I cheated a bit. I removed the rear fuse box covers to get to the rear seat cushion bolts only to find the bolts were pretty messed up so I was starting to dispair. They looked like torx bolts so I was resigning myself to a trip to the car store in the morning to get a torx driver set...... so with nothing else to do I took the fuel tank cover out of the boot/trunk to see if I could see the underside of the rear shelf.
You can't see much of it, but I could get my hands all the way up to the right rear corner and push the bottom of the B pillar trim cover outwards so to create a little gap between the shelf and the B pillar cover. Now, we all know a 3.5mm mini jack is not very big so with a bit of fiddling I managed to poke it through so it came out onto the rear shelf. Then I pulled it towards the front of the car and it went neatly behind the rear seat. Then I routed it down the edge of the rear seat, and along inside the rear fuse boxes to the tunnel, then down under the mat to the side of the centre console, then up the inside under the cubby box which I'd removed (That was fiddly too). From start to finish this took me 15 minutes and I never took the rear seats out !! The cable is completely invisible the whole run. As I have a tiny Sony MP3 player that fits inside the ashtray I removed the ashtray completely and drilled a hole in the side of the ash tray holder and fed the wire through there (You wouldn't see this hole once the ashtray was put back in)
I'm so glad I found the link on the other thread about hacking into the CD changer. My CD Changer was actually still working most of the time (only skipped on bad potholes) so I wired another set of RCA leads off the original CD outputs and fed them out the back of the CD Changer and into the spare tyre/tire well. This is also where I connected the RCA to mini jack cable so if I want to go back to having the CDChanger working, I just swap the RCA plugs over and the CDChanger sound plays out of the stereo instead of the MP3 player.
I have seriously messed around with this for 2 months trying to get MP3 player connectivity and here the actual solution cost about 20 dollars all told for the RCA leads, plus some time and excitement pulling the trunk and CDChanger apart.
Fabulous!
#4
03-08-2009, 09:54 AM
#5
03-08-2009, 08:01 PM
@stkxjrtech --> Did you connect your ipod using the "Butcher your CDChanger" method as well?
@hrand1987 --> That's the correct link. I used simple RCA cables available from anywhere. See details below. If you are successful, let us know. Then thats at least 2 or 3 folks who have got it working, so we should be able to put together a pretty thorough thread that keeps the info together so others can try.
For completeness in this post here's the link to the original document that reported on the CDChanger butchering method.
http://j.roal.home.mchsi.com/X308Bluetooth.pdf (It was actually hiding in the "Factory Phone" thread)
I'd like to buy Mr Jim Roal, the author of this great document a large beer... Jim, if you're out there.....
I posted late last night after I had got everything done, so I went back this morning and took some pictures to hopefully make it a bit clearer what I did.
Getting to the CDChanger
*******************
Remove the left side rear light cover in the trunk. Remove the trunk trim piece which covers the CD Changer. Mine was not actually fastened down with anything, it was just snugly fitted in place, so it took a bit of fiddling to get it out.
Depending on what your car has you'll either have just a CDChanger, or also a Nav DVD, or also an amplifier in this rack. The rack is bolted to the trunk floor with 4 8mm hex nuts. Undo all of these. You can then bring the whole rack out a bit so you can get to the sides of it to undo more bolts. As I have Nav I had to unbolt both the Nav and the CDChanger (7mm bolts) Then once I had those 2 freed from the rack, I unbolted the CDChanger from the Nav unit. The infamous AI-NET connector runs around the back of the CDChanger so you can unplug that and the CDChanger can now be removed from the car.
Tapping into the CDChanger
*********************
Let the butchering begin ! Remove the 6 screws that hold the CDChanger cover on. Remove the cover by pulling it up first at the back by about half an inch, then pull the cover backwards to get it unhooked from the front on the CDChanger. Then it just lifts off. At the back of the unit where the AI-NET connector goes in there is a small circuit board. (See the above excellent .pdf file link for the details). There is one screw holding this small circuit board in place which you can access from the top of the unit with a long, narrow screwdriver. The screw is soldered on the top, I guess to make a ground connection, so I unsoldered this first before turning it. (Remember to re-solder it when you're putting everything back together). Now that the circuit board is loose inside the unit, you can pull it out of the back of the unit. It's still connected to the rest of the CDChanger by a ribbon cable but Alpine thoughfully made this long enough that you can pull the circuit board out without removing the ribbon cable. The white connector where all of the wires from the AI-NET cable go can now be unplugged. Put the CDChanger out of the way for the time being as you only need to play with the AI-NET cable and white connector now. See the .pdf file for what wires you need to cut. (Pins 2, 3 and 4 on the connector, green, blue and black wires) --> Be careful as there is more than 1 black wire, so check the pin info in the .pdf carefully. Check twice, cut once :-)
The wires are very thin and fragile. You just need to be careful and patient with them. So now that you've made 3 cuts you have 6 wire ends to play with. The 3 wire ends that are still connected to the AI-NET cable are the sound lines that go to the head unit. These are the sound lines you are going to feed your MP3 player music into. Get an RCA/male/female cable from Frys/Radio Shack/Maplin and cut it in half. Put the male half aside for now. On the female half strip the wires at the cut. RCA cables have an inner and an outer wire for both the red and white plugs. Twist the OUTER wires from the red and the white cables together (These are common ground wires). Strip the ends of the inner red and white wires. You now have 3 wires at the cut end of your female RCA cable. Join these to the 3 cut wires that go into the AI-NET cable.
Use the following colour map :
left / white / blue
right / red / green
signal ground / outer wire / black
Label this RCA cable as "To head unit" (This is essential to stop you getting mixed up if you're going to do the next step)
If your CD changer wasn't working anyway, then you don't need to do this part.
If your CDChanger was working (well, if it was working before you opened it up!) you can still make it work if you ever need to sell the car, or if you want to urgently listen to a CD for some reason. By following the procedure listed above, connect the male half of the RCA cable you cut up earlier to the 3 wire ends that are still connected to the white connector plug. Label this RCA cable as "CD Changer output"
For all this wiring, as the wires are very thin, terminal blocks or crimp connectors wouldn't have worked so I used solder and heat shrink on all of the joins.
Reconnect the white connector to the small circuit board. You can now put the CDChanger back together. Remember to re-solder the screw that secures the small circuit board. As you have added a lot of new wiring, it's pretty tight now to get the small circuit board to screw back in, but be patient with it. I routed all of the cables (The AI-NET cable and the 2 sets of RCA cables) out of the hole in the back where the AI-NET cable originally went in.
Before starting to run the wire for the MP3 player up through the car, it's probably worthwhile to test fit the CDChanger to see if it's survived the butchering. It doesn't need to go back in the rack, just lay it flat on the trunk floor and reconnect the AI-NET cable. If your CDChanger wasn't working before you started this, you didn't wire in 2 sets of RCA cables, so you can now switch the stereo on and confirm the CDChanger did what it was doing before you started, which I guess would be powers up but then doesn't play. If your CDChanger was working before you started this you can connect the 2 sets of RCA cables together (The ones you marked "To head unit" and "CD Changer output") and if all goes well, your CDChanger should be working as it did before and you should be able to hear it playing in the car as normal. By connecting the RCA cables together you've basically reconnected the wires inside the CDChanger that you cut.
Running the cable to the front of the car
******************************
stkxjrtech gave a good description earlier in this thread of how to run the wire, and I was intending to follow that, but when I opened the rear fuse boxes I saw the bolts holding the rear seat bottom down were mangled, so I had to turn to plan B.
Plan B : Remove the trim covering the fuel tank at the front of the trunk (2 plastic popper things that come out if you put long nosed pliers around them and lever them out). Now, with the CDChanger rack mounted on the lefthand side of the trunk, it may have been sensible to route the wire along the left hand side of the car, but the fuel filler is on the left hand side, so I decided to stay away from there and go across the trunk and try the right hand side. I bought a 15foot 3.5mm mini jack extension cable to run in one go from the trunk to the centre cubby. Working with this cable, I lay on the trunk floor and felt as far forward under the rear shelf as I could. With an assistant standing outside of the car and looking at the rear shelf through the rear window I found that I could push the B pillar trim apart a little from the rear shelf, so with the assistant now inside the car I pushed the mini jack cable up between the rear shelf and the B pillar trim panel and the assistant pulled it through. Hopefully this picture helps to understand what I'm talking about. The picture was taken from outside the car looking through the rear window.
This picture was taken after I had already ran my wire, and guess what, you can't see it!
Then I routed the cable down the side of the rear seat and along the front of the rear seat, behind the fuse box covers
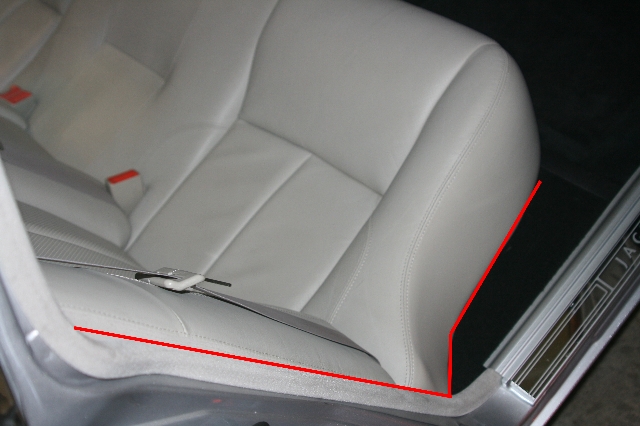
Again, the cable is already run here and it's not even visible.
Once I had the cable at the tunnel hump I cheated and ran it under the mat to underneath the drivers seat but if you were wanting to fiddle more I'm sure you could get it under the carpet "properly" by removing the centre cubby (which we're going to do anyway) and fishing it through. If you use the cheating method like I did, I suggest you tie grip the wire to the seatbelt anchor to make sure it doesn't get fouled up in the seat runners at some point.
Open the centre cubby and remove the 4 screws that are visible. Lift out the cubby box along with the lid. Be careful when removing the lid from the centre console as mine was kind of glued and if you yanked it you would probably have damaged the leather. Again, with an assistant if you can, one of you feeds the wire up underneath the side of the centre console and the other has their hand inside the centre console pushing the side away from the tunnel to make some space for the cable. Once you have the cable inside the centre console you can decide where you want to put your MP3 player, or Ipod or whatever you are connecting. As I have a tiny sony MP3 player I had already tested it in the ashtray and it fit fine once I had taken out the ashtray insert. I drilled a hole through the side of the ashtray (Not the insert, so if I put the insert in the car looks stock/unmutilated) and fed the wire through.
The finished article
Now go back into the trunk and connect the end of the wire you have just run through the car to the RCA cables labelled "To head unit" As i had used a 15ft mini jack cable extension it had a female connector on the end still in the trunk so I bought an RCA male to mini jack cable to connect here. I labelled the wire going to the MP3 player as "MP3 player output" as I now had a lot of RCA cables lying in the trunk. Obviously you should never connect the MP3 player output cables to the CD Changer output cables as this would likely fry your CDChanger and your MP3 player if they were both running at the time.
Now that I'm finished I put all of the RCA cables into the spare wheel well out of sight, but I took them out this morning to take a picture which hopefully helps others.

Operation
*******
Press CD on the head unit. I left the magazine empty so the display says "Disc/No Disc". If you leave the magazine out it will say "no magazine" I think. If you have a disc in the magazine it will show the track and disc number as normal but of course there's no sound because you've got the feed to the head unit connected to the MP3 player wires now. Connect your MP3 player, press play and rejoice in MP3 / ipod connectivity AT LAST in the Jaguar XJ8/R X308. With my Sony MP3 player set at 20/30 volume, I need the stereo at around 12 or 13 level. If I was being a real perfectionist I would probably install a preamp/line driver http://www.discountcarstereo.com/detail.aspx?ID=317 into the MP3 feed to increase the level to better match the radio, but as I never listen to the radio, I'm ok as is. I guess different MP3 players / ipods have different outputs so maybe better to try first then decide if you need a preamp. Fitting the preamp in the trunk would be easy as it only needs power and there's plenty of wires to tap into.
Parts List
*******
I bought everything easily from Fry's, but here's links to similar parts
I already had a soldering iron and a heat shrink gun
3.5mm mini jack extension cable male/female. I got a 15ft one. --> This is the long cable that runs through the car
http://www.cablestogo.com/product.as...2002&sku=40408 (link shows 12ft)
RCA male to female cable. 5ft should be ok. This is the cable you're going to cut up to connect into the CDChanger with
http://www.amazon.com/Professional-G...562008&sr=1-10
RCA male to 3.5mm mini jack cable. I got a 6ft one. This cable connects the female RCA cables that are connected to the head unit to the 3.5mm mini jack extension cable that runs through the car to the MP3 player in the cubby box
http://www.amazon.com/3-5mm-Stereo-M...6562099&sr=1-2 (Link shows 5ft)
Conclusion
********
An AUX input for MP3 / ipod with great sound quality (forget cassette adaptors, fm transmitters, fm modulators)
Allows you to keep the car looking 100% stock. (ahem, I said "looking" stock... no one needs to know you butchered your CDChanger!)
If you already own a soldering iron you can probably buy all the necessary cabling for ~ 20 bucks !
If anyone else tries this and gets it to work (no reason why it shouldn't) reply to this post to let the community know and if you have any other golden tips, lets hear them.
@hrand1987 --> That's the correct link. I used simple RCA cables available from anywhere. See details below. If you are successful, let us know. Then thats at least 2 or 3 folks who have got it working, so we should be able to put together a pretty thorough thread that keeps the info together so others can try.
For completeness in this post here's the link to the original document that reported on the CDChanger butchering method.
http://j.roal.home.mchsi.com/X308Bluetooth.pdf (It was actually hiding in the "Factory Phone" thread)
I'd like to buy Mr Jim Roal, the author of this great document a large beer... Jim, if you're out there.....
I posted late last night after I had got everything done, so I went back this morning and took some pictures to hopefully make it a bit clearer what I did.
Getting to the CDChanger
*******************
Remove the left side rear light cover in the trunk. Remove the trunk trim piece which covers the CD Changer. Mine was not actually fastened down with anything, it was just snugly fitted in place, so it took a bit of fiddling to get it out.
Depending on what your car has you'll either have just a CDChanger, or also a Nav DVD, or also an amplifier in this rack. The rack is bolted to the trunk floor with 4 8mm hex nuts. Undo all of these. You can then bring the whole rack out a bit so you can get to the sides of it to undo more bolts. As I have Nav I had to unbolt both the Nav and the CDChanger (7mm bolts) Then once I had those 2 freed from the rack, I unbolted the CDChanger from the Nav unit. The infamous AI-NET connector runs around the back of the CDChanger so you can unplug that and the CDChanger can now be removed from the car.
Tapping into the CDChanger
*********************
Let the butchering begin ! Remove the 6 screws that hold the CDChanger cover on. Remove the cover by pulling it up first at the back by about half an inch, then pull the cover backwards to get it unhooked from the front on the CDChanger. Then it just lifts off. At the back of the unit where the AI-NET connector goes in there is a small circuit board. (See the above excellent .pdf file link for the details). There is one screw holding this small circuit board in place which you can access from the top of the unit with a long, narrow screwdriver. The screw is soldered on the top, I guess to make a ground connection, so I unsoldered this first before turning it. (Remember to re-solder it when you're putting everything back together). Now that the circuit board is loose inside the unit, you can pull it out of the back of the unit. It's still connected to the rest of the CDChanger by a ribbon cable but Alpine thoughfully made this long enough that you can pull the circuit board out without removing the ribbon cable. The white connector where all of the wires from the AI-NET cable go can now be unplugged. Put the CDChanger out of the way for the time being as you only need to play with the AI-NET cable and white connector now. See the .pdf file for what wires you need to cut. (Pins 2, 3 and 4 on the connector, green, blue and black wires) --> Be careful as there is more than 1 black wire, so check the pin info in the .pdf carefully. Check twice, cut once :-)
The wires are very thin and fragile. You just need to be careful and patient with them. So now that you've made 3 cuts you have 6 wire ends to play with. The 3 wire ends that are still connected to the AI-NET cable are the sound lines that go to the head unit. These are the sound lines you are going to feed your MP3 player music into. Get an RCA/male/female cable from Frys/Radio Shack/Maplin and cut it in half. Put the male half aside for now. On the female half strip the wires at the cut. RCA cables have an inner and an outer wire for both the red and white plugs. Twist the OUTER wires from the red and the white cables together (These are common ground wires). Strip the ends of the inner red and white wires. You now have 3 wires at the cut end of your female RCA cable. Join these to the 3 cut wires that go into the AI-NET cable.
Use the following colour map :
left / white / blue
right / red / green
signal ground / outer wire / black
Label this RCA cable as "To head unit" (This is essential to stop you getting mixed up if you're going to do the next step)
If your CD changer wasn't working anyway, then you don't need to do this part.
If your CDChanger was working (well, if it was working before you opened it up!) you can still make it work if you ever need to sell the car, or if you want to urgently listen to a CD for some reason. By following the procedure listed above, connect the male half of the RCA cable you cut up earlier to the 3 wire ends that are still connected to the white connector plug. Label this RCA cable as "CD Changer output"
For all this wiring, as the wires are very thin, terminal blocks or crimp connectors wouldn't have worked so I used solder and heat shrink on all of the joins.
Reconnect the white connector to the small circuit board. You can now put the CDChanger back together. Remember to re-solder the screw that secures the small circuit board. As you have added a lot of new wiring, it's pretty tight now to get the small circuit board to screw back in, but be patient with it. I routed all of the cables (The AI-NET cable and the 2 sets of RCA cables) out of the hole in the back where the AI-NET cable originally went in.
Before starting to run the wire for the MP3 player up through the car, it's probably worthwhile to test fit the CDChanger to see if it's survived the butchering. It doesn't need to go back in the rack, just lay it flat on the trunk floor and reconnect the AI-NET cable. If your CDChanger wasn't working before you started this, you didn't wire in 2 sets of RCA cables, so you can now switch the stereo on and confirm the CDChanger did what it was doing before you started, which I guess would be powers up but then doesn't play. If your CDChanger was working before you started this you can connect the 2 sets of RCA cables together (The ones you marked "To head unit" and "CD Changer output") and if all goes well, your CDChanger should be working as it did before and you should be able to hear it playing in the car as normal. By connecting the RCA cables together you've basically reconnected the wires inside the CDChanger that you cut.
Running the cable to the front of the car
******************************
stkxjrtech gave a good description earlier in this thread of how to run the wire, and I was intending to follow that, but when I opened the rear fuse boxes I saw the bolts holding the rear seat bottom down were mangled, so I had to turn to plan B.
Plan B : Remove the trim covering the fuel tank at the front of the trunk (2 plastic popper things that come out if you put long nosed pliers around them and lever them out). Now, with the CDChanger rack mounted on the lefthand side of the trunk, it may have been sensible to route the wire along the left hand side of the car, but the fuel filler is on the left hand side, so I decided to stay away from there and go across the trunk and try the right hand side. I bought a 15foot 3.5mm mini jack extension cable to run in one go from the trunk to the centre cubby. Working with this cable, I lay on the trunk floor and felt as far forward under the rear shelf as I could. With an assistant standing outside of the car and looking at the rear shelf through the rear window I found that I could push the B pillar trim apart a little from the rear shelf, so with the assistant now inside the car I pushed the mini jack cable up between the rear shelf and the B pillar trim panel and the assistant pulled it through. Hopefully this picture helps to understand what I'm talking about. The picture was taken from outside the car looking through the rear window.
This picture was taken after I had already ran my wire, and guess what, you can't see it!
Then I routed the cable down the side of the rear seat and along the front of the rear seat, behind the fuse box covers
Again, the cable is already run here and it's not even visible.
Once I had the cable at the tunnel hump I cheated and ran it under the mat to underneath the drivers seat but if you were wanting to fiddle more I'm sure you could get it under the carpet "properly" by removing the centre cubby (which we're going to do anyway) and fishing it through. If you use the cheating method like I did, I suggest you tie grip the wire to the seatbelt anchor to make sure it doesn't get fouled up in the seat runners at some point.
Open the centre cubby and remove the 4 screws that are visible. Lift out the cubby box along with the lid. Be careful when removing the lid from the centre console as mine was kind of glued and if you yanked it you would probably have damaged the leather. Again, with an assistant if you can, one of you feeds the wire up underneath the side of the centre console and the other has their hand inside the centre console pushing the side away from the tunnel to make some space for the cable. Once you have the cable inside the centre console you can decide where you want to put your MP3 player, or Ipod or whatever you are connecting. As I have a tiny sony MP3 player I had already tested it in the ashtray and it fit fine once I had taken out the ashtray insert. I drilled a hole through the side of the ashtray (Not the insert, so if I put the insert in the car looks stock/unmutilated) and fed the wire through.
The finished article
Now go back into the trunk and connect the end of the wire you have just run through the car to the RCA cables labelled "To head unit" As i had used a 15ft mini jack cable extension it had a female connector on the end still in the trunk so I bought an RCA male to mini jack cable to connect here. I labelled the wire going to the MP3 player as "MP3 player output" as I now had a lot of RCA cables lying in the trunk. Obviously you should never connect the MP3 player output cables to the CD Changer output cables as this would likely fry your CDChanger and your MP3 player if they were both running at the time.
Now that I'm finished I put all of the RCA cables into the spare wheel well out of sight, but I took them out this morning to take a picture which hopefully helps others.
Operation
*******
Press CD on the head unit. I left the magazine empty so the display says "Disc/No Disc". If you leave the magazine out it will say "no magazine" I think. If you have a disc in the magazine it will show the track and disc number as normal but of course there's no sound because you've got the feed to the head unit connected to the MP3 player wires now. Connect your MP3 player, press play and rejoice in MP3 / ipod connectivity AT LAST in the Jaguar XJ8/R X308. With my Sony MP3 player set at 20/30 volume, I need the stereo at around 12 or 13 level. If I was being a real perfectionist I would probably install a preamp/line driver http://www.discountcarstereo.com/detail.aspx?ID=317 into the MP3 feed to increase the level to better match the radio, but as I never listen to the radio, I'm ok as is. I guess different MP3 players / ipods have different outputs so maybe better to try first then decide if you need a preamp. Fitting the preamp in the trunk would be easy as it only needs power and there's plenty of wires to tap into.
Parts List
*******
I bought everything easily from Fry's, but here's links to similar parts
I already had a soldering iron and a heat shrink gun
3.5mm mini jack extension cable male/female. I got a 15ft one. --> This is the long cable that runs through the car
http://www.cablestogo.com/product.as...2002&sku=40408 (link shows 12ft)
RCA male to female cable. 5ft should be ok. This is the cable you're going to cut up to connect into the CDChanger with
http://www.amazon.com/Professional-G...562008&sr=1-10
RCA male to 3.5mm mini jack cable. I got a 6ft one. This cable connects the female RCA cables that are connected to the head unit to the 3.5mm mini jack extension cable that runs through the car to the MP3 player in the cubby box
http://www.amazon.com/3-5mm-Stereo-M...6562099&sr=1-2 (Link shows 5ft)
Conclusion
********
An AUX input for MP3 / ipod with great sound quality (forget cassette adaptors, fm transmitters, fm modulators)
Allows you to keep the car looking 100% stock. (ahem, I said "looking" stock... no one needs to know you butchered your CDChanger!)
If you already own a soldering iron you can probably buy all the necessary cabling for ~ 20 bucks !
If anyone else tries this and gets it to work (no reason why it shouldn't) reply to this post to let the community know and if you have any other golden tips, lets hear them.
Last edited by Sarc; 03-09-2009 at 12:32 AM.
#6
03-08-2009, 08:42 PM
Great Tutorial! Thanks for the heads up on the wires being extra thin I was just going to tap into the wires the way they are this way I wouldnt have to worry about selling the car down the road but your procedure should work great.
Could you make a guess as to what gauge the inside wires are 28 maybe? Im thinking about making mini plugs just to neaten everything up a bit. I found a really good soldering tutorial for them on youtube as well. heres the tutorial
Also how did you feed the wires back out of the cd changer once you soldered them in, seems a little tight unless you removed the black ai-net cord grommet.
Last edited by hrand1987; 03-08-2009 at 09:01 PM.
#7
03-08-2009, 08:54 PM
Trending Topics
#8
03-08-2009, 09:19 PM
I looked up wire guages (a new topic for me) and if I'm reading the table correctly, I would estimate the inside core diameter to be no more than 0.5mm, so that would put the guage somewhere around 24ish.
The most tricky part is that there's not a lot of exposed wire between the AI-NET connector and the white connector, so once you've made your cut, when you strip the wires you really can't afford to lose any length so when you strip them, you need to be careful not to cut the conductor.
Good point about getting the cables out the back of the CDChanger. I used a knife to make cut outs on either side of the AI-NET cable grommet and fed 1 set of cables through each cut out. I should have taken a picture of that but it's all back in the car now and I'm not going to tempt fate by taking it all out again :-)
Great youtube soldering link. Mine wasn't as neat as that !
Last edited by Sarc; 03-08-2009 at 09:39 PM.
#9
03-09-2009, 12:34 PM
Well I got the sound coming out of the passenger side but not the driver side I double checked by playing a couple songs and also switching to the tape converter and it was definately my wiring. When I went to pull the cord out I broke the AInet cord coming out of the back of the cd player so I will either have to source a new cord or cd changer. My cd changer was dying anyway so not to big of a deal just frustrating, oh well i was able to return most of my stuff to radioshack so I will now be able to save a lot of money on that end by finding it online. I havent given up on this project yet. The right side was a little sketchy. I also think when I work on the new cord I will slice into the cord outside of the cable the signal wires seem to be seperate and shouldnt be hard to locate.
#10
03-09-2009, 01:12 PM
Sorry to hear that.
If you are more comfortable hacking into the AI-NET cable itself you could buy an AI-NET cable extension (http://www.crutchfield.com/S-EeOOhds...-KWA-350B.html), fit it in between the CDChanger and the cable running to the head unit and hack into that. Hacking the cable could be easier as you would have more wire length to play with. In fact in hindsight this may actually be easier than opening up the CDChanger. The only thing that worried me about doing this was that the cable is shielded and I didn't know if cutting the shield would impact the cables functionality or not.
I rocked into work this morning playing MP3s and the wiring survived its first road trip with bumps and all. I also liked the position of the MP3 player as it is in the picture above. It stays where it is, doesn't roll around and is easy to reach.
#11
03-09-2009, 09:25 PM

The crutchfield link you supplied said the part was discontinued, but I've been wondering about taping an extender cable. In fact, I was wondering if there wasn't a way to get into the connection up close to the head unit already in the console and save myself the wire route from the trunk. Has anyone pulled their radio and located the AI Net connection at the head unit?
#12
03-09-2009, 10:33 PM
@ XJ8Johnny
I didn't notice the cable was discontinued, sorry. I had a look at other sites for 10 minutes and I couldn't find a cable in that time. Maybe this part is discontinued by Alpine for some reason.
I've had the head unit out before. The AI-NET cable connects to the left hand side of the head unit (looking at the head unit from the front panel), ie
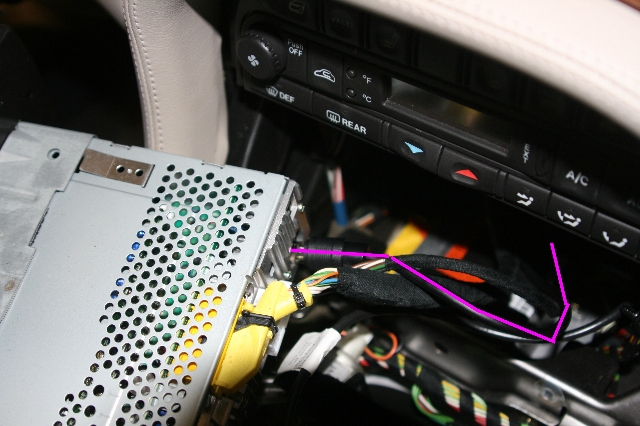
The AI-NET cable is highlighted with the purple line.
You can see how much slack there is on the cable (not a lot). If you were confident then I'm sure it could be spliced here. The worry would be if you damaged the cable somehow, rerouting a new one through the car would not be pleasant.
It took me a long time to work out how to route the mini jack cable from the trunk but now that I know how to do it, I'm sure I could do it in 10 minutes. There's also a bit of work required to take off the skislope and pull the headunit, etc. That coupled with the fact that I could take the whole CDChanger out of the car and work with it on a workbench with plenty of light and all my soldering stuff easily at hand (instead of trying to solder in the car) would swing me towards doing it the same way I did it before.
If you try going behind the head unit, let us know how you get on.
I didn't notice the cable was discontinued, sorry. I had a look at other sites for 10 minutes and I couldn't find a cable in that time. Maybe this part is discontinued by Alpine for some reason.
I've had the head unit out before. The AI-NET cable connects to the left hand side of the head unit (looking at the head unit from the front panel), ie
The AI-NET cable is highlighted with the purple line.
You can see how much slack there is on the cable (not a lot). If you were confident then I'm sure it could be spliced here. The worry would be if you damaged the cable somehow, rerouting a new one through the car would not be pleasant.
It took me a long time to work out how to route the mini jack cable from the trunk but now that I know how to do it, I'm sure I could do it in 10 minutes. There's also a bit of work required to take off the skislope and pull the headunit, etc. That coupled with the fact that I could take the whole CDChanger out of the car and work with it on a workbench with plenty of light and all my soldering stuff easily at hand (instead of trying to solder in the car) would swing me towards doing it the same way I did it before.
If you try going behind the head unit, let us know how you get on.
#13
03-10-2009, 12:09 PM
Resoldered and my sound is still only coming out of right side I believe it could be the cord I am using as it is really for a video camera, will try hooking up my video cam later and using playback as well as my fiancees video ipod, mine is an old HP ipod yes an HP ipod!
Did find something very clever out tho, the sound came out with out me hooking the cord back into the cd changer and so I have come up with a new possible solution for people that do not want to hack into there cd changer. Get an AI-net cord extension and splice into that and just leave cd changer out of car, the screen will flash something like no cd controller but sound still comes out and bass treble subwoofer adjustments can still be made. Either way this is probably the way to go since the original ai-net cord that attaches to the circuit board is impossible to find, and if your like me then youll screw up the connection and have to go find a new cd changer for a 100 bucks. A quick ebay search will pull a few up ai net extension cords up to.
search
listing
Was also thinking there must be some type of switch setup we could use to make it easier to switch between the cd changer and auxiliary input
Last edited by hrand1987; 03-10-2009 at 12:18 PM.
#14
03-10-2009, 02:39 PM
Member
Join Date: May 2008
Location: Omaha, Nebraska
Posts: 61
Likes: 0
Received 0 Likes
on
0 Posts
#15
03-10-2009, 03:08 PM
Member
Join Date: May 2008
Location: Omaha, Nebraska
Posts: 61
Likes: 0
Received 0 Likes
on
0 Posts
#16
03-10-2009, 03:41 PM
Thank you I will have to check my circuit board out is it pretty easy to tell when a wire snapped?
Also Scratch what I said earlier about it working with no cd changer in. Just tried and it didnt but I think it is because I went from cd to fm then cd. Seems to work if your in cd mode with cd changer in then unplugging cd changer.
Also Scratch what I said earlier about it working with no cd changer in. Just tried and it didnt but I think it is because I went from cd to fm then cd. Seems to work if your in cd mode with cd changer in then unplugging cd changer.
The following users liked this post:
leroy1 (03-01-2012)
#17
03-10-2009, 06:11 PM
@ hrand1987
I think you are now describing the correct behaviour of the CDChanger. When it powers up it does the "handshake" with the headunit, and after that you could disconnect the wire and insert anything and it would work, but if you switch sources (CD to FM to CD), or power off and on again, the handshake fails, so this isn't a workable solution unfortunately.
@ stkxjrtech
It sounds like you had some adventures but finally is it working ok for you ? (At least that would be 2 of us !)
#18
03-11-2009, 09:08 AM
Member
Join Date: May 2008
Location: Omaha, Nebraska
Posts: 61
Likes: 0
Received 0 Likes
on
0 Posts
@ SARC
Yes everything is working great, had the one issue with only the right side playing sound but got that figured out right away. Iv got it set up with the interchangable set of rca cables so i can listen to the cd changer or the ipod, just have to switch the connections. The headunit always displays "cd changer not control" or something like that. Changer cycles through the cds and will read them but no sound because of the rca hook up to AUX. Is this how you have yours setup? I would like to figure out a way to keep the cd changer from cycling, i guess its not really a big deal but was wondering if it was possible?
Also has anyone tried wiring in the correct ipod cable with charging capabilities and all instead of the headphone jack?
#19
03-11-2009, 12:42 PM
@ stkxjrtech
Cool. Well, thats 2 of us out of millions :-)
Maybe I misunderstood what you were asking about the CDChanger but I have mine with the magazine in, but empty. The first time you insert the empty magazine it searches through (and can't find anything) so the display says "disc / no disc" Now any subsequent time you turn the car off and on the CDChanger (smartly) knows that you haven't opened the magazine door since the last time, so the magazine is still in the same state as it was before, so it doesn't search the (empty) magazine again.
I think you can also leave the magazine out completely and the display says "disc / no magazine" and the handshake between the head unit and the CDChanger is still successful. I'll try that tonight and post the results.
I left my magazine in, but empty because my CDChanger actually still works and if I took the magazine out I would be guarenteed to lose it !