
Gonna try this one - DIY Parking Brake Adjustment
#1
 04-06-2010, 07:52 PM

For three years, I've never used this PB, and never gotten dinged on TX inspection either. I'm afraid this time, it won't pass...I tried it recently. The car won't hold the slightest incline, even at idle the PB can't hold the car still...so its either out of adjustment, or something more serious. I'm going to try this adjustment myself. I've got two questions...
(1) Wheel nut size to hold the hub secure, I am pretty sure my lug nut won't work, so can I get a few of these from Lowes/HomeDepot, or is this something special?
(2) Anything else tricky you see?
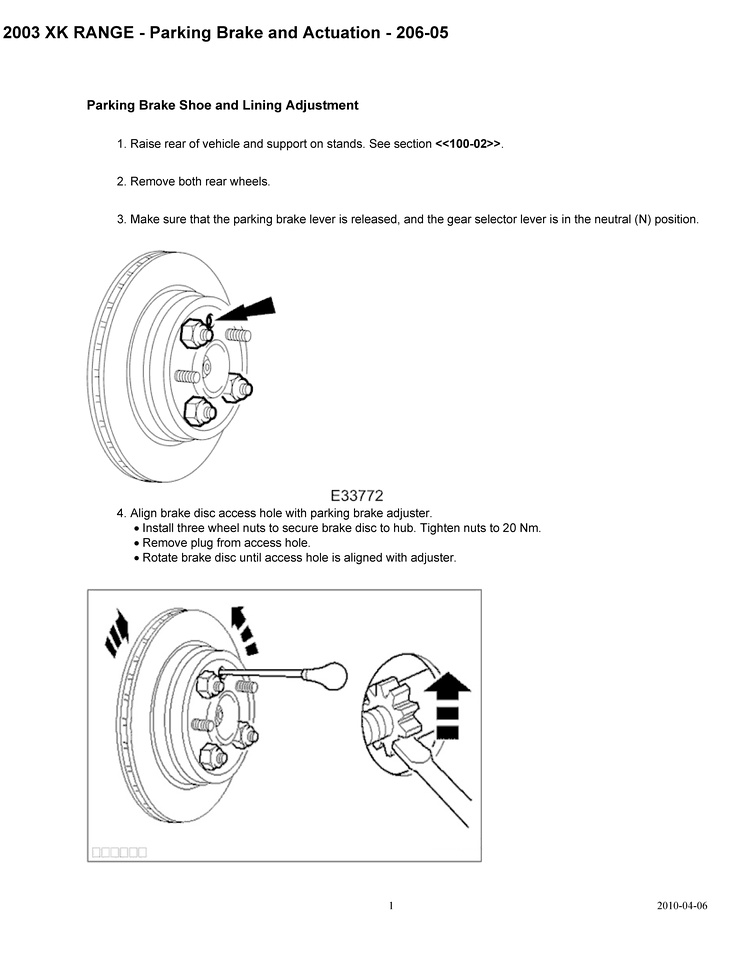
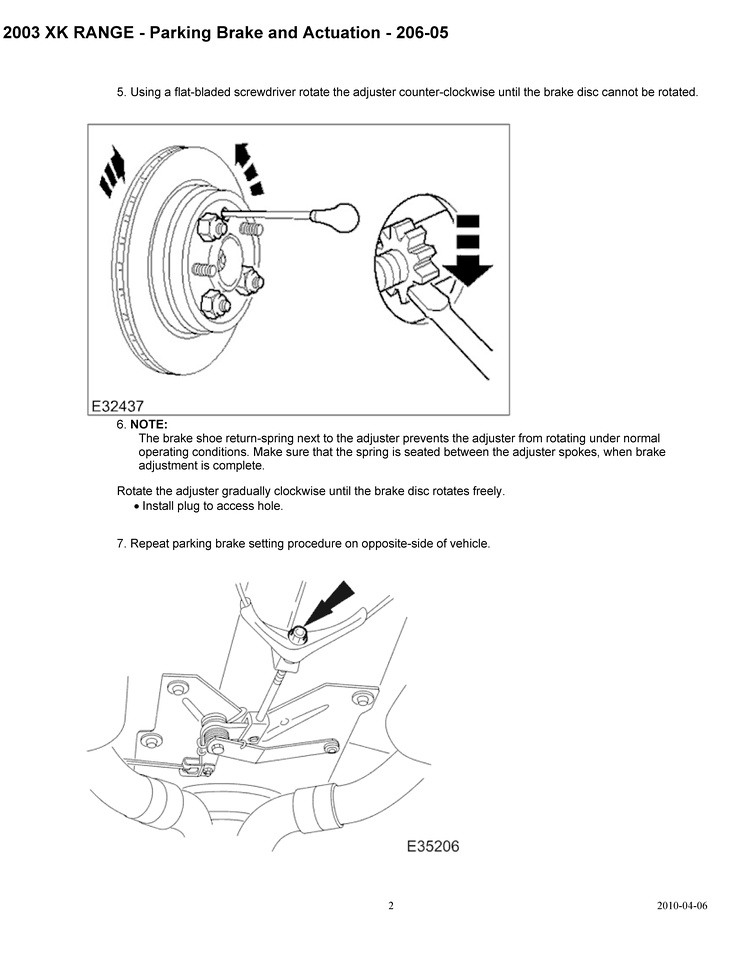
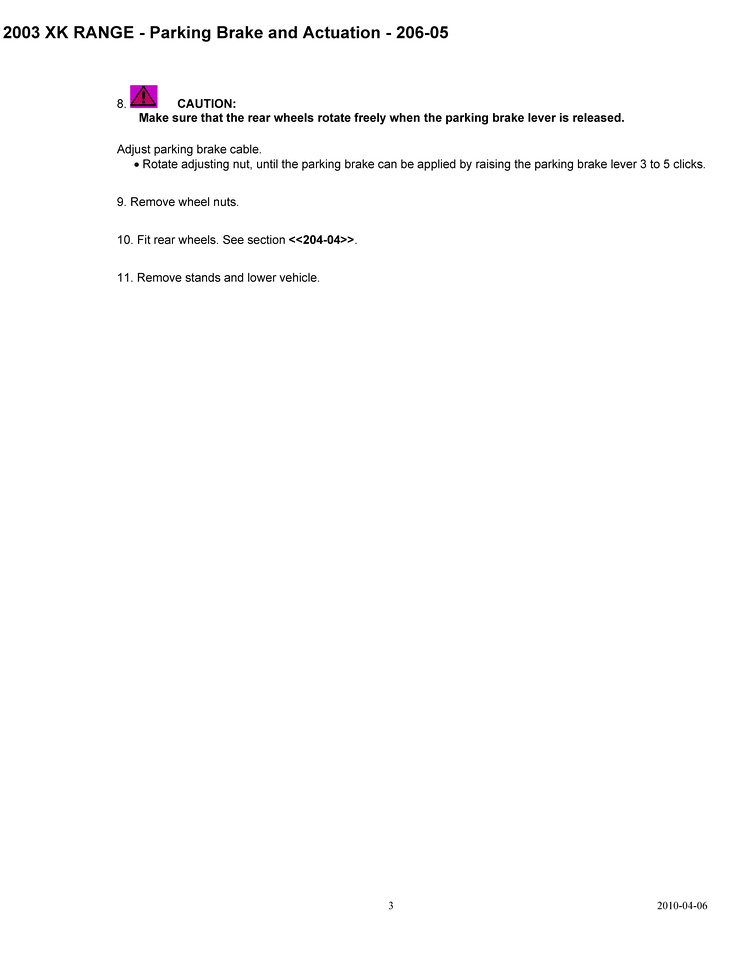
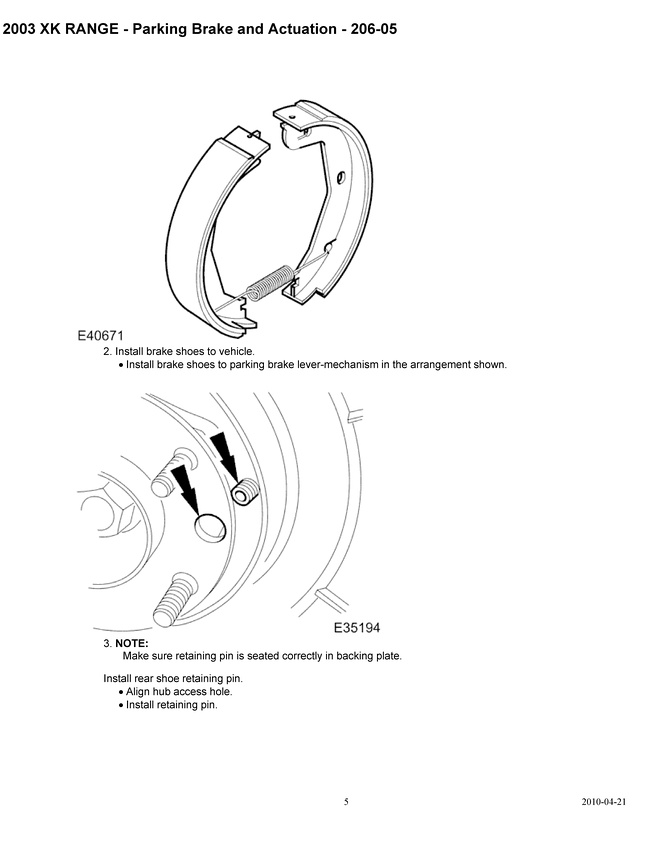
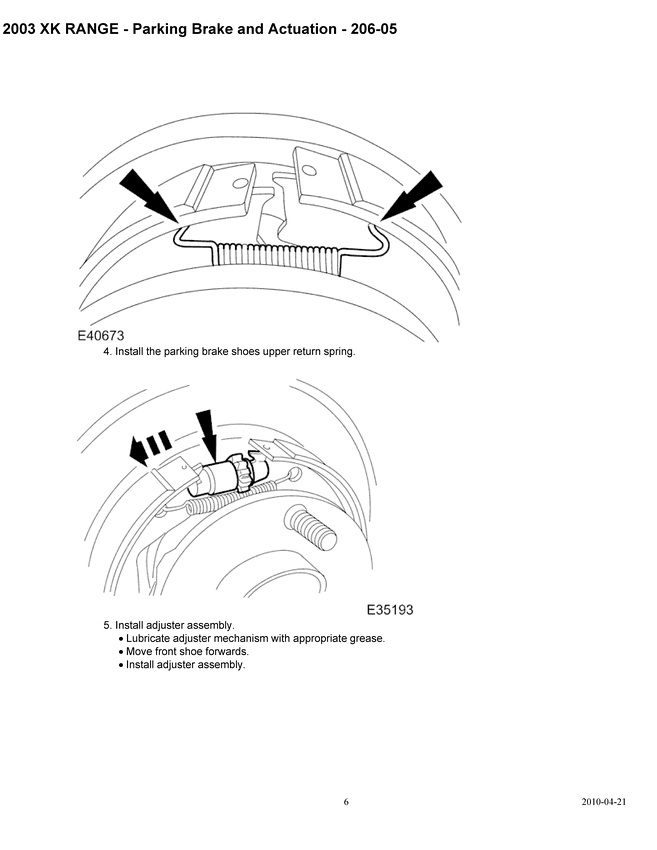
JTIS is pretty straightforward on how to do it... Will do the brake pad adjustment along with the cable afterwards.
And one in pdf, in case you want to print it out.
(1) Wheel nut size to hold the hub secure, I am pretty sure my lug nut won't work, so can I get a few of these from Lowes/HomeDepot, or is this something special?
(2) Anything else tricky you see?
JTIS is pretty straightforward on how to do it... Will do the brake pad adjustment along with the cable afterwards.
And one in pdf, in case you want to print it out.
#2
04-06-2010, 08:36 PM
Veteran Member
#3
04-06-2010, 09:10 PM

#4
04-06-2010, 10:17 PM
That's exactly how the old VW bug drum brakes were adjusted, and not just the emergency brakes either. Only difference is you could come at it from the other side, back of the drum and not have to take the wheel off. But what a pain in the butt! Then they finally discovered self-adjusting brakes.
I had no idea the emergency brake was adjusted this way but it does not look terribly difficult. Good luck.
I had no idea the emergency brake was adjusted this way but it does not look terribly difficult. Good luck.
#5
04-06-2010, 10:48 PM
Funny you mentioned that Bob, first thing I thought about when I saw those 'wheel nuts', I said.. I bet Bob has some of those in his tool box...along with my tow hook! And my client up near Bridgeport is no longer a client...so driving that direction - not so much (i.e., none).
I wish I had a lift, it sure would make it easy to get these adjustments done...especially that cable procedure...i'm not sure my gut will fit under the car that far.
I wish I had a lift, it sure would make it easy to get these adjustments done...especially that cable procedure...i'm not sure my gut will fit under the car that far.

#7
04-07-2010, 10:22 AM
Trending Topics
#8
04-19-2010, 09:18 PM
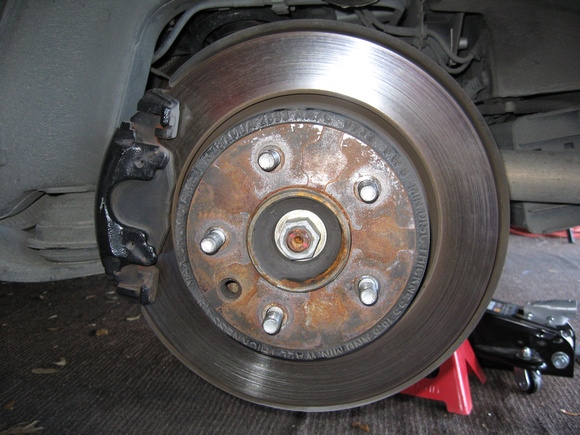
Well, tried the adjustment tonight in the garage, with a couple floor jacks and an empty stomach (see me squeezing under the car)
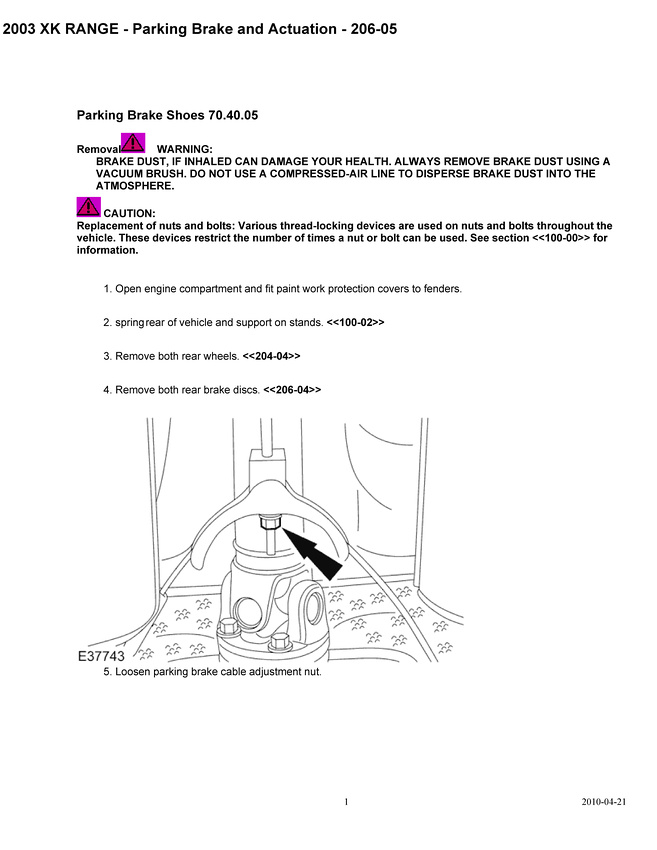
Anyway, driver side adjustment was first, followed the JTIS and rotated the adjuster until it couldn't turn, then backed it off. Felt like (and sounded like) it would drag a little, so I let it off a little more. Then off to the passenger side. Couldn't get the adjuster to tighten and seat the pad fully, before it stopped letting me counter-screw it. Damn. So, I stopped there, moved forward towards the parking brake cable adjustment nut, and turned it oh...maybe 2 full turns, till it wasn't bouncing anymore. With the car still up, I pulled the brake handle, it got to about 3 clicks, started getting resistance, got another two clicks after that. I thought I was good.
Bolted all the wheels back up (torqued of course), took it out of the driveway and onto my flat street and proceeded with the test. Remember, previously, my car wouldn't stay still at idle, let alone any gas (and RPM increase)
In idle, foot on the brake, pulled the hand brake up...felt good, no movement, so let off the brake...she sat still. Tried a little nudge of accelerator, and she couldn't handle maybe a few hudrned more RPMs before she inched forward. shyte!! TX I think requires somewhere between 1500 and 2000 RPMs...and I only got to about 900 before it moved, Bob, do you recall how its done?
Anyway, driver side adjustment was first, followed the JTIS and rotated the adjuster until it couldn't turn, then backed it off. Felt like (and sounded like) it would drag a little, so I let it off a little more. Then off to the passenger side. Couldn't get the adjuster to tighten and seat the pad fully, before it stopped letting me counter-screw it. Damn. So, I stopped there, moved forward towards the parking brake cable adjustment nut, and turned it oh...maybe 2 full turns, till it wasn't bouncing anymore. With the car still up, I pulled the brake handle, it got to about 3 clicks, started getting resistance, got another two clicks after that. I thought I was good.
Bolted all the wheels back up (torqued of course), took it out of the driveway and onto my flat street and proceeded with the test. Remember, previously, my car wouldn't stay still at idle, let alone any gas (and RPM increase)
In idle, foot on the brake, pulled the hand brake up...felt good, no movement, so let off the brake...she sat still.
Tried a little nudge of accelerator, and she couldn't handle maybe a few hudrned more RPMs before she inched forward. shyte!! TX I think requires somewhere between 1500 and 2000 RPMs...and I only got to about 900 before it moved, Bob, do you recall how its done?
#9
04-19-2010, 09:49 PM

H20, sounds like the problem with my driver side, may need some new shoes on the passenger.
So your passenger hub had a through hole to adjust it?
There was no way to adjust my passenger without taking the hub off.
I was just happy my noise disappered. I never use my E-Brake, but it would be nice to know it does work.
So your passenger hub had a through hole to adjust it?
There was no way to adjust my passenger without taking the hub off.
I was just happy my noise disappered. I never use my E-Brake, but it would be nice to know it does work.
#11
04-19-2010, 10:27 PM
I saw the shoes on autopartswharehouse.com
Centrix $38.70 OE Replacement Part #111.08260
Ferodo $125.95 Direct OE Replacement Part # W0133-1612707
You can always tell a jag part they have that W0---
Free Shipping too.
I shoud have buught stock in that place . I've ordered from them and a few other places. Funny thing is when the box shows up it always says Autopartswharehouse. The others will show cheaper prices by a few bucks sometimes but then they hit you for shipping.
I also use jaguarparts.com for certain items. They're actually a Jag dealer that buys the rights from jag to sell the parts on the web. Nice thing about them is they'll show breakdown views of the assemblies, so you can tell which part your looking for.
Centrix $38.70 OE Replacement Part #111.08260
Ferodo $125.95 Direct OE Replacement Part # W0133-1612707
You can always tell a jag part they have that W0---
Free Shipping too.
I shoud have buught stock in that place
I also use jaguarparts.com for certain items. They're actually a Jag dealer that buys the rights from jag to sell the parts on the web. Nice thing about them is they'll show breakdown views of the assemblies, so you can tell which part your looking for.
#13
04-20-2010, 03:19 PM
Veteran Member
#14
04-20-2010, 11:45 PM
I wouldn't bother unless its not working. When I lifted the Brake handle my passenger locked up tight, and rotated freely when released. Driver was still able to rotate even with the brake on. So I'll just replace the driver side shoes. If your worried about it, pull the disk and see what shape your drivers side is in. I think I'm going to get the centrix though @ $38.00
Gus, I think H20's original concern was not passing a state inspection. Mine was a rattling coming from the rear.
Gus, I think H20's original concern was not passing a state inspection. Mine was a rattling coming from the rear.
#17
04-24-2010, 09:08 PM
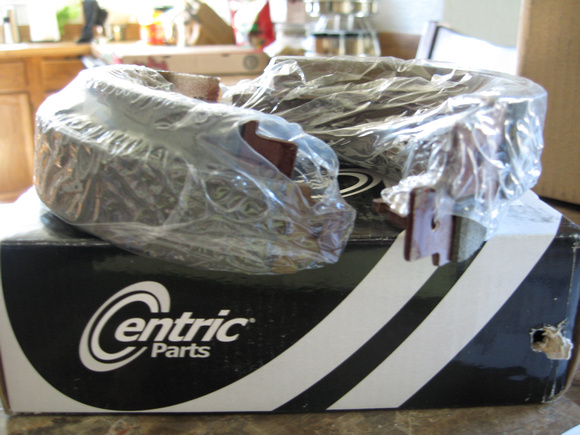
Centric pads arrived this morning from FedEx, your link Dpez, thanks. $38 gets you two pairs, so I did both sides tonight.
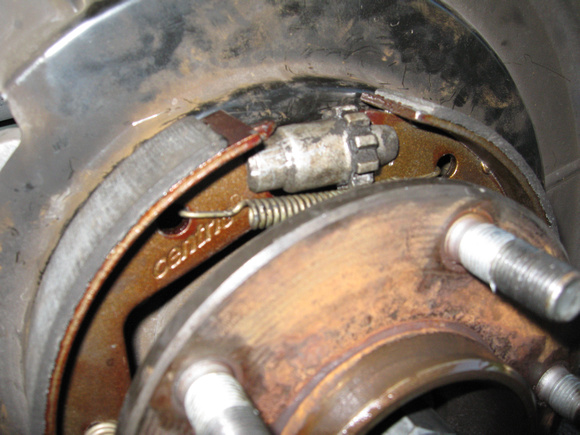
Started on the driver side, got the thing apart as such...(notice the zip tie to hold the caliper, someone around here I think gave that tip that I seemed to retain)
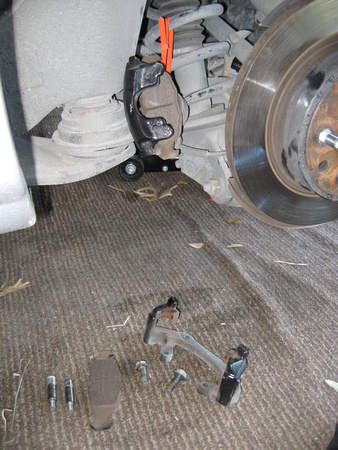
The old parking shoes were sooo very slick, and the new pads were rough. Could be why after adjustment, I coudn't get it to hold well.
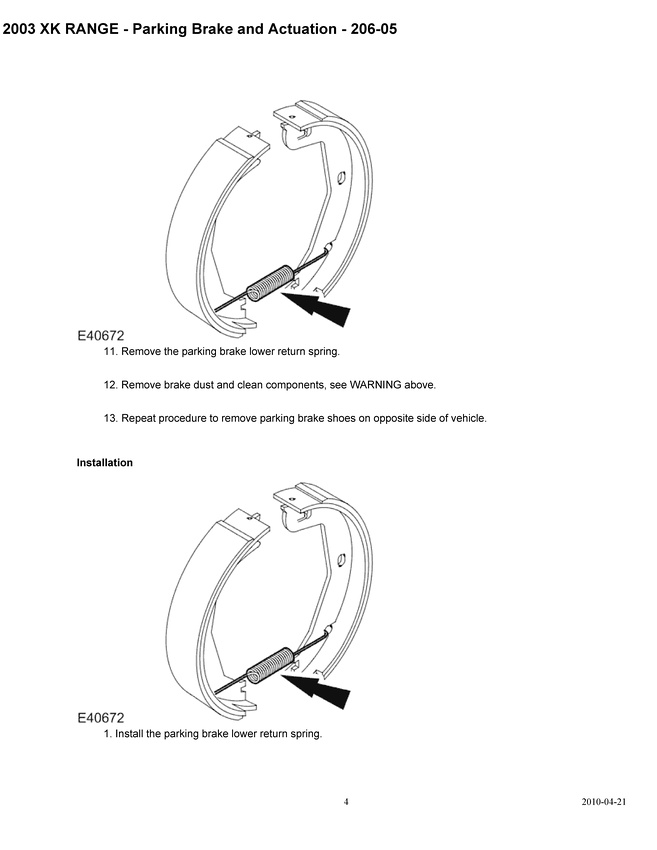
and to be honest, my biggest trouble spot I faced was removing and reinstalling the lower spring on this assembly. It was a bee-otch! Overall time, 3.5 hours...don't laugh. I also touched up my calipers paint job while I was putting it back together.
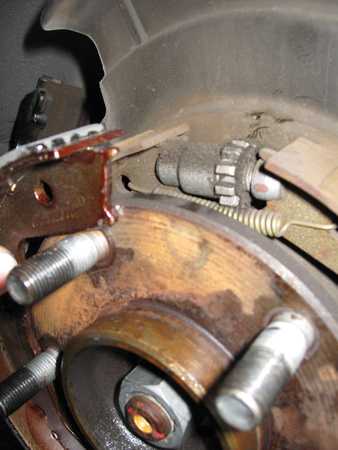
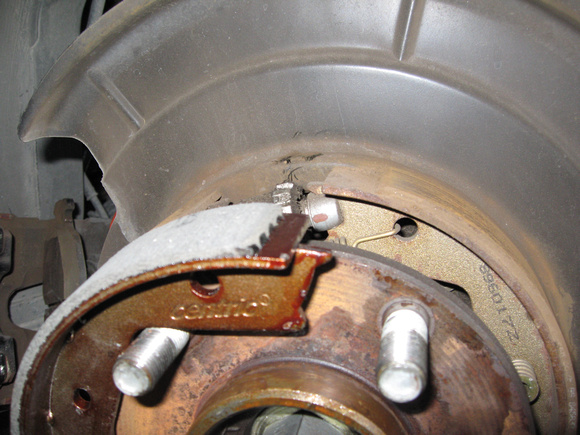
One little surprise that I found, see in the above JTIS layout, you turn the adjustment 'flywheel' counter clockwise to open the pads and tighten them up, right? Well, on the passenger side, the one that I turned all the way before it reached its end-of-travel, which made me believe the pads were gone...well, a previous intervention found that adjustment piece (the silver thing) facing the opposite direction, so when I was thinking I was tightening up the pads by going with the same counter clockwise direction, in fact I was loosening the pad...thats why I could never get it to fully engage like the driver side.
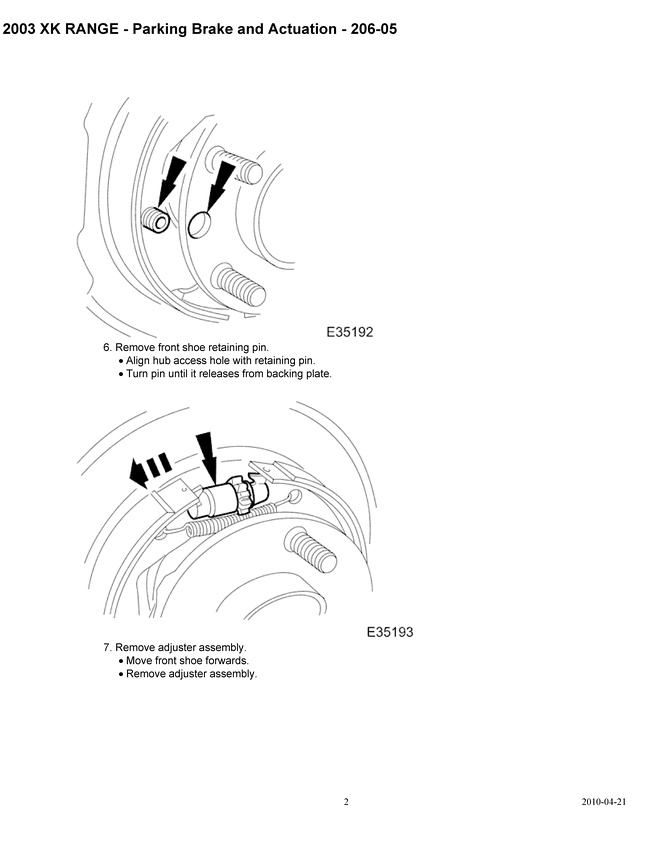
Followed the JTIS to do the install, but most of it was adapting while in there. I mean it didn't even tell me I needed a star driver to release those retaining pins (surrounded by the spring) That was trial and error.
No matter, it was a good $40 well spent, and I learned another system on my car. Now, I can barely pull up the handle to 4 clicks and both wheels lock up solid.
Started on the driver side, got the thing apart as such...(notice the zip tie to hold the caliper, someone around here I think gave that tip that I seemed to retain)
The old parking shoes were sooo very slick, and the new pads were rough. Could be why after adjustment, I coudn't get it to hold well.
and to be honest, my biggest trouble spot I faced was removing and reinstalling the lower spring on this assembly. It was a bee-otch! Overall time, 3.5 hours...don't laugh. I also touched up my calipers paint job while I was putting it back together.
One little surprise that I found, see in the above JTIS layout, you turn the adjustment 'flywheel' counter clockwise to open the pads and tighten them up, right? Well, on the passenger side, the one that I turned all the way before it reached its end-of-travel, which made me believe the pads were gone...well, a previous intervention found that adjustment piece (the silver thing) facing the opposite direction, so when I was thinking I was tightening up the pads by going with the same counter clockwise direction, in fact I was loosening the pad...thats why I could never get it to fully engage like the driver side.
Followed the JTIS to do the install, but most of it was adapting while in there. I mean it didn't even tell me I needed a star driver to release those retaining pins (surrounded by the spring) That was trial and error.
No matter, it was a good $40 well spent, and I learned another system on my car. Now, I can barely pull up the handle to 4 clicks and both wheels lock up solid.
Last edited by H20boy; 04-24-2010 at 09:23 PM.

#19
04-24-2010, 09:21 PM
Veteran Member
#20
04-24-2010, 11:06 PM
Awesome Matt,
Haven't got mine yet but I think they shipped Friday. Good to know that was for both sides. Not laughing about the time either, I expect most of that was looking for the star drive. You probably saved me an hour right there.
I let you know how it goes. I'm going to do them when I add the rear top mount and packing seal for that camber adjustment. Plus I finally get to see what the deal is with my passsenger disc (no way for adjustment). Trying to get some machines out the door so I haven't had time for the car.
Thanks Again, Dan
Haven't got mine yet but I think they shipped Friday. Good to know that was for both sides. Not laughing about the time either, I expect most of that was looking for the star drive
. You probably saved me an hour right there.I let you know how it goes. I'm going to do them when I add the rear top mount and packing seal for that camber adjustment. Plus I finally get to see what the deal is with my passsenger disc (no way for adjustment). Trying to get some machines out the door so I haven't had time for the car.
Thanks Again, Dan