
Covered Headlights and "Sugar Scoops"


Thread Starter
|
Member
Joined: Jul 2012
Posts: 36
Likes: 0
From: Redding, CA
I could use some advice and help here. I have already looked through the limited information I have and can't find what I need. I'm tinkering with the E and want to fix up the headlights a little. The installation of the "sugar scoops" doesn't look correct to me. See the following pic:
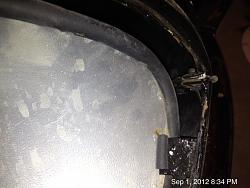
Shouldn't that bracket be under the scoop not on top? How do you remove the scoops? I want to clean them up, repaint them and replace the rubber.
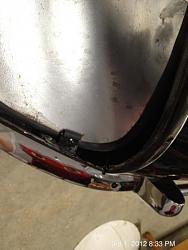
They also look like they don't fit so well. See the next pic. Is that large of a gap normal?
Thank you for any help.

Shouldn't that bracket be under the scoop not on top? How do you remove the scoops? I want to clean them up, repaint them and replace the rubber.
They also look like they don't fit so well. See the next pic. Is that large of a gap normal?

Thank you for any help.
Thread Starter
|
Member
Joined: Jul 2012
Posts: 36
Likes: 0
From: Redding, CA
So, I've done some more searching and from what I can see in the limited pictures I can find those tabs should be underneath. It would also appear that there are 3 screws/bolts that must be removed from the inside of the bonnet to release the scoops.
Now I only need to figure out HOW to actually remove them. Hmmm
Now I only need to figure out HOW to actually remove them. Hmmm
Senior Member


Joined: Dec 2010
Posts: 792
Likes: 152
From: South Carolina
I'm about to re-install my restored sugar scoops so here's what I see for the hardware on my S1 4.2 (don't know if the 3.8 is different). The tabs indeed fit under the scoops and serve to position the front of the scoop. My tabs look a bit different - yours look like they have a screw hole in them? Mine are just simple metal tabs.
The scoops are indeed held on with three bolts - they are accessed from the front wheel wells (just tilt the bonnet forward and stick your face in front of the tire). They are located just outside of the headlamp bowl periphery, at the 2-6-10 o'clock positions. If your forward wheel well/bonnet diaphragm surfaces are encrusted with undercoating/dirt, the nuts may not be immediately obvious. A good landmark is that the upper/inner nut (at the 2-or-10 o'clock position depending on the side of the car) is also used to secure the cable strap running to the headlamp.
One caution - each bolt head is "secured" to the scoop so the bolt will not turn as you undo the nuts. If you bust the hidden bolt head loose, you will be SOL since the bolt head is not (easily) accessible on the installed scoop. So make sure that you clean off each mounting nut and screw end rigorously (lots of rust buster etc) so that each nut spins off easily and does not torque the whole bolt loose, whereupon it will just go roundy-roundy-roundy.
Also, note carefully the original shimming on each bolt - they are different! People who do not do this spend hours cursing their crooked, re-installed scoops.
Nothing is simple on the E-Type!
Last edited by SCMike; Sep 3, 2012 at 03:45 PM.
Thread Starter
|
Member
Joined: Jul 2012
Posts: 36
Likes: 0
From: Redding, CA
Mike,
Thank you for your response! I went ahead and figured I might as well give it a go since I hadn't heard from anybody. Turned out it wasn't as hard as I thought it might have been.
Both of the ones on my car must be reproductions because they don't have bolts attached to them, but rather have nuts attached to them. It was easy to find the screw heads. They also have a flange all the way around. Oh well, they are what they are.
As for any shims....didn't see any. Guess that is because they are after market. Can you provide any pics of the shims or give an idea of how thick they are? Maybe I can come up with a suitable way to shim mine to fit better.
Since I have them out I started to refurbish mine as well. There was silicone holding the rubber trim on and a bead of silicone around the back of the flange. They had been painted on bare metal and the paint wasn't sticking at all.
I fired up the blast cabinet and using glass beads, blasted off the paint and the rest of the silicone I couldn't scrape off. The inner side looks like it had maybe been powder coated, but not a very good job. Some of that paint came off, so now I have to get it all off. It's coming off, but it is slow going.
After they are all cleaned up I intend to primer them, paint the backside black and the inner side hammer tone silver. I have new rubber trim already and I hope they will fit better when I'm done.


Senior Member
Joined: Dec 2010
Posts: 792
Likes: 152
From: South Carolina
The mounting tab hardware on your 3.8 scoops looks quite different than that on my original 4.2 scoops. I'm only familiar with the 4.2, but looking at your photos, (making a totally uneducated statement) I'm guessing your scoops are not aftermarket. Generally the aftermarket does things the cheapest way possible, and those integrated nuts on your scoops suggest a manufacturing process more complex than what the aftermarket would use. But that is only my guess. Perhaps Jaguar modified the scoop design details from the 3.8 to the 4.2?
Trending Topics
Senior Member
Joined: Dec 2010
Posts: 792
Likes: 152
From: South Carolina


One shows an overall view of the three mounting points. The other shows a detail of the center mounting point, which has "significant" shiming on it. The other scoop is identical. Clearly, to get the scoops to sit properly in the opening, the blokes had to move the middle section of the scoop flange significantly forward compared to the two outer mounting points.
I don't know if this a standard fitment, or just what the blokes had to do to fit my car (there was a lot of custom hand adjustment required on the assembly line). I do know that this is the way things looked on my car upon exiting the factory doors at Browns Lane.
Now it looks like the 3.8 scoops are attached in a very different manner. It looks like the 4.2 scoops are installed by offering up the screws already installed on the scoop flange to the holes on the headlamp diaphragm, while on the 3.8 the screws feed to the flange from behind the diaphragm after the scoops are already in position. In fact, I don't see a way to shim the 3.8 flange unless you somehow "glue" the shims in place before positioning the scoop, since only then do you offer up the screws to the scoop flange. Or maybe I'm just not seeing it.
Maybe this is why the flange hardware was changed on the 4.2 compared to the 3.8? It seems to be a lot more straightforward to shim the former.
Anyway, I hope this helps rather than making things even more confusing.
Last edited by SCMike; Sep 9, 2012 at 02:27 PM.
Thread Starter
|
Member
Joined: Jul 2012
Posts: 36
Likes: 0
From: Redding, CA
Once again Mike, Thank you. I appreciate the sharing of information and I'm sure others do as well.
I finished painting mine today and will attempt to install them tomorrow. Since they didn't have any shims, I'll try to put them back that way. Just have to see how they fit. They have been tucked under that tab for years and fit like crap, so I'm guessing just getting them back above the tab will be a big improvement.
Here is how they turned out. I'm happy with the result.
Charlie
Senior Member
Joined: Dec 2010
Posts: 792
Likes: 152
From: South Carolina
Charlie,
The scoops look mahhhhvalous. I hope that they just slip in like greased whatever, and that getting them above the tabs (where they should be) does the trick. If you do need a bit more "lift" at the front of the scoop, you could just glue some sort of rubber gasket/spacer on top of the tab rather than futzing with shims at the rear.
Good luck!
Mike
Thread Starter
|
Member
Joined: Jul 2012
Posts: 36
Likes: 0
From: Redding, CA
Well, they are in! 
It wasn't a piece of cake, but the second one went in easier. All I had to do was:
1. Remove headlight retaining ring
2. Remove the headlight
3. Remove the inner headlight bucket
4. Un-bolt the outer headlight bucket. Can't remove it cause it is wired in with no plug
5. Yell for wife W I F E ! ! ! She was needed to hold #4 up out of the way
6. Remove the turnsignal/running light assembly. This provides access to reach inside the bonnet nose, and under the scoop to aid in positioning.
Then it was simply a matter of making a large scoop shaped object fit into an oblong opening.
Here they are, left and right.

Thread
Thread Starter
Forum
Replies
Last Post
Currently Active Users Viewing This Thread: 1 (0 members and 1 guests)